Creating a New Stand-alone Subscription
A stand-alone subscription is a new subscription created on the Create Subscriptions page, not from another transaction such as a sales order.
You can activate a subscription only after you create and save the subscription's required components. For instructions about creating the necessary parts of a subscription, see the following topics:
To see a high-level overview diagram of the process for creating a subscription plan, see Subscription Plan Creation.
To create a new stand-alone subscription:
-
Go to Transactions > Subscriptions > Create Subscriptions.
-
Select from the list or enter values in any order:
-
Choose the customer for the subscription:
-
From the Customer field, choose an active customer from the list.
-
To create a new customer, click the plus icon next to the Customer field and select New.
You can choose any active customer, with or without a billing account. When you choose a customer, the Subsidiary and Currency fields are filled with the customer's values. If you choose Customer and Subsidiary values and leave Currency blank, the Billing Account field shows the customer's billing accounts.
Note:The order in which you choose values for Customer, Subsidiary, Currency, and Billing Account affects how dependent fields on the Subscription and Billing Account records are filled.
-
-
You can set a subsidiary for a new billing account before creating it. If the customer has subsidiaries, indicate them as follows:
-
From the Subsidiary field list, choose an active subsidiary. The Subscription record's Subsidiary fields are filled with values from the billing account.
-
You can change the subsidiary from primary to secondary. You can only change the subsidiary when the subscription is in Draft or Pending Activation status.
-
To create a new subsidiary, click the plus icon and choose New.
-
-
You can choose the currency for a new billing account before creating it. Indicate the currency as follows:
-
From the Currency field list, choose an active currency. The Subscription record's Currency fields are filled with the billing account's values.
-
You can change the currency only when the subscription is in Draft or Pending Activation status.
-
To create a new currency, click the plus icon and choose New.
-
-
(Optional) You can create a subscription without a billing account until you activate the subscription. You can choose a billing account from the Billing Account field list or create a new billing account by clicking the plus icon and choosing New. To create a create a new billing account, follow the instructions in Creating Billing Accounts.
The Subscription record's Customer, Subsidiary, and Currency fields are needed to create a billing account. After choosing a customer, the Billing Account field contains the customer's default billing account. When all lines in the subscription are in the Draft or Pending Activation status, you can change the billing account to another account for the same customer. After choosing a billing account, the Subsidiary and Currency fields are read-only and have the billing account's values.
A billing account isn't required on default forms. Automation and import templates work when a billing account is set during subscription creation.
To activate a subscription, you must choose a billing account with values that match the Subscription record's Customer, Currency, and Subsidiary fields.
Note:To ensure accurate data, choose the Billing Account, Customer, or Subsidiary before choosing the subscription plan and price book
-
-
From the Subscription Plan list, choose a subscription plan. The Subscription Plan field shows the plans for the selected billing account. If you haven't selected a billing account, you must choose values for the Currency and Subsidiary fields to choose a subscription plan.
Only subscription plans with price books with matching currency are available.
Note:You don't need a subscription plan or price book to create a subscription using the standard form. Creating a subscription with only add-on item lines simplifies the process. To create a subscription without a subscription plan or price book, see Optional Subscription Plan and Price Book.
-
If needed, from the Price Book list, choose a different price book.
-
From the Initial Term list, choose a term, or choose New to define a different term.
-
In the Start Date field, enter or choose a start date for the subscription. The start date defaults to today's date.
-
You can set the Class, Department, and Location fields on subscriptions in Draft or Pending Activation status. These fields, located in the Plan and Term section, are useful for reporting. These fields are automatically populated in this order:
-
If the subscription plan has values in any of the Class, Department, and Location fields, these values are used on the Subscription record.
-
If the subscription plan doesn't have a value in the fields, the billing account value, if available, is used.
-
If neither the subscription plan nor billing account has values in these fields, the fields are empty on the Subscription record.
You can change the values of the Class, Department, and Location fields when the Subscription or Subscription Line record is in Draft status. You can't change the values when the Subscription or Subscription Line record is in Pending Activation or Active status.
The Subscription record's Lines tab includes columns for Class, Department, and Location.
-
-
If needed, define add-on items. See Adding Line Items to an Existing Subscription.
-
If Advanced Revenue Recognition is enabled, set revenue recognition options. To enable Advanced Revenue Recognition, see Enabling the Revenue Recognition Feature.
For evergreen subscriptions with Advanced Revenue Recognition, the Estimated Revenue Recommended End Date field sets the revenue recognition end date.
-
Apply discounts now, if needed.
Discounts can be applied to the plan and line items. Discounts can be set on one-time, usage, commit plus overage, and recurring subscription line items. Discounts work on all line types and pricing options.
Discount can only be applied to a subscription in the Draft state. After a subscription is activated, you can't apply a discount. To apply a discount to a draft subscription, edit the discount field directly. For Active subscriptions, you can only apply discounts using a Modify Pricing change order.
Charges and invoices dynamically display the net charge amount after discounts are applied, so invoices don't have separate discount line items.
-
Go to Transactions > Subscriptions > Create Subscriptions > List.
-
For the draft subscription you want to discount, click the subscription name or View.
-
On the subscription record, click Edit.
-
For the desired subscription line item, enter the discount:
-
Discounts can range from 0-100.
-
For percentage discounts, include the percent sign (%), for example, 50%.
-
For flat rate discounts, enter the amount without notation, for example, 50.
-
Discounts can't be and negative or over 100%.
-
-
To add discount to an active subscription, see Modifying Pricing.
-
-
On the subscription plan Renewal subtab, define the renewal date and default percentage uplift. See Adding Renewal Information to Subscription Plans to learn how the default from subscription populates the renewal.
Note:After you click Save, you can't change the subscription's customer, currency, or subsidiary. Instead, create a new subscription.
-
On the Uplift tab, define the Uplift Percent to increase the price. Create intervals using the combination of the Uplift Frequency and Repeat Every fields. Uplift intervals are created in the Pricing subtab with increased prices using the uplift values after saving the subscription. See Uplift Pricing to learn more about uplift for subscriptions.
-
Click Save.
If a billing account doesn't process, run billing operations again or schedule them for a convenient time. A billing account may not process due to:
-
A charge created after billing operations start processing charges.
-
Each billing operation can process up to 100,000 lines.
Running another billing operation may process remaining invoices. For more information about Billing Operations, see Billing Operations.
After creating the subscription, individually activate each line item. For more information, see Activating a Subscription.
After creating the subscription, you can associate it with a sales transaction or activate it.
For more information about revenue recognition, see Revenue Recognition for SuiteBilling.
Optional Subscription Plan and Price Book
You don't need a subscription plan or price book to create a subscription using the standard form. Creating a subscription with only add-on item simplifies the process.
To create a subscription without a plan or price book:
-
Go to Setup > Company > Enable Features > Transactions > Add-on Items..
-
Go to Transactions > Subscriptions > Create Subscription
-
Supply the subscription information. See Creating a New Stand-alone Subscription for instructions about creating a new subscription.
-
Leave the Subscription Plan and Price Book fields blank.
-
Choose an Item from its menu.
-
Select a Line Type from its menu.
-
Choose a Catalog Type from its menu.
-
Click Add to create an add-on item.
-
To set the item price, go to the Pricing subtab and click Edit.
-
From the Price Plan record, choose a Pricing Option from its menu and enter a price such as 100.
-
Click Add.
-
Click Save to save the price. The Subscription record shows the added price.
-
Choose an Initial Term.
-
Required fields on the Subscription record are marked with a red asterisk. Fill any missing values for required fields.
-
Click Save to save the subscription. Notice that the Subscription Plan and Price Book fields are empty, and the subscription has one add-on line.
-
Click Edit. Notice that after the subscription is saved, the Subscription Plan and Price Book fields are locked and can't be edited.
When using CSV or scripting to create a subscription without a subscription plan or price book, leave each of these fields blank on the form or null on the script.
To require subscription plan or price book fields, create a custom subscription form that requires those fields.
To make the subscription plan or price book fields required:
-
Open a subscription record and click Edit.
-
Select Customize and click Customize Form.
-
Select Fields.
-
From the Mandatory column, choose Subscription Plan and Price Book.
-
Click Save.
Uplift Pricing
With uplift pricing, you set a percentage price increase annually or monthly during the subscription term and at renewal. Price increases are automatically applied after defining them on the Uplift or Renewal subtab. Uplift can be defined on a subscription plan that defaults to the subscription.
Uplift fields now support seven decimal points for precise pricing.
On the subscription Uplift subtab, define the Uplift Percent to increase the price. Create intervals using both the Uplift Frequency and Repeat Every fields. Saving the subscription in the pricing subtab creates uplift intervals with price increases based on uplift values. Use fields in the Uplift subtab as follows:
-
Uplift Percent: Enter a percentage to increase the price of each interval after the first interval.
-
Uplift Frequency: Choose when to create new uplifted intervals, monthly or annually.
-
Repeat Every: Choose the frequency, months or years, for generating uplift intervals.
-
Uplift Start Date: View a read-only column showing the first three intervals to be created based on the values you input.
The uplift percentage can be updated for uplift lines or added to time-based pricing lines to increase the price, either when the line is in draft status or through modifying pricing when the line is active. Uplift can't be added to one-time lines or lines using total interval values instead of price plans.
Subscriptions active before enabling uplift pricing can't use percent uplift when modifying pricing. Uplift pricing only works on new subscriptions or those in draft status. For subscriptions active before uplift pricing was enabled, either renew the subscription or create a new one to use the percent uplift column in a modify pricing change order.
The following image is the Uplift subtab before saving the subscription.

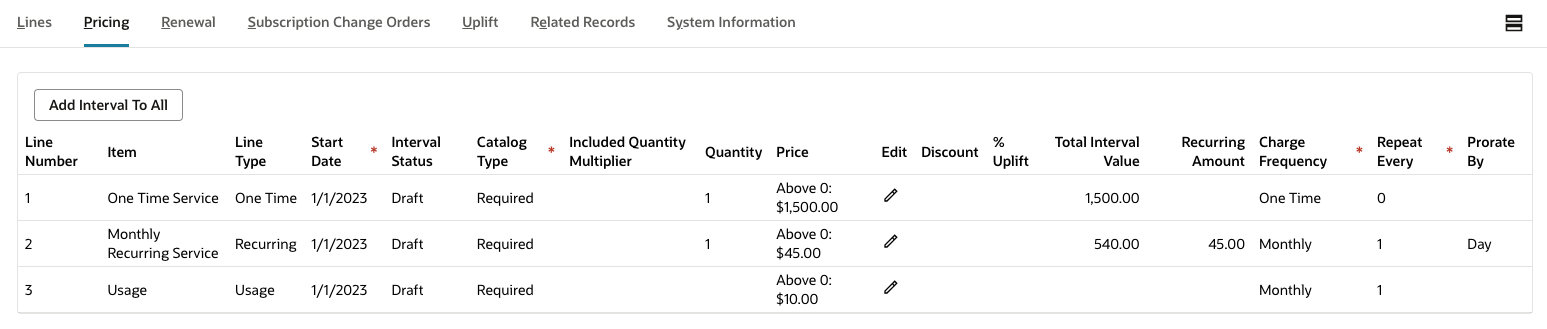
The following image is the Pricing subtab before saving the subscription.
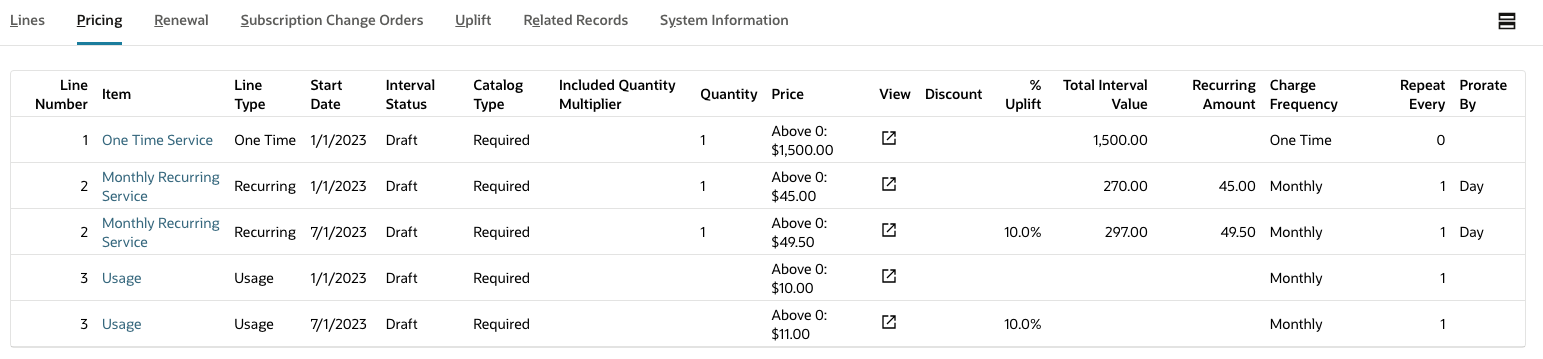
The following image is the Pricing subtab after saving the subscription.
Editing a Draft Subscription
You can edit a subscription record in Draft status.
To edit a draft subscription:
-
Open the draft subscription record.
-
Click Edit.
-
Change the field values as needed.
Note:Changing the billing account doesn't reset the subscription plan, price plan, and term.
-
Click Save.
Note:After saving, you can't change the customer, currency, or subsidiary. Instead, create a new subscription.
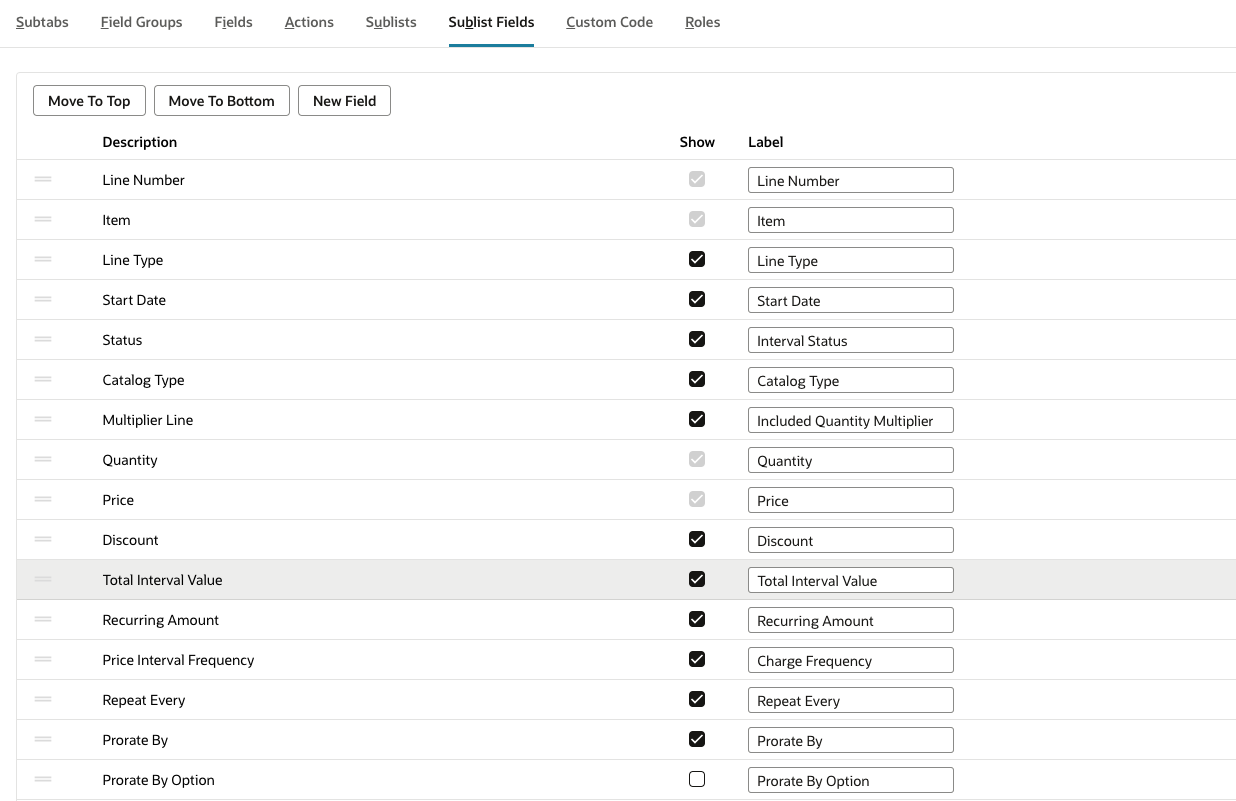
Customizing the Pricing Sublist Fields on Subscriptions
You can customize the Pricing tab's sublist fields. With the subscription in Edit mode, click the customization link and go to the Sublist Fields tab. You can reorder, relabel, and hide fields. Line Number, Item, Quantity, and Price can't be hidden.
Related Topics
- Creating a Subscription from a Transaction
- Updating a Subscription on a Transaction
- Adding Line Items to an Existing Subscription
- Activating a Subscription
- Creating Usage Records
- Managing Rating Runs
- Terminating a Subscription Line Item
- Suspending a Subscription Line Item
- Reactivating a Subscription Line Item
- Modifying Pricing
- Renewing a Subscription
- Adding Renewal Information to Subscription Plans