Creating Price Books
After saving a subscription plan, you can create pricing for the items. A price book defines the pricing for a collection of items or services that are sold as part of a subscription plan. Each item on a subscription plan needs a price plan within the price book. A subscription plan can have one or multiple price books. You can use multiple price books to create different pricing options, such as multiple currencies, or monthly, quarterly, and annual pricing.
When creating a subscription using the standard form, you don't need a subscription plan and price book. Creating a subscription using only add-on item lines simplifies the process. To learn how to create a subscription without a subscription plan or price book, see Optional Subscription Plan and Price Book.
To learn how to set up a subscription plan and price book in NetSuite, view the video:
For high-level overview diagrams of the workflows that include this procedure, see Subscription Plan Creation, New Stand-Alone Subscription Creation, and Subscription Creation from a Sales Order.
When you renew to a new subscription, you can select the renewal plan and price book. Refer to Adding Renewal Information to Subscription Plans to learn how the default from subscription populates the renewal. After renewal setup is done, your settings apply to new subscriptions created with this plan.
To create a price book:
-
On the saved subscription plan record, click the Price Books subtab. This subtab opens by default after you save a subscription plan.
-
Click New Price Book.
-
On the price book record, in the Name field, enter a name for the price book.
-
From the Currency list, select the appropriate currency.
-
On the Price Book Lines subtab, in the Edit column, click the edit icon for an item to make its price plan. For instructions on making price plans, see Creating Price Books.
Note:You need to make a price plan for each item before saving the price book. Fill the required fields on the price plan, then click Save to return to the price book record.
-
From the Interval list (if showing), select the time period to set the duration of the interval. You can choose Day, Week, Month, or Year.
-
In the Start On field, enter a number for when the interval begins.
For example, set the Interval to Month and the Start On field to 1 (one). The interval runs from month 1 until the end of the term. When creating a subscription from this plan, the relative dates are converted to real dates based on the subscription start date. If you set the start date of the subscription to January 1 and the Start On field to 1, the interval starts on January 1.
Example:
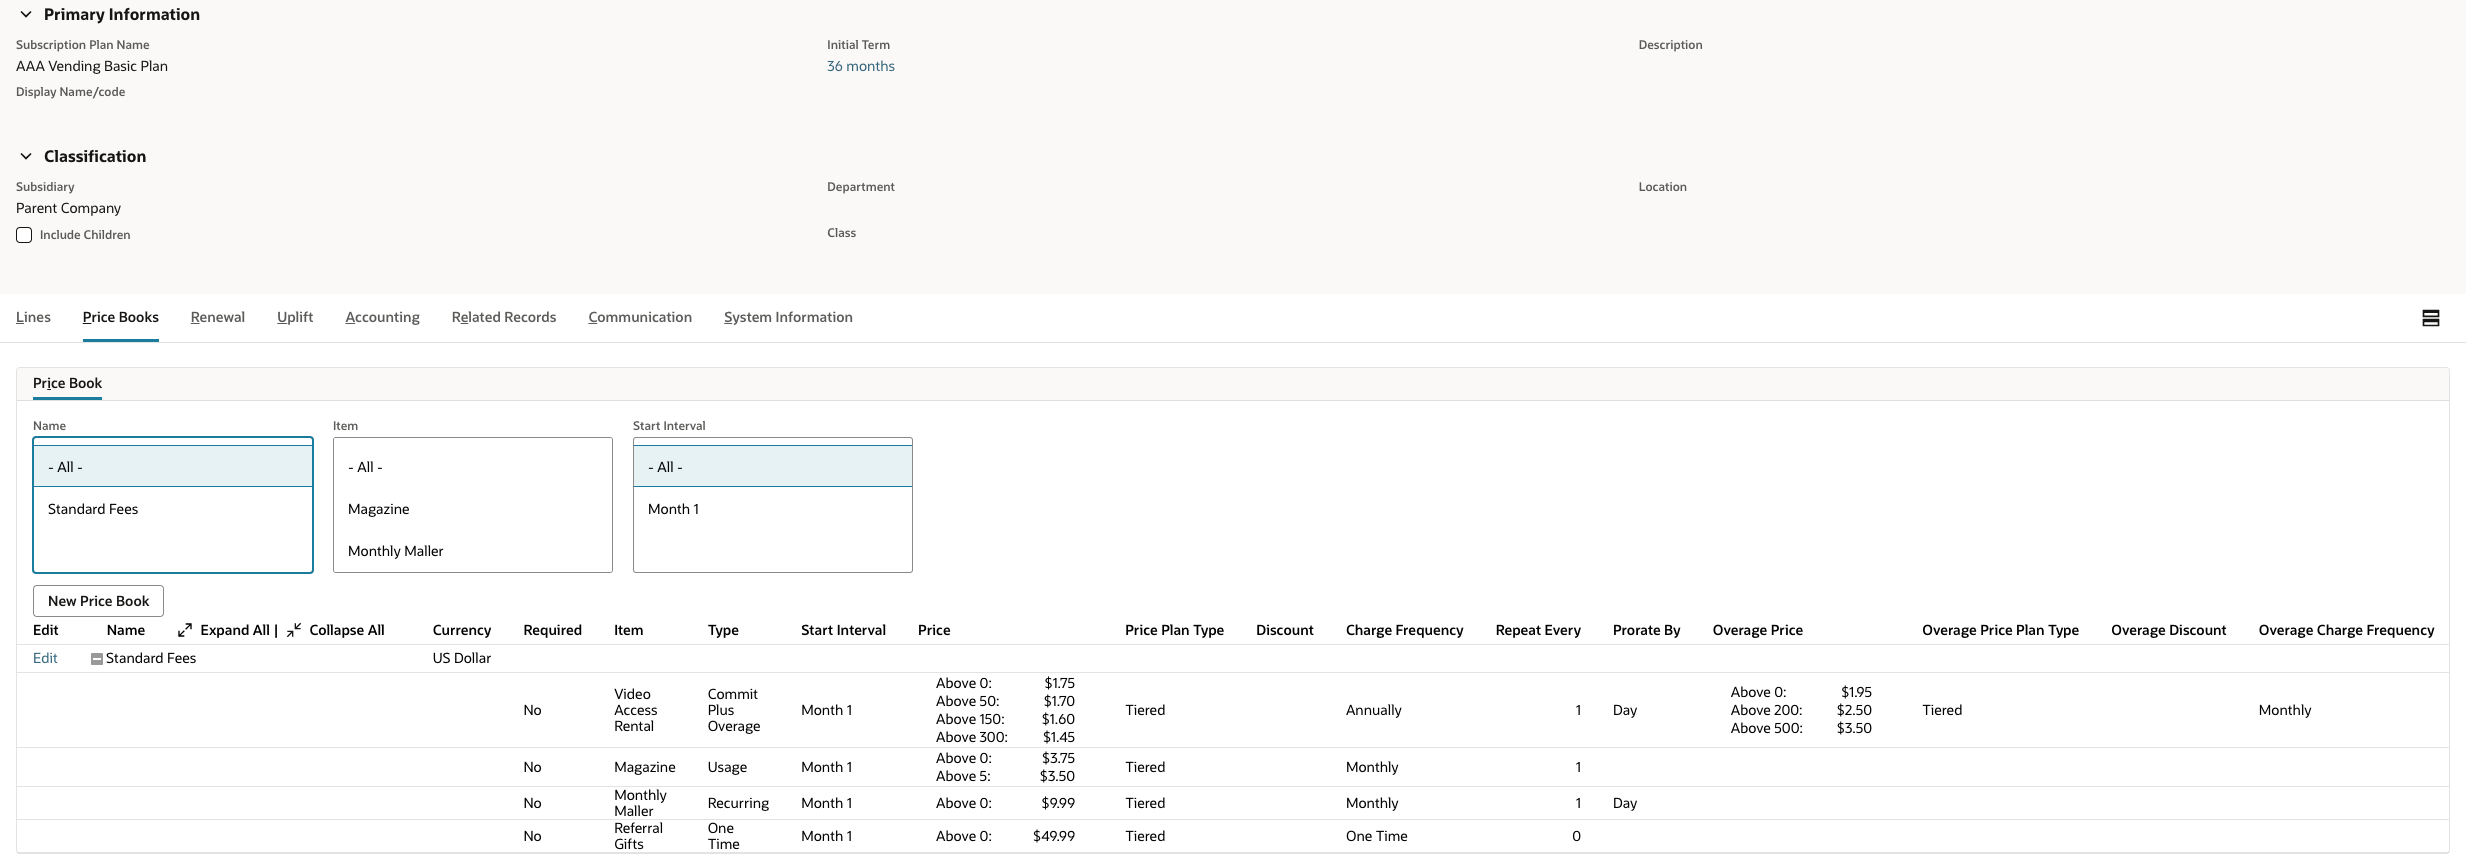
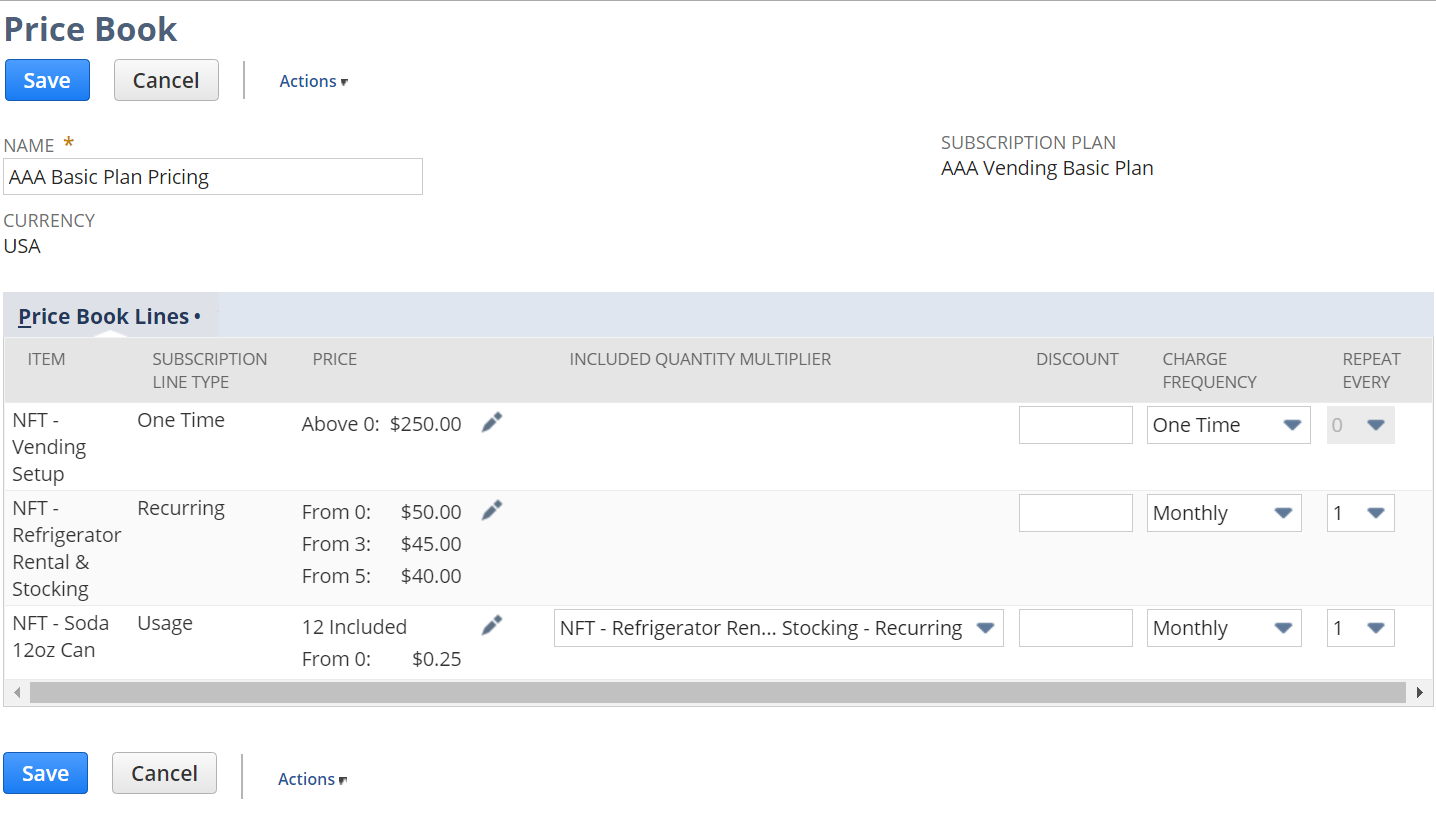
Consider a price book, AAA Basic Plan Pricing, has currency in US dollars. The items associated with the price book include a one-time item, a recurring item, a usage item, and a commit plus overage item.
-
(Optional) In the Included Quantity Multiplier column, enter a number. For more information, see Creating Usage Records.
-
(Optional) If you want to enter a default discount, enter the discount in the Discount column.
Enter discounts as a percentage or as a flat rate. For percentage discounts, add the percent sign (%) after the positive number you enter in the Discount field. Flat rate discounts don't need a notation.
-
From the Charge Frequency list, select Weekly, Monthly, or Annually.
-
For non-one-time items, choose how often the charge occurs from the Repeat Every list.
For example, if you want to charge monthly, select a Monthly from the Charge Frequency list and enter 1 in the Repeat Every field.
Example:
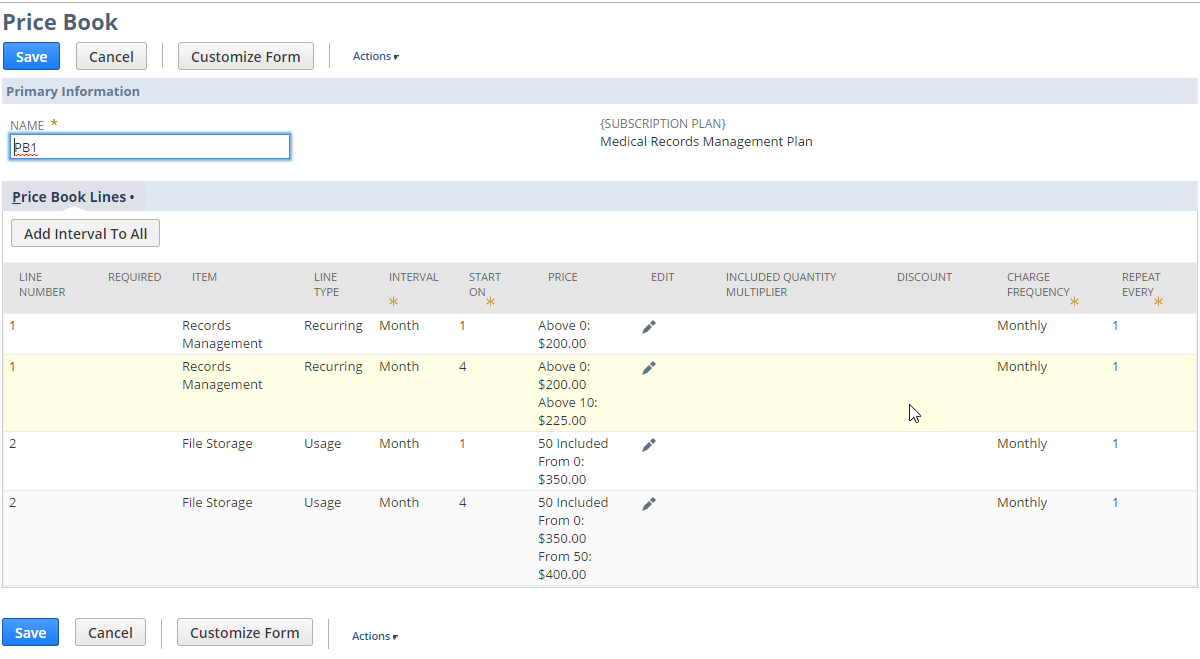
Consider a basic price book with tiered pricing (line 1) and volume pricing (line 2), charge frequency, and recurrence. Notice that no discounts are included.
-
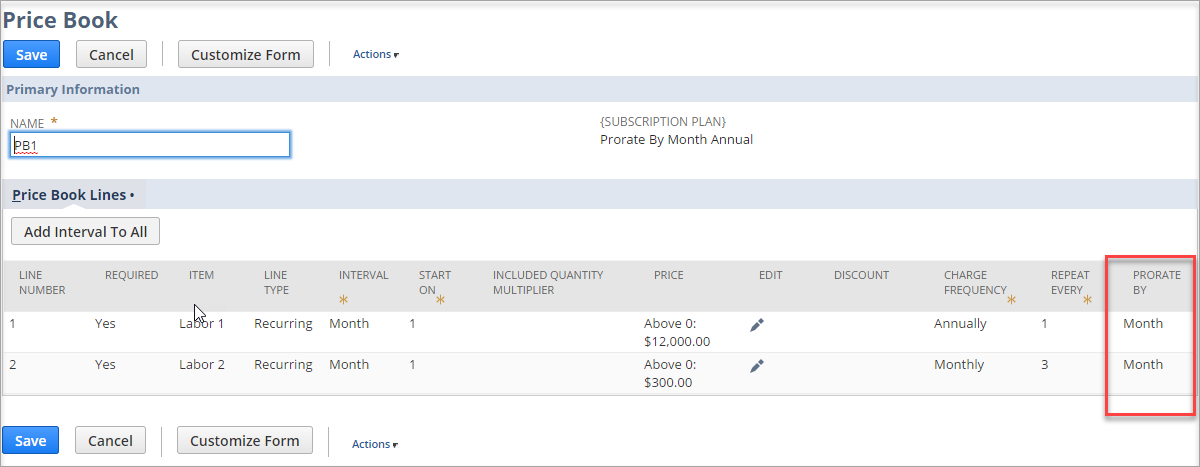
From the Prorate By column, select Month or Day.
Tip:Prorate By Month rounds charges for the billing period. For example, a 12-month subscription costs $12,000 that is billed monthly. If you select Prorate By Month, the charge for each month is rounded to $1,000. With Prorate By Day for the same subscription, the monthly charge varies from $920.55 to $1019.18 based on the number of days in the month.
Example:
Consider that when you enable proration for an item, charges are created based on the number of days or months in the charge period. The default setting of Prorate By for recurring items is Day.
-
Repeat the previous steps for each price book item until all have pricing information.
-
Click Save.
Time-Based Pricing
Use time-based pricing to create pricing models with planned pricing changes over time, also called interval pricing models. Examples include free trials, ramp pricing, and introductory pricing. You use time-based pricing to create intervals for price, quantity, or discount changes over time.
You can define how charges are calculated for time intervals during a subscription term. For example, consider a one-year subscription with an introductory pricing plan. A reduced price applies for the first three months and the full price applies for the last nine months. To set up this price plan, add an interval for the item starting on the fourth month without a discount.
For instructions on enabling time-based pricing, see Enabling SuiteBilling Features.
To learn how to create a subscription plan, price book, and price plans with time-based pricing in NetSuite, view the video:
If you use the SuiteBilling Enhanced UI SuiteApp (formerly called the Time-Based Pricing SuiteApp) with the Time-Based Pricing feature, see Subscription Billing Enhanced UI.
Creating Intervals for Time-Based Pricing
You can apply a single price interval to all items on a price plan or define different price intervals for each item. Use the time-based pricing feature to add a price interval to all items in the price book and subscription.
Before creating a price interval, you need a subscription plan, price book, and price plan. See Creating Items for Subscription Plans, Creating Subscription Plans, and Creating Price Books.
For example, consider a subscription with two line items, each with two price intervals. The new price for each item starts in the 4th month.
To create a price interval, set up the price plan using the following processes.
Adding a Price Interval to All Items at Once
You can simultaneously add a price interval to all items in a subscription plan.
To add a price interval to all items in a subscription plan:
-
From the subscription plan on the Price Book subtab, click the edit icon for an item. The price plan window opens.
Note:Items with one-time pricing have only one price interval.
-
Click Add Interval to All to add a single price interval to all items at once.
-
Edit the price, discount, or quantity for the new price interval. For example, to set a price interval starting after the subscription starts, change the Start On value.
Note:Adjacent price interval items must be unique. If you have identical adjacent price intervals, the items are combined into one price interval.
-
Click Save to save the intervals
-
When you're done configuring the price interval for all items, click Save to save the price book. The Interval and Start On columns appear on the price book. For information about these columns of the price book, see steps 6 and 7 of Creating Price Books.
Adding a Price Interval to a Single Item
You can add a price interval to one subscription plan item at a time.
To add a price interval to a single item in a subscription plan:
-
Select the item with the price plan you want, and click Make Copy.
Tip:When you copy a price interval, you save the effort of completing all the fields that a new price interval requires. For example, if you have tiered pricing and don't want to recreate the tiers for each new price interval.
-
Click the edit icon for an item. The price plan window opens.
-
Edit the price, discount, or quantity for the new price interval. For example, to create a price interval that starts after the subscription start date, change the Start On value.
Note:Price interval items that are located next to each other must be unique. If you have two identical adjacent price intervals, the items from each interval are combined into one price interval.
-
Click Save to save the intervals in your price plan.
-
Repeat steps 2-4 for each remaining item in the price book.
-
When you're done configuring the price interval for all items, click Save to save the price book. The Interval and Start On columns appear on the price book. For information about these columns of the price book, see steps 6 and 7 of Creating Price Books.
Pass-Through for Time-Based Pricing Intervals
With time-based pricing enabled, you can use pass-through for time-based pricing intervals. Pass-through happens when a change order is created between two time-based pricing intervals and the changed field(s) are the same in both intervals. Pricing intervals that start after the change order can pass through and update the time-based pricing interval with the new value(s) if they don't change the same quantity, discount, or price field(s) as the change order.
Pass-through on time-based pricing intervals reduces manual effort by updating them automatically, so you don't have to create multiple change orders. Pass-through also makes time-based pricing intervals more consistent.
Example:
Consider a 12-month subscription starting July 18 with the following time-based pricing intervals:

A change order is created and effective August 1, changing the quantity from 1 to 2. This change passes through and updates all subsequent time-based pricing intervals with the same quantity value as the one changed. The updated pricing intervals are as follows:

Deleting a Price Interval
You can delete a price interval from a price book even if it's used in a subscription. You can delete a price interval when the item is in the Draft status.
To delete a price interval:
-
Choose the price interval to delete.
-
Click Remove.
Setting Up Standard Pricing
As a System Administrator, you can set up standard pricing that other users can't change.
To set up standard pricing that other users cannot change:
-
Grant access permission to a subscription process with the following restrictions:
-
Limit how many users can edit the subscription pricing.
-
Restrict editing permissions for specific price plans, subscription change orders, or price books.
When access is restricted, non-System Administrators can update discounts or quantities but not the price plans, unless they have price plan permissions. To learn how to grant access permissions to a subscription process, see Setting Permissions.
-
To learn SuiteBilling change order fundamentals, see SuiteBilling Change Orders.
Copying a Price Book
To save effort in filling the fields for a similar price book, copy it. For example, you might want to copy a price book when creating price books for different currencies.
To copy a price book:
-
Open the price book recordto copy.
-
From the Actions menu, select Make Copy.
-
Edit the copy with any needed changes.
-
Click Save.
Deleting a Price Book
When a price book hasn't been used to create any subscriptions, you can delete it.
To delete a price book:
-
Open the price book record to delete.
-
From the Actions menu, select Delete.