Adding or Editing Time Entries
After you have created a timesheet and added at least one time card, you can add time entries or modify existing time entries at any time before you submit the timesheet for approval.
-
You can add or modify time entries one at a time using the normal edit mode. See Adding or Modifying a Single Time Entry.
-
You can add or modify multiple time entries at the same time using the bulk-edit mode. See Adding or Modifying Multiple Time Entries at the Same Time.
-
You can split the time entered in the same time card and for the same day over multiple time entry cells by adding time card rows. See Adding a Time Card Row.
You cannot add or edit time entries if your device is offline and there is a Submit or Delete action pending for the timesheet.
Adding or Modifying a Single Time Entry
You can add or modify time entries one at a time using the normal edit mode.
To add or modify a single time entry:
-
On the timesheet screen, tap the time entry cell for the time entry you want to add or edit. See Timesheets in SuiteProjects Pro Mobile.
-
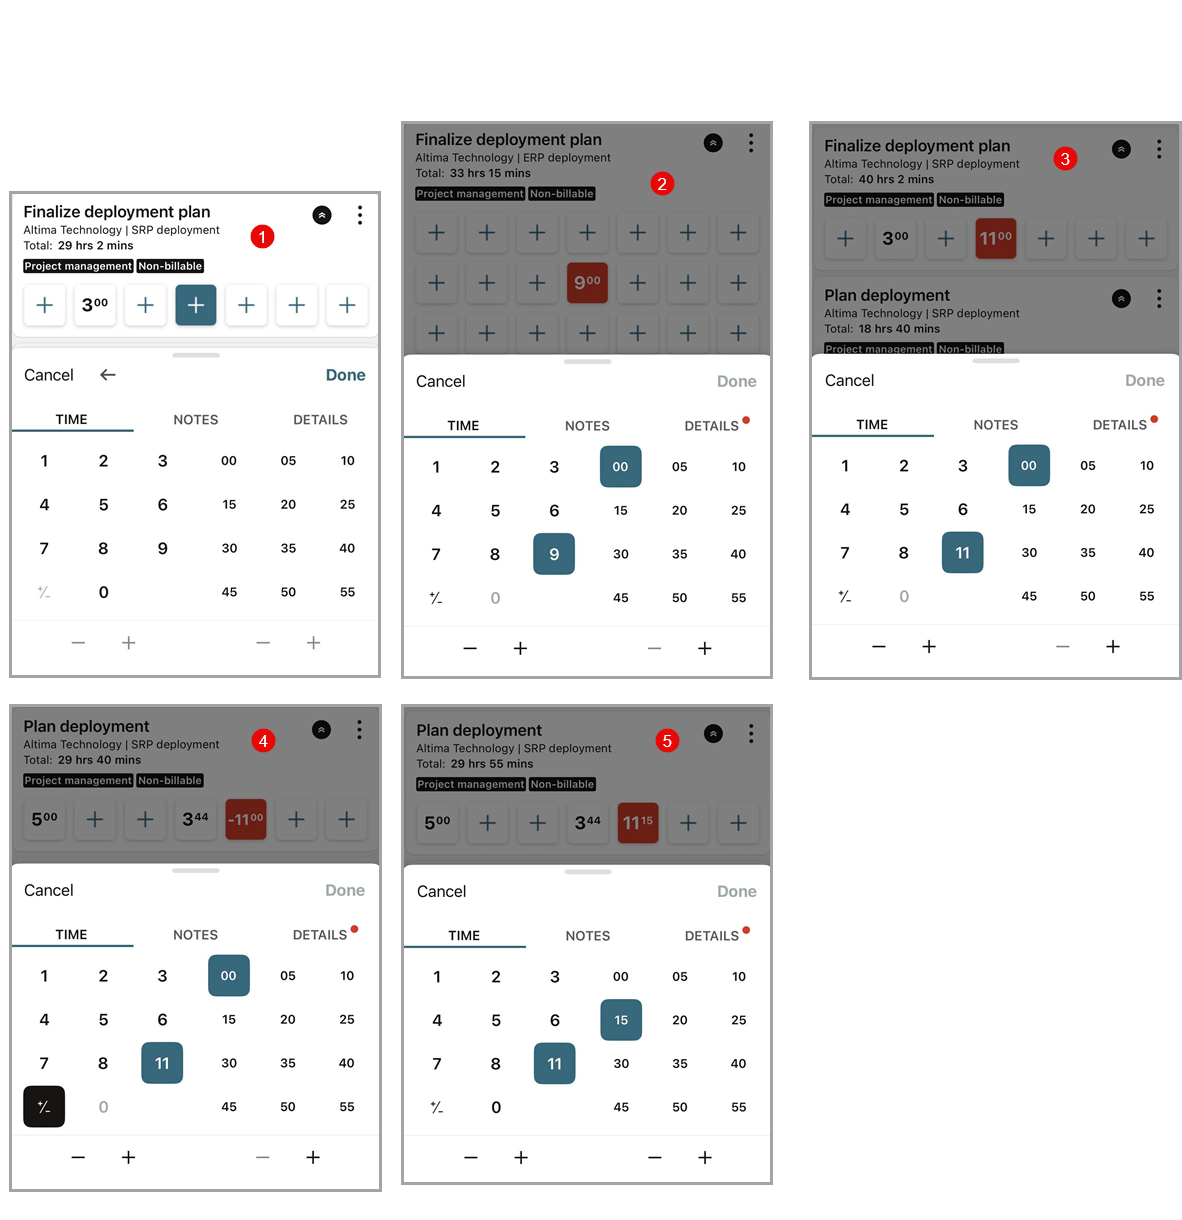
The time entry form appears in the bottom part of the screen. The time entry cell you are editing is highlighted with a solid green color background in the timesheet.
Note:If your timesheet period covers more than one week, swipe the calendar right or left to view the relevant week.
-
Use the time entry form to record your time or to change the recorded time and to add or to change any notes or other details. See Using the Time Entry Form and Time Picker.
-
To save the time entry and return to the timesheet, tap Done or tap another time entry cell.
You must resolve any errors on the time entry form before you can save and close the time entry form:
-
The Done link is disabled and appears in gray color if there are any errors on the form.
-
The time entry cell you are editing is highlighted with a red color background if additional information is required in the Details tab.
-
The tabs containing errors are indicated by a red color dot
 next to the tab title.
-
Using the Time Entry Form and Time Picker
The time entry form lets you add or change time values using an intuitive time picker and lets you add notes and other details to your time entries. You can clear time entries or discard all changes made at any time when using the time entry form.
You can choose between two time entry methods: Selecting a start time and end time or entering a duration time entry method. For more information, see Time Entry Form and Time Picker.
To add or modify a duration value:
-
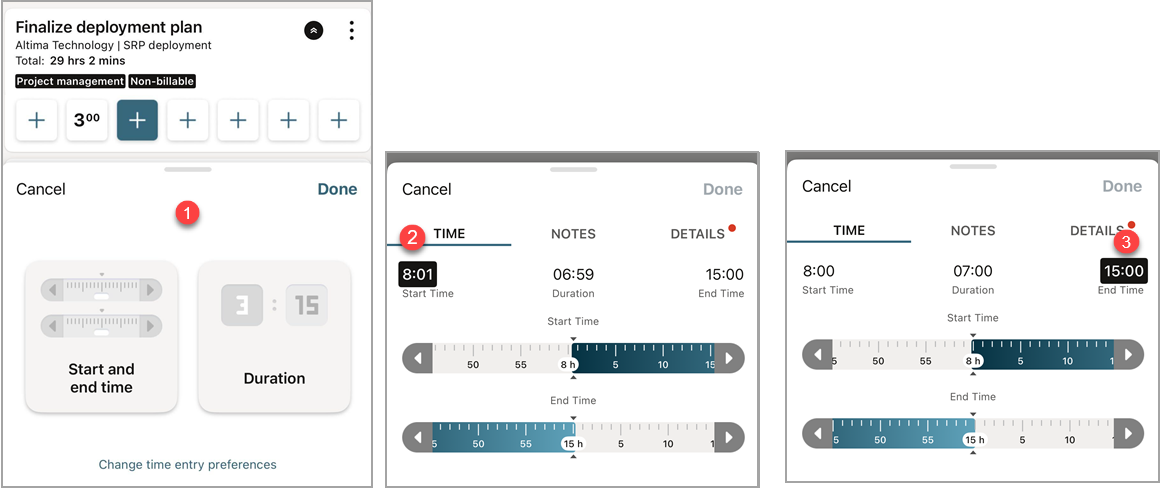
Depending on your time entry preferences, choose Duration or change your preferred time entry method. See Time Entry.
Note:The time entry form shows the time picker by default when it appears after you tap a time entry cell.
-
In the time entry form, tap Time to view the time picker.
-
Tap the number of hours on the left side. The available options let you pick numbers between 0 and 9 in a single tap.
-
If you need to set a time value of 10 hours or over, tap the add icon
 to increase the number of hours by one hour, and tap again until you reach the number required.
If you need to decrease the number of hours, tap the subtract icon
 until you reach the number required.
 -
To enter a negative value, tap the positive/negative icon
 .
. -
Tap the number of minutes from the options available on the right side. The possible values for the number of minutes are determined by your company's SuiteProjects Pro account configuration.
To add or modify a start time and end time:
-
Depending on your time entry preferences, choose Duration or change your preferred time entry method. See Time Entry.
-
In the time entry form, tap Time to view the time picker.
Note:The time entry form shows the time picker by default when it appears after you tap a time entry cell.
-
Flick the Start Time slider left or right and set the start time. Use the left and right arrow for better precision, if necessary. If you did not change the end time before changing the start time, the end time changes with the start time to match the default duration. Otherwise the duration changes with the start time.
-
Flick the End Time slider left or right and set the end time. Use the left and right arrow for better precision, if necessary. The duration changes as you change the end time.
To add or modify time entry notes and other details:
-
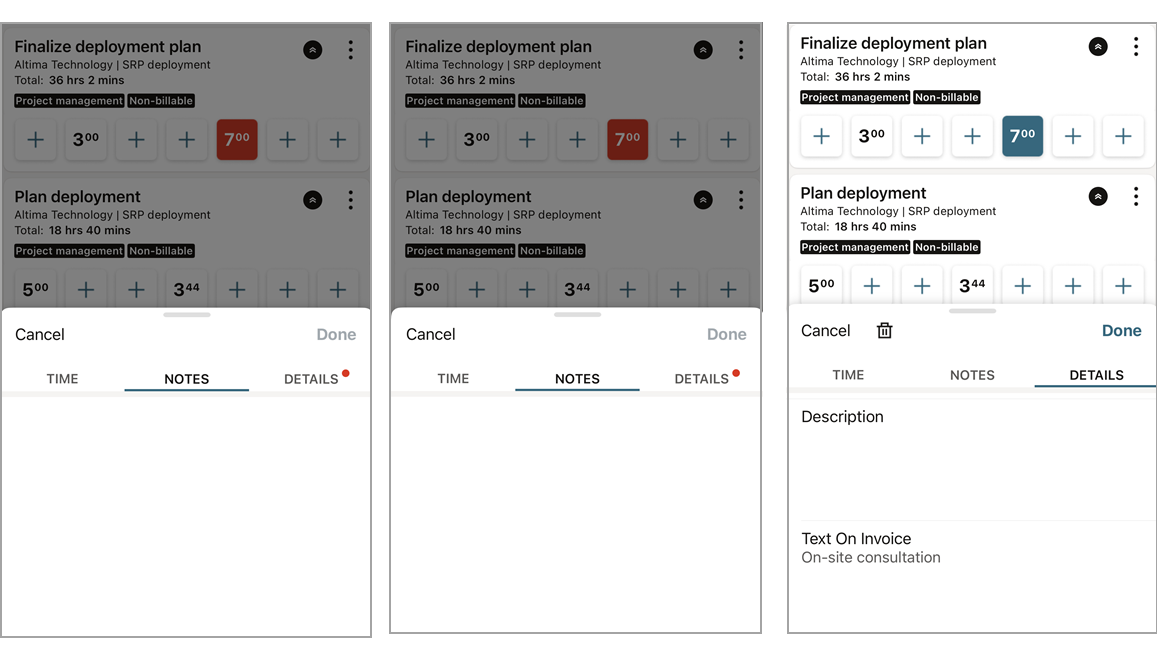
In the time entry form, tap Notes to view the Notes tab.
-
Tap the space under Note to show the touchscreen keyboard and enter any notes related to the selected time entry or time entries.
-
In the time entry form, tap Details to view the Details tab.
-
On iPhone, swipe up to scroll the form or drag the bar
 up to expand the time entry form. On Android, drag anywhere on time entry form up to expand it. All required fields on the form show a red color 'Required' tag (iPhone) or show the text '(Required)' in the field label. See Time Entry Bulk Edit.
 -
Tap the space under a field label to show the touchscreen keyboard and enter the information.
Note:Additional details may be required when adding time entries, depending on your company's SuiteProjects Pro account configuration. You need to enter all the required details to save the changes and return to the timesheet. After you have added all the required details, the time entry cells are highlighted in a green color instead of red.
To clear all time entry information:
-
In the time entry form, tap the delete icon
 .
. -
Depending on whether you are using the time entry form in normal or bulk-edit mode:
-
If you are adding or editing a single time entry cell in normal mode, a confirmation dialog appears. Tap Delete to clear the selected time entry cell and return to the timesheet.
-
If you are adding or editing time entries in bulk-edit mode, all time entry information in the selected cells is cleared but the time entry form remains open. You can continue editing the selected time entry cells.
-
To discard the changes made:
-
Depending on whether you are using the time entry form in normal or bulk-edit mode:
-
If you are adding or editing a single time entry cell in normal mode, tap Cancel (iPhone) or the cancel icon
 (Android) in the time entry form.
 -
If you are adding or editing time entries in bulk-edit mode, tap Cancel (iPhone) or the cancel icon
 (Android) in the top left corner of the timesheet screen.
-
-
Tap Discard in the confirmation dialog to exit the time entry form or the bulk-edit mode and return to the timesheet.
Adding or Modifying Multiple Time Entries at the Same Time
You can add or modify multiple time entries across multiple time card rows, multiple time cards and multiple weeks at the same time using the bulk-edit mode. See also Time Entry Bulk Edit.
To add or modify multiple time entries at the same time:
-
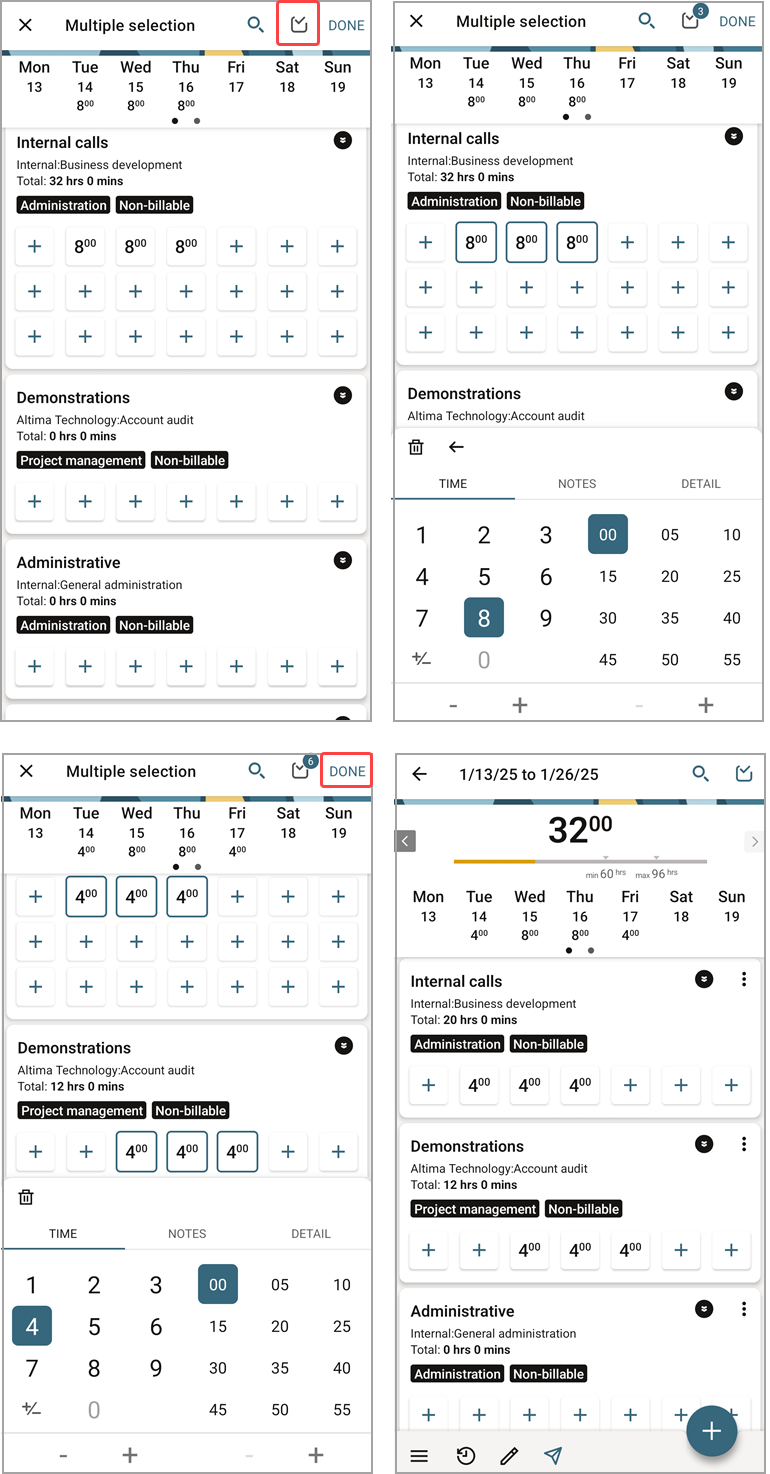
On the timesheet screen, tap Select (iPhone) or the select icon
 (Android) in the top right corner. See Timesheets in SuiteProjects Pro Mobile.
 -
To select the time entries you want to add or change, tap each empty time entry cell one after the other. You can tap any selected time entry cells again to unselect them.
The time entry form appears in the bottom part of the screen as soon as you select the first time entry cell. Selected time entry cells are highlighted with a green color outline in the time sheet.
Note:Remember you can select time entry cells across multiple time card rows, multiple time cards, and if your timesheet period covers more than one week, multiple weeks. Swipe the calendar right or left to view the previous or next week
Tip:You can select or unselect time entry cells at any time when adding or editing multiple time entries. This gives you the flexibility to add different information to different set of cells. For example, if you worked on the same project or task over a whole week with two full days and three half days, but all other information is the same for all time entries.
-
Use the time entry form to record your time or to change the recorded time and to add or to change any notes or other details. See Using the Time Entry Form and Time Picker.
-
To save all the changes made, exit the bulk-edit mode and return to the timesheet, tap Done in the top right corner of the timesheet screen.
You must resolve any time entry errors before you can save your changes and return to the timesheet:
-
The Done link is disabled and appears in gray color if there are any time entries with errors.
-
Selected time entry cells with errors are highlighted with a solid red color outline.
-
In the time entry form, the tabs containing errors for any of the selected time entry cells are indicated by a red color dot
 next to the tab title.
-
Modified time entry cells containing errors show a red color dot
 in the top right corner of the cell, if they are not currently selected.
-
For example, imagine you added two time cards to the timesheet and want to enter time entries for the first three weeks of June with full 8 hours working days spent on one project. You select all 15 time entry cells, enter all details and set the time value to 8:00. Before saving the time entries, you realize the last three days were split between the two projects with 4 hours spent on each projects. You unselect the 12 time entry cells you do not want to edit and select the additional 3 time entry cells on the other time card, enter all details and set the time value to 4:00. In effect, you are editing three time entries and adding three time entries at the same time. Finally, tap Done to save all the changes made.
Adding Time Entries from the Draft Inbox
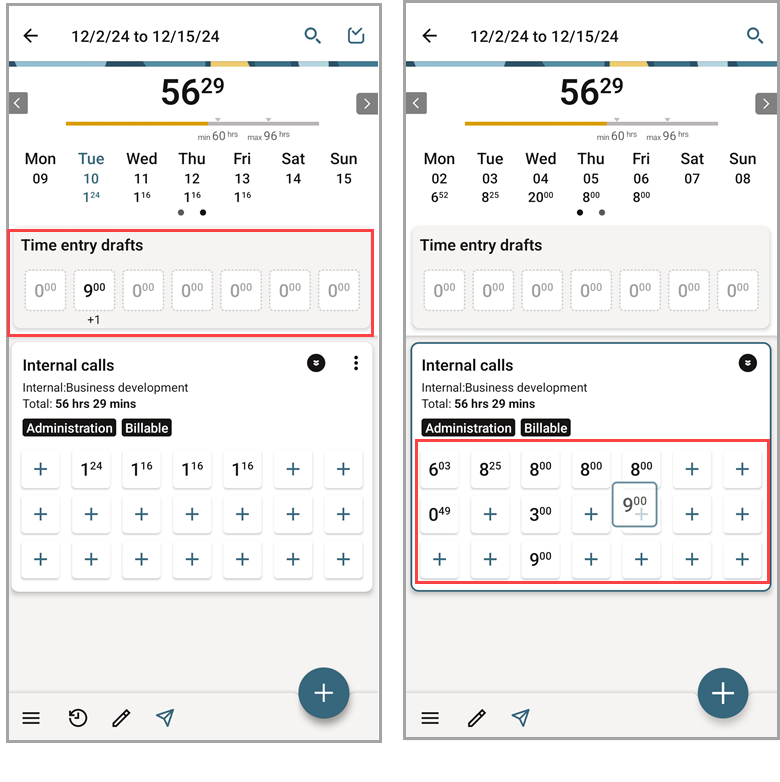
You can move time entry drafts from your draft inbox to any time card in the an open or to approve timesheet. For more information, see Working with Drafts in SuiteProjects Pro Mobile.
To add time entries from the draft inbox:
-
Select the open or rejected timesheet you want to add a time entry draft.
-
On the timesheet summary, tap the time entry draft.
-
Drag a draft time entry to a timecard.
-
Edit the time entry and resolve any time entry errors if necessary. For more information see, Adding or Editing Time Entries.
The time entry draft form is designed for quick information entry - it includes only the most important standard fields and ignores the usual standard and custom business rules for time entries in your company's SuiteProjects Pro account. Time entry drafts may contain errors if your company requires specific information on time entries.
Adding a Time Card Row
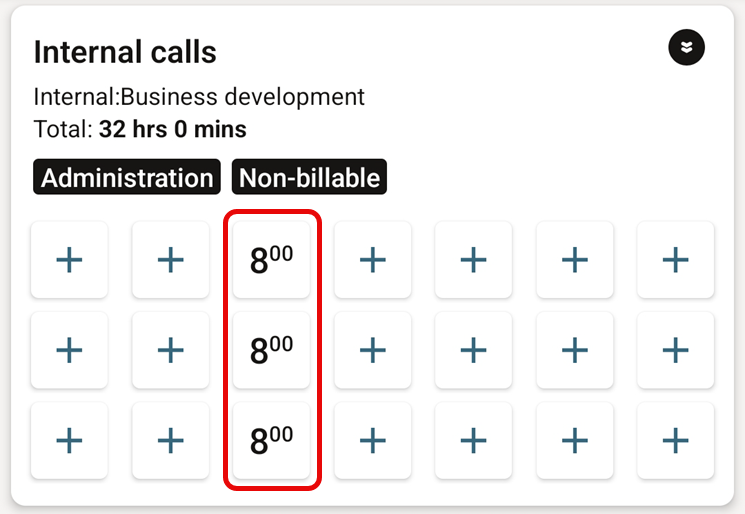
You can add multiple time card rows if you need to split the time entered for the same task or project and the same day over multiple time entry cells.
To add a time card row:
-
In the time card, tap the more icon
 . A context menu appears.
 -
In the context menu, tap Add new time card row.
A new card row appears.
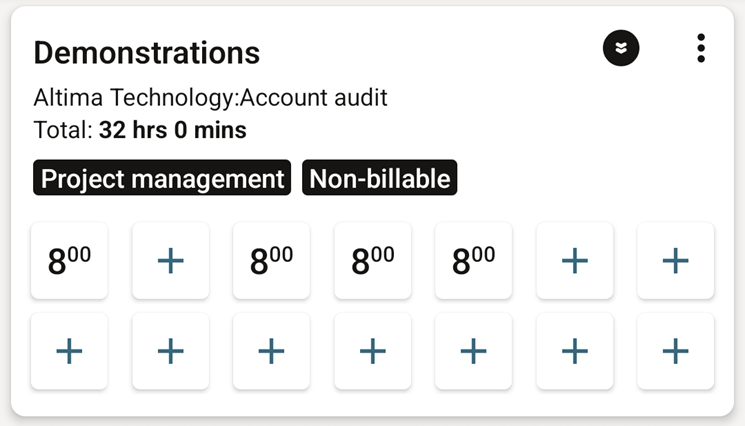
Time card rows are fluid. A time entry cell will automatically move to the row above if the time entry cell immediately above is empty. Empty time card rows will be deleted automatically if you close the timesheet and open it again.

Related Topics
- Timesheets Lists in SuiteProjects Pro Mobile
- Timesheets in SuiteProjects Pro Mobile
- Creating a Timesheet
- Editing Timesheet Properties
- Deleting a Timesheet
- Adding a Time Card to a Timesheet
- Editing Time Card Properties
- Deleting a Time Card
- Deleting Time Entries
- Submitting Timesheets
- Approving or Rejecting Timesheets
- SuiteProjects Pro Mobile Icons