Timesheets in SuiteProjects Pro Mobile
You can use timesheets in SuiteProjects Pro Mobile to record your time and submit it for approval. Your timesheets in SuiteProjects Pro Mobile are synchronized automatically with your timesheets in SuiteProjects Pro.
In a timesheet list, tap a timesheet summary to see your time entries in a week view.
|
1 |
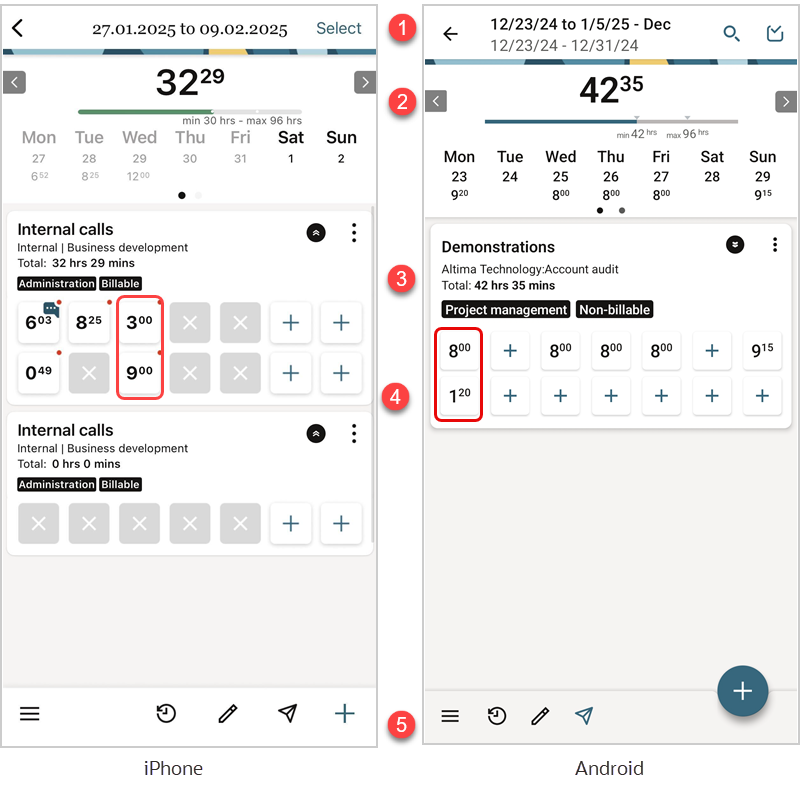
Timesheet header - The timesheet header shows the name and dates of the timesheet you are viewing in the center, a back arrow
Note:
The header does not show the dates if the timesheet name is generated automatically and includes the exact same date.
|
|
2 |
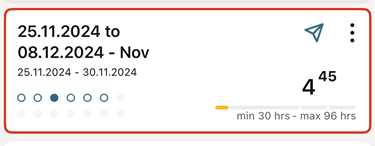
Time total and Timesheet navigation - The total time recorded in the timesheet is indicated in bold. To go to the previous timesheet or the next timesheet, tap Prev or Next. If the link and arrow icon appear in light gray color, you have reached the first or last available timesheet. If there are timesheet rules set on your company's SuiteProjects Pro account defining a minimum or maximum total number of hours for each timesheet, a progress bar shows underneath the time total. The bar gives a visual representation of the time entered on the timesheet and shows the minimum and maximum number of hours.
|
|
3 |
Week view and week navigation - The week view shows the time entered for the selected week. Each day is a column in the timesheet grid with time entries aligned under each day of the week. The calendar shows the total time entered for each day. The day, date and total time entered for the day show in one of the following colors:
If your timesheet period covers more than one week, swipe the calendar or any time card row right or left to view the next or previous week. Dots under the calendar indicate the number of weeks covered by the timesheet and the week you are currently viewing - e.g.
Note:
If the timesheet status is open or rejected and there is at least one time card in the timesheet, the timesheet week view scrolls automatically to the first week with time entry cells that you can edit. This would happen in the following example scenarios, depending on your account configuration:
|
|
4 |
Time entry drafts - The time entry drafts are available on all editable timesheets. The time entry drafts shows all drafts created in the draft inbox, which are associated with the specific timesheet. Drag draft time entries to a time card on your timesheet. See Moving a Time Entry Draft to a Timesheet. |
|
5 |
Time cards - Time cards are subdivision of timesheets associated to a specific project and/or task. All time entries are added to a time card. See Time Cards. |
|
6 |
Actions toolbar - The actions toolbar includes all the actions available for the timesheet you are viewing:
Note:
On iPhone, some of these actions may not be available if your device is not connected to the internet and there is a Submit or Delete action pending for the timesheet. You may be able to perform the action after the device is connected to the internet again and the synchronization completes. |
 indicates the third week of five weeks covered (fully or partially) by the timesheet period.
 (Android).
Time Cards
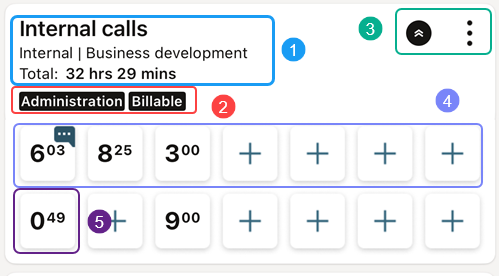
Time cards are subdivision of timesheets. You can use time cards to keep your time entries organized. Each time card is associated to a specific project or task. It shows all your time entries and other useful information such as service and job code tags. All time entries are added to a time card.
There cannot be two time cards with the same header information (main information) and tags (additional settings) on the same timesheet.
Time cards must contain time entries to be saved. Any empty time cards will disappear if you close the timesheet and open it again.
|
1 |
Time card header - The time card header can include the following information: Task name, Customer name and Project name. The time card header also shows the total number of hours recorded in the time card.
Note:
Depending on your company's SuiteProjects Pro account configuration, your recorded time may be associated to a customer, project and task at the time card, or the time entry level. If the customer, project and task association is at the time entry level, the time card header shows the text 'Multiple values'. |
|
2 |
Time card tags - Time card tags can include additional information associated with the task or the time card: Service Type (e.g. Data migration), Job Code (e.g. 'PM'), Payroll Type. |
|
3 |
Actions - The following actions are available:
|
|
4 |
Time card row - Single row of time entries. It contains one time entry cell for each day of the week (each day corresponds to a column in the timesheet week view grid). This is roughly equivalent to the timesheet row in the SuiteProjects Pro web application. You can add multiple rows to the time card if you want to add multiple time entries for the same day in the same time card. If you enter time entries on multiple rows, a time entry cell will automatically move to the row above if the time entry cell immediately above is empty. |
|
5 |
Time entry cell - Time entry cells are displayed in a grid with a column for each day of the week and a row for each time card row. Time entry cells show:
Tap a cell to add or edit a time entry. The time entry form appears at the bottom of the screen. The time entry cell you are currently editing is highlighted with a solid green background if there are no errors or with a solid red background if there are errors in the time entry. See Time Entry Form and Time Picker. |
 shows 7 hours and 45 minutes.
 when you cannot add a time entry - for example, if the day is out of the timesheet period or if time entries are not permitted for that day.
If there is an error in the time card properties, the more icon shows in red color and all the time entry cells are disabled. This may happen after synchronization if some required information was missing in the data downloaded from the SuiteProjects Pro server. In the example pictured below, the Task is a required field but it is missing from the time card properties. The time card tags include a red tag indicating the missing required information. If you tap the more icon to open the context menu, the Edit Time card menu option shows in red color and with a 'Required' tag.
Time Entry Form and Time Picker
The time entry form and time picker let you enter and edit all time entry information. See also Using the Time Entry Form and Time Picker.
Tap a cell to add or edit a time entry. The time picker screen appear in the bottom part of the screen.
The time entry cell you are currently editing is highlighted with a solid green color background if there are no errors
|
1 |
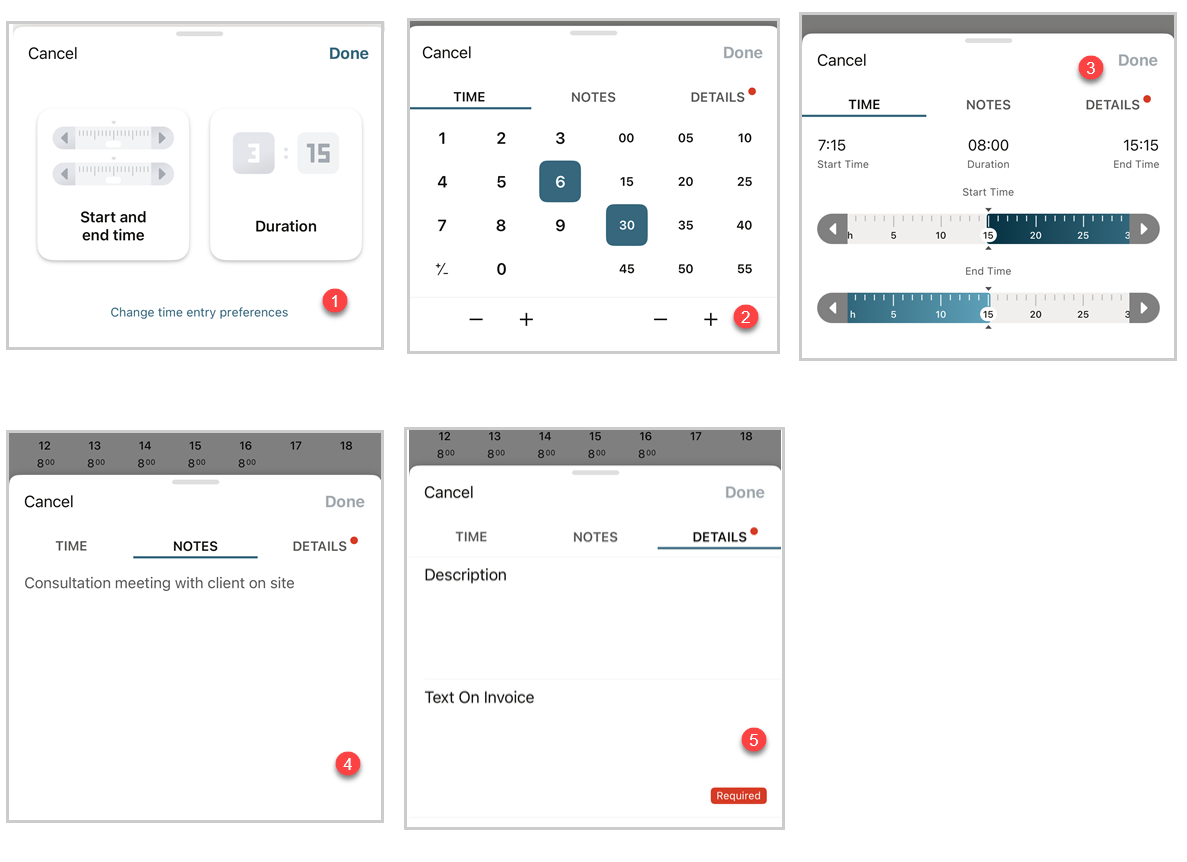
Time Entry Method - Depending on your time entry preferences, you may need to choose a time entry method. To change your time entry preferences, tap Change time entry preferences. You can change these preferences at any time, see Time Entry. |
|
2 |
Time Picker - Duration - The time picker lets you enter the number of hours and minutes you worked.
After you have entered a value:
|
|
3 |
Time Picker - Start time and end time The time picker lets you select a start time and end time using sliders. The time picker shows the start time, duration, and end time at the top. When adding a new time entry, the time picker shows default values based on the default start time and duration set in your preferences. For more information about setting your time entry preferences, see Time Entry.
|
|
4 |
Notes - Enter any time entry notes in the Notes tab, if required. |
|
5 |
Details - Depending on your company's SuiteProjects Pro account configuration, additional details may be required when adding a time entry. You need to enter all the required details to save and close the time entry form. Required fields show a red 'Required' tag. |
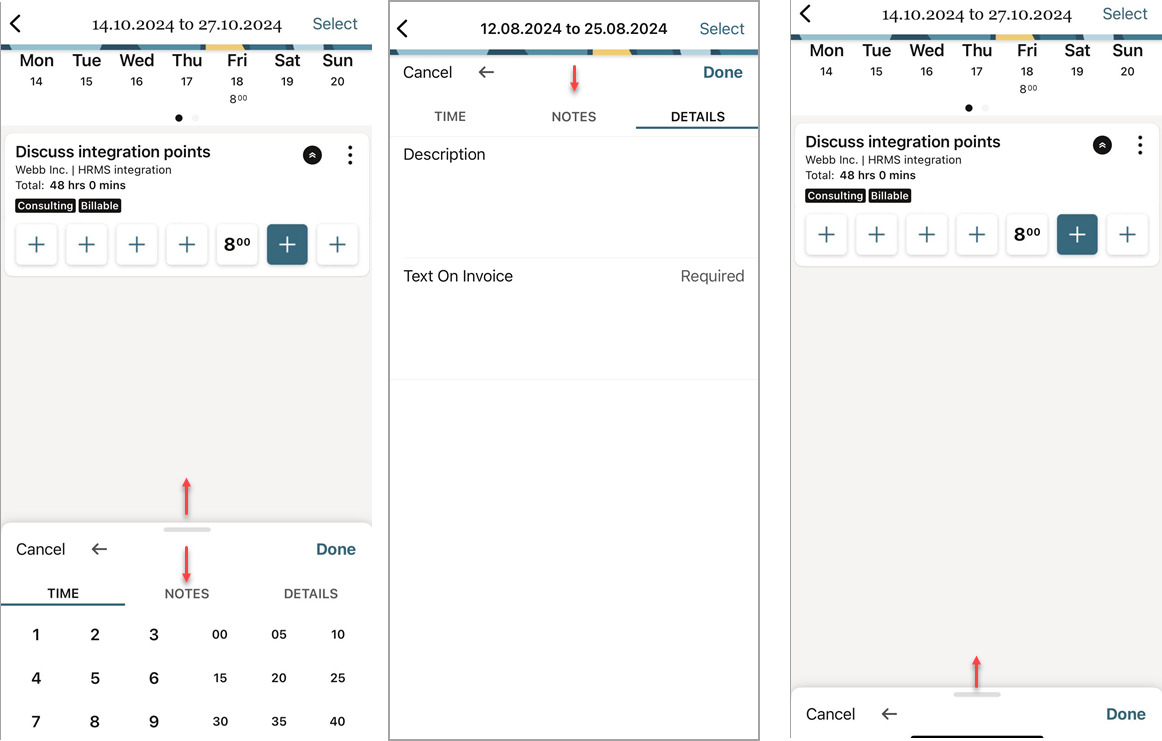
The size of the time entry form is optimized to fit the time picker and to let you view the time entry you are editing. You can swipe to scroll the time entry form to view all fields in the Details tab. You can also drag the bar ![]() at the top of the form (iPhone) or anywhere on the form (Android) to maximize or minimize the time entry form.
at the top of the form (iPhone) or anywhere on the form (Android) to maximize or minimize the time entry form.
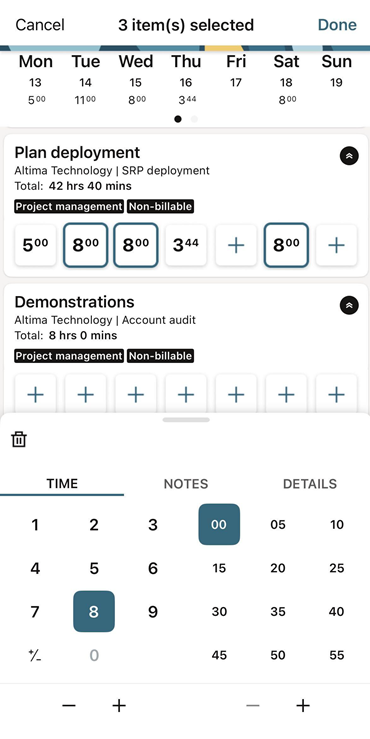
Time Entry Bulk Edit
The time entry bulk-edit mode lets you add or edit multiple time entry cells with the same information.
To select multiple time entry cells in the timesheet you are currently viewing, tap Select (iPhone) or the select icon ![]() (Android) then tap to select or unselect time entry cells across one or multiple time cards. Use the time picker to set the same value for selected time entry cells, or add the same notes and details to all selected time entries.
(Android) then tap to select or unselect time entry cells across one or multiple time cards. Use the time picker to set the same value for selected time entry cells, or add the same notes and details to all selected time entries.
The bulk-edit mode may not always be available depending on your timesheets configuration. For example, if your time cards are associated to a project but not to a specific task, and if you can select different tasks for each time entry, you will not be able to edit multiple time entries in one go. If this is the case, the timesheet screen does not show the Select link (iPhone) or the select icon (Android).
-
You can select multiple time entry cells across multiple rows, multiple time cards and multiple weeks in the same timesheet.
-
You can select and unselect time entry cells at any time when in bulk-edit mode. This allows to add or edit different sets of time entries and to make the same changes to as many or as few time entry cells as required.
-
The number of time entry cells selected shows at the top, in place of the timesheet title.
-
The time entry form appears if you select one or more time entry cells. The time entry form shows any values (hours, minutes, note and details fields) which are the same for all selected time entry cells. It shows the text 'Multiple values' for Note and Details fields if the field values are different across the selected time entry cells.
-
The selected time entry cells are highlighted with a green color outline if there are no errors for these time entries.
-
The selected time entry cells are highlighted with a red color outline if there are errors for these time entries. If a time entry is highlighted with a red color outline, some required information is missing - a time value or a required field in the Details tab. A red color dot
 next to the tab title indicates there is an error in the tab for any of the selected time entries.
 -
Modified time entry cells which are not currently selected show a red color dot
in the top right corner if there are errors for these time entries. -
To clear the selected time entry cells, tap the delete icon
 . All time entry information in the selected cells will be cleared immediately.
 -
To save all changes made, exit the bulk-edit mode and return to the timesheet, tap Done in the top right corner of the timesheet screen.
-
To discard all changes made, exit the bulk-edit mode and return to the timesheet, tap Cancel (iPhone) or the cancel icon
 (Android) in the top left corner of the timesheet screen then tap Discard in the confirmation dialog.
Timesheet History and Timesheet Errors
To view the history of a timesheet or any errors associated with a timesheet, go to that timesheet screen and tap the history icon ![]() in the timesheet toolbar. On iPhone, the history icon shows a red dot
in the timesheet toolbar. On iPhone, the history icon shows a red dot ![]() if there are any errors.
if there are any errors.
The history screen shows the submission and approval history of your timesheet. On iPhone, the history screen shows the History and Errors tabs. The Errors tabs lists warnings or errors, if any, preventing your timesheet from being submitted or preventing your SuiteProjects Pro Mobile timesheet data from being synchronized with the SuiteProjects Pro server data. To close the history screen and return to the timesheet, tap Cancel (iPhone) or the back arrow icon ![]()
(Android).
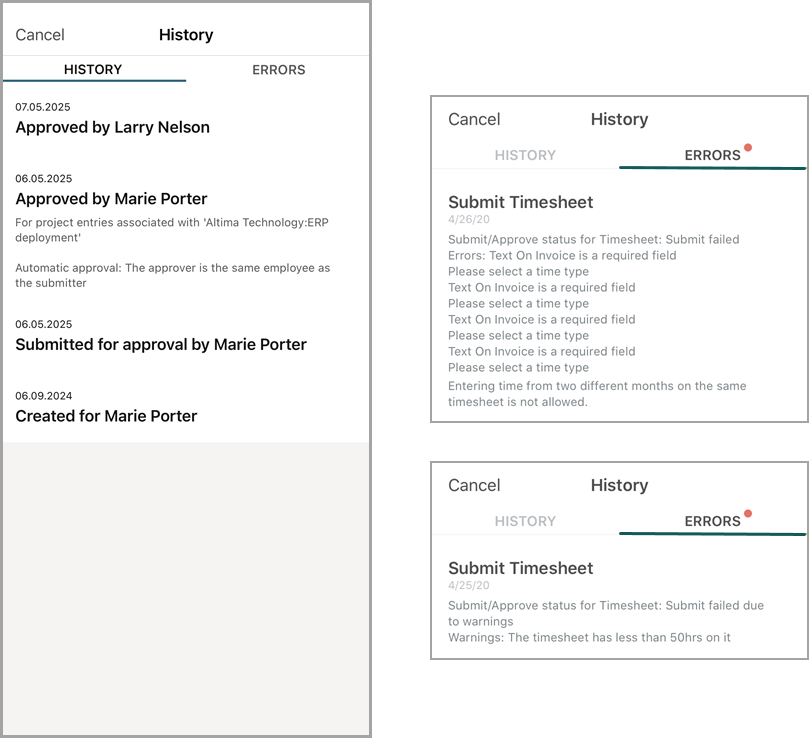
On iPhone, the timesheet summary is highlighted with a red color outline on the list if there are any warnings or errors associated with a timesheet.
Related Topics
- Timesheets Lists in SuiteProjects Pro Mobile
- Creating a Timesheet
- Editing Timesheet Properties
- Deleting a Timesheet
- Adding a Time Card to a Timesheet
- Editing Time Card Properties
- Deleting a Time Card
- Adding or Editing Time Entries
- Deleting Time Entries
- Submitting Timesheets
- Approving or Rejecting Timesheets
- SuiteProjects Pro Mobile Icons