Setting Display Options for Custom Fields
You can choose exactly where each custom field appears on a form, relative to other fields and subtabs.
To set the display properties of a custom field:
-
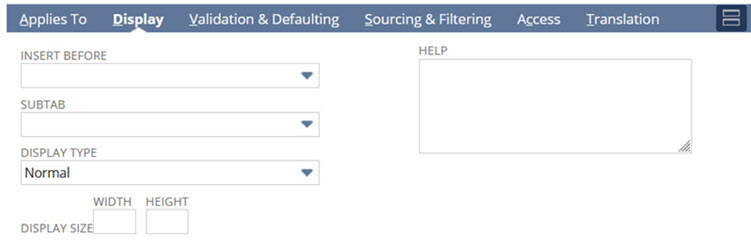
On the custom field setup page, click the Display subtab.
The fields available on the subtab depend on the field type you're modifying.
-
In the Insert Before field, select where to place your new field on records.
The field lists existing custom fields of the same type.
Note:The Insert Before field affects the placement of fields on standard forms and on newly created fields. To rearrangement of fields on a custom form, need to edit the custom form itself.
You can also choose to have the custom field span the entire column at the top or bottom of a subtab or section. This is useful for adding a text area field to provide additional context. For more information, see Adding a Field that Spans the Top or Bottom of a Page.
-
In the Subtab field, select the subtab you want the field to display on.
For instance, select Main to display the field at the top of the record.
Important:If you don't select a subtab, the field will default to a custom subtab for the record. Select a subtab that's relevant for the type of information the custom field stores.
Note:To include the field in saved searches, make sure it's set up to display on your preferred form and included on a subtab that displays the form. For more information, see Configuring Subtabs for Custom Entry and Transaction Forms.
-
In the Display Type field, select the display type.
Display types let you specify how your custom fields behave in NetSuite. You can use display types to make fields only for informational purposes and not have them stored in your account. You can also create fields that aren't editable or that have default information or custom code calculations.
Following are the available display types.
-
Normal: A normal field can be edited. You can use the field with custom code calculations, defaulting, and sourcing information.
For example, you create a custom field on employee records for a spending limit. The Spending Limit field has a display type of normal because you want to edit and store the information entered in the field.
Custom transaction fields are available in the custom form setup for all record types. The custom transaction fields are available in the Screen Fields > Custom subtab.
If you specify normal display for a transaction field, and then hide it on the custom form, it still appears in the custom form setup.
-
Disabled: A disabled field can't be edited. You can use the field with custom code calculations, defaulting, and sourcing information only. Any field with a display type of disabled that does not have default, sourced, or custom code information won't display on forms.
For example, you create a custom field on expense reports for a spending limit. The Spending Limit field on expense reports is sourced from the Spending Limit custom field on employee records. When an employee enters an expense report, they automatically see their spending limit on the expense report. The field has a display type of disabled because you want the information in the field to be updated but not edited.
Note:You can't disable a required field unless the field has a default value.
-
Inline Text: An inline text field is for informational purposes only. The information in the field is the result of custom code calculation, defaulting, or sourcing information only. Note that a value for a field with an Inline Text display type will be interpreted as HTML markup source. The value will be evaluated by the browser when a record containing the field is displayed. Inline text fields of the List/Record or Check Box type aren't available for use with custom code. These fields are also not available for transaction line fields.
For example, you create a Tax ID custom field for your purchase orders. When creating the custom field, you can enter your tax ID in the Default Value field. Your Tax ID then appears on purchase orders. The field has a display type of inline text because your tax ID is for informational purposes only. The information won't be stored with each transaction.
-
Hidden: A hidden field can't be seen on the record or transaction you apply it to. You can perform a search to display the value of the field. The information in the field is the result of custom code calculations and defaulting information. You must use custom code or set a default for the field. Note that you can also define a field as shown in its custom field definition, and then selectively hide it on a form-by-form basis.
If a custom field is marked as hidden, it isn't available to add to custom forms. Also, the custom field isn't available in the Fields list when customizing the form.
For example, you can use a hidden field to indicate if a customer requires special handling based on internal guidelines. Customer service agents won't see this field directly, but management can still search and report on the information.
In SuiteScript, only user event, scheduled, and Suitelet scripts can set the value of a custom field that has a display type of hidden. For more information about custom coding with SuiteScript, see SuiteScript 2.1 Script Types.
Note for custom transaction body and custom transaction line fields: If the Display Type field is set to Hidden, the field is still included on all forms, even if it isn't displayed. The system ignores any changes you make to show or hide the field on all forms that apply to that custom transaction body or custom transaction line field.
If the Log System Notes on Update Only permission isn't set, when you create a new transaction, the default value of a hidden field appears on the System Information subtab on transaction forms where the field is applied. For more information, see Setting General Account Preferences.
Warning:Hiding a custom field doesn't provide field-level security. It's for display purposed only. Keep in mind that hidden custom fields are still visible in the page source.
-
-
Set the height and width of your custom field.
The height and width you enter only affect how the field looks on the page. The permitted size of the custom field (number of pixels or lines permitted) is controlled by default options. For more information about defaulting options, see Setting Validation and Defaulting Properties.
-
Height: Set the height for the custom field in number of lines. The default is three lines.
-
Width: Set the width for your custom field in columns.
Important:Field configurations on each custom form interact with the values you set here. Actions such as setting up field groups, adding column breaks, and setting fields to be Same Row as Previous on custom forms can cause custom field text to be displayed in an unexpected way based on the custom field width. For details about configuring fields on custom forms, see Configuring Field Groups, Configuring Fields or Screens, and Associating Related Fields on Custom Forms.
-
-
(Hyperlink fields only) If needed, in the Link Text field, enter text to display instead of a URL for hyperlink fields.
Users will see the custom text instead of the URL on records and transactions. Clicking the text will take you to the URL.
-
(Decimal Number, Integer Number, and Percent fields only) Review the Apply Formatting setting and change if needed. To enable the setting, check the box. To disable the setting, clear the box.
-
When Apply Formatting is enabled, the field follows the company's number format settings in the Number Format and Negative Number Format preferences at Company, Subsidiary, or User level.
-
When Apply Formatting is disabled, the custom field's values aren't formatted, meaning they have no commas or decimal points. (The setting is appropriate for Integer Number type fields used as unique identifiers.)
Note:Default settings are as follows: disabled for custom fields created prior to 2012.1 upgrade, to preserve pre-upgrade behavior, and enabled for custom fields created after 2012.1 upgrade.
-
-
In the Help field, enter a brief description of the purpose of the field and the information that should be entered into the field.
The help is available when a user clicks the name of the field.
You can enter HTML in the field. Be sure to begin your markup source with
<html>and end with</html>.Note:You should always enter information in the Help field to increase the usability of customized forms or records.
-
In the Label for Input field, enter the label for the item option as you want it to appear to customers on your website.
-
If the custom field is of type list/record or multi-select, and the selection in the List/Record list is hierarchical, a Show Hierarchy box is available.
To show the record hierarchy, or the full name, check the Show Hierarchy box. To show the field name without the hierarchy, or the short name, clear the Show Hierarchy box.
In the case of accounts, when the Use Account Numbers preference is enabled, custom account fields display the account numbers together with account names.
-
After you've set the display properties, you should define any validation and defaulting properties. See Setting Validation and Defaulting Properties.
Related Topics
- Creating a Custom Field
- Creating Custom Fields by Type
- Assigning Custom Fields to Specific Record Types
- Behavior of View from Order Only Settings on Transaction Line and Transaction Body Custom Fields
- Setting Validation and Defaulting Properties
- Setting Sourcing Criteria
- Sourcing and Filtering Examples
- Setting Filtering Criteria
- Dependent Dropdown Lists
- Restricting Access to Custom Fields
- Restricting Access to Employee Custom Fields
- Creating Read-Only Custom Fields
- Adding Translations for Custom Fields
- Adding Custom Fields to Transaction Forms
- Tracking Changes to Custom Fields