How to Create an Application With an Embedded Reusable Worklist Region
The usage of each reusable worklist region is the same with a few exceptions. The following procedure provides the detailed steps to create an application and embed the Task List task flow in the application. Where applicable, notes on how to use other types of reusable worklist regions are provided.
To create an application with an embedded reusable worklist region:
-
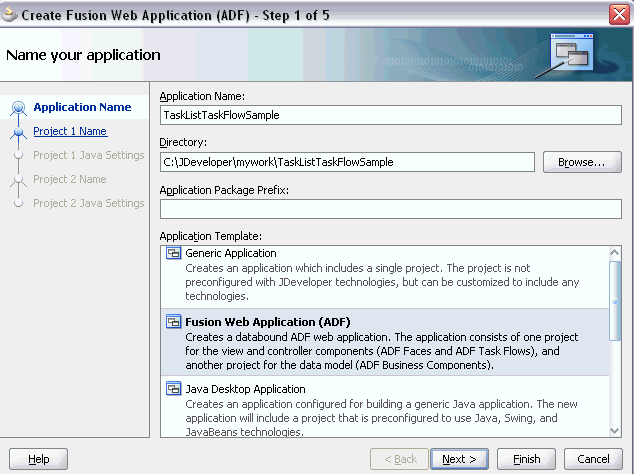
Create new Fusion Web Application in Oracle JDeveloper. In this example, the name of the application is TaskListTaskFlowSample. Figure 32-65 provides details.
Figure 32-65 Creation of Application with an Embedded Reusable Worklist Region

Description of "Figure 32-65 Creation of Application with an Embedded Reusable Worklist Region" -
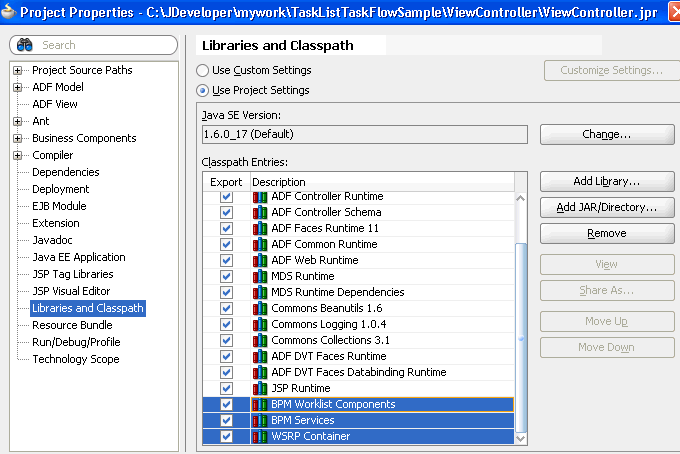
Open the View Controller Project Properties, Libraries and Classpath section, and click Add Library to add the following libraries in the class path:
-
BPM Worklist Components Add this library to add the task flow JAR
adflibTaskListTaskFlow.jarandadflibWorklistComponents.jar, which are required in the project's class path. -
BPM Services
-
WSRP Container
Figure 32-66 provides details.
Figure 32-66 Libraries and Classpath Section

Description of "Figure 32-66 Libraries and Classpath Section" -
-
If your application runs on non-SOA server, you must perform two additional steps.
-
Install the
oracle.soa.workflowshared library.If your server has
oracle.soa.workflow.wcalready installed, you do not need to installoracle.soa.workflow. -
Configure a foreign JNDI on the server.
If you run the Task List task flow in federated mode, you do not need to do this step. See "federatedMode" in section What You May Need to Know About Task List Task Flow for information about how to use the task flow in federated mode.
-
-
Select the View Controller project and choose File > New > Current Project Technologies > Web Tier > JSF Page to create a jspx file (for example,
testSample.jspx).Be sure to select Create as XML document (*.jspx) in the Create JSF Page dialog.
-
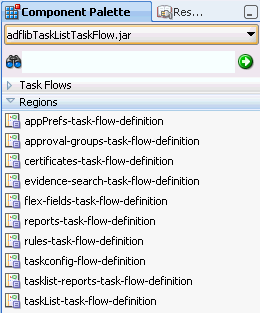
Choose
adflibTaskListTaskFlow.jarfrom the Components window. It contains the list of all the Task Flows and Regions. Figure 32-67 provides details. -
Drag and drop one of the task flow Regions to the jspx page, and select Region in the Create menu (for example, taskList-task-flow-definition for Task List Task Flow).
See the following sections for details about the task flow definitions:
-
If you chose flex-fields-task-flow-definition, rules-task-flow-definition, tasklist-reports-task-flow-definition, or taskList-task-flow-definition, pass the task flow parameters in the Edit Task Flow Binding dialog that appears.
-
A new entry is added to the
pagenamePagedef.xmlfile.For example, adding the taskList-task-flow-definition results in the following new entry:
<taskFlow id="taskListtaskflowdefinition1" taskFlowId="/WEB-INF/taskList-task-flow-definition.xml#taskList-task- flow-definition" xmlns="http://xmlns.oracle.com/adf/controller/binding"> <parameters> <parameter id="taskFlowMode" value="MODE_WORKLIST"/> <parameter id="showTaskDetailsPanel" value="true"/> <parameter id="showActionDropdown" value="true"/> <parameter id="showViewFilter" value="true"/> <parameter id="showStatusFilter" value="true"/> <parameter id="showSearchControl" value="true"/> </parameters> </taskFlow> -
Add the shared libraries in the
weblogic-application.xmlfile. If you haveoracle.soa.workflow.wcinstalled on your server, add that library.<library-ref> <library-name>oracle.soa.workflow</library-name> </library-ref>If the generated custom application is a module, use
weblogic.xml.<library-ref> <library-name>oracle.soa.worklist.webapp</library-name> </library-ref>Before deploying the application, see How to Set Up the Deployment Profile.
