- Developing SOA Applications with Oracle SOA Suite
- Using the BPEL Process Service Component
- Using Oracle BPEL Process Manager Sensors and Analytics
- Configuring Sensors and Sensor Actions in Oracle JDeveloper
- How to Configure Sensor Actions
How to Configure Sensor Actions
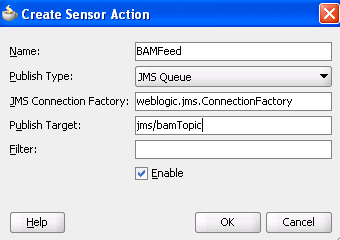
When you create sensors, you identify the activities, variables, and faults you want to monitor during runtime. If you want to publish the values of the sensors to an endpoint (for example, you want to publish the data of the LoanApplicationSensor variable sensor created in Figure 18-5 to a JMS queue), then create a sensor action, as shown in Figure 18-7, and associate it with the LoanApplicationSensor variable.
To configure a sensor action:
- Select Change to Monitor view at the top of Oracle BPEL Designer.
- In the Structure window, right-click the Sensor Actions folder.
- Select Create > Sensor Action.
- Enter the details described in Table 18-1.
Table 18-1 Sensor Actions Dialog
Field Description Name
Enter a name or accept the default name.
Publish Type
Select the destination to which to publish sensor data. For more information, see section Introduction to Sensors.
JMS Connection Factory
If your publish type is JMS Queue, JMS Topic, or JMS Adapter, specify the connection factory.
Publish Target
If your publish type is JMS Queue, JMS Topic, Custom, or JMS Adapter, specify the publish target. The publish target represents different things depending on the publish type specified:
-
If the publish type is a database, this field is left blank.
-
If the publish type is JMS Queue, JMS Topic, or JMS Adapter, this represents the JMS destination's JNDI name.
-
If the publish type is Custom, this represents the fully-qualified Java class name.
Filter
Enter filter logic as a boolean expression. A filter enables you to monitor sensor data within a specific range. For an example of a configured filter, see Figure 18-9.
Enable
Deselect this check box to disable a sensor action. By default, sensor actions are enabled. If you disable a sensor action by deselecting this check box, the action does not publish data.
A new entry is created in the
bpel_process_name_sensorAction.xmlfile:<action name="BAMFeed" enabled="true" publishType="JMSQueue" publishTarget="jms/bamTopic"> <sensorName>LoanApplicationSensor</sensorName> <property name=“JMSConnectionFactory“> weblogic.jms.ConnectionFactory </property> </action>Note:
You cannot specify a
<(less than) sign in the Filter field of the Sensor Action dialog. If you do, Oracle JDeveloper translates the<sign to<in thebpel_process_name_sensorAction.xmlfile. In addition, you cannot specify a<sign by directly editing thefilename_sensorAction.xmlfile. This action causes an error. -
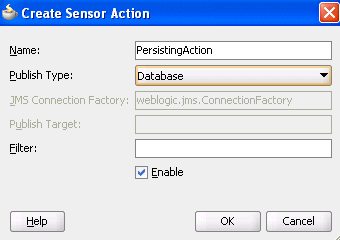
- If you want to publish the values of LoanApplicationSensor and CreditRatingSensor to the reports schema in the database, create an additional sensor action, as shown in Figure 18-8, and associate it with both CreditRatingSensor and LoanApplicationSensor.
Figure 18-8 Creating an Additional Sensor Action

Description of "Figure 18-8 Creating an Additional Sensor Action"A new entry is created in the
bpel_process_name_sensorAction.xmlfile:<action name="PersistingAction" enabled="true" publishType="BPELReportsSchema"> <sensorName>LoanApplicationSensor</sensorName> <sensorName>CreditRatingSensor</sensorName> </actionThe data of one sensor can be published to multiple endpoints. In the two preceding code samples, the data of LoanApplicationSensor was published to a JMS queue and to the reports schema in the database.
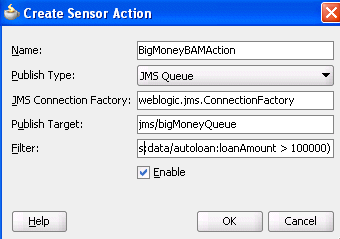
- If you want to monitor loan requests for which the loan amount is greater than $100,000, create a sensor action with a filter, as shown in Figure 18-9. There is no design-time validation of the filter query. You must ensure the query is correct.
Figure 18-9 Creating a Sensor Action with a Filter

Description of "Figure 18-9 Creating a Sensor Action with a Filter"A new entry is created in the
bpel_process_name_sensorAction.xmlfile:<action name="BigMoneyBAMAction" enabled='true' filter="boolean(/s:actionData/s:payload /s:variableData/s:data /autoloan:loanAmount > 100000)" publishType="JMSQueue" publishTarget="jms/bigMoneyQueue"> <sensorName>LoanApplicationSensor</sensorName> <property name=“JMSConnectionFactory“> weblogic.jms.ConnectionFactory </property> </action>Note:
-
You must specify all the namespaces that are required to configure an action filter in the
bpel_process_name_sensorAction.xmlconfiguration file. For example, assume you have acustomerXML-schema element with namespace"http://myCustomer"and you want to create a filter on thecustomerageelement. Therefore, you must manually declare the namespace for"http:/myCustomer"in the file before you can use it in your filter. Otherwise, it is not possible to create a valid query. Addxmlns:ns1="http://myCustomer"in the attribute declaration part of the file. You can then use..../ns1:customer/ns1:age/...in your query. -
You must specify the filter as a boolean XPath expression.
-
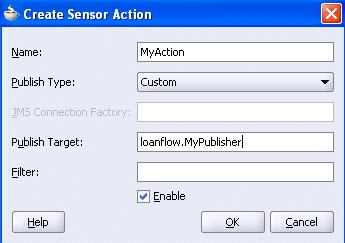
- If you have special requirements for a sensor action that cannot be accomplished by using the built-in publish types (database, JMS queue, JMS topic, and JMS adapter), then you can create a sensor action with the custom publish type, as shown in Figure 18-10. The name in the Publish Target field denotes a fully qualified Java class name that must be implemented. For more information, see How to Create a Custom Data Publisher.
Figure 18-10 Using the Custom Publish Type

Description of "Figure 18-10 Using the Custom Publish Type"
