11 Using the Events Tab
You use the Events tab to view the list of all events occurred in a table with the following columns:
Table 11-1 Events Columns
| Column | Description |
|---|---|
| Severity | The severity of the alarms. The alarm severities are:
|
| Event ID | A unique ID for the event. |
| Alarm Type | The alarm type of the event. See "About Alarm Types" for the list of alarm types. |
| Event Status | The event status that you get from the assurance system. See "About Event Statuses" for more information. |
| Resource | The resource that on which the event has occurred. This is a hyperlink, clicking on which you can view the summary of the corresponding resource in UIM. |
| Analysis Status | The lifecycle status of the impact data analysis. See "About Analysis Status" for more information. |
| Created On | The date when the event was created. |
| Source | The source of the event, which is the unique identifier of the assurance system from which the event is collected. |
| Owner | The person who is assigned to work on the alarm event. |
Using the Events tab, you can perform the following:
- Viewing the list of events.
- Searching and filtering the events using customizable filter chips.
- Customizing the columns.
- Viewing insights of the events.
- Performing actions on the selected events.
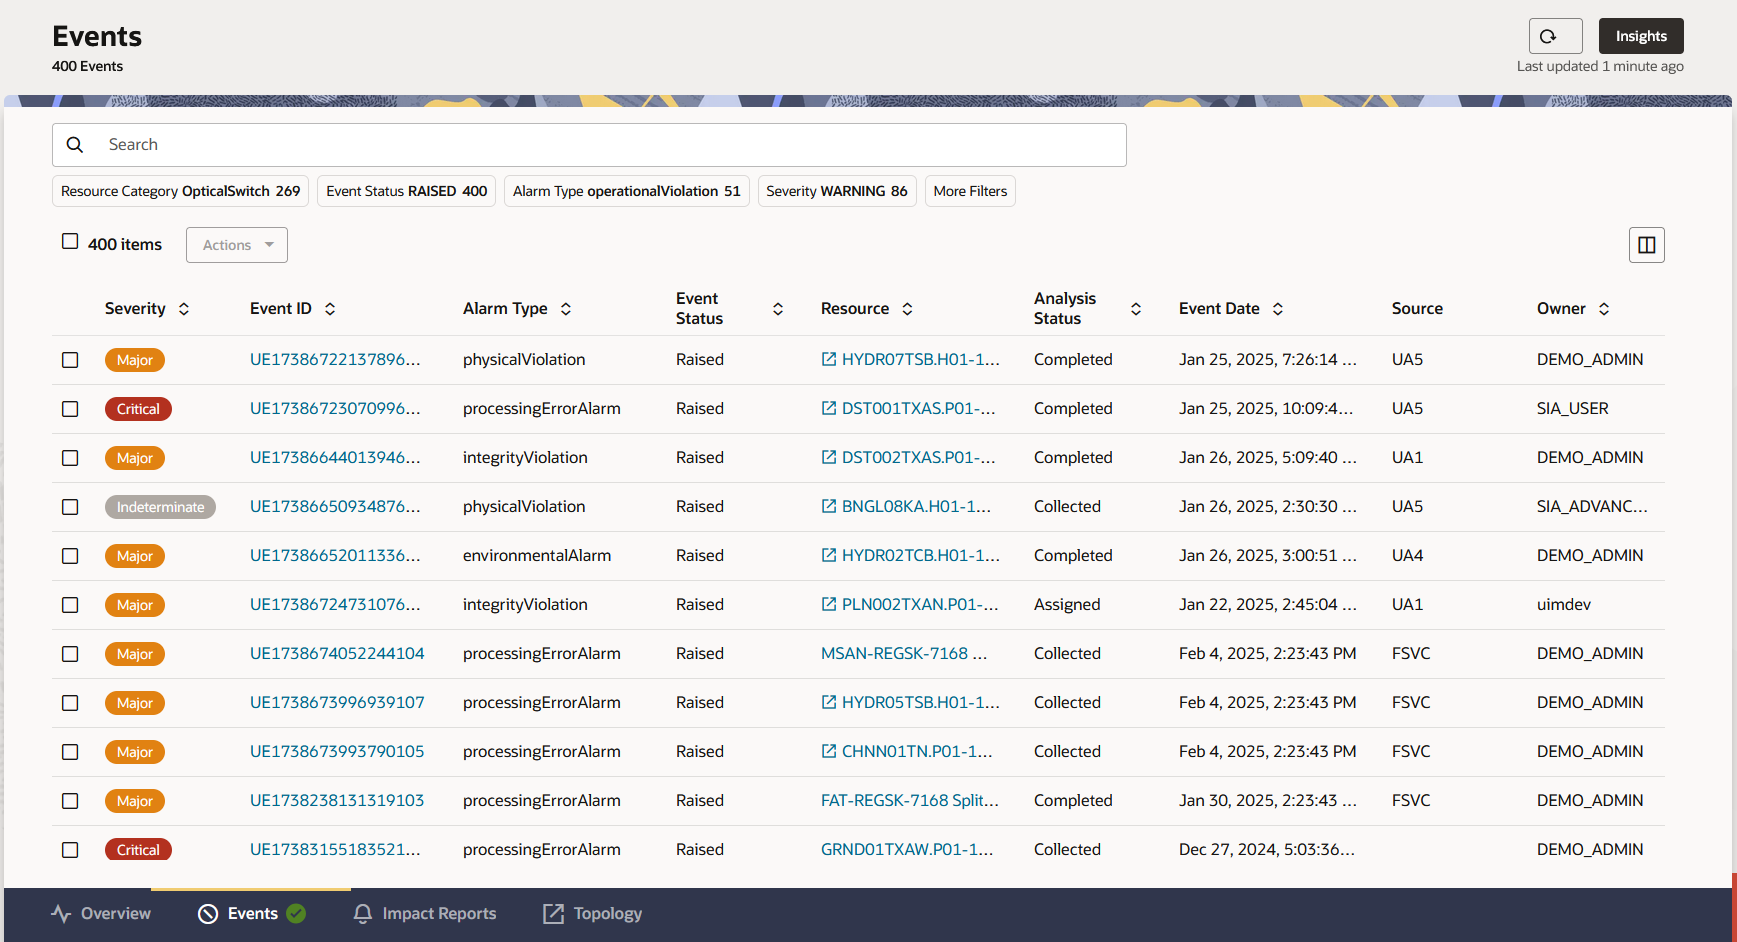
The following figure shows the Events tab of Service Impact Analysis.
Figure 11-1 Events tab of Service Impact Analysis
Viewing the List of Events
The Events tab provides the details of all events that have occurred. You can scroll down to view the list of all events.
To view the list of events:
- Navigate to the Events tab.
The list of events appears in a table.
- Search the events using the filter options. See "Searching and Filtering the Events" for more information.
- Sort the columns using the corresponding sort options.
- Click on the required event ID link to view the event details.
The Event Details panel appears that shows the event summary. See "Working with Event Details" for more information.
- Click on the required resource link to open the corresponding resource summary.
- Select a row using the corresponding checkbox.
- (Optional) Select all rows in the table using the total count checkbox.
- Select an option from the Actions list. See "Performing Actions on the Selected Events" for more information.
- Click Insights on the top-right corner of the Events page to view the insights. See "Viewing Insights of the Events" for more information.
- Click the Refresh icon beside the Insights button to refresh the events list.
Working with Event Details
You can use the Event Details panel to view and edit an event and initiate the analysis.
To do so:
- From the list of events, click on the required event ID.
The Event Details panel appears.
- Click on the links for Alarm Details to view the alarm
details.
The Alarm Details pop-up window appears that shows the alarm details.
Note:
The Alarm Details link provides the entire message sent from the assurance system for additional information. - Click Edit Event to edit the event description and owner.
- Enter the change description in Description.
- Select the owner of the change from Owner.
- Click Save.
The changes are saved.
- On the top-right corner of the Event Details panel, click on the ellipses
option and select either of the following:
- View Resource in Topology to view the resource in ATA.
- View Resource in Inventory to view the resource summary in UIM.
- Click Initiate Analysis to start a new analysis.
The system performs an analysis, and you will get a notification after the analysis completes. See "About Analysis Status" for more information on analysis lifecycle statuses.
Note:
When you initiate an analysis, the analysis status is changed to INITIATED and then will be changed to COLLECTED after the analysis is successfully completed.
The analysis status changes to FAILED if there is a system failure during the impact gathering phase.
- Click View Impact Summary to view the impact summary. See "Viewing Impact Summary" for more information.
Viewing Impact Summary
You can view the summary of the impact analysis you perform.
To do so:
- From the Event Details panel of a selected event, click View
Impact Summary after you perform a new impact analysis.
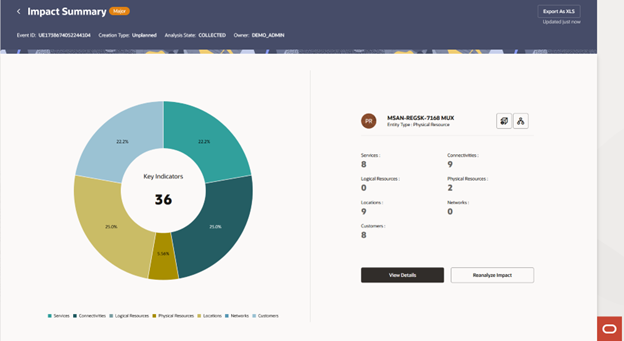
The Impact Summary page appears with further analysis of the event. The impact analysis details include Event ID, Creating Type, Analysis State, and Owner.
- Use the pie chart to understand the impact analysis.
- Hover over the pie chart for more details on the event.
- Hover over the resources legend to highlight the corresponding resource details in the pie chart.
- Click on the View Resource in Inventory icon to open the resource summary in UIM.
- Click on the View Resource in Topology icon to open the resource details in ATA.
- Click View Details at the bottom of the page to view further details on the
impact analysis details.
The Impact Analysis Details page appears. See "Working with Impact Analysis Details" for more information.
- Click Reanalyze Impact to delete the current impact and run the impact analysis again.
- On the top-right corner of the page, click Export As XLS to export the
analysis into a spreadsheet.
The spreadsheet is downloaded to your system.
- On the top-left corner of the page, click on the Back icon to go back to the Events tab.
The following figure shows the impact summary of a selected event:
Figure 11-2 Impact Summary View of a Selected Event
Working with Impact Analysis Details
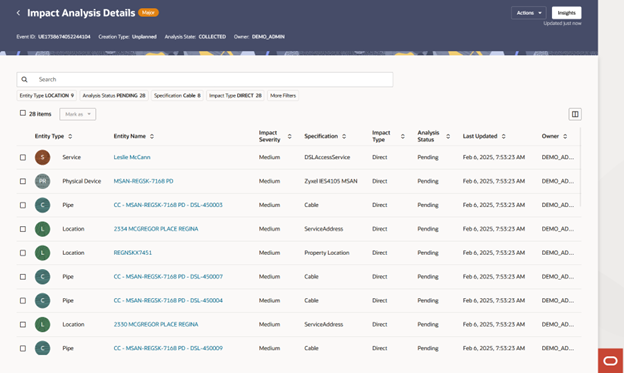
You use the Impact Analysis Details page to understand more about the generated impact analysis. The Impact Analysis Details page shows the following details of the analysis:
- Event ID
- Creation Type
- Analysis State
- Owner
The Impact Analysis Details page shows the following details of entities impacted because of the analysis:
Table 11-2 Impact Analysis Details
| Impact Analysis Details Column | Description |
|---|---|
| Entity Type | The entity or resource type from UIM. The valid values
are:
|
| Entity Name | The name or ID of the entity or resource from UIM. This is a hyperlink and displays the entity details in a side panel. |
| Impact Severity | The severity level of the impact. The valid values
are:
|
| Specification | The resource or entity specification from UIM. |
| Impact Type | The impact type. The valid values are:
|
| Analysis Status | The analysis status. The valid values are:
|
| Last Updated | The date when the impact was last updated. |
| Owner | Name of the owner who is assigned with the impact to resolve. |
To work on the Impact Analysis Details:
- Open the Impact Analysis Details page.
- Enter a name or a value in Search to view the corresponding search results.
- Use the filter tags available and select the corresponding values to choose the filter values.
- Click More Filters to customize the filters.
- From the results table, select the required analysis record.
- Select Assign Owner from the Mark as list to assign the owner.
- Select Change Impact Severity to select a severity value from the list in the Change Impact Severity panel and then click Save.
- Click Analyze Result, select the required value from the Analyze Result panel, and then click Mark.
- From the Actions list on the top-right corner, select either of the
following:
- Export As XLS to export the analysis to a
spreadsheet.
Note:
The Export As XLS is disabled by default. It is enabled after you select the entities that you want to export. - Generate Report to generate a report.
The Analysis Status value gets changed to COMPLETED after the report is generated.
Note:
You can no longer modify the analysis details after the Analysis Status value becomes COMPLETED.
All impacted items of the event should be analyzed to either Qualified or Disqualified to generate the report.
- Export As XLS to export the analysis to a
spreadsheet.
- Click Insights on the top-right corner.
The Insights panel appears that helps you understand further details about the analysis. See "Viewing Insights of the Events" for more information.
- (Optional) Hover over the corresponding insights details to view more details.
- On the top-left corner, click on the Back icon to go back to the Impact Summary page.
The following figure shows the Impact Analysis Details page that opens from the Impact Summary page.
Figure 11-3 Impact Analysis Details Page
Searching and Filtering the Events
You can search by entering the required value of the event or by using filter options. The filter options can be used to view the list of events according to the selected filter criteria. Each of the filter options displays the number of records or events exist for the corresponding filter option.
To search and filter the events:
- In the Events tab, enter the required value in the Search field.
The list of events appears as per the searched criteria.
- To filter the list of events, use the following filter chips or
options:
- Resource Category
- Event Status
- Alarm Type
- Severity
- (Optional) Use More Filters to customize the filter tags.
The corresponding filter criteria is added to the search criteria.
- Select the corresponding values within the filtered criteria to filter
the list further.
The corresponding filtered list appears.
Customizing the Events
You can customize the events table columns that can help you in viewing only the required event details. You can hide the other details.
To customize the columns:
- In the Events tab, click on the Columns icon on the
top-right corner of the events table.
The Columns panel appears.
- Select the required columns and deselect the columns that you do not need.
- (Optional) Type the column name in the Search field to search and choose it.
- Click Restore Defaults to restore the default columns.
- Close the Columns panel to reflect the changes.
Viewing Insights of the Events
You can view additional analysis on the events using the Insights panel.
To view insights of the events:
- In the Events tab, click Insights on the top-right corner of the
page.
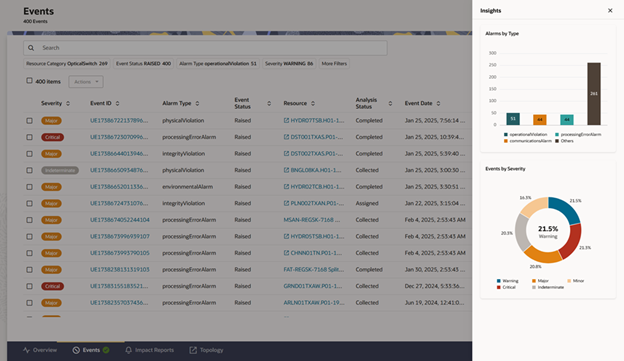
The Insights panel appears with additional analysis on the list of events.
- In the Alarm by Type section of the insights, hover over the corresponding alarm type to view the details.
- In the Events by Severity section of the insights, hover over the pie chart to view the details.
- Use the severity legend at the bottom of the Insights panel to understand the colors used for alarm severities.
Performing Actions on the Selected Events
You can perform actions on events depending on the role you are assigned with. You can select multiple events and perform an action on the selected events.
See "About Authentication" in Unified Inventory and Topology Deployment Guide for more information on the Service Impact Analysis roles.
You can perform the following actions using the Actions menu from the Events tab:
- Assign owner: You can assign an owner to resolve the event. You need necessary permissions to perform this action.
- Reject event: You can remove the event from the list without deleting the event record. You reject an event when the assurance system has sent an improper event. The status changes to REJECTED and this enables you to track the invalid events. These events are stored seperately in case analysis needs to be done on the reason behind the assurance system sending invalid events. You need necessary permissions to perform this action.
- Delete events: You can purge the event so that the event is no longer available. You need necessary permissions to perform this action.
- Generate report: You can generate reports. All impacted items in the event should be analyzed to either Qualified or Disqualified to generate a report.
To perform actions on the selected events:
- In the Events tab, select the required event or events.
- Select an option from the Actions menu to perform the following:
- Select Assign Owner to assign an owner to the event or events. See "Assigning an Owner to the Events" for more information.
- Select Reject Event and then click Reject from the dialog box to reject the selected event or events.
- Select Delete Event and then click Delete to delete the selected event or events.
- Select Generate Report and then click Confirm to generate reports for the selected event or events.
Assigning an Owner to the Events
You can assign an owner if you have the necessary permission to perform this action.
See "About Authentication" in Unified Inventory and Topology Deployment Guide for more information on the Service Impact Analysis roles.
You can assign an owner to the selected events.
To do so:
- In the events table, select the required events.
- Select Assign Owner from the Actions menu.
The Assign Owner popup appears.
- Enter a name in Search and select it.
- (Optional) Use the dropdown arrow in the Search field to select a name.
- Click Assign to assign the owner.
- (Optional) Click Cancel to cancel it.


