Printing Transactions
Before printing any invoices, credit memos, sales orders, or purchase orders using the templates delivered by the Advanced Localization Features SuiteApp, make sure that the templates and individual features are properly configured. For more information, see Setting Up the Advanced Localization Features Templates and ALF Additional Features and Configuration.
Invoices, credit memos, and sales orders that are printed in Arabic and Hebrew languages are rendered in right-to-left direction.
The printout type is always original for item receipt and transfer order prints.
Printing invoices, credit memos, sales orders, and purchase orders (as well as other records) is a native feature of NetSuite. To learn more, see the following help topics:
However, the Advanced Localization Feature SuiteApp enhances the printing capability by providing additional fields that can be printed on invoices, credit memos, sales orders, and purchase orders to support compliance or common business requirements.
Several new subtabs, buttons and transaction body fields have been added to every invoice, credit memo, sales order, and purchase order record.
The new subtabs are as follows:
-
Invoice Configuration - Under this subtab, you can adjust print-related information for each particular invoice, credit memo, sales order, or purchase order. The following fields are available:
-
Payment Reference - Use this field to insert a reference that your customer or vendor should add to the payment. This is mainly used in cases when structured payment references are required.
-
Transaction Bank Details - Use this dropdown list to assign a Transaction Bank Details record to this transaction. Every Transaction Bank Details record contains different data to be printed on an invoice, credit memo, sales order, or purchase order. For more information, see Transaction Bank Details.
-
Method of Payment - Use this dropdown list to assign a Method of Payment record to this transaction. The Method of Payment records specify the content of the Transaction Bank Details record for invoices or a credit memos. For more information, see Method of Payment.
-
Hide Total Incl. VAT Column- Use this box to hide the Total incl. VAT (Gross Amount) column in the Item Detail section of printed invoice, credit memo, sales order, or purchase order.
-
-
Printing History - Under this subtab, you can view the printing history of the transactions. The following columns are available:
-
Printout Type - Displays if the printout type is Original or a Copy.
-
Date - Displays the date and time of printing the transaction.
-
Issued By - Displays the name of the user printed the transaction.
-
Printed PDFs - Displays a link from which you can access and download a copy of the printed PDF files.
The Printed PDFs column is available only if you check the Save Printed PDFs box on the customer record.
Note:Every copy made by the Print a PDF Copy button is also recorded. However, drafts and duplicates are not listed here. For more information, see Transaction Print Marks.
For invoices, credit memos, sales orders, and purchase orders printed using the script, the Issued By column in the table under this subtab contains the word System (instead of the issuer's name).
-
The set of available print-related buttons depends on the status of your invoice, credit memo, sales order, or purchase order:
|
Status |
Status Description |
Available Buttons |
Button Description |
|---|---|---|---|
|
Pending Approval |
The invoice, credit memo, sales order, or purchase order is waiting to be approved. |
|
Prints the PDF and marks it as Draft. |
|
Preview PDF |
Prints the PDF and marks it as Draft. |
||
|
Approved |
The invoice,credit memo, sales order, or purchase order has been approved but hasn't been printed yet (or there is no approval process). |
|
Prints the original PDF. A record is created under the Printing History subtab. |
|
Preview PDF |
Prints the PDF and marks it as Draft. |
||
|
Approved and Printed |
The invoice, credit memo, sales order, or purchase order has already been printed (original record exists in the printing history). |
|
Prints the PDF. Marks it as Duplicate if Mark Document as Copy or Duplicate box is checked. |
|
Print a PDF Copy |
Prints the PDF. Marks it as Copy if Mark Document as Copy or Duplicate box is checked. A record is created under the Printing History subtab. |
The EORI transaction body field is used to enter the Economic Operators Registration and Identification (EORI) number that is assigned to importers and exporters by the customs. The EORI number is required for importing and exporting goods between UK and European Union (EU). This field is sourced from the customer record. If no value is available in the customer record, the value is retrieved from the subsidiary record.
This field is not available on the custom form by default. You must customize the custom forms to add the EORI field.
Sending Transactions Through Email
You can send invoice, credit memo, sales order, and purchase order PDFs through email to your contacts.
To send PDF of a transaction record through email:
For more information, see Working with Mail Merge.
For more information, see Sending Email from Records.
-
Go to a record.
-
To send an email, do any of the following:
-
From the Actions dropdown list, select Email.
-
On the Communication subtab, under Messages subtab, click Email.
-
-
On the Recipients subtab, from the Recipient field, select the contact you want to email the PDF file.
-
In the Email field, enter the recipient email address if the contact doesn't have one preset already.
-
On the Attachments subtab, check the Include Transaction box.
-
In the Type field, select PDF as format type.
-
Perform one of the following:
-
Enter other relevant details and click Send.
-
If you use the Mail Merge feature, click Merge & Send.
-
Transaction Print Marks
This feature is only available if you're using the advanced PDF/HTML templates provided by the Advanced Localization Features SuiteApp.
If you print a transaction in a certain status, a short text will be added to the printed PDF (depending on the button or link that you've used to print it). These marks serve to identify and categorize every printed invoice. The following marks are available:
-
None (Original) - Approved transactions printed for the first time (originals) bear no mark.
-
Draft - Mark on all transactions that you're previewing, that is:
-
All transactions are printed whenin the Pending Approval status.
-
Already approved transactions are displayed using the Preview PDF button.
-
-
Duplicate - Mark a transaction that has been already approved and printed (using Print or Print and Email link). Duplicate transactions are intended for information, or reminder purposes only.
-
Copy - Mark a transaction that has been approved and printed using the Print a PDF Copy button. Unlike duplicate transactions, the transaction copies are due for payment. Typically, they are issued if the original printed transaction is lost.
For sales order transaction, only Draft and None (Original) type prints are supported. Therefore, the Print a PDF Copy button will not available.
The following diagram summarizes the transaction printing statuses, actions available for each of them, and marks on printed transactions:
Printing a Transfer Order
You can print a transfer order PDF from a transfer order record
To Print a Transfer Order
-
Go to Transactions> Inventory> Transfer Orders.
-
Go to an existing transfer order or create a new transfer order.
-
Enter the required information and click Save.
-
On the saved transfer order record, click Print Transfer Order. The printed transfer order PDF opens in a new tab of your browser.
The Printing History subtab of transfer order record shows the printing activity details
The following columns are available on the Printing History subtab :
-
Date- Displays the date and time of printing the transaction.
-
Issued By- Displays the name of the user who printed the transaction.
-
Printed PDFs- Displays a link from which you can access and download a copy of the printed PDF files.
The following is a sample of transfer order PDF :

Fields and Placeholders in Transfer Order Template
The transfer order template contains FreeMarker placeholder tags for sourcing and displaying required information as well as setting the layout of the transfer order document when printed. The following information is available when you print transfer order template to PDF or HTML.
Advanced PDF Field Sourcing - Header Fields
|
Field |
Default Label |
Placeholder or value in Default Template |
Description |
|---|---|---|---|
|
Subsidiary Logo |
Logo |
{subsidiary.pagelogo} |
If the account is OneWorld, logo is sourced from the fulfilling subsidiary. |
|
_ |
Transfer Order |
|
The transfer order is hard coded at the top of Advanced PDF. |
|
Date |
Order Date |
{record.trandate} |
Transaction date of the transfer order. |
|
Order# |
Order No. |
{record.tranid} |
Order number of the transfer order. |
|
Address |
Address |
{subsidiary.mainaddress_text} |
Address of the subsidiary. |
|
Phone |
Phone |
{subsidiary.addrphone} |
Phone number of the subsidiary. |
|
Return Email Address |
|
{subsidiary.email} |
Email address of the subsidiary. |
|
VAT Registration No |
VAT Registration No ABN (Australia Country) NABN (New Zealand Country) |
{subsidiary.federalidnumber} |
Tax identification number of the subsidiary. |
Advanced PDF Field Sourcing - Body Fields
|
Field |
Default Label |
Placeholder or Value in Default Template |
Description |
|---|---|---|---|
|
Address: From Location |
Pickup Address |
{location.mainaddress_text} |
Address of the source location. |
|
Address: To Location |
Delivery Address |
{location.mainaddress_text} |
Address of the transfer location. |
|
Ship Date |
Ship Date |
{record.shipdate} |
Shipping date of the transfer order. |
|
Additional Tracking Number |
Tracking # |
{record.trackingnumbers} |
Additional tracking number of the transfer order. |
|
Shipping Method |
Ship Via |
{record.shipmethod} |
Shipping Method. |
|
Item |
Item No. |
{item.item} |
Item number. |
|
Description |
Description of Goods |
{item.description} |
Item description. |
|
Options |
Options |
{item.options} |
Options |
|
Quantity |
Ordered Qty |
{item.itemquantity} |
Number of items ordered. |
|
Units |
Units |
{item.units} |
Units |
|
Inventory Detail |
Inventory Detail |
{item.inventorydetail} |
Inventory details of the item. |
|
Back Ordered |
Back Ordered |
{item.quantitybackordered} |
Quantity of the items back ordered. |
|
Fulfilled |
Ship Qty |
{item.quantityfulfilled} |
Quanity of the items fulfilled. |
Printing an Item Receipt
You can print an item receipt PDF from an item receipt record
To Print an Item Receipt
-
Go to Transactions> Purchases> Receive Orders.
-
Enter the information as required.
-
Click Save to save the information.
-
On the saved item receipt record, click Print Item Receipt. The printed item receipt PDF opens in a new tab of your browser.
The Printing History subtab on the item receipt record shows the printing activity details.
The following columns are available on the Printing History subtab:
-
Date- Displays the date and time of printing the transaction.
-
Issued By- Displays the name of the user who printed the transaction.
-
Printed PDFs- Displays a link from which you can access and download a copy of the printed PDF files.
The following is a sample of item receipt PDF:
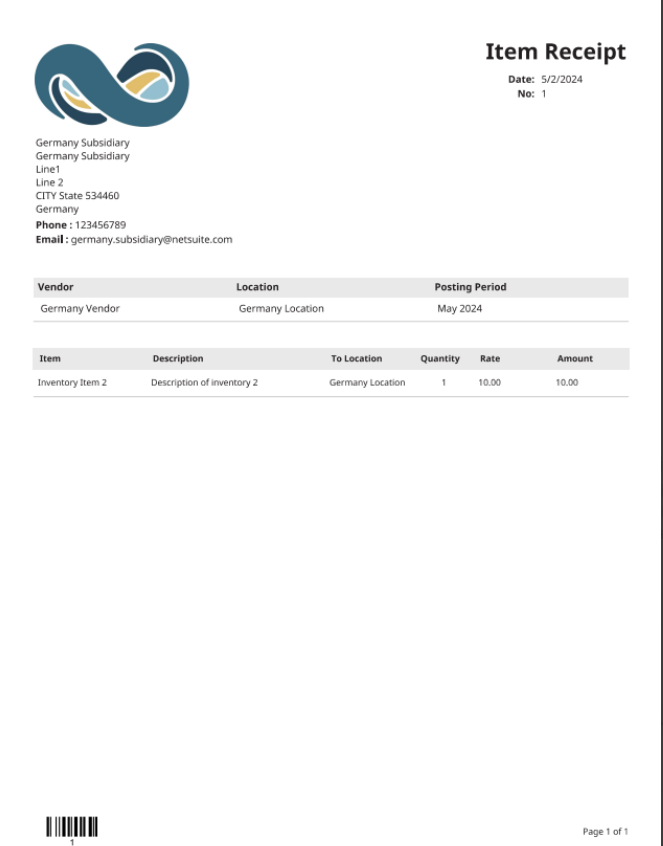
Fields and Placeholders in Item Receipt Template
The item receipt template contains FreeMarker placeholder tags for sourcing and displaying required information as well as setting the layout of the item receipt document when printed. The following information is available when you print item receipt template to PDF or HTML.
Advanced PDF Field Sourcing - Header Fields
|
Field |
Deafult Label |
Placeholder or Value in Default Template |
Description |
|---|---|---|---|
|
Subsidiary Logo |
Logo |
{subsidiary.pagelogo} |
If the account is OneWorld,{subsidiary.logo} is sourced from the fulfilling subsidiary. |
|
|
Item Receipt |
- |
Item receipt is hard coded at the top of Advanced PDF. |
|
Date |
Date |
{record.trandate} |
Transaction date of the item receipt. |
|
Order# |
No. |
{record.tranid} |
Order number of the item receipt. |
|
Address |
Address |
{subsidiary.mainaddress_text} |
Address of the subsidiary. |
|
Phone |
Phone |
{subsidiary.addrphone} |
Phone number of the Subsidiary. |
|
Return Email Address |
|
{subsidiary.email} |
Email address of the subsidiary. |
Advanced PDF Sourcing - Body Fields
|
Field |
Default Label |
Placeholder or Value in Default Template |
Description |
|---|---|---|---|
|
Vendor |
Vendor |
{purchaseorder.entity} |
Name of the Vendor. This is applicable to the item receipt created from purchase order. |
|
Customer |
Customer |
{returnauthorizations.entity} |
Name of the customer. This is applicable to the item receipt created from customer returns. |
|
Location |
Location |
{purchaseorder.location} {returnauthorizations.location} |
Location taken from either purchase order or customer returns. |
|
Posting Period |
Posting Period |
{record.postingperiod} |
Period you want to post this transaction. |
|
From Location |
From Location |
{transferorder.location} |
Source location of the transfer order. This is applicable to the item receipt created from transfer order. |
|
Item |
Item No. |
{item.item} |
Item number. |
|
Description |
Description of Goods |
{item.description} |
Description of the item. |
|
To Location |
To Location |
{item.location} |
Location where the item will be received. |
|
Quantity |
Quantity |
{item.itemquantity} |
Number of Items. |
|
Rate |
Rate |
{item.rate} |
Unit price of the item. |
|
Amount |
Amount |
{item.inventorydetail} |
Price of total units. |
The printout type is always original for transfer order and item receipt prints.
Related Topics
- Advanced Localization Features Overview
- Enabling Required Features for Advanced Localization Features
- Installing the Advanced Localization Features SuiteApp
- Setting Up the Advanced Localization Features Templates
- Roles and Permissions Setup for Advanced Localization Features
- ALF Additional Features and Configuration
- Commercial Invoice
For the transactions that are created before installing the Advanced Localization Features SuiteApp, you must run the ALF MR Copy Print Details - customdeploy_alf_mr_copy_print_details MR script to add the print marks on documents. You must make sure that the printed documents and email transactions have the correct watermarks and the printing history is updated.
To run the ALF MR Copy Print Details MR script:
The MR script takes a few hours to based on the number of the transactions present in the account. You must not stop or halt the script execution until it is successfully completed.
As an alternative to running ALF MR Copy Print Details - customdeploy_alf_mr_copy_print_details, you can edit and save any specific transaction record to add print marks and update printing history. The supported transaction types are invoice, credit memo, sales order, and purchase order.
-
Go to Customization > Scripting > Script Deployments.
-
Click Edit next to the ALF MR Copy Print Details MR script.
-
Select the value of the Concurrency Limit list to 2 or the next available higher value.
-
Click Save & Execute from the Save list.
For the new transactions created after installing the Advanced Localization Features SuiteApp, it is not required to run or perform the MR script.