SuiteScript 2.1 Custom Forms
You can create custom forms using a Suitelet, Portlet, or user event script triggered on the beforeLoad entry point. Buttons, fields (configured or specialized), field groups, tabs and subtabs, sublists, and page links can all be included on a custom form.
When you create a custom form, you can build a custom UI to optimize your NetSuite environment while maintaining the NetSuite look and feel. You have a few options for creating and managing your custom UI. You can use Customization, SuiteScript 2.1 UI Components, or HTML. For more information, see SuiteScript 2.1 Working with UI Objects
Supported Script Types for Custom Form Creation
You can use the following script types to create custom forms:
-
Suitelet: Suitelets offer the most flexibility for creating forms. With Suitelets, you're in control of the data and can process requests and responses directly. For information about Suitelets, see SuiteScript 2.1 Suitelet Script Type.
-
Portlet: Portlets are rendered within dashboard portlets. For information about portlet scripts, see SuiteScript 2.1 Portlet Script Type.
-
Before Load User Event Script: User event scripts are executed on the server when a user performs certain actions on records. Use a before load user event script to customize an existing form when a user edits a record. For information about before load user event scripts, see SuiteScript 2.1 User Event Script Type and beforeLoad(context).
Supported UI Components for Custom Forms
You can use the following elements in your custom forms: buttons, fields (configured or specialized), field groups, tabs and subtabs, sublists, and page links.
Buttons
Buttons can trigger specific actions. The Submit button saves your changes to a record. You can also attach a client script to a form and trigger it with a custom button.
-
For information about adding a custom button to a form, see Form.addButton(options).
-
For information about adding a submit button to a form, see Form.addSubmitButton(options).
Fields
Add a customized field to a form to collect specific information from a user. Use the serverWidget.FieldType enumeration to specify the field type. Most field types have built-in error checking to ensure correct formatting.
-
For information about adding a custom field to a form, see Form.addField(options).
Configuring Fields
After you've added a field, you can customize its position on the form by placing them within a field group, or on a tab or subtab.
-
For information about field positioning and layout, see Positioning Fields on Forms.
-
For information about placing a field on a tab or subtab, see Steps for Adding a Tab to a Form.
You can set various field properties using enum values. Here are some common field properties you can set:
-
Use serverWidget.FieldDisplayType to control how a field is displayed. For example, you can disable, hide, or make fields read-only.
-
Use Field.isMandatory to indicate whether a field is required.
-
For other field configuration properties, see serverWidget.Field.
Specialized Fields
The Secret Key field is a special field that can be used with the N/crypto Module to perform encryption or hashing.
-
For information about using a Secret Key field, see Form.addSecretKeyField(options).
Credential fields are special text fields for storing credentials like passwords, used to invoke third-party services. You can limit access to Credential fields by domain, script, or user. Credential field data is encrypted, not stored in plain text.
-
For information about using a Credential field, see Form.addCredentialField(options).
Field Groups
Use field groups to organize and manage fields on a form. Some of the properties listed in serverWidget.FieldGroup can provide additional field group customization.
-
For details, see Form.addFieldGroup(options).
Tabs and Subtabs
You can add tabs or subtabs to a form to organize large groups of fields so that a user can use the form more easily.
-
For information about adding a tab to a form, see Steps for Adding a Tab to a Form and Form.addTab(options).
Sublists
A sublist is a list of child records that you can add to a parent record form.
-
For information about adding a sublist to a form, see Steps for Adding a Sublist to a Form, and Form.addSublist(options).
Page Links
Page links on form can be either breadcrumb links or crosslinks. Breadcrumb links display a series of links leading to the location of the current page. Crosslinks help with navigation and can include links like Forward, Back, List, Search, and Customize.
-
For more information about page link types, see serverWidget.FormPageLinkType.
-
For more information about adding page links to a form, see Form.addPageLink(options).
Positioning Fields on Forms
You can add field groups to position fields together with other closely related fields on custom forms. Use the properties in serverWidget.FieldGroup to add field groups to forms. You also can use Field.updateLayoutType(options) to define the positioning and placement of fields.
Note that some field group properties, like collapsing and hiding, aren't supported on forms.
The following screenshot shows a single column field group above a double column field group.

Field Layout Type
The serverWidget.FieldLayoutType enumerations contain values used by Field.updateLayoutType(options) to position fields outside of a field group and on the same row.
Use OUTSIDE to position a field outside a field group. You can also use OUTSIDEABOVE and OUTSIDEBELOW to position a field above or below a field group. The following screenshot displays three text fields positioned outside of a field group by setting these Field Layout Type values.

The following code sample illustrates how to set Field Layout values to produce the field placement in the screenshot.
            //Add additional code
...
var outsideAbove = form.addField({
    id: 'outsideabovefield',
    type: serverWidget.FieldType.TEXT,
    label: 'Outside Above Field'
});
outsideAbove.updateLayoutType({
    layoutType: serverWidget.FieldLayoutType.OUTSIDEABOVE
});
...
//Add additional code
You can use the STARTROW, MIDROW, and ENDROW enumerations to position fields together in the same row. For instance, you can group similar fields like first name and last name together. The following screenshot displays three text fields positioned together using these Field Layout Type values.

The following code sample illustrates how to set Field Layout values to produce the field placement in the screenshot.
            //Add additional code
...
 var startRow = form.addField({
    id: 'startrow',
    type: serverWidget.FieldType.TEXT,
    label: 'STARTROW',
    container: 'usergroup'
});

startRow.updateLayoutType({
    layoutType: serverWidget.FieldLayoutType.STARTROW
});

var midRow = form.addField({
    id: 'midrow',
    type: serverWidget.FieldType.TEXT,
    label: 'MIDROW',
    container: 'usergroup'
});

midRow.updateLayoutType({
    layoutType: serverWidget.FieldLayoutType.MIDROW
});

var endRow = form.addField({
    id: 'endrow',
    type: serverWidget.FieldType.TEXT,
    label: 'ENDROW',
    container: 'usergroup'
});

endRow.updateLayoutType({
    layoutType: serverWidget.FieldLayoutType.ENDROW
});

...
//Add additional code
Field Break Type
The serverWidget.FieldBreakType enumeration contains the values set by Field.updateBreakType(options) to define how fields are divided across columns and rows on forms.
-
Use the STARTCOL value to move a field to a new column. The following screenshot shows the difference between the EMAIL field when the break type is set to NONE (top image) and when it is set to STARTCOL (bottom image).
Note:If the
isSingleColumnproperty (for a field group) is set totrue, then breaking columns doesn't apply. In single column mode, column breaks aren't allowed.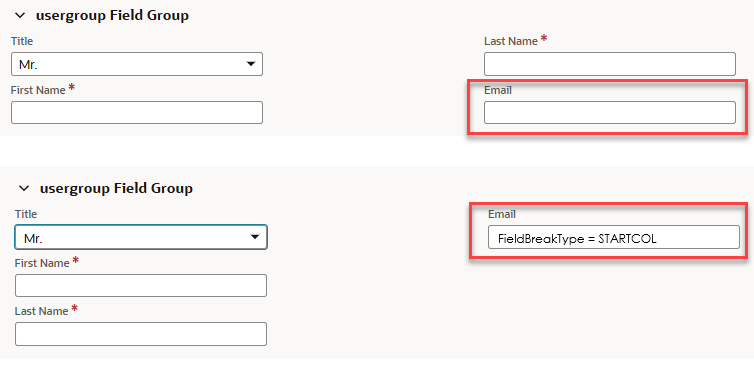
The following code sample illustrates how to set the FieldBreakType values to produce the field placement in the screenshot.
                //Add additional code
...
var email = form.addField({
    id: 'emailfield',
    type: serverWidget.FieldType.EMAIL,
    label: 'Email',
    container: 'usergroup'
});

email.updateBreakType({
    breakType : serverWidget.FieldBreakType.STARTCOL
});
...
//Add additional code
Use the STARTROW value to move a field to a new row. Note that STARTROW only works on fields outside of a field group. By default, NONE is used, which doesn't move a field to a new row. For information about how to position a field outside of a field group, see serverWidget.FieldLayoutType and Field.updateLayoutType(options).
The following screenshot shows the difference between a field with a break type set to STARTROW and STARTCOL.
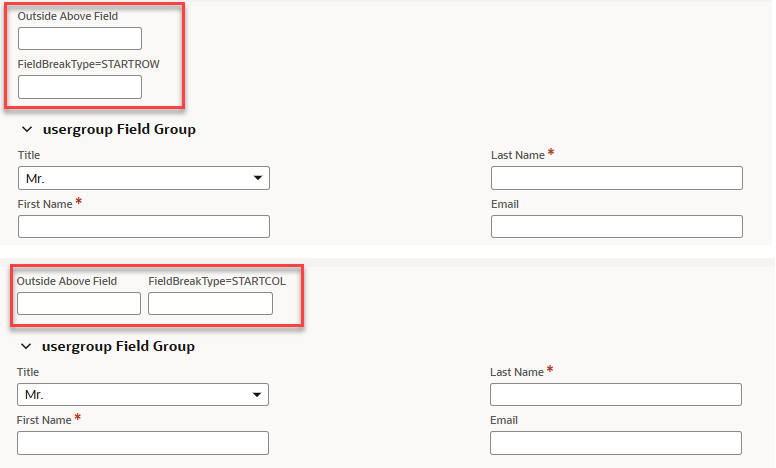
The following code sample illustrates how to set the FieldBreakType to STARTROW to produce the field placement in the screenshot.
                //Add additional code
... outsideAbove = form.addField({
    id: 'outsideabovefield',
    type: serverWidget.FieldType.TEXT,
    label: 'OUTSIDEABOVE'
});

outsideAbove.updateLayoutType({
    layoutType: serverWidget.FieldLayoutType.OUTSIDEABOVE
});

outsideAbove.updateBreakType({
    breakType: serverWidget.FieldBreakType.STARTROW
});
...
//Add additional code