Creating an Export or Import Shortcut
You can create Integration Manager shortcuts for each record import or export you want to run on a regular basis without having to launch the Integration Manager application. Each Integration Manager shortcut you create captures the field mapping, filter, format and other settings you configured for a specific export or import and for a specific record type. You can configure each Integration Manager shortcut to send email messages to report errors, regular status notifications or both.
To create an Export or Import shortcut:
-
In Integration Manager, locate the row corresponding to the record type and the direction required from the table listing the record types available for import
 from and export
  to a CSV file.
 -
Set up the export or import.
-
Set up the field mapping for the export or import - See Mapping SuiteProjects Pro Fields to CSV Columns.
-
Set up Filtering options - See Filtering SuiteProjects Pro Records for Export.
-
Set up Formatting options - See Formatting Information for Export and Import.
-
Set up Accounting settings - See Grouping and Summarizing Record Data and Adding Balancing Entries for Export.
-
-
Do one of the following:
-
Click to select the row, then go to File > Create Shortcut.
-
Right-click the row, then click Create Shortcut from the context menu.
A files selection window appears.
-
-
Select a location, enter a filename for the shortcut then click Save. The default shortcut location is your desktop.
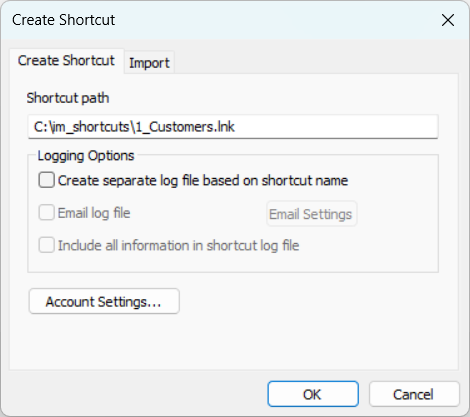
The Create Shortcut window appears. The Shortcut path is sourced from the location you selected and the filename you entered.
Note:You should create a folder for your Integration Manager shortcut. You can save your export and import CSV files in the same folder.

-
Accept the default shortcut location or change it.
-
You should check the Create separate log file based on shortcut name box. This will create a separate log file for this shortcut and name the log file based on the shortcut filename. The log file may be useful to troubleshoot any issues with your export or import.
The following settings become available:
-
To send the export or import status notification and log by email, do the following:
-
Check the Email log to a specified address box.
-
Click Email Settings.
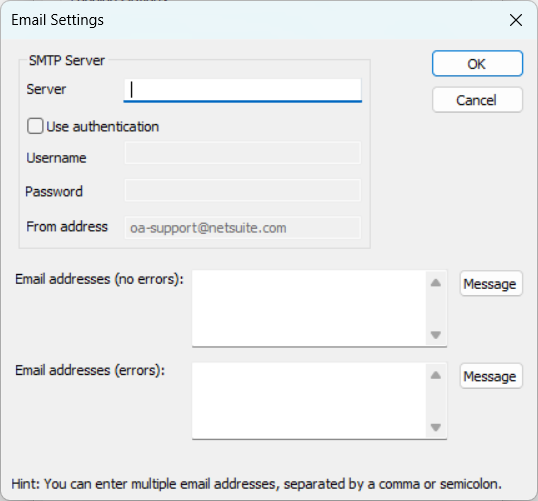
The Email Settings window appears.

-
Enter the Server. This is the name of your outgoing SMTP email server.
-
Check the Use authentication box for, then enter your Username and Password, if required.
-
Enter the Email addresses you want to send the status notification email and log to when the export or import completes with no errors. You can enter several email addresses separated by a semicolon (
;) or comma (,). -
(Optional) Click Message, enter the message body text for email sent when the export or import completes with no errors, then click OK.
-
Enter the Email addresses you want to send the status notification email and log to when the export or import completes with errors.
-
(Optional) Click Message, enter the message body text for email sent when the export or import completes with errors, then click OK.
-
-
Check the Include all information to shortcut log file box.
-
-
To enter SuiteProjects Pro sign-in details specific for this shortcut, click Account Settings.
The Account Settings window appears. The account settings are sourced from the settings entered in Options > Account Settings. See Connecting Integration Manager with your SuiteProjects Pro Account.
Enter new sign-in details if necessary. In most cases, you would use the same SuiteProjects Pro sign-in details for your shortcuts and for the Integration Manager application.
-
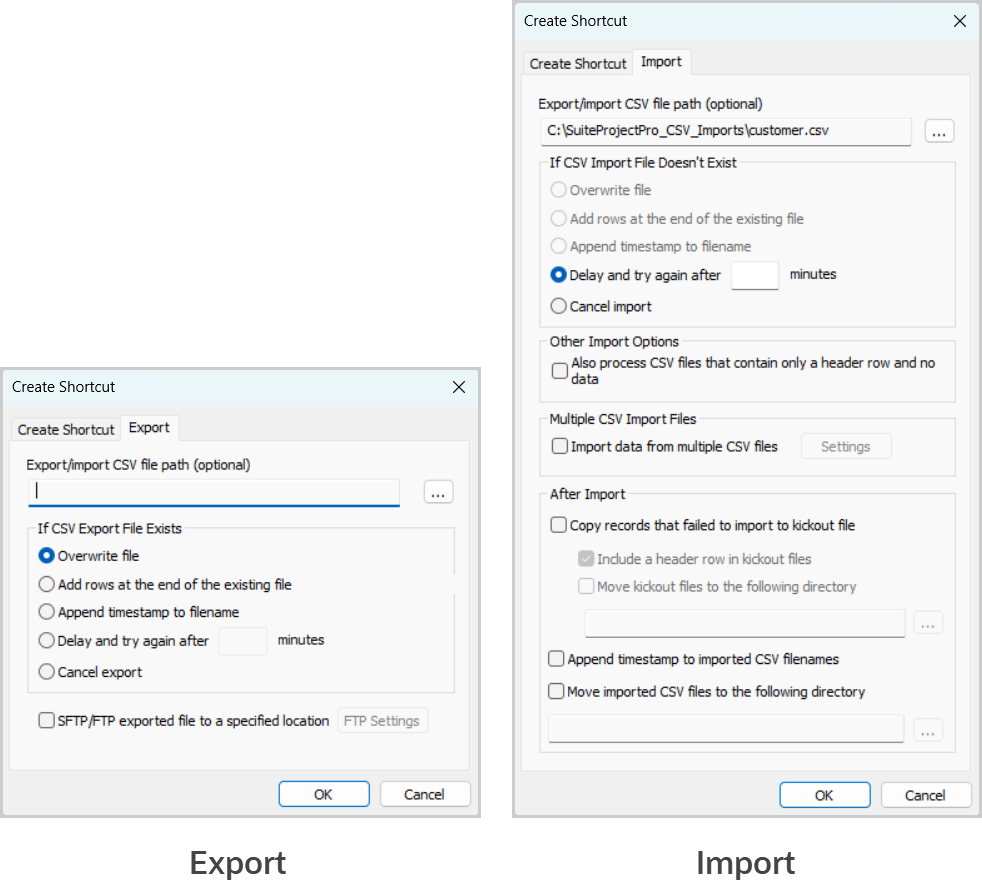
Click the Import or Export tab.

-
Under Export/Import CSV file path (optional), click the Select button
 and select the CSV file you want to export information to or import information from. If you do not select a file, Integration Manager will prompt you to select a file each time you run the shortcut. For imports, the file you select must exist when you run the shortcut and be in the correct format. When importing information from multiple CSV files, select the path to a directory containing files with filenames matching the pattern you specify. See below.
 -
Choose the action Integration Manager should take when the selected file exists (Export) or does not exist (Import). The following options are available:
-
(Export only) Overwrite - Replace the content of the file with the exported information. Previous file content will be lost; it will not be possible to recover it.
-
(Export only) Add rows at the end of the existing file - The exported information is added at the end of the previous file content.
-
(Export only) Append timestamp to filename - Creates a new CSV file with a timestamp at the end of the filename.
-
Delay and try again after … minutes - When choosing this option, enter the retry delay time in minutes.
-
Cancel export / Cancel import - Cancel the export or import.
Note:On import, it is typically best to choose Cancel import and stop trying to process the import if the CSV file does not exist. If you schedule an import shortcut to run automatically and the import is dependent on other automatic process to generate the import CSV file, you should select Delay and try again after.
On export, you should choose Append timestamp to filename to keep a track of each export.
-
-
(Export Only) To transfer the exported CSV file to a remote server, check the SFTP/FTP exported file to a specified location box, then click Settings and enter the FTP server details in the FTP Settings window.
-
(Import only) If you want to schedule the shortcut to run automatically, you should check the Also process CSV files that contain only a header row and no data box. This ensures that the import will be successful even if the CSV file contains no data.
-
(Import only) To import information from multiple files, check the Import data from multiple files, click Settings and enter the name pattern for files to import. You can use the wild card character
*to match any number of characters. All files must be in the directory you selected under Export/Import CSV file path (optional).If you want to schedule the shortcut to run automatically, this option lets you import information from more than one CSV file generated by the source system since your last import.
-
(Import only) You should check the Copy records that failed to import to kickout file box. The kickout file contains a row for each record that could not be imported with all the information in the original import CSV file, and an additional column with the error code and description. You can review the kickout file and resolve any error before you try to import again. For more information, see Import Kickout files.
-
Clear the Include a header row in kickout file box, if you do not want the kickout file to include a header. The box is checked by default.
-
You should check the Move kickout files to the following directory box and create a folder for kickout files within your shortcut folder for better organization.
-
-
(Import only) To append a timestamp to the name of the CSV file after importing information from that file, check the Append timestamp to imported CSV filename box. If your integration does not use external ID values to avoid the creation of duplicate records on import, you should check either or both this box and the Move import file to the following directory box. This prevents the import CSV file from being imported a second time by renaming it and moving it to a different folder.
-
(Import only) To move the CSV file to a directory after importing information from that file, check the Move import file to the following directory box, then select the directory.
-
Click OK.
A window appears and shows some basic information about the shortcut you created.
-
Click OK.
The shortcut is added to the location you selected. You can double click the shortcut to launch the export or import process you configured.
The
C:\Im_shortcuts\folder on your computer contains a copy of the shortcut file as well as the folder holding the shortcut application.
Import Kickout files
You can configure your import shortcuts to create a kickout file automatically when creating or editing an import shortcut. The kickout CSV file contains a row for each record that could not be imported with all the information in the original import CSV file, and an additional column with the error code and description at the end of the row. This additional information can be useful to resolve import errors.
To do so, when creating or editing an import shortcut, do the following:
-
On the Create Shortcut window, Import tab, check the Copy records that failed to import to kickout file box.
-
By default, the kickout file includes a header row at the top. Clear the Include a header row in kickout file box, if you do not want the kickout file to include a header.
-
You should check the Move kickout files to the following directory box and create a folder for kickout files within your shortcut folder for better organization.
For more information about creating or editing an import shortcut, see Creating an Export or Import Shortcut and Editing Integration Manager Shortcuts.
After you have resolved the errors, you can import the kickout CSV file to complete the import. If the kickout CSV file still contains errors, a second kickout file is created during the import of the first kickout file.
Do not modify the error column of the kickout file as this may cause import errors.
Sample kickout file showing a header and error column
            id;nickname;first;last;country;role_id;IM Import Errors
123456789;jadmin;John;Admin;CANADA;3;Import Error:Record #2 for OA type User failed to import. Error Code: 601, Error Description: Invalid ID. There isn't a record matching the ID or code you asked for..
555555555;mcollins;Marc;Collins;USA;3;Import Error:Record #6 for OA type User failed to import. Error Code: 818, Error Description: Duplicate User nickname.