Grouping and Summarizing Record Data and Adding Balancing Entries for Export
When exporting certain types of records SuiteProjects Pro to a text CSV file, you can set up Integration Manager to:
-
Group and summarize your record data. If you are exporting receipts, for example, you can group receipts by project,expense report and expense item, and select the summable fields to include for each summary group. The resulting CSV file will include only summary group rows, with one summary group row for all receipts for the same expense item against the same project in the same expense report, with subtotals of values under the selected columns for each summary row.
-
Add account balancing and secondary balancing entries to your exported record data for each transaction or for each summary group.
The grouping, summarizing and balancing entry functionality is available when exporting one of the following record types:
-
Receipt
-
Revenue Recognition Transactions (Rev. Recogn. Trans.)
-
TimeBill (charge, slip, or bill)
-
Timesheet entry
-
Slip projection
The grouping and summarizing functionality and the balancing entry functionality are often used together when exporting transactions with a container and detail line relationship. They can also be used independently.
The Grouping and Balancing Entries settings restrict the Field Mapping functionality. Only the standard fields selected for inclusion in Grouping and Balancing Entries are available for mapping.
To group and summarize record data and add balancing entries for export:
-
In Integration Manager, locate the row corresponding to the SuiteProjects Pro record type available for export
 to a CSV file.
Remember that the grouping, summarizing and balancing entry functionality is available only when exporting one of the following record types:
-
Receipt
-
Revenue Recognition Transactions (Rev. Recogn. Trans.)
-
TimeBill (charge, slip, or bill)
-
Timesheet entry
-
Slip projection
-
-
Do one of the following:
-
Click to select the row, then go to Options > Grouping and Balancing Entries.
-
Right-click the row, then click Grouping and Balancing Entries from the context menu.
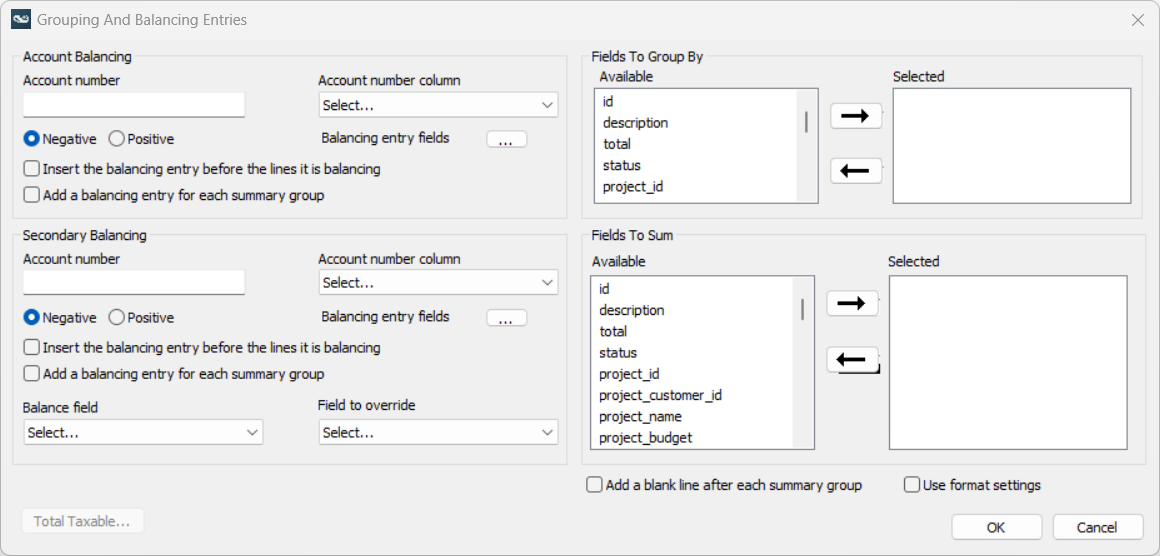
The Grouping and Balancing Entries window appears.

-
-
Set up summary groups and subtotals for export.
-
(Optional) Under Fields To Group By, select the fields you want to group your record data by in the Available column and click the arrow pointing right. The resulting export file will include one summary row for all transactions that have the same values for all fields in the Selected column.
-
Under Fields to Sum, select the summable (monetary or quantity) fields you want to include as subtotals in the Available column and click the arrow pointing right. the selected fields. Integration Manager calculates the sum of values under each field in the Selected column for all the records in the summary group. The resulting export file will include these subtotals on each summary row.
Note:If you do not select any fields under Fields To Group By
-
-
(Optional) Add account balancing entries. The account balancing entries include a balancing amount for each of the selected Fields to Sum and additional balancing entry fields you may select from Fields To Group By, if applicable.
-
Enter the Account number you want to appear on every balancing entry in your CSV export file. If you are adding balancing lines as part of an Account Receivable (A/R) export, this may be an A/R account number.
Important:Balancing entries are added only if Account number is not empty. You must enter a value if you want Integration Manager to add a balancing entry, even if you do not need a fixed account number value to appear on each balancing line.
-
Select the Account number column. The Account number value will appear under the selected column on balancing lines if it is one of the selected Balancing entry fields.
-
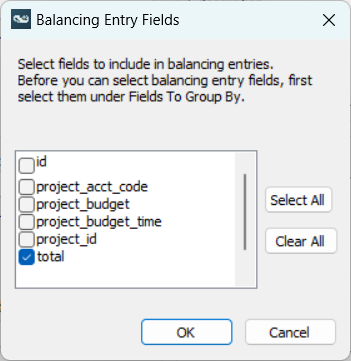
Under Balancing entry fields, select the additional fields to include on balancing lines. To do so, click the Select button
 then check the boxes for each field you want to include in the balancing entry and click OK. You can select any of the Fields To Group By selected in step 3.
-
Choose whether the balancing entry should have Negative or Positive balancing amounts. The balancing line always creates a balancing value for the total field in the record being exported. To create a balancing value for other fields, see Secondary Balancing (step 2).
-
Check the Insert the balancing entry before the lines it is balancing box if you want balancing entries to be inserted before transactions or summary rows in the CSV export file. The balancing entries are inserted after transactions or summary rows otherwise.
-
If you are not using summary groups (you have not selected Fields To Group By):
-
Check the Add a balancing entry for each summary group box to add only one balancing line covering all the transactions in the CSV export file.
-
Clear the Add a balancing entry for each summary group box to add one balancing line for each transaction container if applicable (one balancing line per invoice for a timebill export, one balancing line per envelope for receipt export, or one balancing line per timesheet for timesheet entry export).
Note:If you are using summary groups (you have selected Fields To Group By), a balancing entry is added for each summary row whether the Add a balancing entry for each summary group is checked or not.
-
-
-
(Optional) Add secondary balancing entries. The secondary balancing entries include the amount for the selected Balance field under the Field to override column and additional balancing entry fields you may select from Fields To Group By, if applicable.
-
Follow the same steps as for the account balancing entries.
-
Select a Balance field. This the only balancing amount on secondary balancing lines. You can select any of the selected Fields to Sum.
-
Select a Field to override. This the column under which the balancing amount will be inserted for secondary balancing lines.
-
-
If you are exporting TimeBill records, you can select which columns in the output record contain the total taxable amount and total non-taxable amount for each record. To do so, click the Total Taxable button and select the relevant fields in the Total Taxable window.
-
To ensure that date and time fields in the CSV export file follow the date and time format option, check the Use format settings box. For more information about format options, see Setting the Date and Time Format Used in the CSV File.
-
Check the Add a blank line after each summary group box to an empty line after each summary group.
-
Click OK.