Integration Manager General Settings and Menu Options
To launch Integration Manager, do one of the following:
-
Click the Integration Manager shortcut on your computer desktop. The desktop shortcut is added by default during installation unless you opt out.

-
Go to the Windows Start menu, search for "SuiteProjects Pro Integration Manager" and double click the matching application.
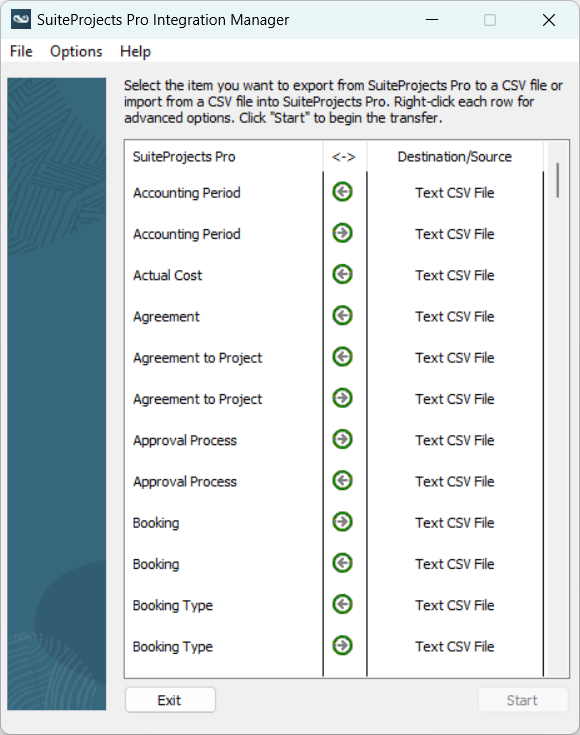
The main Integration Manager window includes a top menu bar and a table listing the record types available for import ![]() from and export
from and export ![]() to a CSV file.
to a CSV file.

Click the menu headers to view the available menu options:
-
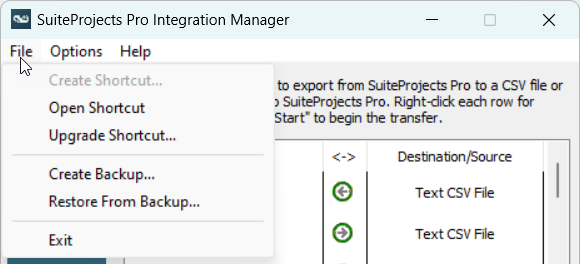
File - The File menu includes the following options:
-
Create Shortcut, Open Shortcut, or Upgrade Shortcut- You can use shortcuts to run specific imports and exports manually without launching the Integration Manager application, or to schedule imports and exports to run automatically. You should upgrade all your Integration Manager shortcuts after you update the Integration Manager application to a new version. See Working with Export and Import Shortcuts.
-
Create Backup or Restore From Backup - You can back up your Integration Manager settings, and restore your application settings from this backup when required. See Backing Up Your Integration Manager Settings and Shortcuts and Restoring Your Integration Manager Settings and Shortcuts from the Backup.
The backup is stored on a SuiteProjects Pro server to ensure availability. The backup may be useful if you want to transfer shortcuts and other settings to a different computer or environment without having to recreate all the field mapping and logic. See Transferring Integration Manager Shortcuts to a Different Computer or Environment.
-
Exit - Click Exit to close the Integration Manager application.

-
-
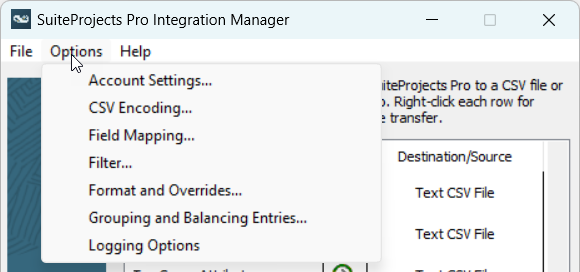
Options - The Options menu includes the following options:
-
Account Settings - You must enter your SuiteProjects Pro sign-in details to connect Integration Manager with your SuiteProjects Pro account. See Connecting Integration Manager with your SuiteProjects Pro Account.
-
CSV Encoding - If you are using Integration Manager 6.6 or later version, you can choose the character encoding scheme used for the CSV file you export to or import from. See CSV Character Encoding.
-
Field Mapping - Integration Manager lets you map the SuiteProjects Pro fields for each supported record type to columns in the CSV file you export information to or import information from. You can set the name and order of columns in the CSV file, combine multiple SuiteProjects Pro fields into a single CSV column (export) or multiple CSV columns into a single SuiteProjects Pro field (import), split a CSV column into multiple SuiteProjects Pro fields (import), or include additional information such as custom fields or calculated fields. This option is unavailable and appears in gray color unless you select a record type for export or import. For more information, see Mapping SuiteProjects Pro Fields to CSV Columns.
-
Filter - You can set up Integration Manager to export only those SuiteProjects Pro records matching specific filter conditions. This option is unavailable and appears in gray color unless you select a record type for export. For more information, see Filtering SuiteProjects Pro Records for Export.
-
Format and Overrides - You can change the format of some of the information you export or import automatically. You can set the date and time format, or set a conditional override. When exporting information from SuiteProjects Pro to a CSV file, you can also set a maximum field length and the range of acceptable numerical values. This option is unavailable and appears in gray color unless you select a record type for export or import. For more information, see Formatting Information for Export and Import.
-
Grouping and Balancing Entries - When you export Receipt, Revenue recognition transaction, TimeBill (charge, slip, or bill), Timesheet entry, or Slip projection records from SuiteProjects Pro to a CSV file, you can perform account balancing and secondary balancing on the records you are exporting. You can also summarize the information for export, and choose the fields to sum and the combination fields for which you want subtotals. This option is unavailable and appears in gray color unless you select one of the record types listed above for export. For more information, see Grouping and Summarizing Record Data and Adding Balancing Entries for Export.
-
Logging Options - Integration Manager always adds a log entry when an error occurs. By default, it also adds a log entry with information about each action performed. You can set logging options so that the log only records errors.
The log file is located in the
AppDatafolder for the Windows user -C:\Users\<Username>\AppData\Roaming\SuiteProjectsPro\Integration Manager\SuiteProjectsProManager.log. To view the log, go to Help > Display log.

-
-
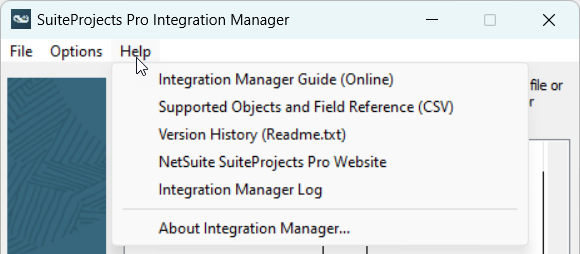
Help - The Help menu includes the following options:
-
Integration Manager Guide (online) - Click to view the latest version of the Integration Manager PDF Guide in your default browser.
-
Supported Object and Field Reference (CSV) - Click to view the list of objects and fields available for export from and import into SuiteProjects Pro (CSV file) in your default application for CSV files. See also Records and Fields Reference.
-
Version History (Readme.txt) - Click to view the
readme.txtfile in your default text editor. The file content includes a version history with a summary of features introduced with each version. -
NetSuite SuiteProjects Pro Website - Click to go to the SuiteProjects Pro sign-in page (https://auth.netsuitesuiteprojectspro.com/login) in your default browser.
-
Integration Manager Log - Click to view the Integration Manager log in your default text editor. It lists actions on specific dates and times. When contacting SuiteProjects Pro Support to report an issue with Integration Manager, it is helpful to attach the log file. See also Troubleshooting.
-
About Integration Manager - Click to view version information.

Selecting and right-clicking a record type for import or export shows a context menu with the following menu options: Create Shortcut, Field Mapping, Filter, Format and Overrides, and Grouping and Balancing Entries. Some options may be unavailable and appear in gray color depending on the context (record type and transfer direction).
