|
|
WebLogic Server 10.0 MP1 Virtual Edition v1.2 (WLS-VE) enables WebLogic Server 10.0 MP1 (WLS) to run in LiquidVM-based computing environments. For this release, WLS-VE is available only as a distribution archive and does not include a BEA product installer mechanism. See Obtaining the WLS-VE Software.
Unlike previous releases of WLS-VE 9.2, WLS-VE 10 v1.2 does not include WebLogic Server or the WebLogic Domain Configuration Wizard to create new virtual domains. Instead, WLS-VE enables you to convert physical WLS 10.0 MP1-based domains hosted on traditional operating systems (OSes) into virtual domains that can be hosted on LiquidVMs in hypervisor environments.
The WLS-VE 10 v1.2 distribution archive includes the following components:
| Note: | In many cases, additional steps are required to complete the transformation of physical WebLogic domains into virtual domains. |
wlsve1001.iso—Contains an ISO image for WLS 10.0 MP1 that includes the WLS classes and LiquidVM executables used to run WLS-VE and the applications on the hypervisor host.WLS-VE configuration and management procedures are documented in the WLS-VE Configuration and User Guide, which provides details for configuring, using, and administering WLS-VE domains.
The following sections describe the features of WLS-VE:
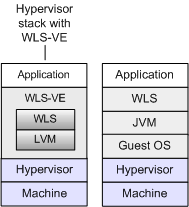
WLS-VE combines WLS 10.0 MP1, with LiquidVM 1.2, a Java Virtual Machine (JVM) that works with hypervisor software and provides only the set of OS features that WLS needs to offer its full range of services. Because hypervisor software recognizes LiquidVM as a guest OS, WLS-VE offers life-cycle control and monitoring features that are unavailable with other application servers.
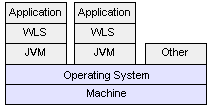
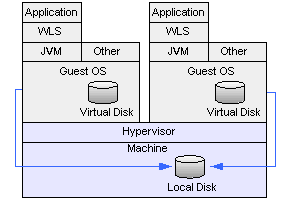
In addition, WLS-VE removes layers of the software stack (see Figure 1-1), which reduces the number of software installations to license, patch, and monitor. This also makes it possible to avoid some of the performance degradation that is common in virtualized data centers.
Before using WLS-VE, you should familiarize yourself with the basic concepts of LiquidVM provided in Understanding LiquidVM in the WLS-VE Configuration and User Guide.
While application servers can consume large amounts of computing resources, even full-featured Java Platform, Enterprise Edition (Java EE) application servers such as WLS use only a subset of the services that a standard OS provides.
For example, while a standard OS typically provides a user interface (either a graphical user interface or a command-line interface), Java EE application servers do not need such services. Instead, application servers rely on the OS mostly for networking and file-system services, and they rely on the JVM for most other services, such as translating Java code into hardware-specific instructions, managing memory, and scheduling threads.
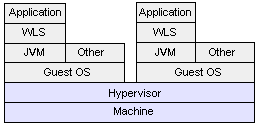
In a virtualized software stack, the responsibilities of the JVM and OS are unchanged, but an additional layer of software—the hypervisor—resides between the OS and the hardware. The hypervisor coordinates low-level calls from multiple OSes that are running on a single physical machine. To fill its coordinating role, the hypervisor provides hardware-specific device drivers and other hardware-specific services.
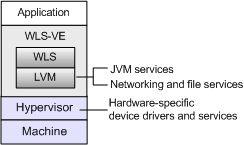
LiquidVM provides the JVM services and operating-system services that WLS needs to offer its full set of services, and it relies on hypervisor software to provide hardware-specific device drivers and other hardware-specific services (see Figure 1-2).
WLS-VE offers the following advantages over running WLS in a Windows or UNIX-based guest OS within a virtualized environment:
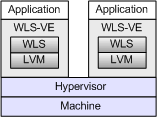
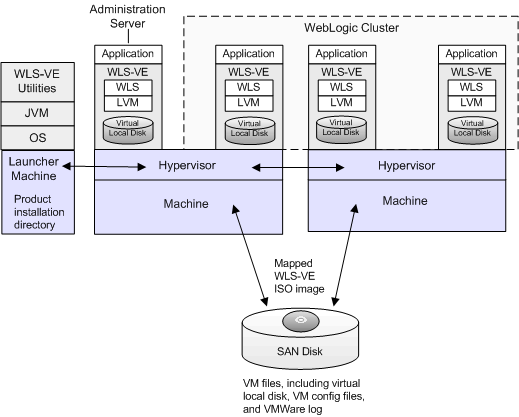
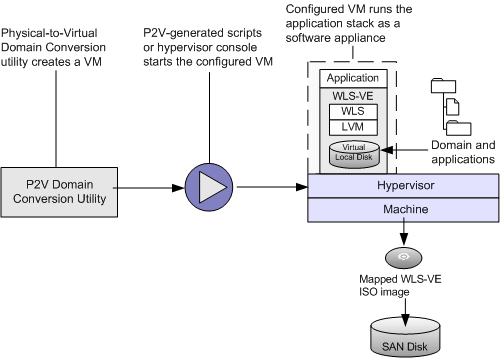
In a virtualized environment, a software appliance is a pre-configured software stack that the hypervisor can start, stop, hibernate, and resume. Some software vendors package software appliances as a single file. WLS-VE includes utilities that enable you to manage a WLS-VE application stack as a software appliance, even though your application and WLS-VE are packaged as a collection of files (see Figure 1-3).
To configure your WLS-VE-hosted application to run as a software appliance, you create a WLS domain and deploy your applications onto the WebLogic Managed Servers in the domain. Then you use the P2V Domain Conversion utility to convert the physical WLS domain (or selected servers in the domain) to WLS-VE instances in the hypervisor environment. You create one such WLS-VE virtual machine for each Managed Server (and optionally the Administration Server) in a domain.
Because for each WLS-VE virtual machine, the application files are installed in a dedicated local disk for the VM, you can deploy a new version of your application without stopping all your WLS-VE instances and without interrupting your application’s clients. (See Deploying Applications to WebLogic Server in Deploying Applications to WebLogic Server.)
In addition, WLS patches can be installed on each WLS-VE virtual machine separately without shutting down the entire domain or cluster (see WebLogic Server Rolling Upgrade in Upgrading WebLogic Application Environments).
Applications that never or only occasionally experience performance barriers due to lack of CPU, memory, or networking resources are good candidates for running in a virtual environment and are therefore good candidates for WLS-VE. For these applications, deploying and serving from WLS-VE is indistinguishable from standard WLS.
Applications that frequently experience performance barriers due to lack of CPU, memory, or networking resources usually require dedicated hardware resources and so are not good candidates for running in a virtual environment or on WLS-VE. See Determining Appropriate Applications for WLS-VE.
WLS-VE delivers the same high-availability, security, and deployment features of WLS that are required for production environments, and its support for virtual environments enables you to maximize the use of the computing resources in your data center.
In a testing (QA) environment, WLS-VE simplifies the process of configuring machines or entire collections of machines for running tests. Using a single script, QA engineers can instantiate an entire WLS domain running on machines with pre-configured amounts of memory, CPU, and network resources. When the tests have completed, another script can reconfigure the same physical machines for additional tests that use different amounts of computing resources.
Note the following limitations when using WLS-VE:
The WLS-VE distribution archive does not include WLS 10.0 MP1, WebLogic Workshop, or the WLS samples.
System.exec from your WLS.| Tip: | BEA’s WebLogic Operations Control (WLOC) and VMware’s VI Client provides similar Node Manager functionality to suspend or resume virtual servers and perform virtual machine migration. For more information, see the WLOC 1.0 documentation and Working with WLS-VE Using the VMware VI Client in the WLS-VE Configuration and User Guide. |
Table 1-1 compares how managed servers are distributed on hardware with WLS and WLS-VE.
Table 1-2 compares the location of file storage for WLS and WLS-VE.
Table 1-3 compares life-cycle control options for WLS and WLS-VE.
This section describes some aspects you should consider in planning your WLS-VE installation.
Before planning any WLS-VE version implementation, you must verify that your environment has a supported configuration of hardware, operating system, application server, and database. See the BEA Products Supported Configurations documentation.
| Note: | LiquidVM itself is a 32-bit VM (meaning that it cannot use more than 4GB of memory). |
For most applications, deploying and serving from WLS-VE is indistinguishable from WLS; that is, WLS-VE is no more CPU-intensive, memory-intensive, or network-intensive than WLS. On the other hand, certain applications will not perform as well in a virtualized environment as in a non-virtualized one. Consider the following factors in deciding whether using WLS-VE is appropriate for your applications:
System.exec from your WLS domain.Installing and using WLS-VE involves multiple machines. It is important to understand the roles and requirements of each.
For more detailed information, see Configuration Overview and Roadmap in the WLS-VE Configuration and User Guide.
WLS-VE provides a virtual local disk for each virtual machine, which removes the dependence on NFS and provides faster and more secure file transfers. The virtual local disk can reside on the ESX host’s local disk, or on a SAN or NAS attached to the ESX server.
However, if you prefer to use an NFS file server as the location for the BEA Home directory, refer to the Creating and Sharing Directories section in the WLS-VE v1.0 Installation and Configuration Guide.
| Note: | When using NFS, applications that use file stores extensively (or that frequently write files directly to the file system) could experience some performance degradation if you use a NFS file server for reading and writing files. Generally, input and output with a local disk is faster than with a file server. |
Because of the importance of non-local storage to WLS-VE, there are some critical questions you need to address before you can successfully run WLS-VE:
This section describes WLS-VE’s requirements for storage and offers ideas for successfully implementing these solutions.
What LVM sees as a local disk is actually implemented by VMware ESX as a large file. To the virtual machine (LiquidVM), however, the virtual local disk looks like a normal physical disk drive and, therefore, it performs the corresponding I/O instructions necessary to write to a physical disk drive. VMware detects these I/O instructions and transforms them into corresponding writes to the large file. Since the representation of the virtual disk is a file, writes to this file will eventually be stored somewhere on the physical storage. The location of this storage is under the control of the VMware administrator. Similar to a typical OS case, the administrator has three choices: the ESX machine’s physical hard disk, a disk-partition on a SAN (best practice), or a large file on a NAS.
Due to its virtualized nature, the storage requirements for WLS-VE somewhat differ from those you need to address for a non-virtualized WLS. The basic requirement is accessibility of storage locations: for some of its data storage activities, WLS-VE requires exclusive access, while for other activities, it assumes that other processes might access the data (as in a standard file system).
WLS-VE requires exclusive access to a storage system for the following activities:
| Note: | Because the ISO image is read-only, it can be stored on a SAN disk allowing multiple machines to have simultaneous access to the same ISO image without violating its exclusivity. See WLS-VE ISO Image Considerations. |
To store its exclusive data, WLS-VE needs to use the virtual disk that is made available by the hypervisor layer. Generally, a SAN implementation is optimal for WLS-VE because it usually performs at a higher level than a NAS due to NAS requiring a higher protocol overhead than a SAN. Moreover, it is more expensive to reference a file somewhere in a NAS’s potentially deep directory structure than it is to just access a certain block on a certain disk partition, as a SAN stores data. Finally, a SAN requires less state on the storage side than a NAS does.
Optionally, you can use the NFS client in LiquidVM to mount a NFS share for files that require or expect shared access. For example:
LiquidVM can access only (virtual) disk drives and (virtual) network cards, which are configured by the LiquidVM launcher when creating a WLS-VE instance.
| Note: | If you are using an NFS share, the communication between the NFS client and the NFS server is not secure. The NFS client authenticates itself to the NFS server by using user-provided credentials, but this traffic is not encrypted, which makes it vulnerable to security breaches. Please refer to NFS Security Measures section in the WLS-VE v1.0 Installation and Configuration Guide for details on how to work around this situation. |
BEA recommends that you store the WLS-VE ISO image on a SAN. The ISO image is a file in ESX storage and appears as a CD drive to LiquidVM. It also differs from normal local disks because it is read-only. This implies that no one can modify it; therefore, multiple machines can have simultaneous access to the same ISO image without violating its exclusivity, and thereby reducing disk footprint.
How much system capacity to plan for is greatly dependent on the applications you are running on WLS-VE. This section provides information that can help you make decisions about your minimal capacity requirements as they apply to WLS-VE. However, you will need to factor in the needs of your application to fully determine the appropriate amount of disk space, number of machines, and physical memory allocation.
The amount of physical disk space that you need to configure on the ESX server depends upon the size of your application and the amount of data you anticipate processing. At a minimum, you need to provide enough disk space for writing images when hibernating an instance of WLS-VE, which is generally an amount equal to your Java heap plus some native memory (for a large application, 300MB should be a reasonable amount of native memory, but the amount of memory you should reserve is highly workload dependent). In addition, you also need to plan for database requirements and other storage needs.
In addition, LiquidVM provides a virtual local disk for each virtual machine. The virtual local disk can reside on ESX host’s local disk, or on a SAN or NAS attached to the ESX server. You specify the size of the disk by passing the diskSize parameter as a startup option to the LiquidVM launcher. By default, the size of the local disk is specified as 1 GB (1024). To determine the amount of physical storage capacity, BEA recommends that you refer to the
VMware Infrastructure Documentation. For instructions about specifying the local disk size, see
Using the Virtual Disk in the WLS-VE Configuration and User Guide.
How much data the domain needs is application-dependent. Before taking a server into production you should check the size of the domain in a development environment and make sure you have at least that much space left on the production server. Normally, the storage space requirements for most applications running on top of WLS are modest. The storage requirements for the domain are identical for standard WLS and WLS-VE.
When determining how many physical cores your implementation, BEA strongly recommends that you refer to the VMware Infrastructure Documentation.
Much like disk space requirements, physical memory requirements depend significantly on the applications you are running on the machine. Because WLS-VE is available only as a 32-bit application, the maximum amount of physical memory available to the virtual machine is 4 GB. Ideally, you should plan to allow enough heap space to run your application, without making it resort to swapping or paging during processing, plus some additional memory for native application code and generated Java code. If you do not allow enough space for Java to run, you will quickly encounter out of memory exceptions and system failure.
While the combinations of hardware and software in data center environments can vary widely to support different business needs, BEA recommends the following general principles for the network topology of your production environments:
Configuring web servers and load balancers for WLS-VE is no different from WLS—when you configure a virtual machine, you assign it an IP address. Then you configure the web server and load balancer to listen for the IP addresses that you have assigned to the VMs in your cluster.
Configuration procedures are documented in the WLS-VE Configuration and User Guide, which provides details for using, administering, and troubleshooting WLS-VE.
For this release, WLS-VE is only available as distribution archive and does not include a BEA product installer mechanism.
You can download the WLS-VE distribution archive from the BEA web site.
For more information on configuring, using, and administering WLS-VE, refer to the following documentation:


|