


|
|
The following sections provide an overview of a sample WebLogic Server Virtual-Edition (WLS-VE) configuration, describe the main components in the configuration, and summarize the main tasks required to successfully install and configure WLS-VE:
To successfully configure and use WLS-VE, it is important to understand the overall architecture and components of a WLS-VE configuration. Figure 1-1 provides a sample configuration consisting of two WLS-VE instances in a virtual environment.
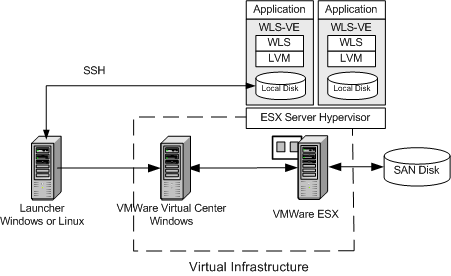
Table 1-1describes the components of the sample WLS-VE configuration.
The following section summarizes the overall process for installing and configuring WLS-VE, depending on whether you are either:
The procedures for downloading and unpacking the WLS-VE distribution archive are documented in Accessing and Using the WLS-VE Distribution Archive. Subsequent sections of this document provide details for configuring and using WLS-VE.
Table 1-2 describes that main steps required to convert an existing WLS 10.0 MP1 domain to a corresponding virtual domain on the VMware ESX machine.
|
|||
The P2V utility does not handle out-of-domain dependencies, such as referenced libraries, nor does it modify the domain configuration file (
config.xml) or any other files under the domain directory. Therefore, any path references that are valid only for the local physical machine must be modified with respect to the LVM file system path. Also, if server instances in the domain use the ListenAddress attribute, the address must be removed for that server to be virtualized.
|
|||
If public key authentication is to be used for SSH connections to LVM instances, then generate an SSH key-pair on the launcher machine using a tool such as
ssh-keygen.
|
|||
Details about downloading and unpacking the distribution archive are provided in
Accessing and Using the WLS-VE Distribution Archive.
|
|||
Details about the copying the ISO image are provided in
Copying the WLS-VE ISO Image.
|
|||
On the launcher machine where the WebLogic domain resides, run the LiquidVM Configuration Wizard to configure the connection between the LiquidVM tools running on the launcher machine and the hypervisor environment (Virtual Center and ESX server).
For details, see Configuring LiquidVM Connection Parameters
|
|||
On the launcher machine, run the P2V Domain Conversion utility to convert the physical WLS 10.0 MP1-based domain (or selected servers in the domain) to a virtual domain in the hypervisor environment. The P2V utility makes sure that the domain, patches, and connection information is available for the new WLS-VE instances.
For details, see Using the P2V Domain Conversion Utility.
|
|||
The P2V utility generates WLS-VE start scripts in the domain directory on the launcher machine. You must run these start scripts to complete the configuration process and start the new WLS-VE instances, as described in
Run the P2V-Generated Start Scripts.
|
|||
If you have experience using non-virtualized WLS 10.0 MP1, you might want to use some of the configuration techniques common to that product. If so, you need to be aware that some of techniques with which you are familiar will not work with WLS-VE. For example:
boot.properties file, can be passed on the command-line when booting the Administration Server. WLS-VE does not provide an interactive prompt, however, so you cannot specify credentials when the virtual server is starting. Therefore, if you want to use these credentials for the virtual domain, the boot.properties file must be available when using the P2V utility to virtualize the domain. See Using the P2V Domain Conversion Utility.By default, both the server and LiquidVM console log files are created on the local disk of the WLS-VE instance. VMware logs are also created and stored on the ESX server.
To view the log files on the WLS-VE instance’s local disk, the instance must be running in passive mode with SSH enabled. Then you can copy them to your local machine using SSH, use a remote syslog collector, or put the logs on an NFS share. For more information, see Configuring Logging.
admin_url parameter set in the Managed Server start scripts that are generated by the P2V utility.| Note: | If DHCP is selected in the P2V utility for the Administration Server, then no IP address will be set in the generated start scripts and LVM will query the DHCP server to obtain an IP address. If the IP address’s time-to-live has expired, then LVM can get a new IP address. Therefore, BEA does not recommend using DHCP for the Administration Server because in such a situation the admin_url parameter in the Managed Server’s start script will be invalid. If DHCP is used, your network administrators must guarantee that the Administration Server gets a fixed IP from the DHCP server. |


|