|
|
The following sections describe actions to take before you run the installation program:
Installing and using WLS-VE involves multiple machines. It is important to understand the roles and requirements of each.
For information about the system requirements for these machines, see Verifying That Your Environment Supports WLS-VE.
Before planning any WLS-VE implementation, you need to verify that the product will run on your company's computer system.
The installer, configuration wizard, and launcher can run on these platforms:
| Note: | LiquidVM itself is a 32-bit VM (meaning that it cannot have a Java heap larger than 4GB) |
WebLogic Server 9.2 supports the following configurations:
| Note: | This release of WLS-VE does not support BSD NFS servers, such as FreeBSD, OpenBSD, NetBSD or derivatives. |
This section describes some aspects you should consider in planning your WLS-VE installation:
For most applications, deploying and serving from WLS-VE is indistinguishable from WebLogic Server: WLS-VE is no more CPU-intensive, memory-intensive, or network-intensive than WebLogic Server. On the other hand, certain applications will not run as well in a virtualized environment as in a non-virtualized one. Consider the following factors in deciding whether using WLS-VE is appropriate for your applications:
System.exec from your WebLogic ServerHow will the application and data be stored? What sort of storage solution—or combination of storage solutions—will best support your version of WLS-VE? What affect does running on VMware have on how you set up your storage? Because of the importance of non-local storage to WLS-VE, these are critical questions you need to address before you can successfully run this product. This section describes WLS-VE's requirements for storage and offers ideas for successfully implementing these solutions.
The underlying implementation in VMware is a large file. This is not something of which the virtual machine (that is, LiquidVM) is aware. To the VM, VMware's underlying storage architecture looks like a normal physical disk drive and therefore, it performs the corresponding I/O instructions necessary to write to a physical disk drive, VMware detects these I/O instructions and transforms them into corresponding writes to the large file. As the representation of the virtual disk is a file, writes to this file will at some point be stored on physical storage somewhere. The location of this storage is under the control of the VMware administrator; as is the normal OS case, the administrator has three choices: the ESX machine's physical hard disk, a disk-partition on a SAN, or a large file on a NAS.
Due to its virtualized nature, the storage requirements for WLS-VE somewhat differ from those you need to address for non-virtualized WebLogic Server. The basic requirement is accessibility of storage locations: for some of its data storage activities, WLS-VE requires exclusive access, while for other activities, it assumes that other processes might access the data (as in a standard file system).
WLS-VE requires exclusive access to a storage system for the following activities:
To store its exclusive data, WLS-VE needs to use the virtual disk that is made available by the hypervisor layer. Generally, a SAN implementation is optimal for WLS-VE as it usually performs at a higher level than a NAS due to NAS requiring a higher protocol overhead than a SAN. Moreover, it is more expensive to reference a file somewhere in a NAS's potentially deep directory structure than it is to just access a certain block on a certain disk partition, as a SAN stores data. Finally, a SAN requires less state on the storage side, another argument in its favor.
Use an NFS client for files that require or expect shared access; for example:
LiquidVM can access only (virtual) disk drives and (virtual) network cards, which are configured by the LiquidVM launcher when creating a WLS-VE instance.
BEA recommends that you store the ISO image on an SAN. The ISO image is a CD drive that appears as a large file in VMware. It also differs from normal local disks because it is read-only. This implies that no one can modify it; hence, multiple different machines can have simultaneous access to the same ISO image without violating its exclusivity, thus reducing disk footprint.
Currently, communication between the NFS client and the NFS server is not secure. The NFS client authenticates itself to the NFS server by using user-provided credentials, but this traffic is not encrypted, which makes it vulnerable to security breaches. Please refer to NFS Security Measures for details on how to work around this situation.
How much system capacity to plan for is greatly dependent on the applications you are running on WLS-VE. The following information will help you make decisions about your minimal capacity requirements as they apply to WLS-VE. You will need to factor in the needs of your application to fully determine the appropriate capacity. This section provides guidelines to help you:
How much disk space you will need to configure depends upon the size of your application and the amount of data you anticipate processing. At a minimum, you need to provide enough disk space for writing images when hibernating an instance of WLS-VE, which is generally an amount equal to your Java heap plus some native memory (for a large application, 300MB might be a reasonable amount of native memory, but the amount of memory you should reserve is very workload dependent). In addition, of course, you also need to plan for database requirements and other storage needs.
Be sure to reserve sufficient space for the domain on the NFS server. How much data the domain needs is very application-dependent. Before taking a server into production you should check the size of the domain in a development environment and make sure you have at least that much space left on the production server. Normally, the storage space requirements for most applications running on top of WebLogic Server are modest. The storage requirements for the domain are identical for normal WebLogic Server and WebLogic Server Virtual Edition.
Determining how many physical cores your implementation requires is based upon your actual system needs; that is, how many virtual CPUs does your environment require to handle your data load? By rule, you can only have one virtual CPU per logical core; for example, a hyperthreaded, dual core hardware can support four virtual CPUs or two virtual CPUs for each hyperthreaded core; were the cores not hyperthreaded, they would each support a single virtual CPU, or a total of two virtual CPUs on the hardware. Thus, if you believe you will need 50 virtual CPUs, you need to plan for 50 physical cores, in whatever combination is most appropriate for your budget and your physical layout.
Much like disk space requirements, physical memory requirements depend significantly on the applications you are running on the machine. Because WLS-VE is currently available only as a 32-bit application, the maximum amount of physical memory available to the virtual machine is 4 GB. Ideally, you should plan to allow enough heap space to run your application, without making it resort to swapping or paging during processing, plus some additional memory for native application code and generated Java code. If you don't allow enough space for Java to run, you will quickly encounter out of memory exceptions and system failure.
You can download WebLogic Server Virtual Edition from the BEA Web site at
http://commerce.bea.com.
If you purchased your software from your local sales representative, you will find the following items in the product box:
You can download an installer that runs on a Windows platform or one that runs on a Linux platform. The Windows installation program enables you to install WLS-VE, configure WebLogic Server domains, and configure and start WLS-VE appliances from a Windows machine. The Linux installation program enables you to complete these tasks from a Linux machine.
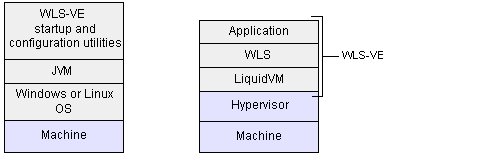
Regardless of which installer you download, WLS-VE always runs directly on a hypervisor platform (see Figure 2-1).
To successfully use WLS-VE, you need two sets of log-in credentials: one for WebLogic Server and one for VMware Virtual Infrastructure Client 2.0 (which includes VMware VirtualCenter). You also need read/write permission on your NFS server.
The WebLogic Server credentials control access to a server domain. You enter these credentials into the system during domain configuration (that is, when you create your virtual server; see Creating WLS-VE Domains). These credentials are encrypted and then stored in the domain directory. For information about specifying credentials when starting WLS, see Provide User Credentials to Start and Stop Servers; you should also read the section titled Boot Identity Files.
The VMware VirtualCenter credentials control access to VMware VirtualCenter, the GUI application used to monitor and manage individual virtual machines (for more information, please refer to Working with WLS-VE Using VirtualCenter). You enter these credentials into the system when configuring LiquidVM, as described in Configuring LiquidVM Connection Parameters.. These credentials are stored in the file bea.lvm.info, which resides in your home directory (for Windows users, this is your personal directory directly beneath Documents and Settings/).
| Note: | For important information about your VirtualCenter password, please see VMware VirtualCenter Security Measures. |
Because you need to add and remove files from the NFS server, you will you also need permission to read and write directories on the NFS server.
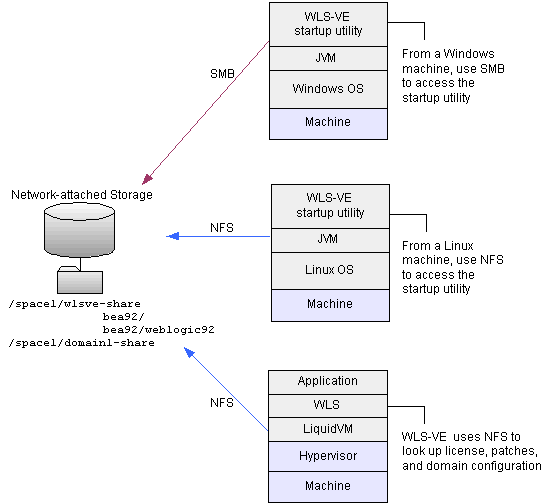
From within WLS-VE, WLS-VE will see the directory structure described in Table 2-1:
Specified in the
BEA_HOME_MOUNT property in the WLS-VE start-up script. For more information on /bea, see The BEA Home Directory.
|
||
Physically, these directories must be in different locations:
With WLS-VE, the BEA license file (license.bea) and the patch directory must reside on an NFS file server below a directory that is exported as an NFS share. When you start a WLS-VE appliance, the WLS-VE classes on the hypervisor use NFS to connect to the shared directory and look up the BEA license and any installed patches. The classes also use NFS to look up the WLS-VE domain configuration data (see Figure 2-2).
To create and share directories for WLS-VE:
| Note: | BEA recommends that you also create an additional read/write NFS share for each WLS-VE domain that you plan to host in your operations center. You do not need to create these domain directories to install WLS-VE, but you will need them to run WLS-VE after the installation process. By creating separate shares for each domain directory, you can control which systems and users are able to access the secure data that is in each WebLogic Server domain. See Securing NFS. |
For example, create the following directory structure on an NFS file server named myFileServer:
/space1/wlsve-share bea92/
bea92/weblogic92
/space1/domain1-share/space1/domain2-share
wlsve-share is exported as an NFS share. If you want to install WLS-VE from a Windows machine, also export this directory as an SMB share.bea92 is the directory that you use as the BEA Home directorybea92/weblogic92 is the directory that you use as the product installation directorydomain1-share and domain2-share are two additional NFS shares that you create to contain two separate WebLogic Server domains. If you want to use a Windows machine to install to the directory structure described in Example Configuration of Directory Shares:
/space1/wlsve-share as an SMB share, on a Windows machine, map the W: drive to \\myFileServer\wlsve-share.W:\bea92.
The installer will install the BEA home directory in W:\bea92 (on myFileServer the namespace will be /space1/wlsve-share/bea92). It will also offer to create the product installation directory and ISO image files under this share.
After you complete the installation process and configuration process, to start a WLS-VE appliance, log on to the Windows machine and use the startup commands that the WLS-VE installer created on the Start menu. Or from a command prompt, change to the W:\bea92 directory and invoke the startup scripts.
The previous example installs WLS-VE in a directory on your NFS share. This is the simplest approach, but can be time consuming. As an alternative, you can:
license.bea) and the patch directories (patch_weblogicNNN) from the BEA Home on your local machine into a directory on your NFS share.BEA_HOME_MOUNT variable points to the BEA directory on your NFS share into which you copied the WLS-VE license file and the patch directories. SeeCreating WLS-VE Domains.Ensure that unauthorized users cannot snoop network traffic, mount the WLS-VE NFS shares, or access the WLS-VE directories on the NFS server's local disk. Any attacker with read access to a WLS-VE domain directory can use the data in the directory to decrypt the WLS-VE boot password, gain administrative privileges, and compromise the entire domain. For more information, see NFS Security Measures.
The following sections describe details about the WLS-VE installation program and the files and directories that the installer creates:
The BEA Home directory serves as a repository for your BEA license file and other files that facilitate any future upgrades or installation of patches. WLS-VE requires this directory to be on an NFS file server and to be accessible to the WLS-VE installer through an NFS mount.
During installation of your BEA software, the WLS-VE installer prompts you to choose an existing BEA Home directory or specify a path to create a new one. If you already have a BEA Home directory on an NFS server, you can choose the existing directory. If you choose to create a new directory, the installation program automatically creates it at the specified path name.
The BEA Home directory can be considered a central support directory for all of the BEA products installed on your system. For example, if you use WebLogic Server, WebLogic Workshop, and WLS-VE, you could maintain a single BEA Home directory for all products, but to support WLS-VE, the WLS-VE license file (license.bea) and the patch directories (patch_weblogicnnn) need to be copied to a directory residing on an NFS server.
If you do not want to configure NFS mounts on the systems that host other BEA products, you can maintain multiple BEA Home directories: one on an NFS server for WLS-VE and another on the local file systems that host the other BEA products.
Table 2-2 describes the files and directories in the BEA Home directory.
The product installation directory for WLS-VE contains the BEA WebLogic Configuration Wizard and Template Builder, the Domain Upgrade Wizard, and the WebLogic Scripting Tool.
During installation of your BEA software, the WLS-VE installer prompts you to choose a product installation directory. Typically, you locate this directory below the BEA Home directory, but you can locate it outside the BEA Home directory as long it is located on an NFS file server and is accessible to the WLS-VE installation, configuration, and startup utilities through an NFS or SMB mount.
Table 2-3 describes the files and directories in the WLS-VE product installation directory.By default, the directory itself is named weblogic<version>.
|
|||
The WLS-VE ISO image contains the LiquidVM and WebLogic Server classes that you use to host your business applications. Each physical machine that hosts an instance of WLS-VE needs access to this ISO image file.
During installation of your BEA software, the WLS-VE installer offers to install the ISO image on your NFS server. After the installation process, you can move the ISO file to the local disk of each WLS-VE host machine, or to a SAN or NAS that can be accessed from each WLS-VE host machine. See Copying the ISO Image..
When you install your BEA Products software as an Administrator on a Windows system, the installation program offers to creates shortcut entries on the Start Menu. You can select from the following options:
Selecting this option provides all users registered on the machine with access to the installed software. However, only users with Administrator privileges can create shortcuts in the All Users folder. Therefore, if a user without Administrator privileges uses the Configuration Wizard to create domains, Start menu shortcuts to the domains are not created. In this case, users can manually create shortcuts in their local Start menu folders, if desired. Press ALT+Y on the keyboard to select the All Users Start Menu.
Selecting this option ensures that other users registered on this machine will not have access to the Start menu entries for this installation. Press ALT+N on the keyboard to select the Local User's start menu.
| Note: | The installer offers to create shortcuts only if you are performing an initial installation. |
To ensure that the shortcuts work across Windows sessions, make the mapping of the drive letter to the SMB share reconnect at logon. The pathnames that are encoded in the shortcuts include the drive letter that you map to the SMB share when you install WLS-VE (see Understanding WLS-VE Directories). For example, if you install WLS-VE in W:\mySMBshare\wls-ve, then the pathnames in the shortcuts start with W:\. If you use a different drive letter on subsequent Windows session, the shortcuts will not function.
The BEA Products folder that the WLS-VE installer creates (Start ProgramsBEA Products) contains following shortcut files:


|