- Developing SOA Applications with Oracle SOA Suite
- Using the BPEL Process Service Component
- Using Oracle BPEL Process Manager Sensors and Analytics
- Configuring BPEL Process Analytics
- How to Access Analytics View
- How to Define Measurements
- How to Define an Interval Stop
How to Define an Interval Stop
You can define an interval stop measurement.
To define an interval stop:
- Access analytics view in a BPEL process as described in How to Access Analytics View.
- From the Components window, drag an Interval Stop icon on to an activity or right-click an activity and select Interval Stop.
- Double-click the icon that is added.
The Interval End dialog is displayed.
- Enter values appropriate to your environment, and click OK. Table 18-6 provides details.
Table 18-6 Interval End Dialog - General Tab
Element Description Name
Enter the name of the interval stop.
Activity
Displays the BPEL activity on which the interval stops.
Evaluation Event
Select the specific activity event that triggers the stop of the interval. It can be one of the five activity events: Activate, Compensate, Complete, Fault, and Retry.
Description
Enter an optional description of the interval stop.
Enabled
Select whether to enable the interval stop. By default, this measurement is enabled.
Note:
A name change is propagated to its corresponding interval start, because the interval name is shared by both the interval start and the interval stop measurements.
An activity change updates the activity anchor of the interval stop floater in the designer.
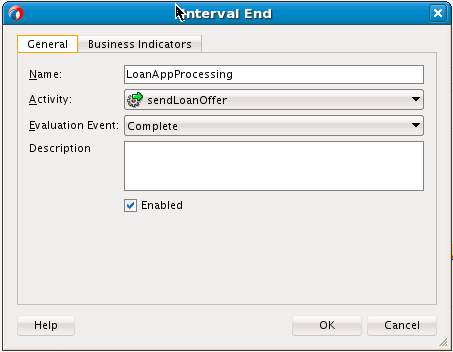
When complete, the General tab of the Interval End dialog looks as shown in Figure 18-25.
Figure 18-25 General Tab of Interval End Dialog

Description of "Figure 18-25 General Tab of Interval End Dialog" - Click the Business Indicators tab.
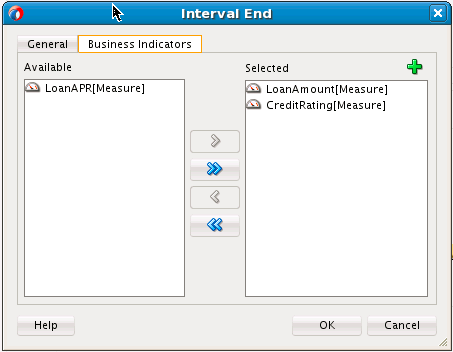
- Move selected business indicators to the Selected section. You can also click the Add icon to create new business indicators. Created business indicators are automatically added to the Selected section.
Note:
You can only create and select measures for interval stops. Dimensions are implicitly added to interval stops, and you cannot create and select counters for interval stops. Counters can only be created and selected for counter marks.
Any change on the business indicators for an interval stop is propagated to its corresponding interval start, because both the interval start and stop share the same business indicators.
When complete, the Business Indicators tab looks as shown in Figure 18-26.
