How to Create an XSL Map File from Imported Source and Target Schema Files in Oracle BPEL Process Manager
The following steps provide a high level overview of how to create an XSL map in Oracle BPEL Process Manager using a po.xsd file and invoice.xsd file.
To create an XSL map file from imported source and target schema files in Oracle BPEL Process Manager:
-
In Oracle JDeveloper, select the application project in which you want to create the new XSL map.
-
Import the po.xsd and invoice.xsd files into the project. For example:
-
In the Structure window of Oracle JDeveloper, right-click Schemas.
-
Select Import Schemas.
-
-
Right-click the selected project and select New.
The New Gallery dialog appears.
-
In the Categories tree, expand SOA Tier and select Transformations.
-
In the Items list, double-click XSL Map.
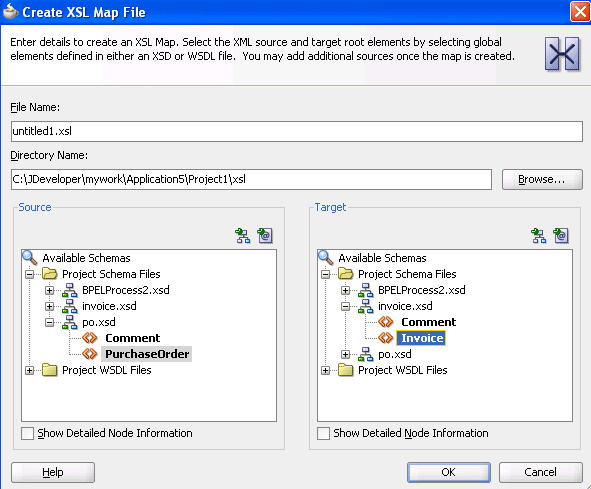
The Create XSL Map File dialog appears. This dialog enables you to create an XSL map file that maps a root element of a source schema file or Web Services Description Language (WSDL) file to a root element of a target schema file or WSDL file. Note the following details:
-
-
WSDL files that have been added to the project appear under Project WSDL Files.
-
Schema files that have been added to the project appear under Project Schema Files.
-
Schema files that are not part of the project can be imported using the Import Schema File facility. Click the Import Schema File icon (first icon to the right and above the list of schema files).
-
WSDL files that are not part of the project can be imported using the Import WSDL File facility. Click the Import WSDL File icon (second icon to the right and above the list of schema files).
-
-
-
In the File Name field, enter a name for the XSL map file.
-
Select the root element for the source and target trees. In the example in Figure 41-4, the PurchaseOrder element is selected for the source root element and the Invoice element is selected for the target root element.
-
Click OK.
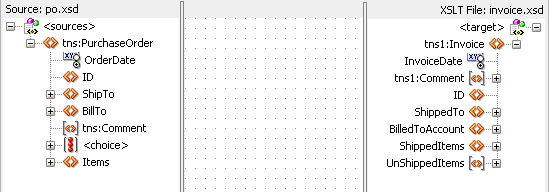
A new XSL map is created, as shown in Figure 41-5.
-
Save and close the file now or begin to design your transformation. Information on using the XSLT Map Editor is provided in Introduction to the XSLT Map Editor.
-
From the Components window, drag a transform activity into your BPEL process.
-
Double-click the transform activity.
-
Specify the following information:
-
Add source variables from which to map elements by clicking the Add icon and selecting the variable and part of the variable as needed (for example, a payload schema consisting of a purchase order request).
Note:
You can select multiple input variables. The first variable defined represents the main XML input to the XSL map. Additional variables that are added here are defined in the XSL map as input parameters.
-
Add target variables to which to map elements.
-
Add the target part of the variable (for example, a payload schema consisting of an invoice) to which to map.
-
-
To the right of the Mapper File field, click the Search icon (first icon) to browse for the map file name you specified in Step 6.
-
Click Open.
-
Click OK.
The XSLT Map Editor displays your XSL map file.
-
Go to Introduction to the XSLT Map Editor for an overview of using the XSLT Map Editor.

