How to Create a Configuration Plan in Oracle JDeveloper

This section describes how to create and use a configuration plan. In particular, this section describes the following:

  • Creating and editing a configuration plan

  • Attaching the configuration plan to a SOA composite application JAR file

  • Validating the configuration plan

  • Deploying the SOA composite application JAR or ZIP file in which the configuration plan is included

To create a configuration plan in Oracle JDeveloper:
  1. Open Oracle JDeveloper.
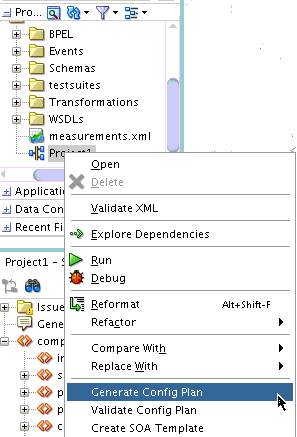
  2. In the Applications window, right-click the composite_name file (also known as the composite.xml file) of the project in which to create a configuration plan, and select Generate Config Plan. Figure 48-1 provides details.

    Figure 48-1 Generate a Configuration Plan

    Description of Figure 48-1 follows
    Description of "Figure 48-1 Generate a Configuration Plan"

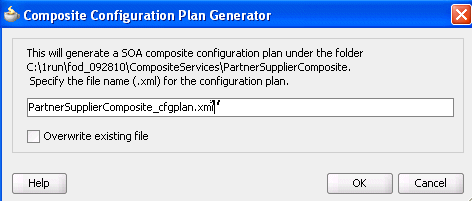
    The Composite Configuration Plan Generator dialog appears, as shown in Figure 48-2.

    Figure 48-2 Composite Configuration Plan Generator Dialog

    Description of Figure 48-2 follows
    Description of "Figure 48-2 Composite Configuration Plan Generator Dialog"
  3. Create a configuration plan file for editing, as shown in Table 48-2.

    Table 48-2 Generate a Configuration Plan

    Field Description

    Specify the file name (.xml) for the configuration plan

    Enter a specific name or accept the default name for the configuration plan. The file is created in the directory of the project and packaged with the SOA composite application JAR or ZIP file.

    Note: During deployment, you can specify a different configuration file when prompted in the Deploy Configuration page of the deployment wizard. For more information, see Deploying the Profile.

    Overwrite existing file

    Click to overwrite an existing configuration plan file with a different file in the project directory.

  4. Click OK.

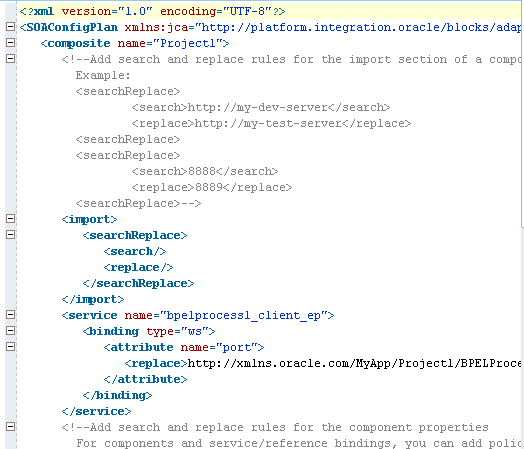
    This creates and opens a single configuration plan file for editing. You can modify URLs and properties for the composite.xml, WSDL, and schema files of the SOA composite application. Figure 48-3 provides details.

    Figure 48-3 Configuration Plan Editor

    Description of Figure 48-3 follows
    Description of "Figure 48-3 Configuration Plan Editor"
  5. Add values for server names, port numbers, and so on to the existing syntax. You can also add replacement-only syntax when providing a new value. You can add multiple search and replacement commands in each section.
  6. From the File menu, select Save All.
  7. Above the editor, click the x to the right of the file name to close the configuration plan file.
  8. In the Applications window, right-click the composite_name file again, and select Validate Config Plan.

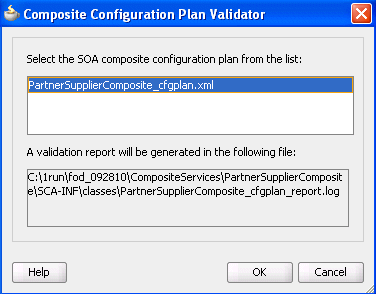
    The Composite Configuration Plan Validator appears, as shown in Figure 48-4.

    Figure 48-4 Validate the Configuration Plan

    Description of Figure 48-4 follows
    Description of "Figure 48-4 Validate the Configuration Plan"
  9. Select the configuration plan to validate. This step identifies all search and replacement changes to be made during deployment. Use this option for debugging only.
  10. Note the directory in which a report describing validation results is created, and click OK.

    The Log window in Oracle JDeveloper indicates if validation succeeded and lists all search and replacement commands to perform during SOA composite application deployment. This information is also written to the validation report.

    Note:

    The old composite.xml, WSDL, and XSD files are not replaced with files containing the new values for the URLs and properties appropriate to the next environment. Replacement occurs only when the SOA composite application is deployed.

  11. Deploy the SOA composite application by following the instructions in one of the following sections:

    During deployment in Oracle JDeveloper, the Deploy Configuration page shown in Step 4 of Deploying the Profile prompts you to select the configuration plan to include in the SOA composite application archive.

  12. Select the configuration plan to include with the SOA composite application.
  13. Click OK.