Deploying the Profile
You now deploy the project profile to Oracle WebLogic Server. Deployment requires the creation of an application server connection. You can create a connection during deployment by clicking the Add icon in Step 10 or before deployment by following the instructions in Creating an Application Server Connection.
To deploy the profile:
-
In the Applications window, right-click the SOA project.
-
Select Deploy > project_name.
The value for project_name is the SOA project name.
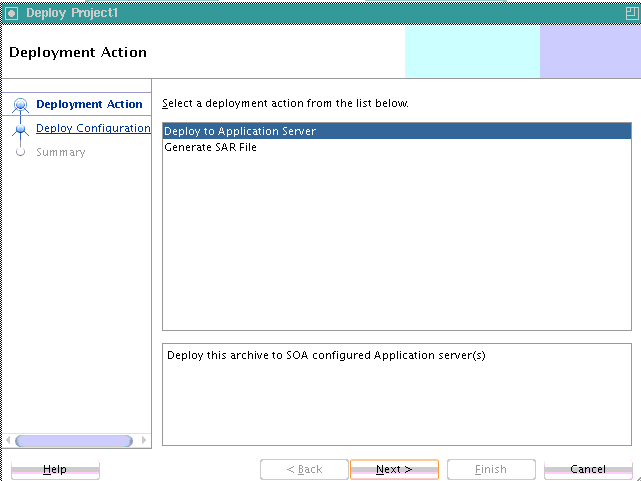
The Deployment Action page of the Deploy Project_Name wizard appears. Figure 48-9 provides an example.
-
Select one of the following deployment options:
-
Deploy to Application Server
Creates a JAR file for the selected SOA project and deploys it to an application server such as Oracle WebLogic Server.
-
Generate SAR File
Creates a SAR (JAR) file of the selected SOA project, but does not deploy it to an application server such as Oracle WebLogic Server. This option is useful for environments in which:
-
Oracle WebLogic Server may not be running, but you want to create the artifact JAR file.
-
You want to deploy multiple JAR files to Oracle WebLogic Server from a batch script. This option offers an alternative to opening all project profiles (which you may not have) and deploying them from Oracle JDeveloper.
-
The page that displays differs based on your selection.
-
-
Select the deployment option appropriate for your environment. Table 48-5 provides details.
Table 48-5 Deployment Target
If You Select... Go to... Deploy to Application Server
Generate SAR File
-
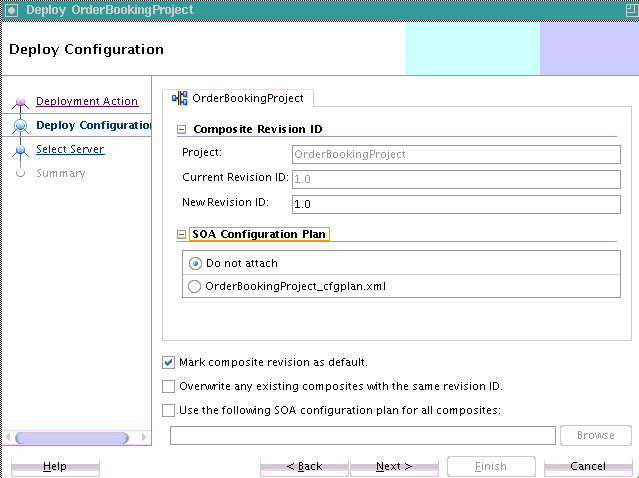
View the Deploy Configuration page shown in Figure 48-10.
Figure 48-10 Deploy Configuration Page for Application Server Deployment
Description of "Figure 48-10 Deploy Configuration Page for Application Server Deployment" -
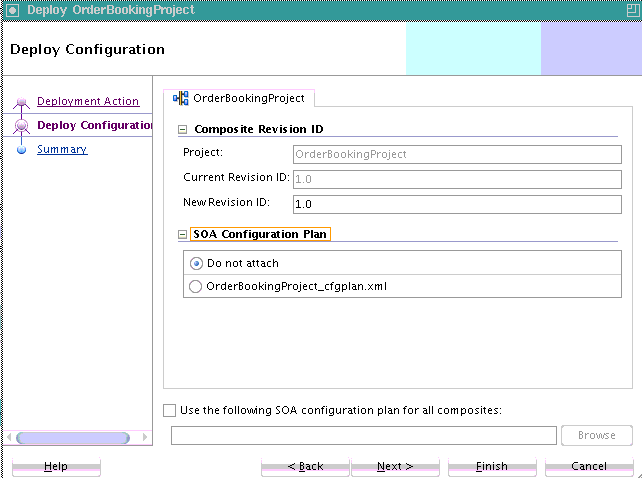
View the Deploy Configuration page shown in Figure 48-11.
Figure 48-11 Deploy Configuration Page for Generate SAR File Deployment
Description of "Figure 48-11 Deploy Configuration Page for Generate SAR File Deployment"
-
-
Provide values appropriate to the deployment option you selected in Step 4, as described in Table 48-6. If you selected to deploy to an application server, additional fields are displayed.
Table 48-6 SOA Deployment Configuration Dialog
Field Description Composite Revision ID
Expand to display details about the project.
-
Project
Displays the project name.
-
Current Revision ID
Displays the current revision ID of the project.
-
New Revision ID
Optionally change the revision ID of the SOA composite application. You can specify a new value or continue to use the current value. This revision ID becomes the value for the
${composite.revision_id}variable in the application name. For example, if you enter2.0as the new revision ID for a composite named OrderBooking,${composite.revision_id}is replaced with_rev2.0(sca_OrderBooking_rev2.0.jar).SOA Configuration Plan
Expand to display details about the configuration plan.
The configuration plan enables you to define the URL and property values to use in different environments. During process deployment, the configuration plan is used to search the SOA project for values that must be replaced to adapt the project to the next target environment.
-
Do not attach
Select to not include a configuration plan with the SOA composite application JAR file. If you have not created a configuration plan, this field is disabled. This is the default selection.
-
Configuration_plan.xml
Select the specific plan. A configuration plan must already exist in the SOA project for this selection to be available.
See How to Use Configuration Plans to Customize SOA Composite Applications for the Target Environment for instructions on creating a configuration plan.
BPEL Monitor
Expand to display details about BPEL monitors.
-
Ignore BPEL Monitor deployment errors
Note: This check box only appears if there is at least one
.monitorfile in the application.Deselect this check box to display BPEL Monitor deployment errors. This check box corresponds to the
ignoreErrorsproperty in themonitor.configBPEL project file. This file defines runtime and deployment properties needed to connect with Oracle BAM Server to create the Oracle BAM data objects and dashboards.If Oracle BAM Server is unreachable, andignoreErrorsis set totrue, deployment of the composite does not stop. If set tofalseand Oracle BAM Server is unavailable, deployment fails.Mark composite revision as default
If you do not want the new revision to be the default, you can deselect this box. By default, a newly deployed composite revision is the default. This revision is instantiated when a new request comes in.
This option only displays if you selected Deploy to Application Server on the Deployment Action page.
Overwrite any existing composites with the same revision ID
Select to overwrite any existing SOA composite application of the same revision value.
This option only displays if you selected Deploy to Application Server on the Deployment Action page.
Keep running instances on after redeployment
Note: This option is displayed if Oracle BPM Suite is installed in Oracle JDeveloper, and only supported for the deployment of Oracle BPM composites. Do not select this option if you are deploying:
-
A SOA composite application from an Oracle JDeveloper environment in which Oracle BPM Suite is also installed.
-
An Oracle BPM composite that includes a durable BPEL process, regardless of whether that process has been modified. Durable BPEL processes are those that take time to complete execution. Examples of durable BPEL processes are asynchronous processes (which are always durable) and synchronous processes that include a durable activity such as a wait activity.
If you select this option and attempt to redeploy a durable BPEL process, then deployment fails.
Select to enable existing instances of the overwritten revision to continue running instead of being aborted. These instances run side by side with any new instances that you create with the new revision of the Oracle BPM composite application.
Force deployment of incompatible processes
This option is only displayed for Oracle BPM Suite composites.
If Keep running instances on after redeployment is checked, this option is displayed. Select this check box to force deployment of incompatible BPM processes. When a composite with BPM processes is overwritten, the system checks to see if the BPM processes being overwritten are compatible with the processes being deployed. If they are compatible, running instances of these processes are not marked as aborted and deployment is successful. If they are incompatible, deployment fails unless you select this check box.
Use the following SOA configuration plan for all composites
Click Browse to select the same configuration plan to use for all composite applications. This option is used when deploying multiple composite applications.
-
-
When finished, click Next.
-
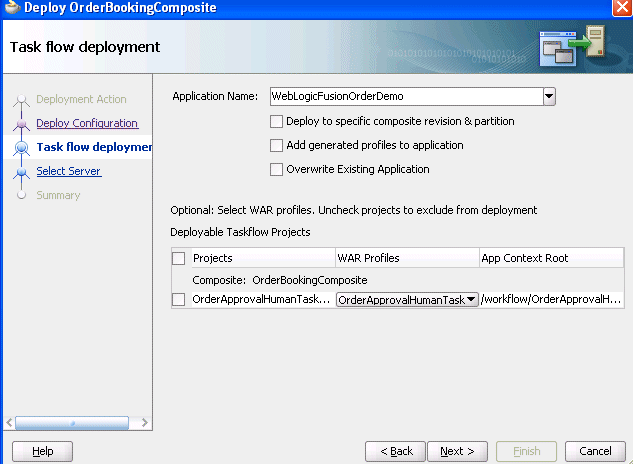
If the SOA project you selected for deployment includes a task flow project defined for a human task, you are prompted with the Task Flow Deployment dialog, as shown in Figure 48-12.
Otherwise, go to Step 10.
You create or configure an Enterprise Resource Archive (EAR) file for the task flow forms of human tasks. The EAR file consists of a Web Resource Archive (WAR) profile that you select in the Deployable Taskflow Projects table of this dialog.
-
Provide values appropriate to your environment, as described in Table 48-7.
Table 48-7 Task Flow Deployment Dialog
Field Description Application Name
Select the EAR file to include in the deployment. This list displays all available EAR profiles in the current Oracle JDeveloper application. These EAR profiles are used as a template to create an EAR profile to deploy based on the WAR profiles selected in the Deployable Taskflow Projects table. You can also enter any EAR profile name to deploy.
Deploy to specific composite revision & partition
Select to append the revision number of the composite to the EAR file name. If selected, this check box includes the composite revision in the EAR name, WAR profile, and context root. This option enables you to deploy an application specific to a composite revision.
Add generated profiles to application
Select to add the generated EAR profile to the current SOA composite application's EAR deployment profile list. The application may have to be saved to persist the generated EAR profile. Once the deployment profile is available, you can deploy the EAR profile by selecting Application > Deploy. This option enables you to avoid using the SOA deployment wizard, if only task flow application deployment is necessary.
Overwrite Existing Application
Select to overwrite the existing version of the EAR file on the server.
Deployable Taskflow Projects
Select the task flow project WAR profiles to include in the EAR file. The task flow project WAR profiles are grouped in accordance with the composites that include the human task related to the task flow project. The context root of the WAR changes if the Add generated profiles to application check box is selected.
Note: If you do not select a WAR profile, no task flows are deployed.
-
Projects
Select from the list of deployable task flow projects or select the Projects check box to choose all available task flows. The task flows that display are based on the composites included in the SOA project or bundle selected for deployment.
-
WAR Profiles
Select the task flow project WAR files. Only the most recently created or modified task flow of the human task is available for selection.
-
App Context Root
Displays the application context root directory based on your selection for the WAR profile.
When you deploy a task form for a human task, as part of notification, the task form details are included in an email. For dynamic payloads, this email includes the content of the payload as it appears at that particular time.
For information about deploying SOA composite applications with task flows to multiple partition environments, see What You May Need to Know About Deploying Human Task Composites with Task Flows to Partitions.
-
-
Click Next.
-
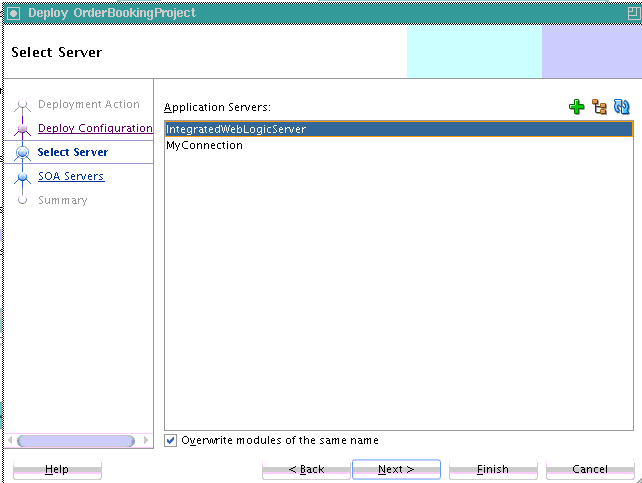
If you selected to deploy to an application server in Step 3, the Select Server page appears for selecting an existing connection to an application server such as Oracle WebLogic Server from the list or clicking the Add icon to create a connection to a server. Figure 48-13 provides details.
If you selected to generate a SAR file in Step 3, go to Step 15.
-
Click Next.
-
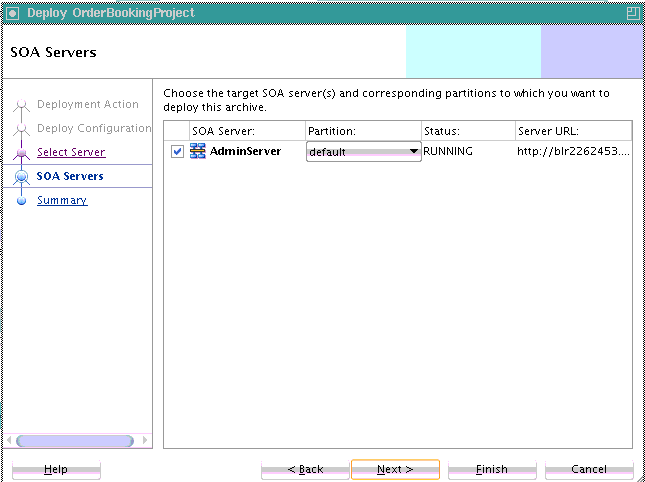
Select the target SOA servers to which to deploy this archive. If there are multiple servers or cluster nodes, select to deploy to one or more servers or nodes. Figure 48-14 provides details.
-
Select the partition in which to deploy this archive. If the server contains no partitions, you cannot deploy this archive. Also, if the server is not in a running state, you cannot deploy this archive. By default, a partition named default is automatically included with Oracle SOA Suite. You create partitions in the Manage Partitions page of Oracle Enterprise Manager Fusion Middleware Control.
Note:
Human workflow artifacts such as task mapped attributes (previously known as flex field mappings) and rules (such as vacation rules) are defined based on the namespace of the task definition. Therefore, the following issues are true when the same SOA composite application with a human workflow task is deployed into multiple partitions:
-
For the same task definition type, mapped attributes defined in one partition are visible in another partition.
-
Rules defined on a task definition in one partition can apply to the same definition in another partition.
-
-
Click Next.
-
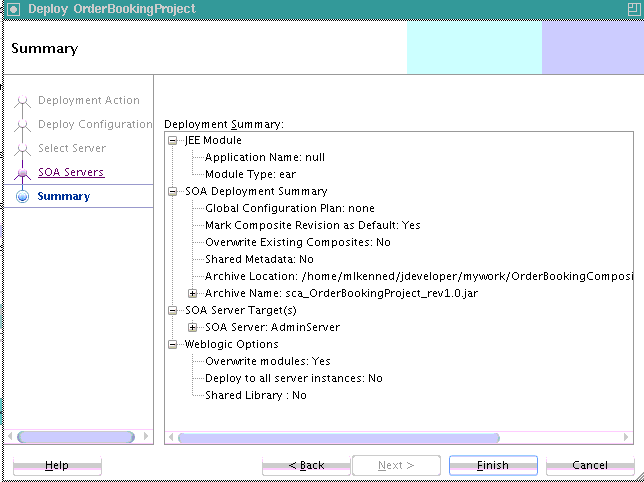
Review the archive details on the Summary page shown in Figure 48-15, and click Finish.
-
If you selected to deploy to an application server in Step 3, view the messages that display in the Deployment log window at the bottom of Oracle JDeveloper.
-
Enter the user name and password, and click OK.
If deployment is successful, the following actions occur:
-
A JAR file for the SOA project is created with a naming convention of sca_composite_name_revrevision_number.jar.
-
The project is displayed in the Resources window under application_server_connection_name > SOA > SOA_server_name > partition_name.
-
The project is displayed in the Application Servers window under application_server_connection_name > SOA > SOA_server_name > partition_name.
You are now ready to monitor your application from Oracle Enterprise Manager Fusion Middleware Control. See Administering Oracle SOA Suite and Oracle Business Process Management Suite for details.
If deployment is unsuccessful, view the messages that display in the Deployment log window and take corrective actions. For more information, see Testing and Troubleshooting.
For information about creating partitions, see the following documentation:
-
Deploying and Managing SOA Composite Applications with ant Scripts
-
Administering Oracle SOA Suite and Oracle Business Process Management Suite
Note:
If you want to redeploy the same version of a SOA composite application, you cannot change the composite name. You can deploy with the same revision number if you selected the Overwrite any existing composites with the same revision ID check box on the Deploy Configuration page.
-
