Release 14c (14.1.2.0.0)
Part Number F92121-01
Contents
Previous
Next
| Oracle Fusion Middleware Oracle E-Business Suite Adapter User's Guide Release 14c (14.1.2.0.0) Part Number F92121-01 | Contents | Previous | Next |
This chapter covers the following topics:
Oracle E-Business Suite Adapter provides a bridge between Oracle E-Business Suite and third party applications. Inbound and outbound XML data is exchanged between Oracle E-Business Suite and third party applications through the XML Gateway.
Oracle XML Gateway provides a common, standards-based approach for XML integration between Oracle E-Business Suite and third party applications, both inside and outside your enterprise. XML is key to an integration solution, as it standardizes the way in which data is searched, exchanged, and presented thereby enabling interoperability throughout the supply chain.
Oracle XML Gateway is an XML messaging based integration infrastructure essentially for business partner integration which includes a set of services that allows easy integration between Oracle E-Business Suite and third party applications. Oracle E-Business Suite utilize the Oracle Workflow Business Event System to support event-based XML message creation and consumption.
Oracle E-Business Suite Adapter can be configured to use XML Gateway to interact with third party applications. The tight integration provided by open interface tables is not suitable for those scenarios where trading partners change frequently. XML Gateway is an ideal solution when you need to interact with third party applications that use open standards. Moreover, it is also suitable for scenarios where trading partners change frequently.
As a provider of broad based business application solutions to support all industries, Oracle XML Gateway supports all Document Type Definition (DTD) based XML standards. The majority of the Oracle prebuilt messages delivered with Oracle E-Business Suite are premapped using the Open Application Group (OAG) standard. Any Oracle prebuilt message map may be remapped to your standard of choice using the XML Gateway Message Designer.
XML Gateway provides an application integration infrastructure that is flexible enough to accommodate the integration requirements of any application that needs to integrate with Oracle E-Business Suite. XML Gateway enables you to create an efficient and responsive supply chain that links all customers, factories, warehouses, distributors, carriers, and other trading partners. All these entities can seamlessly operate as a single enterprise.
Oracle XML Gateway supports both Business-to-Business (B2B) and Application-to-Application (A2A) initiatives. B2B initiatives include communicating business documents and participating in industry exchanges. An example of an A2A initiative is data integration with legacy and disparate systems.
XML Gateway enables bidirectional integration with Oracle E-Business Suite by allowing you to insert and retrieve data from Oracle E-Business Suite. Oracle E-Business Suite Adapter for XML Gateway supports inbound and outbound XML Gateway message processing. For XML Gateway inbound message processing, the inbound message will be placed in the ECX_INBOUND queue. Agent Listeners running on ECX_INBOUND would enable further processing by the Execution Engine. Oracle XML Gateway picks this XML message, does trading partner validation, and inserts data into Oracle E-Business Suite. For XML Gateway outbound message processing, the outbound message will be first enqueued to the ECX_OUTBOUND queue. Oracle BPEL PM listens to ECX_OUTBOUND queue for the message with the same correlation Id BPEL. The message will then be dequeued to retrieve outbound data from Oracle E-Business Suite. The retrieved data can be passed to trading partners or consumers who subscribed to the message.
XML Gateway Integration Architecture
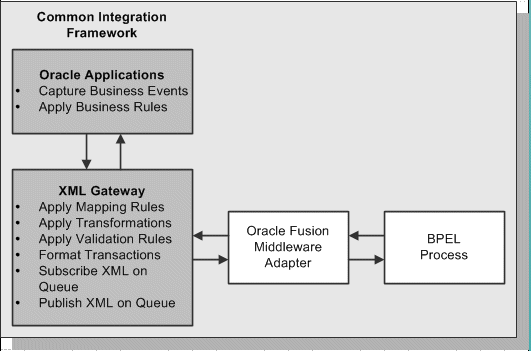
The XML Gateway uses queues specifically at two points in the process as well as employing a general error queue. The first point is at the transport agent level between the transport agent module and the XML Gateway. The second point is at the transaction level between base Oracle E-Business Suite application products and the XML Gateway.
Inbound message queues are used for XML messages inbound into Oracle E-Business Suite. Inbound message queues are positioned between the Transport Agent and the Oracle Workflow Business Event System.
The messages must be formatted according to the XML Gateway envelope message format. The envelope message format is discussed under XML Gateway Envelope. Oracle Workflow Business Event System copies the inbound messages to the proper inbound Transaction Queue.
Outbound message queues are used for XML messages outbound from Oracle E-Business Suite. The outbound Message Queue is positioned between the XML Gateway and the Transport Agent.
The XML Gateway creates XML messages, then enqueues them on this queue. The Transport Agent dequeues the message and delivers it to the Trading Partner.
In addition to the business document such as a purchase order or invoice in the XML Payload, a set of message attributes are also transmitted. Collectively, these attributes are called the XML Gateway envelope. The following table describes some of these attributes.
The following parameters may be defined by the base application:
ATTRIBUTE1
ATTRIBUTE2
ATTRIBUTE4
ATTRIBUTE5
The following parameters are not used:
PARTYID
PARTYTYPE
Note: See Oracle XML Gateway User's Guide for details on the XML Gateway Execution Engine, Trading Partner validation, and other XML Gateway information. This guide is part of the Oracle E-Business Suite Documentation Library which can be accessed on the Oracle Technology Network (OTN).
This section describes configuring Oracle E-Business Suite Adapter to use XML Gateway. It describes the tasks required to configure Oracle E-Business Suite Adapter using the Adapter Configuration Wizard in Oracle JDeveloper.
SOA Composite Application with BPEL Process Scenario
Take the XML Gateway Inbound Process PO XML Transaction as an example to explain the BPEL process creation. In this example, the XML Gateway inbound message map is exposed as a Web service through PROCESS_PO_007 inbound map. It allows sales order data including header and line items to be inserted into Order Management system while an associated purchase order is created.
When a purchase order is sent by a trading partner, the purchase order data is used as input to the BPEL process along with ECX Header properties such as jca.apps.ecx.TransactionType. The BPEL process then pushes this purchase order in ECX_INBOUND queue. Agent Listeners running on ECX_INBOUND would enable further processing by the Execution Engine. Oracle XML Gateway picks this XML message, does trading partner validation, and inserts order data to Order Management application.
When the SOA Composite application with BPEL process has been successfully executed after deployment, you should get the same order information inserted into the Order Management table once a purchase order is created.
Prerequisites to Configure XML Gateway Inbound
Setting XML Gateway Header Properties
You need to populate certain variables in the BPEL process in order to provide context information for Oracle E-Business Suite applications. This is accomplished by setting individual fields as header properties from the SYSTEM.ECXMSG object used in earlier releases.
The header properties can include, for example, jca.apps.ecx.TransactionType, jca.apps.ecx.TransactionSubtype, jca.apps.ecx.PartySiteId, jca.apps.ecx.MessageType, jca.apps.ecx.MessageStandard, jca.apps.ecx.DocumentNumber that you need to populate for the XML transaction to complete successfully.
These header property values can be defined through the Properties tab of an Invoke activity. See Configure the Invoke activity for more information.
Setting Up XML Gateway Trading Partner
You need to ensure that you have defined a valid inbound XML Gateway trading partner in the Trading Partner Setup form through XML Gateway responsibility.
For example, a Trading Partner (such as 'Business World' with Site information '2391 L Street San Jose CA 95106' and partner type 'Customer') has the following details for an inbound transaction:
Transaction type: ONT
Transaction sub type: POI
Standard Code: OAG
External transaction type: PO
External transaction subtype: PROCESS
Direction: IN
Map: ONT_3A4R_OAG72_IN
Source Trading partner location code: BWSANJOSE
Ensuring Agent Listeners Are All Up and Running
You also need to configure and schedule two listeners on the Oracle E-Business Suite application side. These are the ECX Inbound Agent Listener and the ECX Transaction Agent Listener. Use the following steps to configure these listeners in Oracle E-Business Suite:
Log in to Oracle E-Business Suite with the responsibility of Workflow Administrator.
Select the Workflow Administrator Web Applications link from the Navigator.
Click the Workflow Manager link under Oracle Applications Manager.
Click the status icon next to Agent Listeners.
Configure and schedule the ECX Inbound Agent Listener, ECX Transaction Agent Listener, and the Workflow Deferred Agent Listener. Select the listener, and select Start from the Actions box. Click Go.
Based on the XML Gateway Inbound Process PO XML Transaction business scenario, the following design-time tasks are discussed in this chapter:
To create a new SOA Composite application with BPEL process
Launch Oracle JDeveloper.
Click New Application in the Application Navigator.
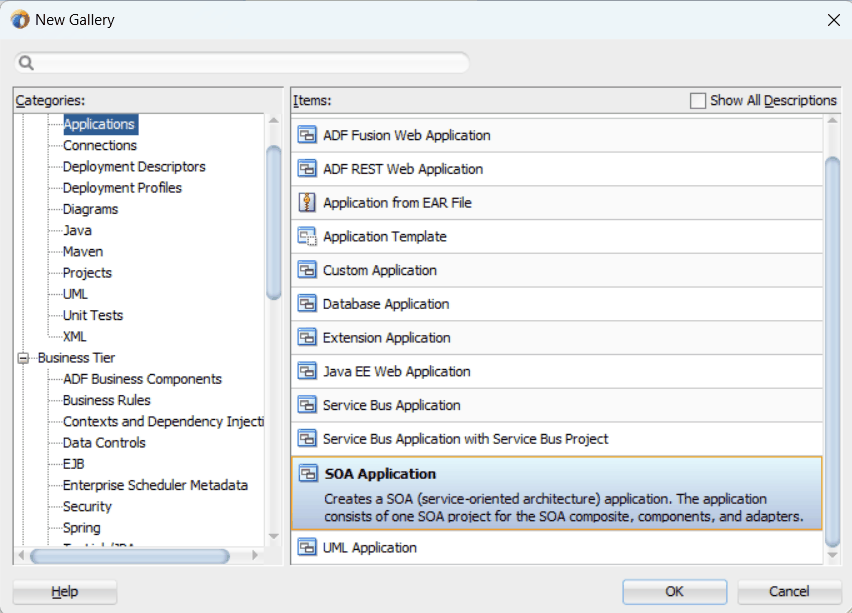
The New Gallery page appears. Select SOA Application from the Items list.
The New Gallery Page
Click OK.
The Create SOA Application - Name your application page appears.
The Create SOA Application - Name your application Page
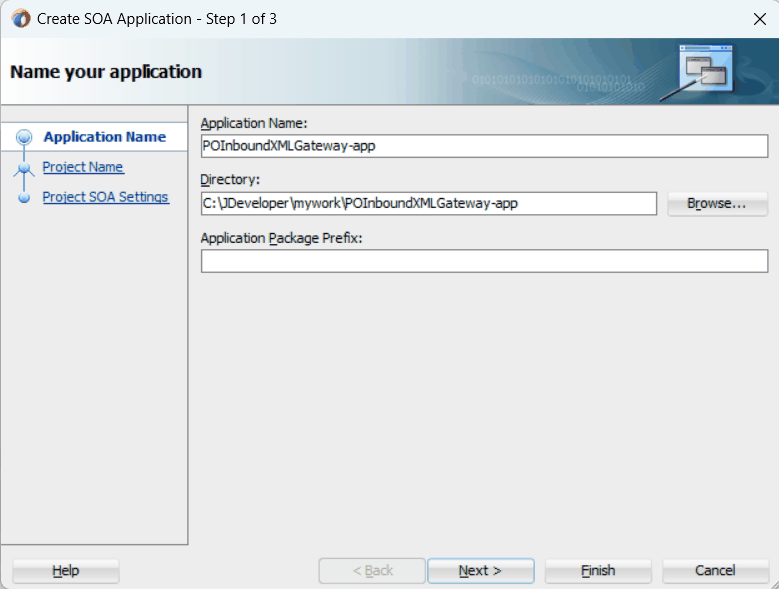
Enter an appropriate name for the application in the Application Name field.
Click Next. The Create SOA Application - Name your project page appears.
The Create SOA Application - Name your project Page
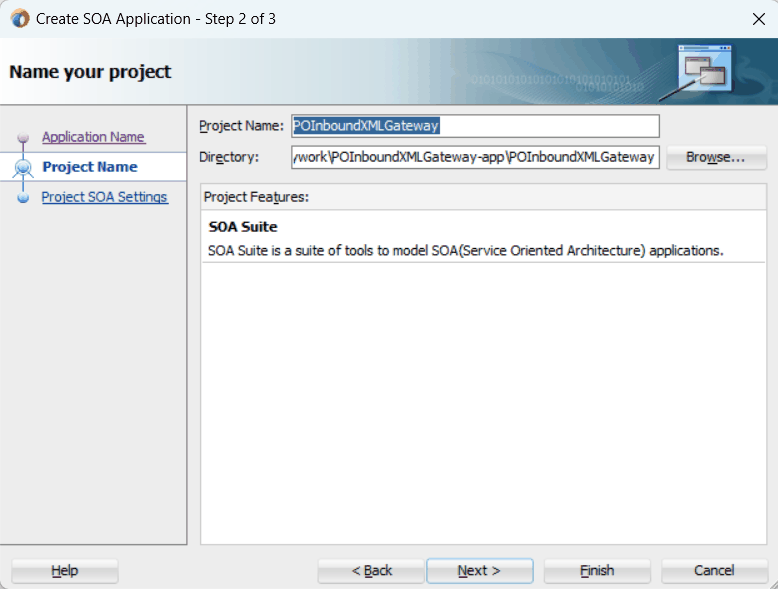
Enter an appropriate name for the project in the Project Name field, such as POInboundXMLGateway.
Notice that SOA Suite is shown in the Project Features section.
Click Next. The Create SOA Application - Configure SOA settings page appears.
The Create SOA Application - Configure SOA settings Page
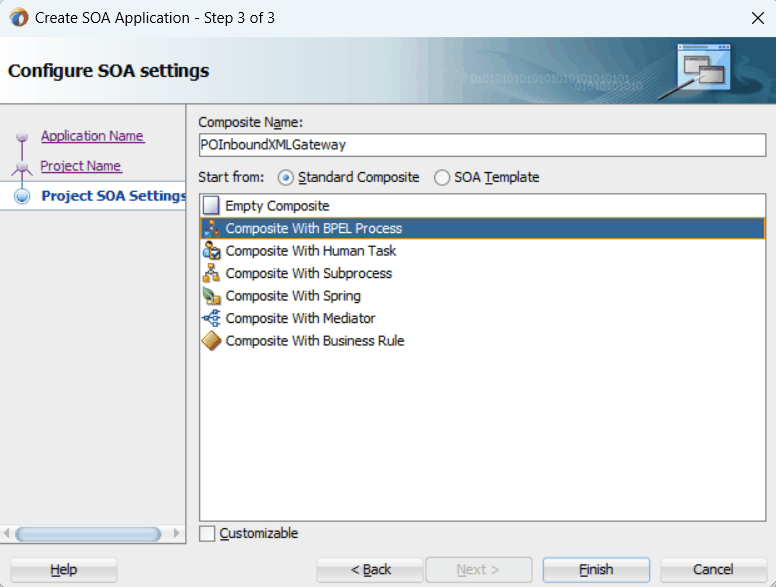
Leave the default Standard Composite selection unchanged for the Start from field.
Select Composite With BPEL Process from the Standard Composite list, and then click Finish.
You have created a new application, and a SOA project. This automatically creates a SOA Composite.
In the Create BPEL Process page, leave the default BPEL 2.0 Specification selection unchanged. This creates a BPEL project that supports the BPEL 2.0 specification.
The Create BPEL Process Page
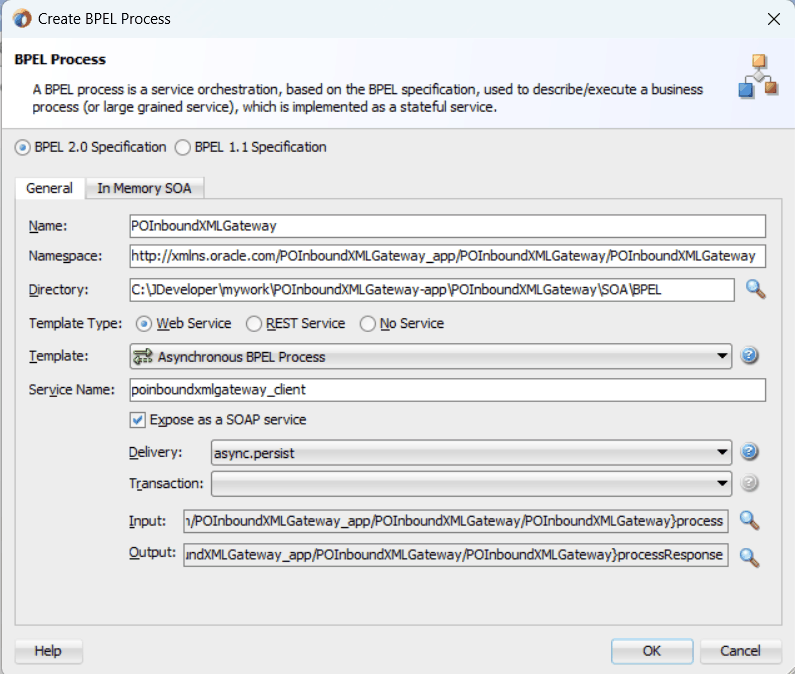
Name: Enter an appropriate name for the BPEL process, such as POInboundXMLGateway.
Template Type: Select "Web Service".
Asynchronous BPEL Process is automatically populated in the Template field.
Click OK.
An asynchronous BPEL process is created with the Receive and Callback activities. The required source files including bpel and wsdl, using the name you specified (for example, POInboundXMLGateway.bpel and POInboundXMLGateway.wsdl) and POInboundXMLGateway (composite.xml) are also generated.
An Asynchronous BPEL Process
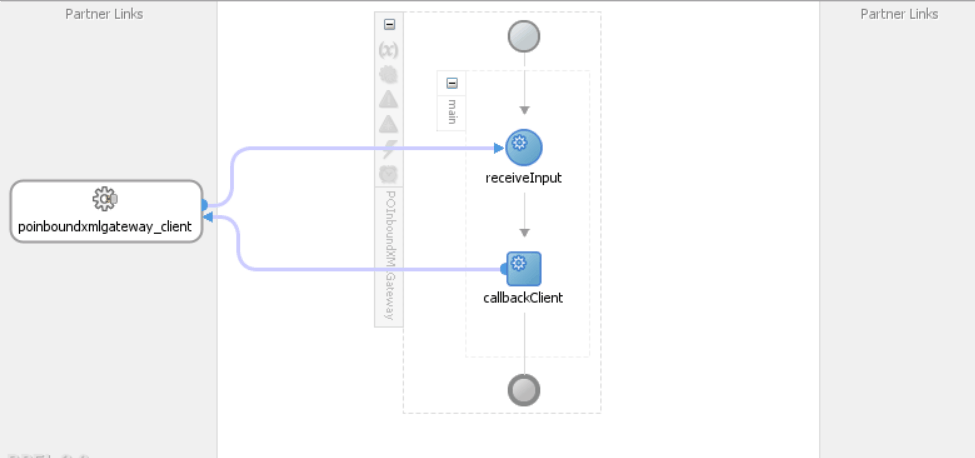
The next task is to add a partner link to the BPEL process. A partner link defines the link name, type, and the role of the BPEL process that interacts with the partner service.
To add a partner link
Click BPEL Services in the Component palette.
Drag and drop Oracle E-Business Suite (formerly known as Oracle Applications) from the BPEL Services list into the right Partner Link swim lane of the process diagram. The Oracle E-Business Suite Reference page appears.
Enter a reference name in the Name field. For example, XMLGatewayOrderInbound.
Click Next. The Service Connection dialog appears.
You can either create a new database connection or use an existing connection.
Note: You need to connect to the database where Oracle E-Business Suite is running.
Creating a New Database Connection:
Complete the following steps to create a new database connection:
From the Service Connection page, click the Create a New Database Connection icon.
The Create Database Connection page appears.
Enter the following information:
In the Connection Name field, specify a unique name for the database connection.
From the Connection Type list, select the type of connection for your database (such as Oracle (JDBC)).
In the UserName field, specify a unique name for the database connection.
In the Password field, specify a password for the database connection.
In the Oracle (JDBC) Settings, from the Driver list, select Thin.
In the Host Name field, specify the host name for the database connection.
In the JDBC Port field, specify the port number for the database connection.
In the SID field, specify the unique SID value for the database connection.
Click Test Connection to determine whether the specified information establishes a connection with the database.
The status message "Success!" indicates a valid connection.
Click OK.
The Service Connection dialog box appears, providing a summary of your database connection.
Selecting an Existing Database Connection:
Instead of creating a new database connection, you can use an existing database connection that you have configured.
From the Service Connection page, select an appropriate connection from the Connection drop-down list.
The Service Connection page will be displayed with the selected connection information. The JNDI (Java Naming and Directory Interface) name corresponding to the database connection appears automatically in the Database Server JNDI Name field. Alternatively, you can specify a JNDI name.
Note: When you specify a JNDI name, the deployment descriptor of the Oracle E-Business Suite Adapter must associate this JNDI name with configuration properties required by the adapter to access the database.
The JNDI name acts as a placeholder for the connection used when your service is deployed to the BPEL server. This enables you to use different databases for development and later for production.
Note: For more information about JNDI concepts, refer to Oracle Fusion Middleware Understanding Technology Adapters.
Once you have completed a new connection or selected an existing connection, you can add an XML Gateway inbound map by browsing through the list of APIs available in Oracle E-Business Suite.
Click Next.
If you are connecting to Oracle E-Business Suite Release 12, then the IREP File not present dialog appears indicating that Adapter could not find the Oracle Integration Repository data file corresponding to the database you are connecting in your workspace. Absence of the data file would make browsing or searching of Integration Repository tree considerably slow. You can choose to extract the data file and create a local copy of the Integration Repository data file. Once it is created successfully, Adapter will pick it up automatically next time and retrieve data from your local Integration Repository.
You can select one of the following options:
Click Yes to extract the Integration Repository data file.
After the system successfully creates a local copy of the Integration Repository data file, next time when you connect to the database, you will find the IRep Data File field appears in the Operation dialog indicating where your local copy exists with the creation date and time as part of the file name.
Click No to query the Integration Repository data file from the live database you are connecting to display the Integration Repository tree.
In this example, click No. Click Next in the Operation page to open the Oracle E-Business Suite Module Browser.
The Oracle E-Business Suite Module Browser combines interface data from Oracle Integration Repository with information about the additional interfaces supported by Oracle E-Business Suite Adapter, organized in a tree hierarchy.
Oracle E-Business Suite Module Browser with an Inbound XML Gateway Message Map
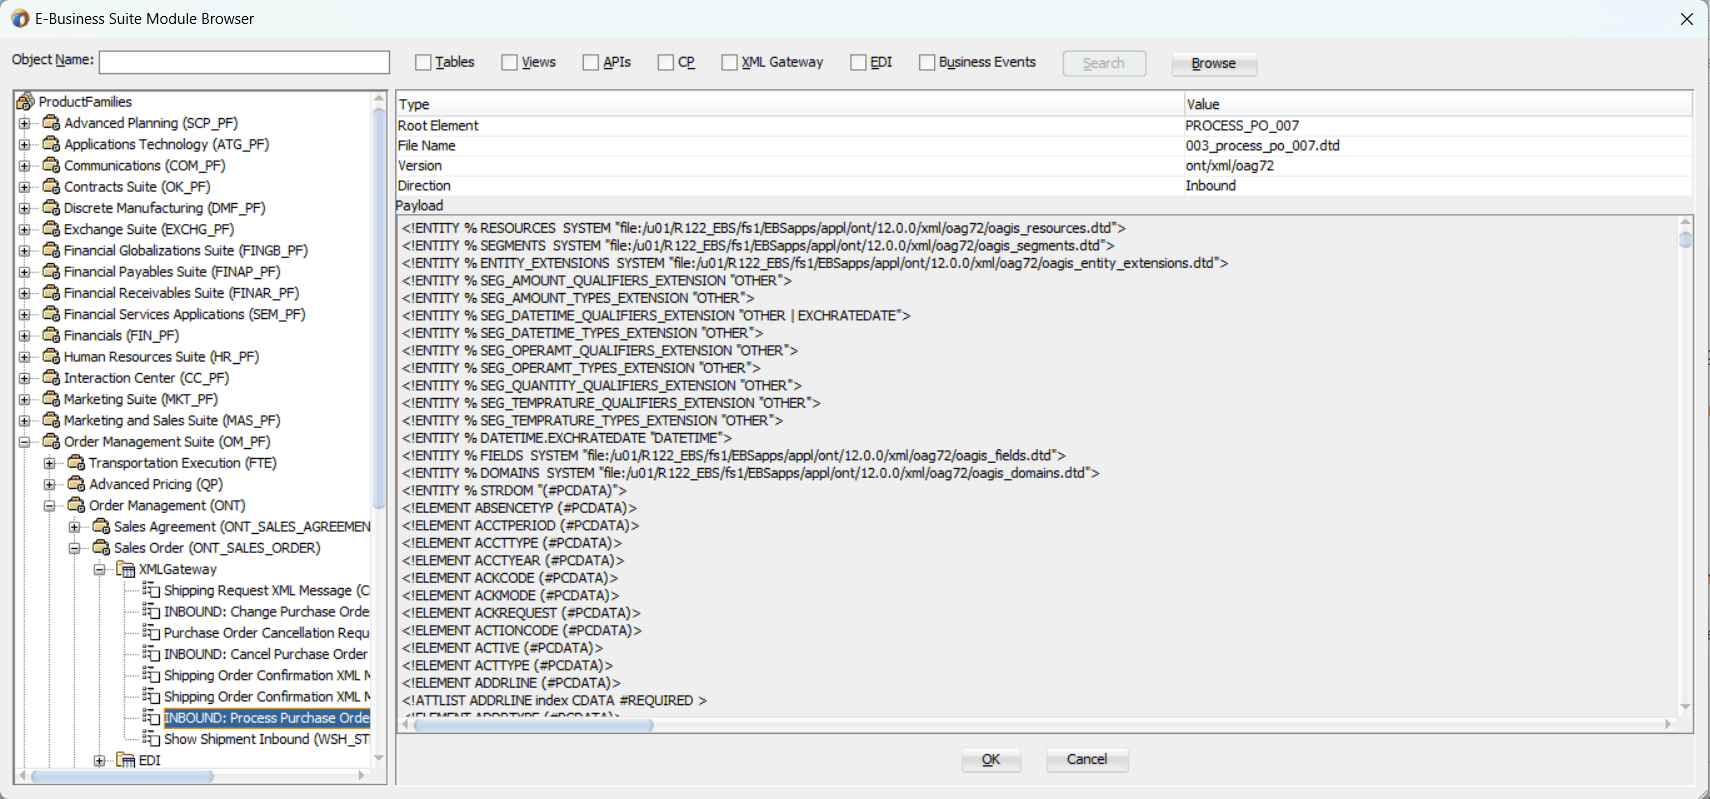
Note: The Oracle E-Business Suite Module Browser includes the various product families that are available in Oracle E-Business Suite. Each product family contains the individual products. Each product contains the business entities associated with the product. Business entities contain the various application modules that are exposed for integration. These modules are grouped according to the interface they provide.
Navigate to Order Management Suite > Order Management >Sales Order > XML Gateway to select Inbound: Process Purchase Order XML Transaction (ONT_3A4R_OAG72_IN).
Click OK.
Adapter Configuration Wizard - Application Interface Page
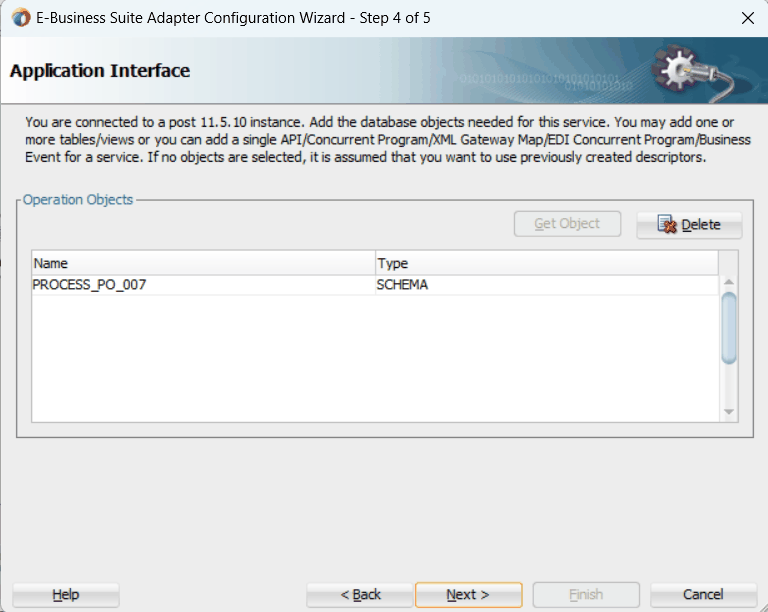
Click Next.
Click Finish to complete the process of configuring Oracle E-Business Suite Adapter. The partner link is created with the required WSDL settings. The wizard also generates the WSDL file corresponding to the XML schema. This WSDL file is now available for the partner link.
Double click the newly generated Partner Link (XMLGatewayOrderInbound) icon to view the partner link details.
If you are configuring an inbound message, then you would need to add another partner link for the file adapter. This allows the inbound message to pick up an XML file received from the third party application. The data is inserted into Oracle E-Business Suite through the partner link that was configured earlier.
To add a partner link for the file adapter to get the XML Message:
In JDeveloper BPEL Designer, click BPEL Services in the Component palette.
Drag and drop File Adapter from the BPEL Services list into the right Partner Link swim lane of the process diagram. The File Adapter Reference page appears.
File Adapter Reference Page
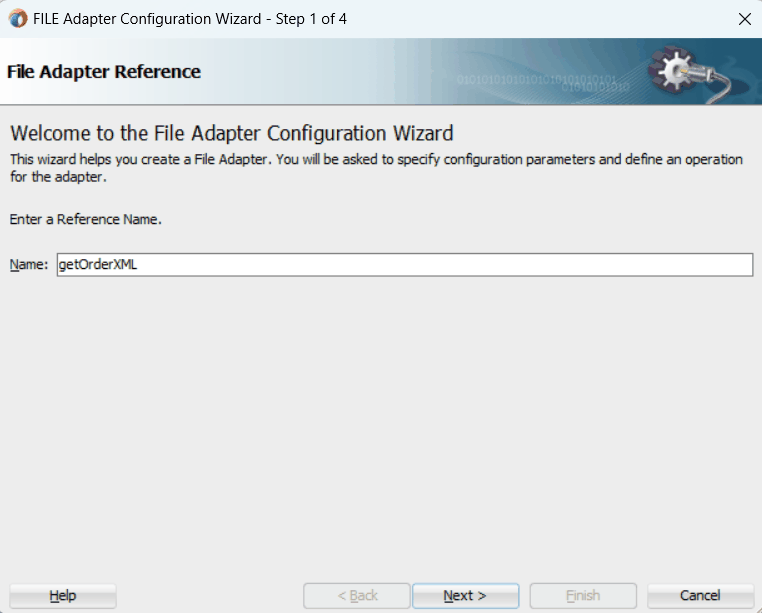
Enter a name for the file adapter service, for example, getOrderXML.
Click Next. The Adapter Interface page appears.
Adapter Interface Page
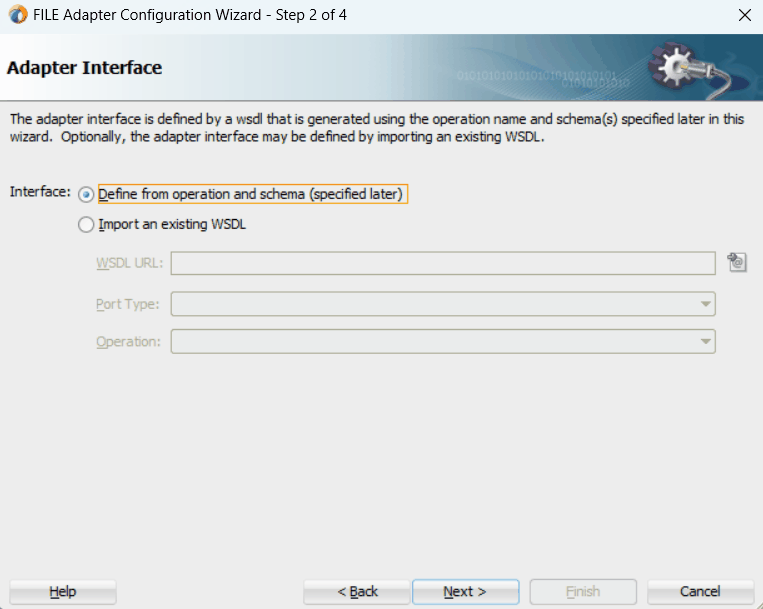
Select the Define from operation and schema (specified later) radio button and click Next.
The File Server Connection page appears. Leave the default value unchanged for the File Server JNDI Name field.
Click Next
In the Operation page, specify the operation type. For example, select the Synchronous Read File radio button. This automatically populates the Operation Name field.
Operation Page
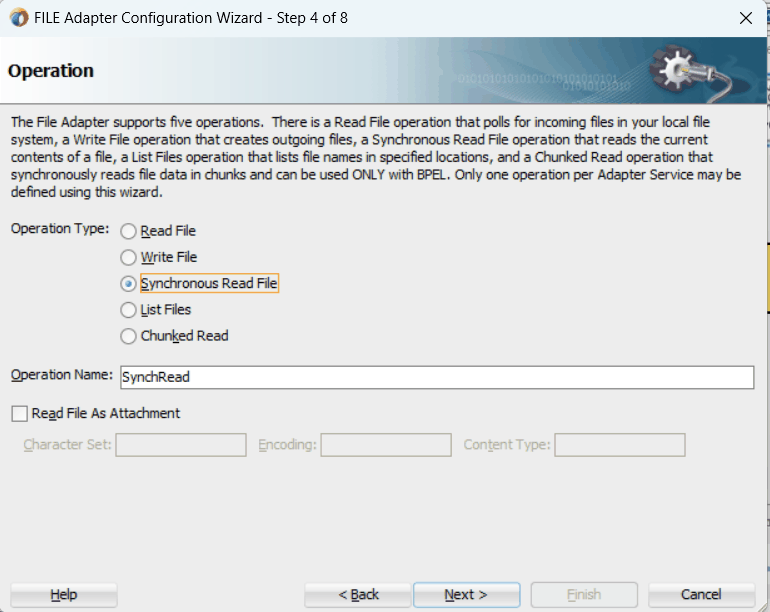
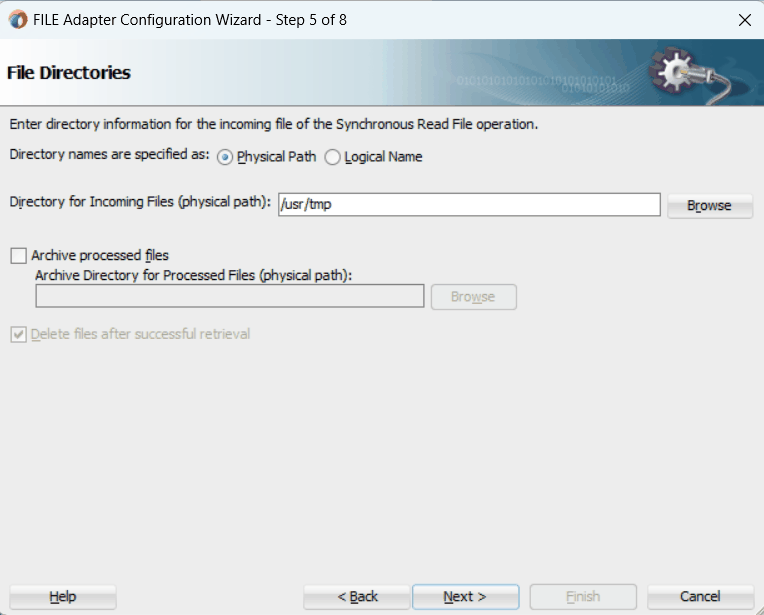
Click Next to access the File Directories page.
Select the Physical Name radio button and specify directory for incoming files, such as /usr/tmp.
Ensure the Delete files after successful retrieval checkbox is not selected.
File Directories Page
Click Next to open the File Name page.
Enter the name of the file for the synchronous read file operation. For example, enter order_data_xmlg.xml.
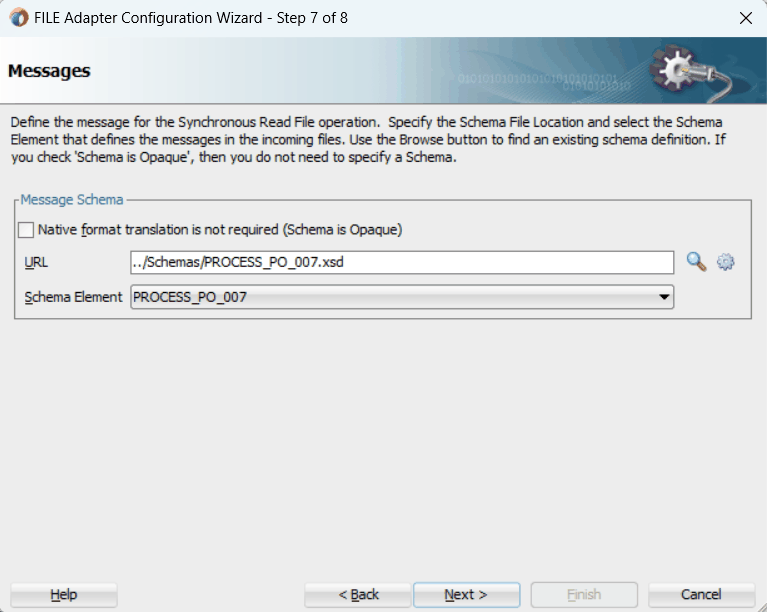
Click Next. The Messages page appears.
Select the 'browse for schema file' icon to open the Type Chooser window.
Expand the node by clicking Project Schema Files > PROCESS_PO_007.xsd > PROCESS_PO_007.
The selected schema information will be automatically populated in the URL and Schema Element fields.
Messages Page
Click Next and then Finish. This completes the configuration and creates the partner link with the required WSDL settings for the File Adapter service. The wizard also generates the getOrderXML.wsdl WSDL file corresponding to the partner link.
The getOrderXML Partner Link appears in the BPEL process diagram. Double click the Partner Link service icon to open the Edit Partner Link dialog and view the details.
After adding and configuring the partner link, the next task is to configure the BPEL process. You can start by configuring the Invoke process activity to enqueue the XML Gateway inbound messages and set XML Gateway header properties.
Based on the scenario described earlier, you need to configure the following two Invoke activities:
To get the XML message details from the input XML file through synchronous read operation by invoking the getOrderXML partner link.
To enqueue the purchase order information to the ECX_INBOUND queue by invoking XMLGatewayOrderInbound partner link in an XML file.
The ECX Header properties for the XML Gateway inbound service can also be set through the Invoke activity.
To configure the first Invoke activity
In Oracle JDeveloper BPEL Designer, expand the BPEL Constructs from the Component Palette. Drag and drop the first Invoke activity into the center swim lane of the process diagram, between the receiveInput and callbackClient activities.
Link the Invoke activity to the getOrderXML partner link service.
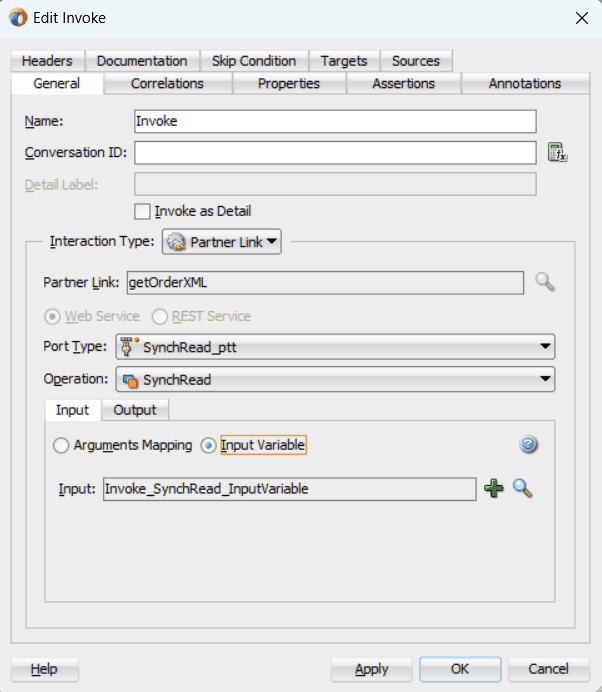
In the Edit Invoke dialog, enter a name for the Invoke activity in the General tab.
The value of the Operation field is automatically selected based on the associated partner link. For example, this Invoke activity is to invoke a File Adapter service to synchronize read an input XML file; thus, the SynchRead is automatically populated in the Operation field.
Enter a name for the Invoke activity. In the Input tab, ensure the Input Variable radio button is selected. Click the Create icon next to the Input Variable field to create a new variable. The Create Variable dialog box appears.
Select Global Variable and enter a name for the variable. You can also accept the default name. Click OK.
In the Output tab, ensure the Output Variable radio button is selected. Click the Create icon next to the Output Variable field to create a new variable. The Create Variable dialog box appears.
Select Global Variable and enter a name for the variable. You can also accept the default name. Click OK to return to the Edit Invoke dialog.
The Edit Invoke Dialog
Click Apply and then OK.
To configure the second Invoke activity
In Oracle JDeveloper BPEL Designer, expand the BPEL Constructs from the Component Palette. Drag and drop the second Invoke activity into the center swim lane of the process diagram, between the first Invoke activity and callbackClient activity.
Link the Invoke activity to the XMLGatewayOrderInbound partner link service.
In the Edit Invoke dialog, enter a name for the Invoke activity in the General tab.
The value of the Operation field is automatically selected based on the associated partner link. Since this Invoke activity is associated with an inbound message map partner link, the Enqueue operation is selected.
In the Input tab, ensure the Input Variable radio button is selected. Click the Create icon next to the Input Variable field to create a new variable. The Create Variable dialog box appears.
Select Global Variable and enter a name for the variable. You can also accept the default name. Click OK.
Click Apply.
Setting ECX Header Message Properties
You need to enter appropriate XML Gateway header property values in order to pass individual message properties required for XML transaction to complete successfully.
Use the following steps to set ECX header message properties:
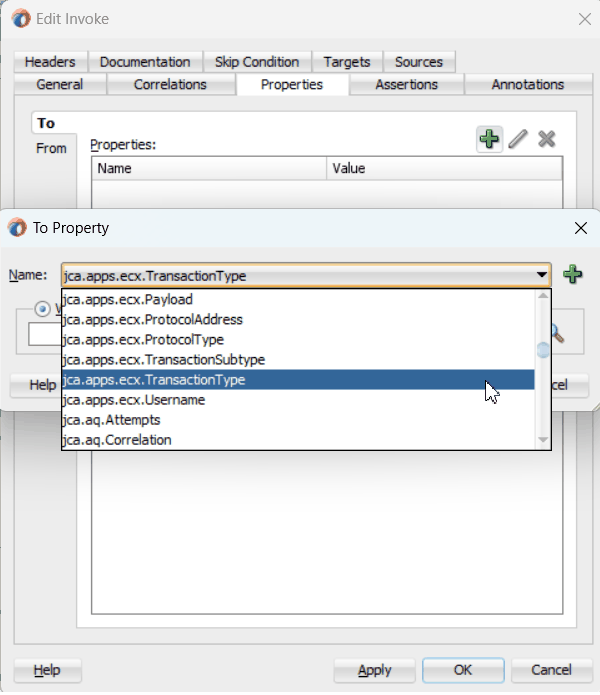
Click the Properties tab in the Invoke dialog box. You will find all predefined normalized message properties.
Click the Create icon. The To Property dialog appears.
Select the jca.apps.ecx.TransactionType property from the Name drop-down list.
Edit Invoke: Properties Dialog
Select the 'Expression' button as the message type.
Enter a property value for the selected property. For example, enter 'PO' for the property jca.apps.ecx.TransactionType.
To Property Dialog

Click OK.
Repeat Step 2 to Step 4 to set the following property values:
jca.apps.ecx.MessageType: 'XML'
jca.apps.ecx.TransactionSubType: 'PROCESS'
jca.apps.ecx.PartySiteId: 'BWSANJOSE'
jca.apps.ecx.MessageStandard: 'OAG'
jca.apps.ecx.DocumentNumber: 'order_xml_01'
Note: In earlier releases, XML Gateway header variables including MESSAGE_TYPE, MESSAGE_STANDARD, TRANSACTION_TYPE, TRANSACTION_SUBTYPE, DOUCMENT_NUMBER, and PARTY_SITE_ID are contained in the SYSTEM.ECXMSG object. Oracle E-Business Suite Adapter normalizes the SYSTEM.ECXMSG object to create and set each individual message property through the Properties tab of the Invoke activity. These header properties are required for the XML transaction to complete successfully.
In the Invoke dialog box, click Apply and then OK.
Note: If you have configured a partner link for outbound messages, then you need to configure a Receive activity in place of the Invoke activity. The Receive activity is used to dequeue the XML Gateway outbound messages.
Use the Assign activity to pass the output of getOrderXML service as an input to the XMLGatewayOrderInbound service.
To add an Assign activity:
In Oracle JDeveloper BPEL Designer, expand the BPEL Constructs from the Component Palette. Drag and drop the Assign activity from the Basic Activities section into the center swim lane of the process diagram between the two Invoke activities you just created earlier.
Double-click the Assign activity to access the Edit Assign dialog.
Click the General tab to enter a name for the Assign activity. For example, SetOrderXML.
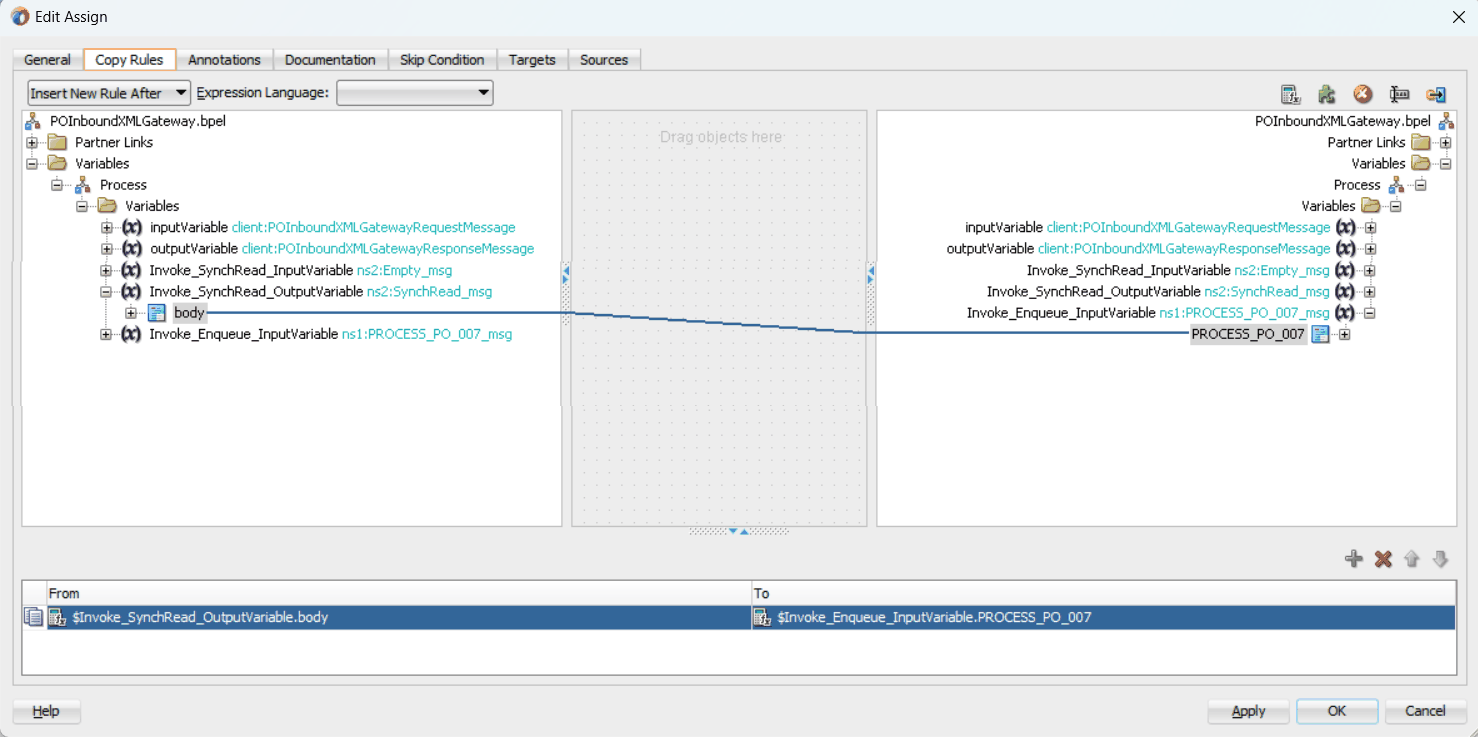
Select the Copy Rules tab and expand the target trees:
In the From navigation tree, navigate to Variable > Process > Variables > Invoke_SynchRead_OutputVariable and select body.
In the To navigation tree, navigate to Variable > Process > Variables > Invoke_Enqueue_InputVariable and select PROCESS_PO_007.
Drag the source node (body) to connect to the target node (PROCESS_PO_007) that you just specified. This creates a line that connects the source and target nodes. The copy rule is displayed in the From and To sections at the bottom of the Edit Assign dialog box.
Edit Assign Dialog
Click Apply and OK to complete the configuration of the Assign activity.
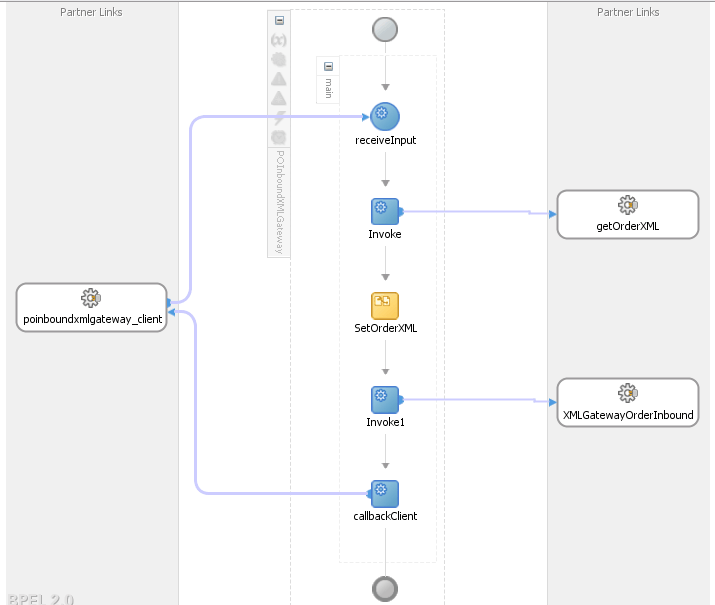
The following diagram illustrates the complete BPEL process:
BPEL Process Diagram
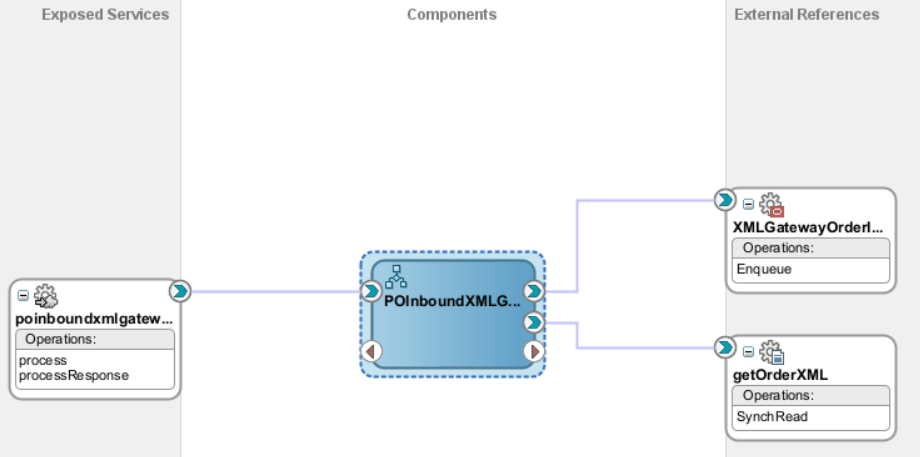
Click the POInboundXMLGateway (composite.xml) to display the Oracle JDeveloper composite diagram:
Oracle JDeveloper Composite Diagram
After designing the SOA Composite with BPEL process, the next step is to deploy, run and monitor it.
To invoke the XML Gateway inbound service from the BPEL client contained in the SOA composite, the SOA composite needs to be deployed to the Oracle WebLogic managed server. This can be achieved using Oracle JDeveloper. Once the composite is deployed, it can be tested from the Oracle Enterprise Manager Fusion Middleware Control.
Prerequisites
Before deploying the SOA composite with BPEL process using Oracle JDeveloper, you must have established the connectivity between the design-time environment and the runtime server. For more information, see Configuring the Data Source in Oracle WebLogic Server and Creating an Application Server Connection.
Note: If a local instance of the WebLogic Server is used, start the WebLogic Server by selecting Run > Start Server Instance from Oracle JDeveloper. Once the WebLogic Admin Server "DefaultServer" instance is successfully started, the <Server started in Running mode> and DefaultServer started message in the Running:DefaultServer and Messages logs should appear.
To deploy the SOA Composite application with BPEL process
Select the SOA Composite project in the Applications Navigator.
Right-click the project name. Select Deploy > [project name] > [serverConnection] from the menu that appears.
For example, you can select Deploy > POInboundXMLGateway > soa-server1 to deploy the process if you have the connection set up appropriately.
Note: If this is the first time to set up server connection, then the Deployment Action window appears. Select 'Deploy to Application Server' and click Next.
In the Deploy Configuration window, ensure the following information is selected before clicking Next to add a new application server:
New Revision ID: 1.0
Mark composite revision as default: Select this checkbox.
Overwrite any existing composites with the same revision ID: Select this checkbox.
The steps to create a new Oracle WebLogic Server connection from JDeveloper are covered in Creating an Application Server Connection.
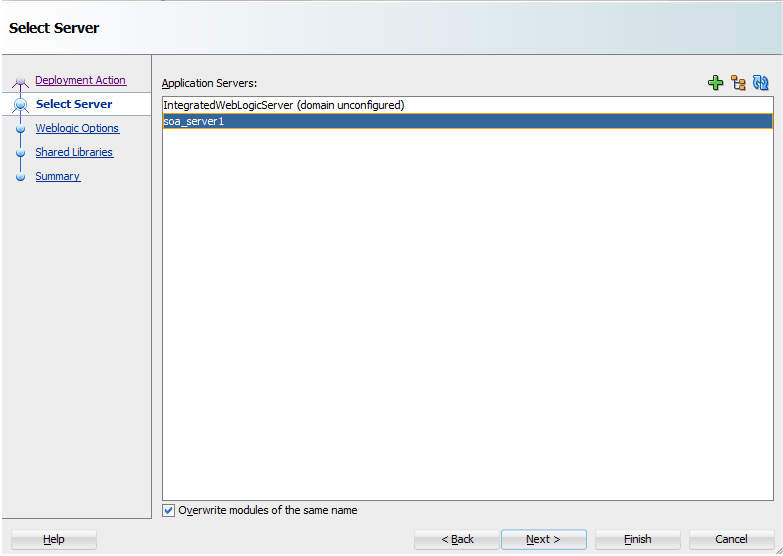
In the Select Server page, select 'soa-server1' that you have established the server connection earlier. Click Next.
Select Server Page
In the SOA Servers page, accept the default target SOA Server ('soa-server1') selection.
Click Next and Finish.
If you are deploying the composite for the first time from your Oracle JDeveloper session, the Authorization Request window appears. Enter username and password information specified during Oracle SOA Suite installation. Click OK.
Deployment processing starts. Monitor deployment progress and check for successful compilation in the SOA - Log window.
SOA - Log Window

Verify that the deployment is successful in the Deployment - Log window.
Deployment - Log Window

Once the BPEL process contained in the SOA Composite application is deployed, you can manage and monitor the process from the Oracle Enterprise Manager Fusion Middleware Control. You can also test the process and the integration interface by manually initiating the process.
To test the deployed SOA Composite with BPEL process
Navigate to Oracle Enterprise Manager Fusion Middleware Control (http://<servername>:<portnumber>/em). The composite you deployed is displayed in the Target Navigation tree.
Oracle Enterprise Manager Fusion Middleware Control
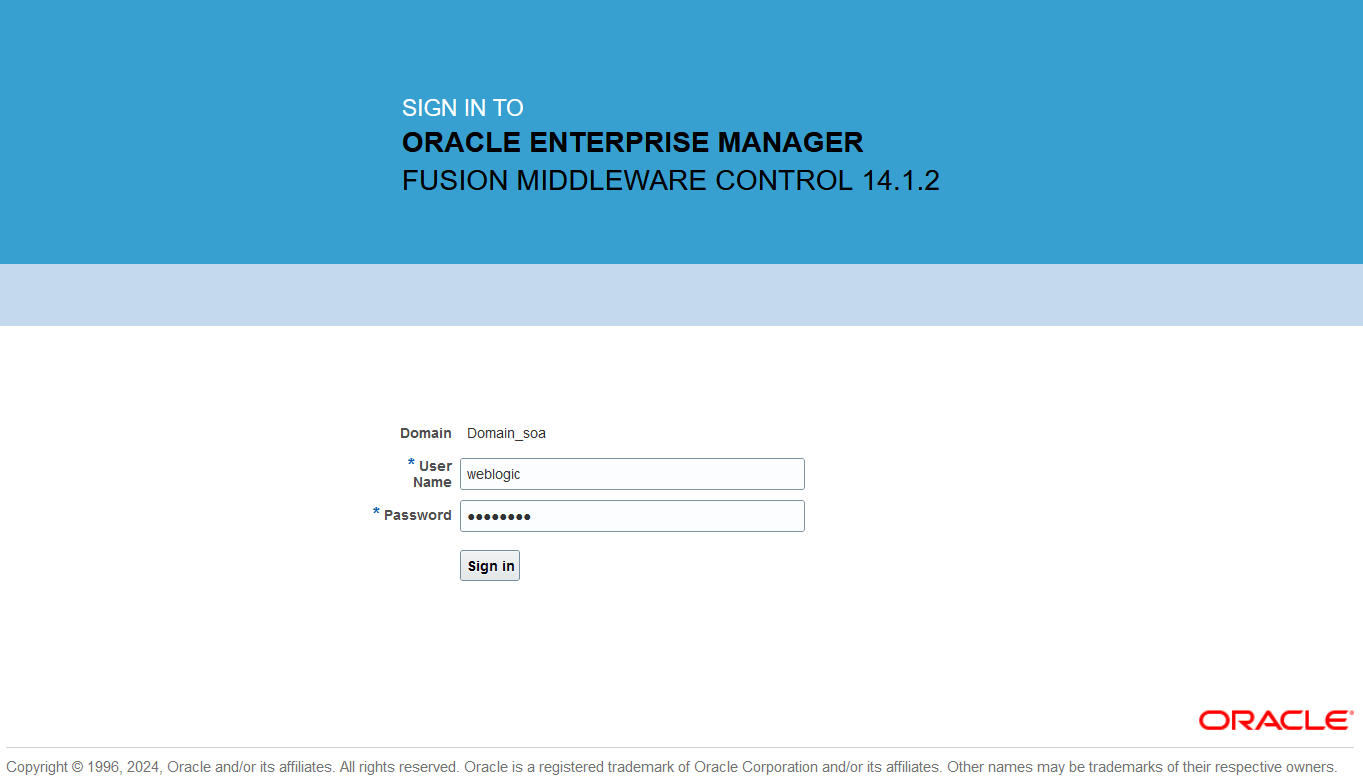
Enter username (such as weblogic) and password and click Sign In.
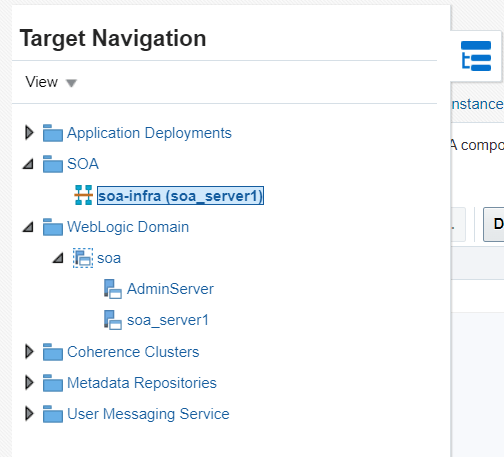
Click the Target Navigation icon near the left top corner to display the Target Navigation pane on the left. Expand the Target Navigation tree by clicking SOA > soa-infra (soa_server1) to navigate through the SOA Infrastructure home page and menu to access your deployed SOA composite applications running in the SOA Infrastructure for that managed server.
Target Navigation Tree
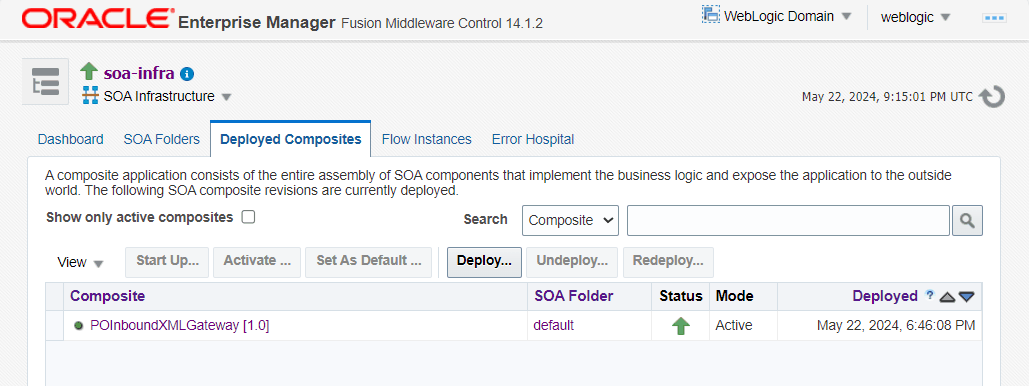
In the Deployed Composites tab, click the SOA Composite application that you want to initiate (such as 'POInboundXMLGateway').
SOA Infrastructure Home Page - Deployed Composites Tab
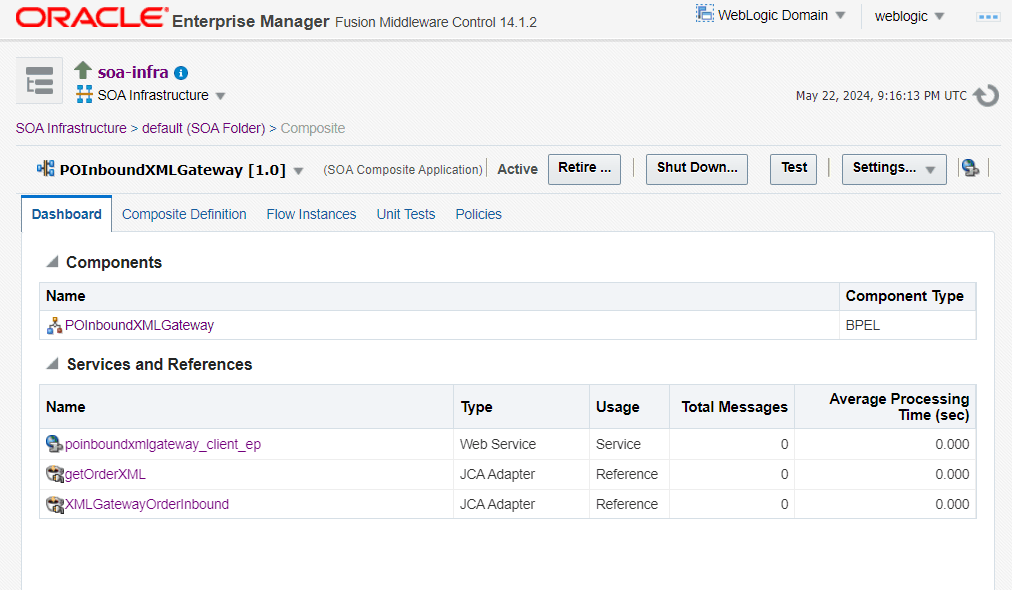
The selected composite details for 'POInboundXMLGateway' including the associated component name, services, and references are shown in the Dashboard tab. Click Test at the top of the page.
Composite Details Shown in the Dashboard Tab
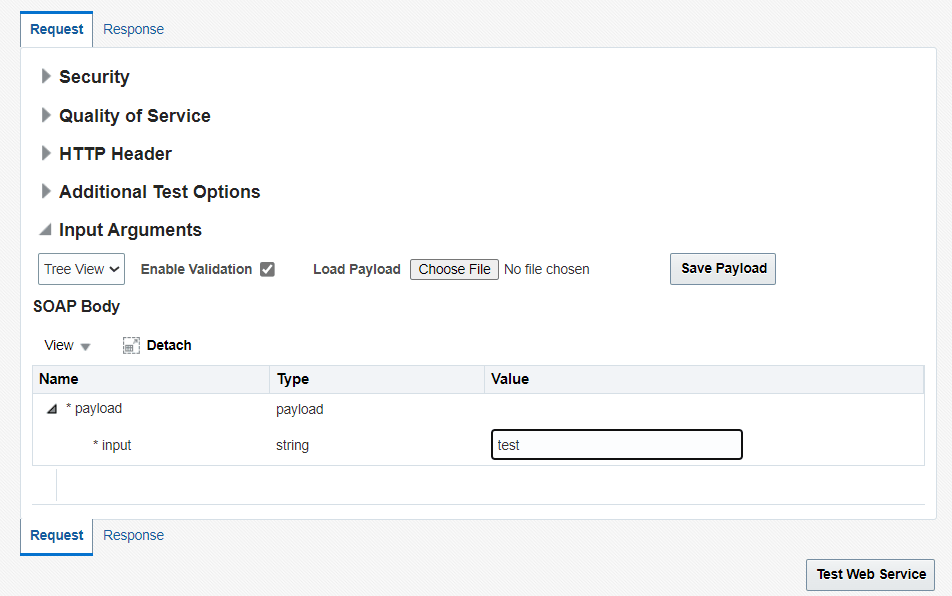
The Test Web Service page for initiating an instance appears. You can specify the XML payload data to use in the Input Arguments section.
Enter the input string required by the process and click Test Web Service to initiate the process.
Input Arguments Section with Data Entered for Testing Service Invocation
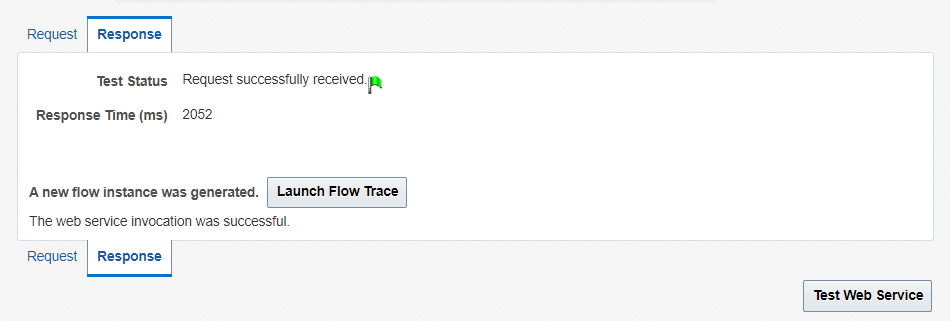
The test results appear in the Response tab upon completion. Click Launch Flow Trace in the Test Web Service page.
Response Tab
Click the Flow Instances tab. In the Search Options dialog, select desired search criteria including "default" as the Folder Name and "default/POInboundXMLGateway!1.0" as the Composite Name and click Search. From the Search Results page, click the desired Flow ID to display the Flow Trace page.
If any error occurred during the test, you should find it in the Faults section.
In the Trace section, you should find the sequence of the message flow for the service binding component (poinboundxmlgateway_client_ep), BPEL component (POInboundXMLGateway), and reference binding components (getOrderXML and XMLGatewayOrderInbound). All involved components have successfully received and processed messages.
If any error occurred during the test, you should find it in the Faults section.
Click your BPEL service component instance link (such as POInboundXMLGateway) to display the Instances page where you can view execution details for the BPEL activities in the Audit Trail tab.
Click the Flow tab to check the BPEL process flow diagram. Click an activity of the process diagram to view the activity details and flow of the payload through the process.
Once the BPEL process contained in the SOA Composite application is successfully initiated and completed, you can validate it through the relevant module in Oracle E-Business Suite applications.
For example, you can validate it using Oracle Transaction Monitor to ensure the process is successfully completed, and then import the order to Order Management application. You can then verify it in Oracle Order Management to ensure the order does exist.
To validate it Using Oracle Transaction Monitor
Additionally, you can also validate it from the Transaction Monitor. The Transaction Monitor is a tool for monitoring the status of inbound and outbound transactions originating from and going into Oracle E-Business Suite applications that have been processed by the XML Gateway and delivered or received by the Oracle Transport Agent. It shows a complete history and audit trail of these documents.
You can navigate to the Transaction Monitor page using the Workflow Administrator Web responsibility. The Transaction Monitor provides the following:
Flexible search criteria to support access to a specific document or group of documents
Search results at the document header level with drill down by document ID
Resend capability for outbound messages
Viewing capability of the XML message content
Note: For details on using the Transaction Monitor, see Oracle XML Gateway User's Guide. This guide is part of the Oracle E-Business Suite Documentation Library which can be accessed on the Oracle Technology Network (OTN).
Use the following steps to validate in Oracle Transaction Monitor:
Log on to Oracle E-Business Suite as a user who has the Workflow Administrator Web Applications responsibility. Select Transaction Monitor to open the search window to search for the order.
Select the Inbound Messages radio button.
Performing Search Using the Transaction Monitor
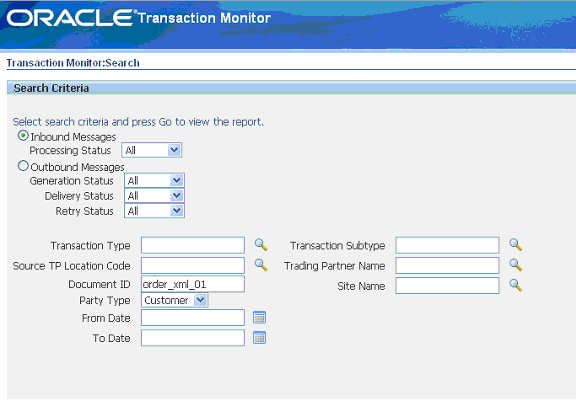
Enter the following information in the search window:
Party Type: Customer
Document ID: Enter the document ID you defined for the header message property. For example, enter oder_xml_01.
Click Go to retrieve all XML inbound messages listed in the Inbound Search Results region.
Confirm that transaction for 'order_xml_01' has the 'Success' status.
To import the order to Oracle Order Management:
Log on to the Forms-based Oracle E-Business Suite as a user who has the Order Management Super User, Vision Operations (USA) responsibility.
Select Orders, Returns : Import Orders > Order Import Request. The Order Import Request window is displayed along with the Parameters dialog.
Order Import Request Window and Parameters Dialog
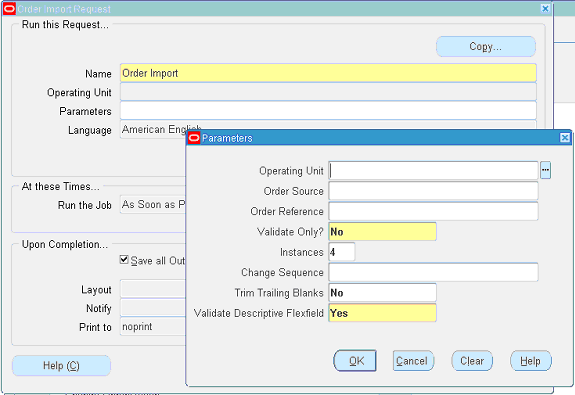
Click OK in the parameters dialog. The Order Import request name is populated automatically in the Import Request window.
Click Submit to submit the request. This displays a concurrent request number. Record the request number, but click No in the Decision dialog that you will not submit another request.
From the application menu, select View >Requests to open the Find Requests window.
Enter the request number you recorded earlier and click Find.
This would show the status of Order Import request. It should be success and the order should be created in Order Management application.
To validate it in Oracle Order Management:
Log on to the Forms-based Oracle E-Business Suite as a user who has the Order Management, Super User responsibility.
Select Order Returns > Sales Order. The Sales Orders window appears.
Search for an order by entering the order number (order_xml_01) in the Customer PO field. This would bring up the details of a newly created order using XML Gateway inbound map.
Sales Orders Window
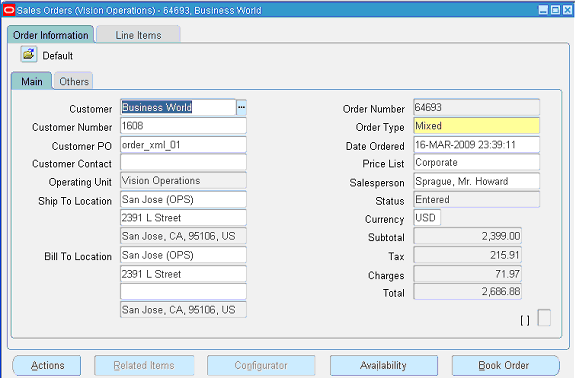
You can also select the Items tab for item details.
For an outbound XML Gateway Map interface, since an outbound message is first enqueued to the ECX_OUTBOUND queue, Oracle BPEL PM listens to ECX_OUTBOUND queue for the message with the same correlation Id. The message will then be dequeued to retrieve outbound data from Oracle E-Business Suite. The retrieved data can be passed to trading partners or consumers who subscribed to the message.
SOA Composite Application with BPEL Process Scenario
Take XML Gateway outbound interface PO acknowledgement XML Transaction as an example. The XML Gateway outbound interface is exposed as a Web service through ECX_CBODO_OAG72_OUT_CONFIRM outbound map.
When a purchase order is created and approved, on approval of the purchase order, a workflow will be triggered which creates the Purchase Order Acknowledgement flow and sends out the PO Acknowledgement as an XML file. The workflow delivers the Confirm BOD as the PO Acknowledgement to ECX_OUTBOUND queue for delivery to the other system.
The correlation Id for this message is set to “BPEL” and the Oracle BPEL PM listens to ECX_OUTBOUND queue for the message with the correlation Id “BPEL”. Confirm BOD as the PO Acknowledgement is written as an output XML file using File Adapter.
Prerequisites to Configure XML Gateway Outbound
Setting Up Correlation Identifier
For invoking an outbound message map, you need to set up the correlation identifier in Oracle E-Business Suite. The correlation identifier enables you to label messages meant for a specific agent, in case there are multiple agents listening on the outbound queue. The agent listening for a particular correlation picks up the messages that match the correlation identifier for the agent.
To set up the correlation identifier:
Log in to Oracle E-Business Suite with the XML Gateway responsibility. The Navigator page appears.
Click the XML Gateway link.
Click the Define Lookup Values link under XML Gateway to open the XML Gateway Lookups window.
XML Gateway Lookups Window
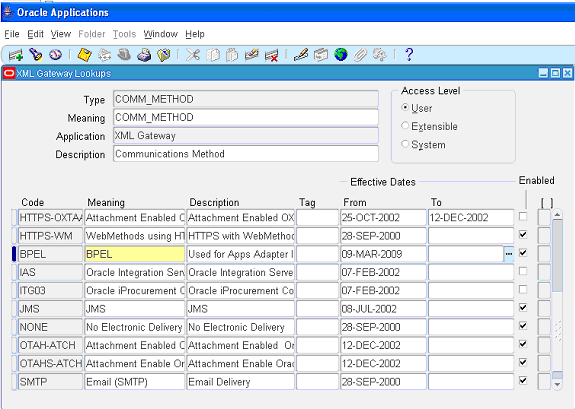
Search for COMM_METHOD in the Type field to see if it exists in the system.
Add a new record to the COMM_METHOD type by entering BPEL for the Code field and Meaning field. Enter description information and save the record.
Oracle XML Gateway puts the correlation of BPEL when enqueueing the message on the ECX_OUTBOUND queue.
Setting Up XML Gateway Trading Partner
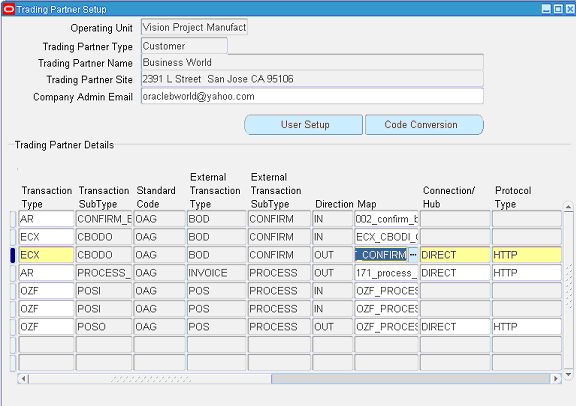
Once you have the correlation identifier set up correctly, you also need to ensure a valid outbound XML Gateway trading partner in the Trading Partner Setup window through the XML Gateway responsibility. You want to have the Protocol Type field set to BPEL.
For example, a Trading Partner (such as 'Business World' with Site information '2391 L Street San Jose CA 95106' and partner type 'Customer') has the following details for an outbound transaction:
Transaction type: ECX
Transaction sub type: CBODO
Standard Code: OAG
External transaction type: BOD
External transaction subtype: CONFIRM
Direction: OUT
Map: ECX_CBODO_OAG72_OUT_CONFIRM
Connection/Hub: DIRECT
Protocol Type: BPEL
Source Trading partner location code: BWSANJOSE
Trading Partner Setup Window
SOA Composite Application with BPEL Process Creation Flow
Based on the PO acknowledgement XML Transaction scenario, the following design-time tasks are discussed in this chapter:
To create a SOA Composite application with BPEL process
Launch Oracle JDeveloper.
Click New Application in the Application Navigator.
The New Gallery page appears. Select SOA Application from the Items list.
The New Gallery Page

Click OK.
The Create SOA Application - Name your application page appears.
The Create SOA Application - Name your application Page
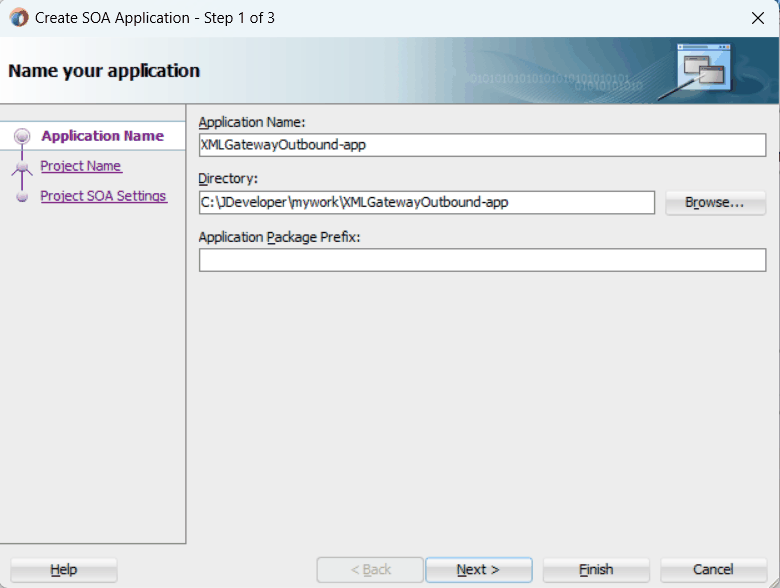
Enter an appropriate name for the application in the Application Name field.
Click Next. The Create SOA Application - Name your project page appears.
The Create SOA Application - Name your project Page
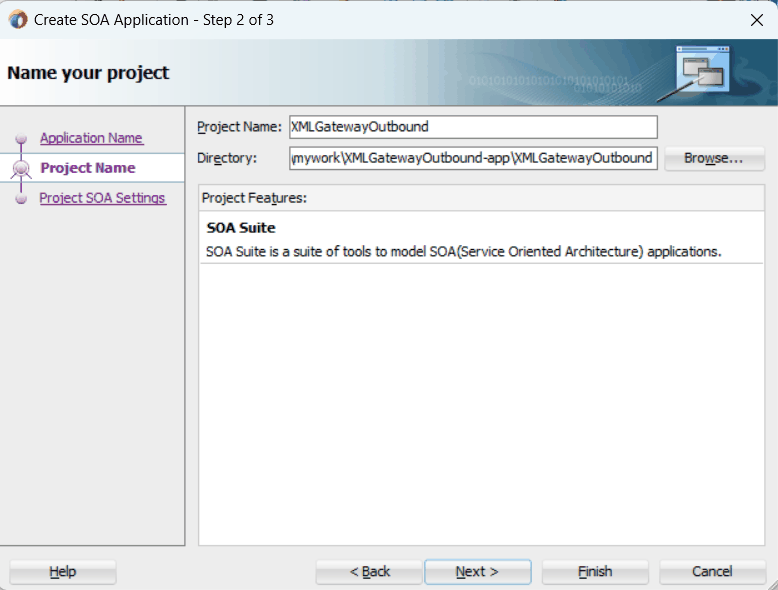
Enter an appropriate name for the project in the Project Name field, such as XMLGatewayOutbound.
Notice that SOA Suite is shown in the Project Features section.
Click Next. The Create SOA Application - Configure SOA settings page appears.
Leave the default Standard Composite selection unchanged for the Start from field.
Select Composite With BPEL Process from the Standard Composite list, and then click Finish.
You have created a new application, and a SOA project. This automatically creates a SOA Composite.
In the Create BPEL Process page, leave the default BPEL 2.0 Specification selection unchanged. This creates a BPEL project that supports the BPEL 2.0 specification.
Create BPEL Process Page
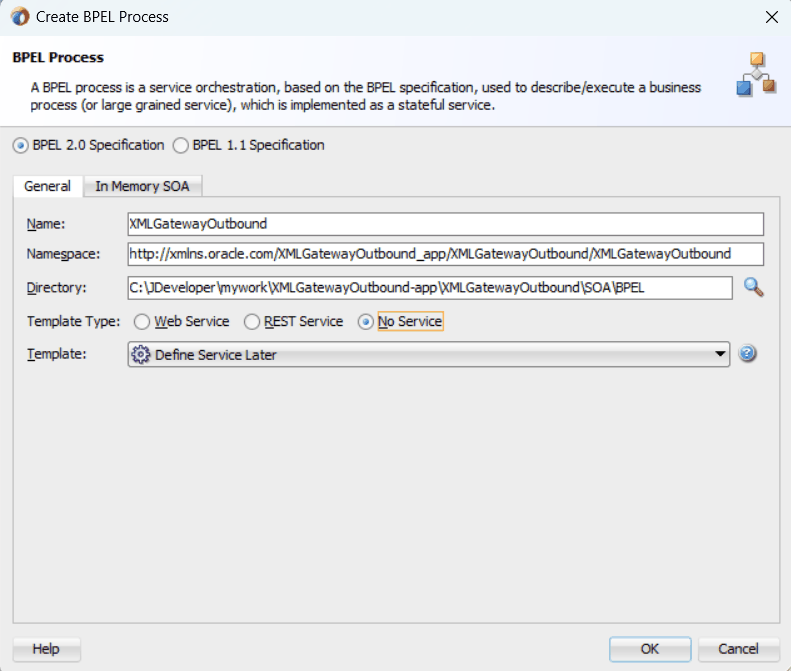
Name: Enter an appropriate name for the BPEL process, such as XMLGatewayOutbound.
Template Type: Select "No Service".
Define Service Later is automatically populated in the Template field.
Click OK.
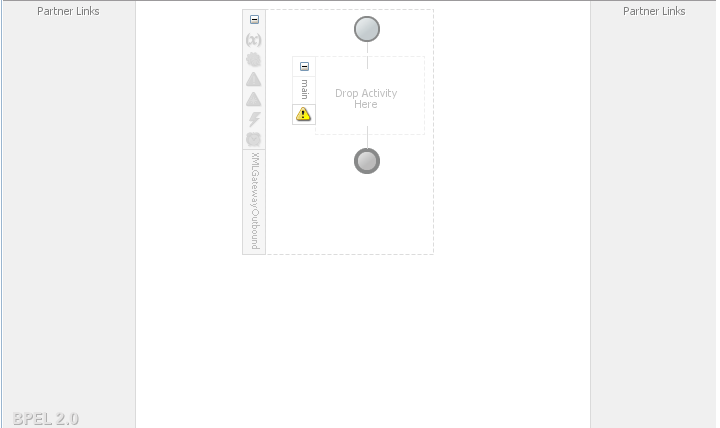
An empty BPEL process is created. The required source files including bpel and wsdl, using the name you specified (for example, XMLGatewayOutbound.bpel and XMLGatewayOutbound.wsdl) and XMLGatewayOutbound (composite.xml) are also generated.
An Empty BPEL Process
This section describes how to create an Oracle E-Business Suite Adapter for the application service by adding a partner link to your BPEL process. A BPEL partner link defines the link name, type, and the role of the BPEL process that interacts with the partner service.
You need to add a partner link for the outbound XML message in order for the Receive activity to dequeue it later.
To add a partner link
Click BPEL Services in the Component palette.
Drag and drop Oracle E-Business Suite (formerly known as Oracle Applications) from the BPEL Services list into the right Partner Link swim lane of the process diagram. The Oracle E-Business Suite Reference page appears.
Enter a reference name in the Name field. For example, XMLGatewayPOAckOutbound.
Click Next. The Service Connection dialog appears.
You can perform either one of the following options for your database connection:
Note: You need to connect to the database where Oracle E-Business Suite is running.
You can create a new database connection by clicking the Create a New Database Connection icon.
How to define a new database connection, see Create a New Database Connection.
You can select an existing database connection that you have configured earlier from the Connection drop-down list.
The Service Connection page will be displayed with the selected connection information. The JNDI (Java Naming and Directory Interface) name corresponding to the database connection appears automatically in the Database Server JNDI Name field. Alternatively, you can specify a JNDI name.
Note: When you specify a JNDI name, the deployment descriptor of the Oracle E-Business Suite Adapter must associate this JNDI name with configuration properties required by the adapter to access the database.
The JNDI name acts as a placeholder for the connection used when your service is deployed to the BPEL server. This enables you to use different databases for development and later for production.
Note: For more information about JNDI concepts, refer to Oracle Fusion Middleware Understanding Technology Adapters.
Once you have completed creating a new connection for the service, you can add an outbound message map by browsing through the list of APIs available in Oracle E-Business Suite.
Click Next.
If you are connecting to Oracle E-Business Suite Release 12, then the IREP File not present dialog appears indicating that Adapter could not find the Oracle Integration Repository data file corresponding to the database you are connecting in your workspace. Absence of the data file would make browsing or searching of Integration Repository tree considerably slow. You can choose to extract the data file and create a local copy of the Integration Repository data file. Once it is created successfully, Adapter will pick it up automatically next time and retrieve data from your local Integration Repository.
You can select one of the following options:
Click Yes to extract the Integration Repository data file.
After the system successfully creates a local copy of the Integration Repository data file, next time when you connect to the database, you will find the IRep Data File field appears in the Operation page indicating where your local copy exists with the creation date and time as part of the file name.
Click No to query the Integration Repository data file from the live database you are connecting to display the Integration Repository tree.
In this example, click Next in the Operation page to open the Oracle E-Business Suite Module Browser.
The Oracle E-Business Suite Module Browser combines interface data from Oracle Integration Repository with information about the additional interfaces supported by Oracle E-Business Suite Adapter, organized in a tree hierarchy.
Oracle E-Business Suite Module Browser
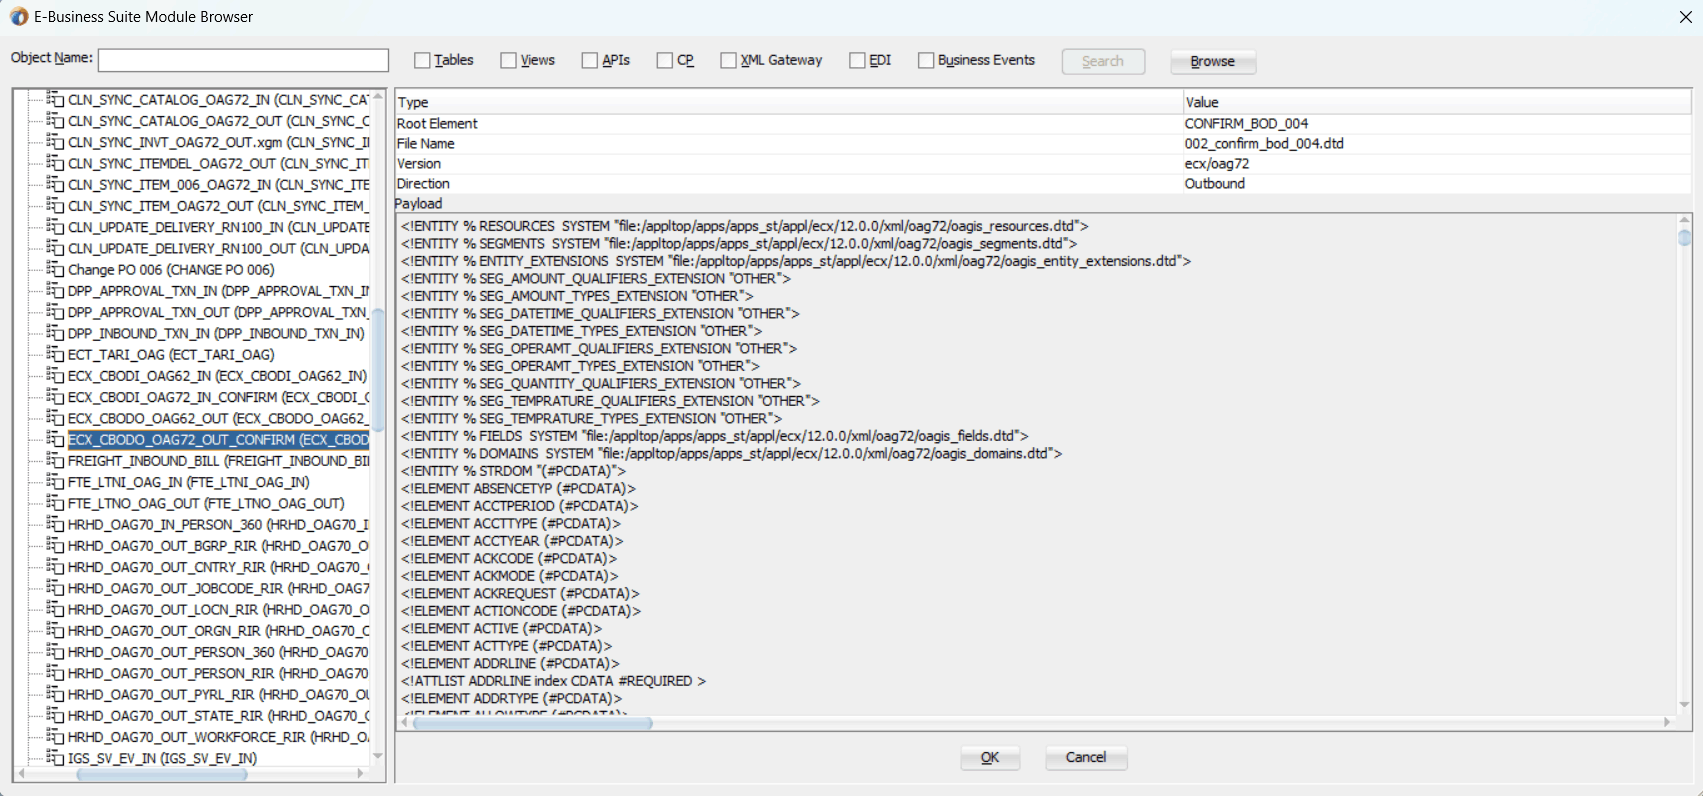
Note: The Oracle E-Business Suite Module Browser includes the various product families that are available in Oracle E-Business Suite. Each product family contains the individual products. Each product contains the business entities associated with the product. Business entities contain the various application modules that are exposed for integration. These modules are grouped according to the interface they provide.
Navigate to Other Interfaces > Custom Objects >XML Gateway Maps> Outbound to select an outbound map ECX_CBODO_OAG72_OUT_CONFIRM.
Click OK.
Application Interface Page
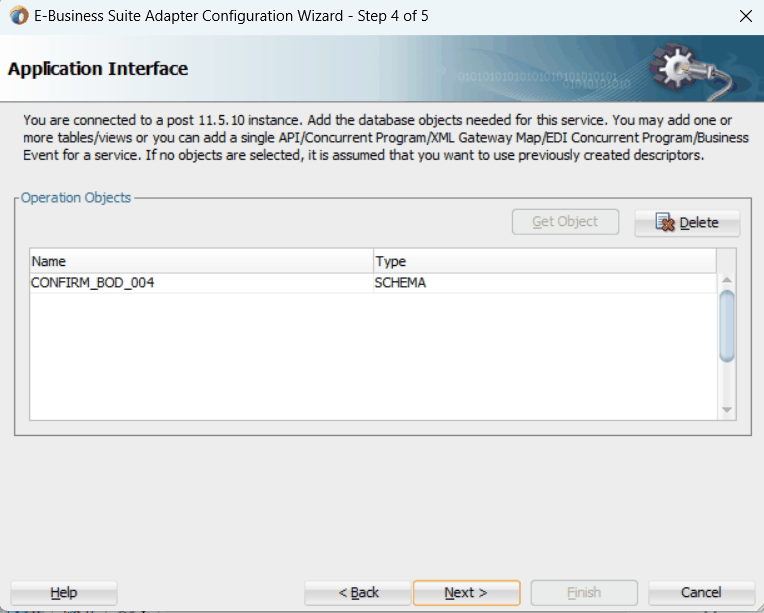
Click Next.
Click Finish to complete the process. The partner link is created with the required WSDL settings. The wizard also generates the WSDL file corresponding to the XML schema. This WSDL file is now available for the partner link.
When configuring the Oracle E-Business Suite Adapter to use an outbound XML Gateway map, you need to configure the Receive activity for the associated partner link. The Receive activity dequeues the outbound XML messages.
To configure the Receive activity
In Oracle JDeveloper BPEL Designer, expand the BPEL Constructs from the Component Palette. Drag and drop the Receive activity from the Web Service section into the center swim lane of the process diagram.
Link the Receive activity to the partner link XMLGatewayPOAckOutbound you created earlier.
The Receive dialog appears.
Enter an appropriate name for the Receive activity.
The Dequeue Operation is automatically selected since the partner link has been configured with an outbound XML Gateway map.
Specify a Variable to receive the message data from the partner link by clicking the Create icon to the right of the Variable field.
The Create Variable dialog box appears.
Click OK to accept the default name.
Select the Create Instance checkbox.
Edit Receive Dialog
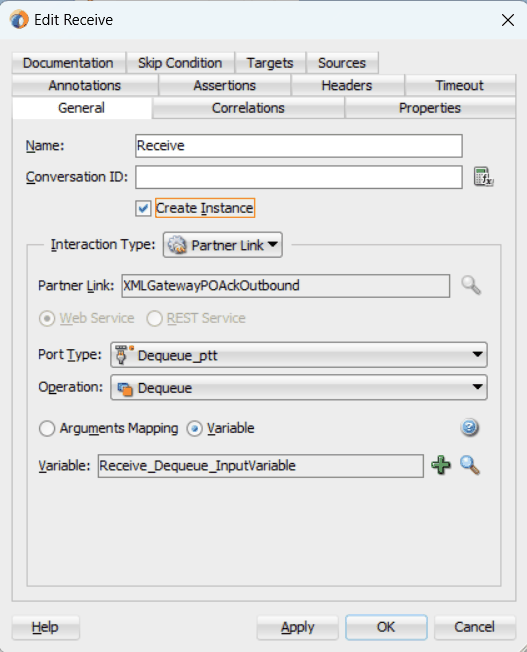
Click Apply in the Receive dialog, then click OK.
Use this step to write PO acknowledgement details in an XML file as an output file.
To add a Partner Link for File Adapter:
In Oracle JDeveloper BPEL Designer, click BPEL Services in the Component palette. Drag and drop File Adapter from the BPEL Services list into the right Partner Link swim lane of the process diagram. The File Adapter Reference page appears.
File Adapter Reference Page
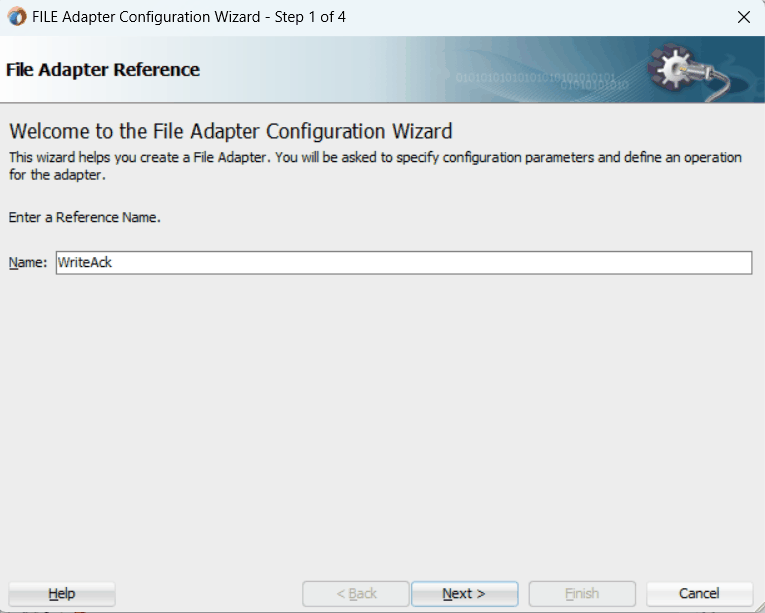
Enter a name for the file adapter service, for example, WriteAck.
Click Next. The Adapter Interface page appears.
Select the Define from operation and schema (specified later) radio button and click Next.
The File Server Connection page appears. Leave the default value unchanged for the File Server JNDI Name field.
Click Next
In the Operation page, specify the operation type. For example, select the Write File radio button. This automatically populates the Operation Name field.
Operation Page
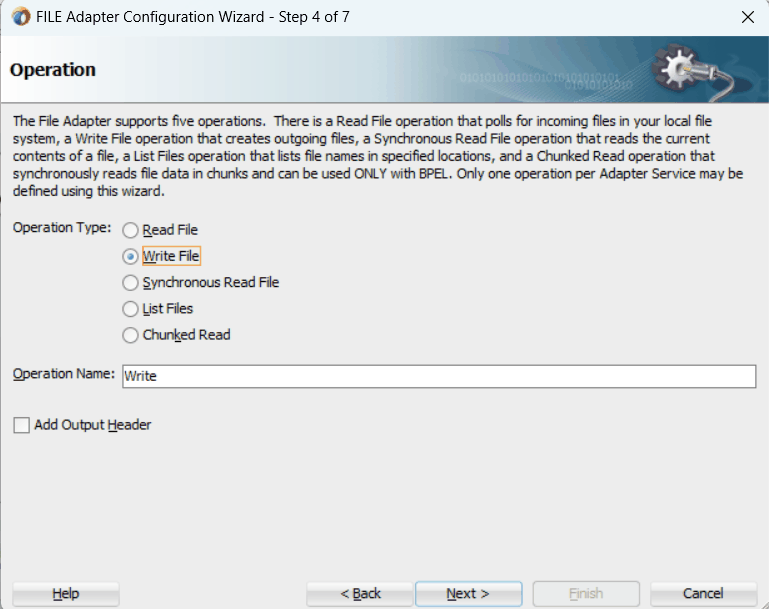
Click Next to access the File Configuration page.
File Configuration Page
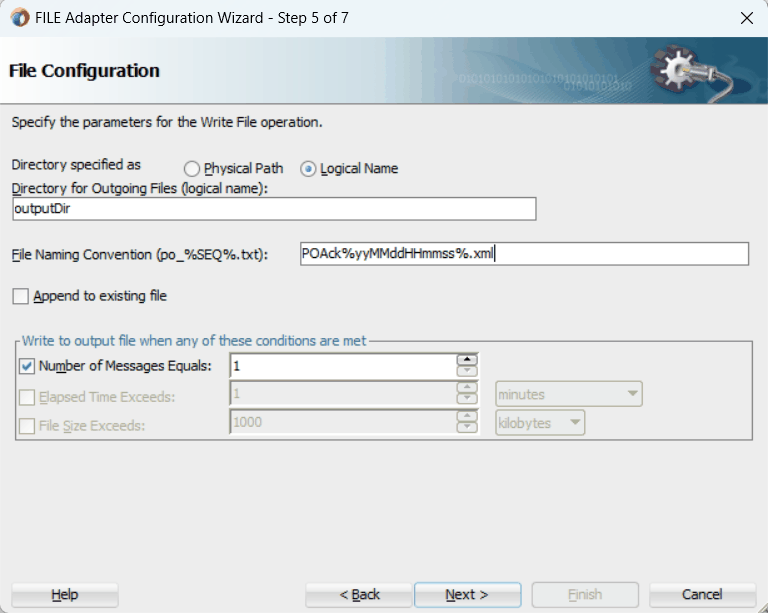
For the Directory specified as field, select Logical Name. Enter directory name in the Directory for Outgoing Files (logical name) field, for example, outputDir.
Specify a naming convention for the output file, for example, POAck%yyMMddHHmmss%.xml.
Select the Number of Messages Equals checkbox and set it to '1'.
Click Next to open the Messages page.
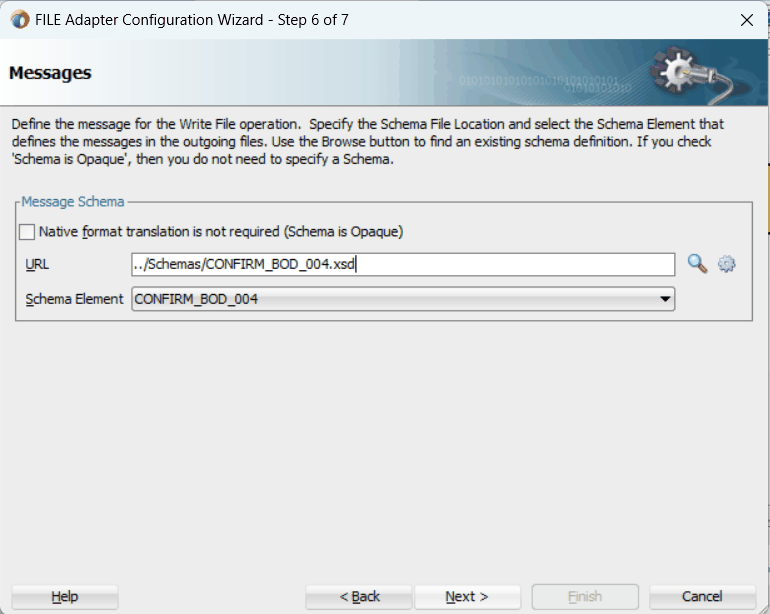
Select the 'browse for file schema' icon next to the URL field to locate the schema location and schema element.
The Type Chooser dialog box appears. Expand the node by clicking Project Schema Files > CONFIRM_BOD_004.xsd. Select CONFIRM_BOD_004 and click OK.
The selected schema information will be automatically populated in the URL and Schema Element fields.
Messages Page
Click Next.
This step is to configure an Invoke activity to write PO acknowledgement information to an XML file through invoking the partner link for File Adapter.
To add an Invoke activity:
In Oracle JDeveloper BPEL Designer, expand the BPEL Constructs from the Component Palette. Drag and drop the Invoke activity from the Web Service section into the center swim lane of the process diagram after the Receive activity.
Link the Invoke activity to the WriteAck service.
The Edit Invoke dialog appears.
Edit Invoke Dialog
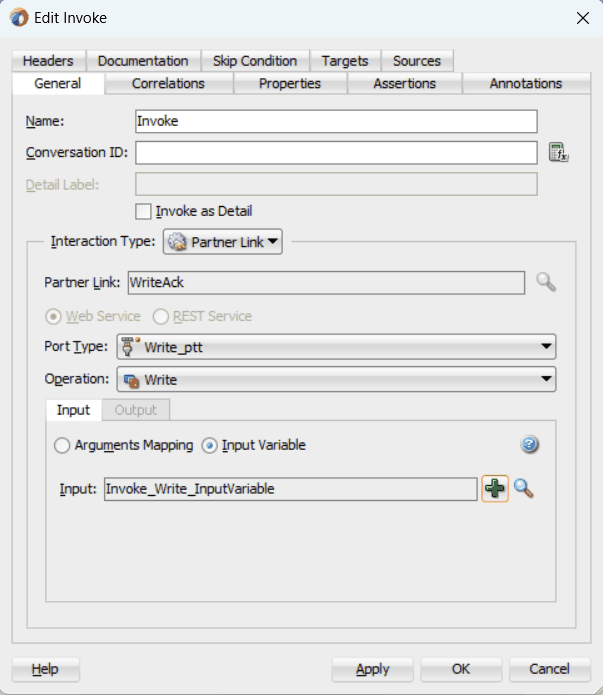
Enter a name for the Invoke activity. In the Input tab, ensure the Input Variable radio button is selected. Click the Create icon next to the Input Variable field to create a new variable. The Create Variable dialog box appears.
Select Global Variable, then enter a name for the variable. You can also accept the default name. Click OK.
Click Apply and then click OK in the Edit Invoke dialog to finish configuring the Invoke activity.
The Invoke activity appears in the process diagram.
Use the Assign activity to take the output from the Receive activity and to provide input to the Invoke activity.
To add an Assign activity:
In Oracle JDeveloper BPEL Designer, expand the BPEL Constructs from the Component Palette. Drag and drop the Assign activity from the Basic Activities section into the center swim lane of the process diagram, between the Receive and Invoke activities that you just created earlier.
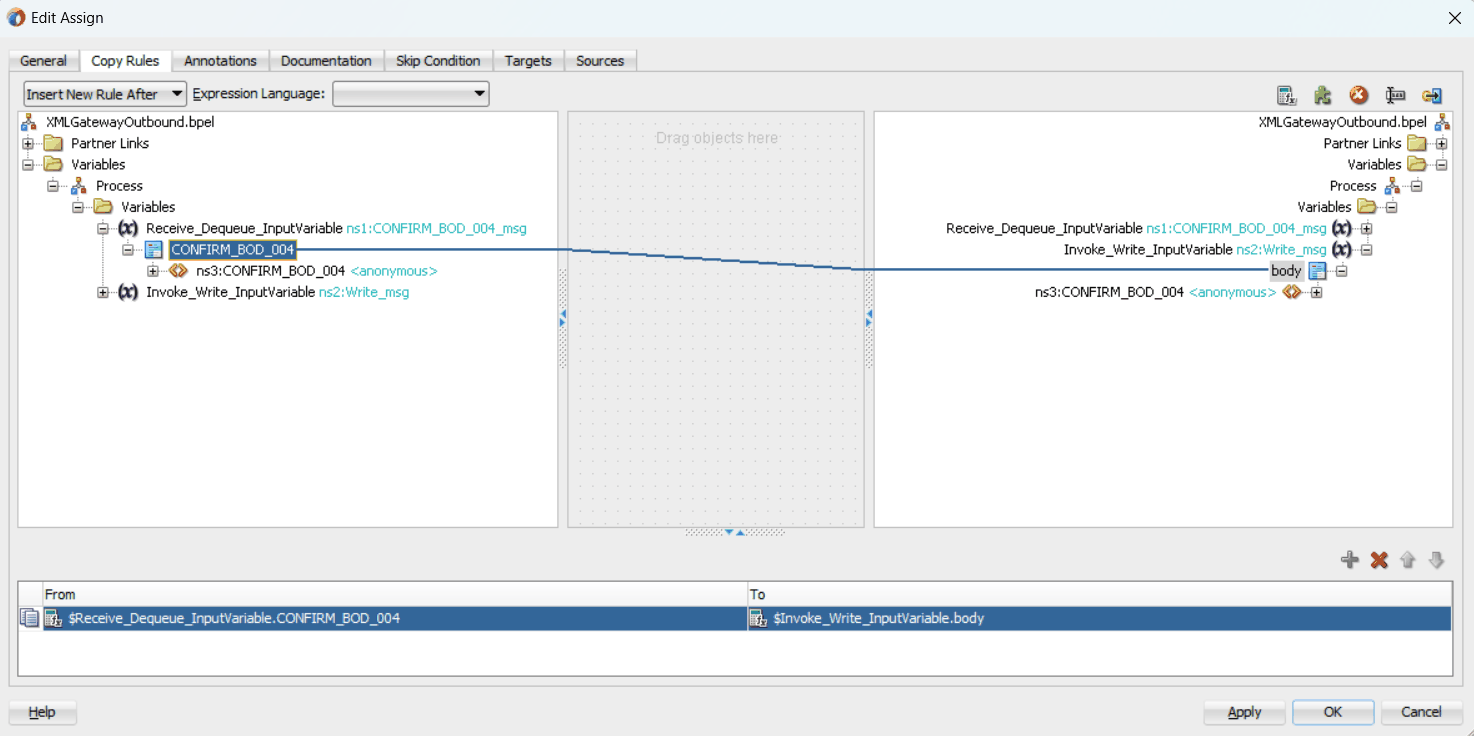
Double-click the Assign activity to access the Edit Assign dialog.
Click the General tab to enter a name for the Assign activity.
Select the Copy Rules tab and expand the target trees:
In the From navigation tree, navigate to Variable > Process > Variables > Receive_DEQUEUE_InputVariable and select CONFIRM_BOD_004.
In the To navigation tree, navigate to Variable > Process > Variables > Invoke_Write_InputVariable and select body.
Drag the source node (CONFIRM_BOD_004) to connect to the target node (body) that you just identified. This creates a line that connects the source and target nodes. The copy rule is displayed in the From and To sections at the bottom of the Edit Assign dialog box.
Edit Assign Dialog
Click Apply and then click OK to complete the configuration of the Assign activity.
The following diagram illustrates the complete BPEL process diagram:
BPEL Process Diagram
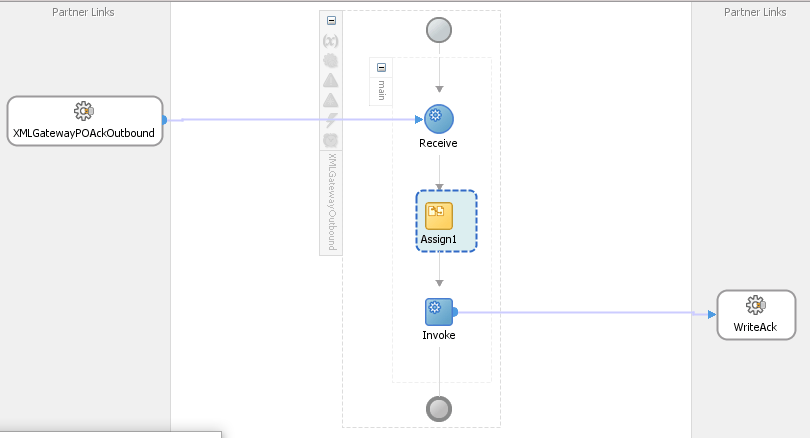
Note: Click the Source tab of XMLGatewayOutbound (composite.xml) to enter a value for the physical directory outputDir for the reference WriteEventData (such as /usr/tmp).
<property name="outputDir" type="xs:string" many="false" override="may">/usr/tmp</property>
Click XMLGatewayOutbound (composite.xml) to display the Oracle JDeveloper composite diagram:
Oracle JDeveloper Composite Diagram
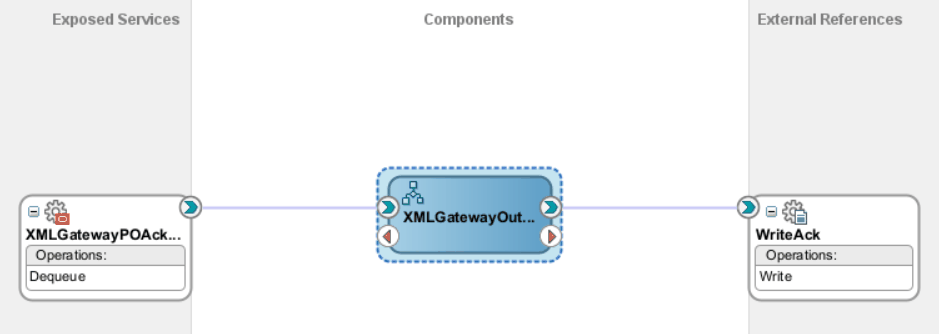
After designing the SOA Composite application with BPEL process, you can compile, deploy and test it.
After creating a SOA composite application with BPEL process for XML Gateway outbound message map, you need to deploy it to the Oracle WebLogic managed server. This can be achieved using Oracle JDeveloper. Once the composite is deployed, it can be tested from the Oracle Enterprise Manager Fusion Middleware Control.
Prerequisites
Before deploying the SOA composite with BPEL process using Oracle JDeveloper, you must have established the connectivity between the design-time environment and the runtime server. For more information, see Configuring the Data Source in Oracle WebLogic Server and Creating an Application Server Connection.
Note: If a local instance of the WebLogic Server is used, start the WebLogic Server by selecting Run > Start Server Instance from Oracle JDeveloper. Once the WebLogic Admin Server "DefaultServer" instance is successfully started, the <Server started in Running mode> and DefaultServer started message in the Running:DefaultServer and Messages logs should appear.
To deploy the SOA Composite application with BPEL process
Select the SOA Composite project in the Applications Navigator.
Right-click the project name. Select Deploy > [project name] > [serverConnection] from the menu that appears.
For example, you can select Deploy > XMLGatewayOutbound > soa-server1 to deploy the process if you have the connection set up appropriately.
Note: If this is the first time to set up server connection, then the Deployment Action window appears. Select 'Deploy to Application Server' and click Next.
In the Deploy Configuration window, ensure the following information is selected before clicking Next to add a new application server:
New Revision ID: 1.0
Mark composite revision as default: Select this checkbox.
Overwrite any existing composites with the same revision ID: Select this checkbox.
The steps to create a new Oracle WebLogic Server connection from JDeveloper are covered in Creating an Application Server Connection.
In the Select Server page, select 'soa-server1' that you have established the server connection earlier. Click Next.
In the SOA Servers page, accept the default target SOA Server ('soa-server1') selection.
Click Next and Finish.
If you are deploying the composite for the first time from your Oracle JDeveloper session, the Authorization Request window appears. Enter username and password information specified during Oracle SOA Suite installation. Click OK.
Deployment processing starts. Monitor deployment progress and check for successful compilation in the SOA - Log window.
Verify that the deployment is successful in the Deployment - Log window.
In Oracle E-Business Suite, you can check for outbound transactions that have been processed by the XML Gateway and delivered to the Transaction Agent by using the Transaction Monitor. You can also use the Transaction Monitor to resend an outbound document if necessary.
Note: For details on using the Transaction Monitor, see Oracle XML Gateway User's Guide. This guide is part of the Oracle E-Business Suite Documentation Library which can be accessed on the Oracle Technology Network (OTN).
If you have used a File Adapter to write outbound messages from Oracle E-Business Suite to files, you can check the output directory location for the presence of these files after the BPEL process contained in a SOA Composite application has been executed.
To validate the design-time tasks created earlier, you can log in to Oracle E-Business Suite to manually create and book the order as well as generate the order acknowledgement by submitting a Workflow Background Process concurrent request.
To manually test the SOA Composite application with BPEL process:
Log in to Oracle E-Business Suite as a user who has the XML Gateway responsibility.
This is to ensure that the XML Gateway trading partner is set up correctly so that a purchase order can have a valid customer that has been defined.
Select Define Trading Partner from the navigation menu to access the Trading Partner Setup window.
Enter the header values on the Trading Partner Setup window as follows:
Trading Partner Type: Customer
Trading Partner Name: Business World
Trading Partner Site: Enter a trading partner site information, such as 2391 L Street, San Jose, CA 95106.
Company Admin Email: Enter a valid e-mail address.
Enter the following trading partner details:
Transaction Type: ECX
Transaction SubType: CBODO
Standard Code: OAG
External Transaction Type: BOD
External Transaction SubType: CONFIRM
Direction: Out
Map: ECX_CBODO_OAG72_OUT_CONFIRM
Connection / Hub: DIRECT
Protocol Type: BPEL
Username: 'operation'
Password: Enter the associated password twice.
Protocol Address: 'http://example.com'
Source Trading Partner Location Code: BWSANJOSE
Save your work.
To successfully generated PO Acknowledgement, you need to create an order and then manually book the order through Order Management.
Use the following steps to create an order and then manually book the order:
Switch to the Order Management Super User, Vision Operations (USA) responsibility and select Customer > Standard from the navigation menu to open the Enter Customer window.
Search on the 'Business World' in the Name field and click Find.
Select the Business World with the following information from the search results.
Account Name: Business World
Registry ID: 2813
Identifying checkbox: checked
Address: 2391 L Street, San Jose, CA 95106
Country: United States of America
Select row with the following entries:
Account Number:1608
Account Description: Business World
Status: Active
Click Details to open the Customer Information page.
Click Details in the row with the Business World with Address '2391 L Street, San Jose, CA 95106' and Country 'United States of America'. This opens the Customer Account page.
Enter 'BWSANJOSE' in the EDI Location field.
In the Business Purposes tab, create a new row with the following values:
Usage: Sold To
Check on the 'Primary' checkbox
Save your work.
Use the following steps to generate acknowledgement for already created order:
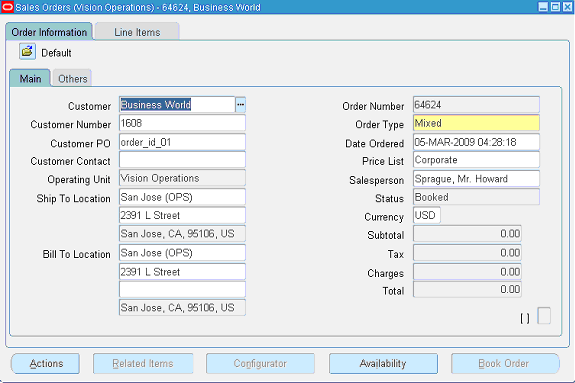
Log in to Oracle E-Business Suite as a user who has the Order Management Super User, Vision Operations (USA) responsibility. Select Order Returns > Sales Order to open the Sales Orders window.
Retrieve the order that you have created earlier by entering the order ID in the Customer PO field. For example, enter order_id_01.
Click Book Order to book the order.
Sales Orders Window
Switch to the System Administrator responsibility and select Request > Run.
Select Single Request and click OK.
Enter the following information in the Submit Request window:
Submit Request Window and Parameters Pop-up Window
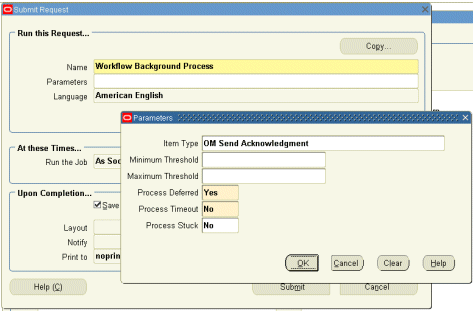
Name: Workflow Background Process
Enter the following parameters:
Item Type: OM Send Acknowledgement
Process Deferred: Y
Process Timeout: N
Process Stuck: N
Click OK.
Click Submit to submit 'send acknowledgement' request.
View your request by entering the request ID to ensure its status is 'Success'.
On approval of the order, Oracle E-Business Suite triggers the workflow that creates the Purchase Order Acknowledgement flow and sends out the PO Acknowledgement as an XML file. The workflow delivers the Confirm BOD as the PO Acknowledgement to the ECX_OUTBOUND queue for delivery to the other system.
On the other hand, Oracle BPEL PM listens to the ECX_OUTBOUND queue for the message with the correlation Id = “BPEL” which is the same id for this outbound message. The Confirm BOD as the PO Acknowledgement is written as the XML file using File Adapter.
Since the BPEL process contained in a SOA Composite application is deployed, the process is continuously polling the ECX_OUTBOUND queue for PO acknowledgement. It also writes PO Acknowledgement in the physical directory mentioned in composite.xml after receiving from the XML Gateway ECX_OUTBOUND queue.
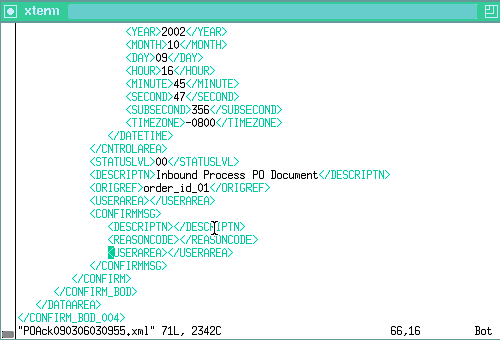
You can open the file in a text editor and search for the ORIGREF element. Its value should be the same as the order id (order_id_01 whose order was booked.
Output File in a Text Editor
If you experience problems with your Oracle XML Gateway integration, you can take the following troubleshooting steps:
Confirm that you have the correct settings for the following elements of the trading partner setup:
Standard Code
Transaction Type
Transaction Subtype
Source Trading Partner Location Code (Party Site ID)
Confirm that the correct transaction is enabled for the trading partner.
Check the status of the XML transaction in Transaction Monitor.
Ensure that the document number is unique within this transaction type.
For inbound transactions, confirm that ECX Listeners are running.
For outbound transactions, confirm that Background Engine is running.
In the trading partner setup, ensure that the Protocol Type is set to BPEL.
Specify the same correlation ID for Oracle E-Business Suite for the Adapter.
The Adapter Configuration wizard does not specify a correlation ID for XML Gateway transactions for inbound or outbound interfaces. Instead, a default correlation ID of BPEL is automatically set in the WSDL file. To make this configuration work, you must configure Oracle E-Business Suite to set the same correlation ID value of BPEL for the corresponding XML Gateway transactions.
If you want the Adapter to use a different correlation ID than the default, you need to configure a correlation ID in Oracle E-Business Suite, then edit the Correlation="BPEL" line contained in the <jca:operation> section of the adapter service WSDL. Replace BPEL with the string value of the correlation ID you specified in Oracle E-Business Suite.
Enable logging for adapter to see if the issue is on the middleware side. How to enable logging for Oracle E-Business Suite Adapter, see Enabling Logging for Adapters.