Creating Formula Fields

In addition to defining a custom field that is populated with dynamic data as described in Dynamic Defaults and Dynamic Hyperlinks, you can define fields to be dynamically calculated based on the values returned in the dynamic fields.

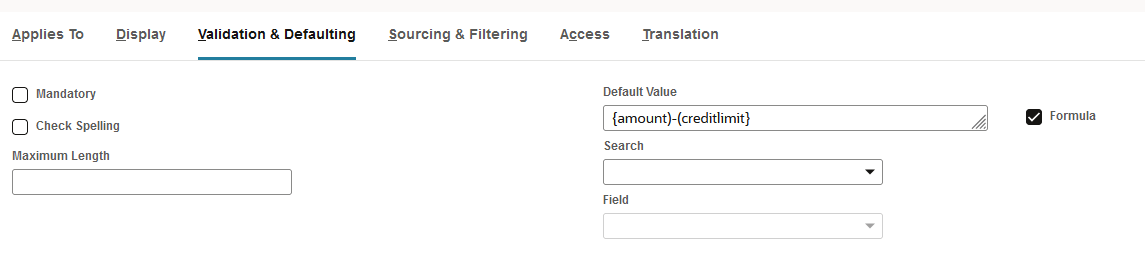
To define formula fields, click the Validation & Defaulting subtab of the custom field. Check the Formula box. In the Formula field, use NetSuite Tags to define the dynamically defaulted fields to be used in the calculation and use SQL Expressions to define the formula.

Validation & Defaulting subtab with Formula box checked.

To dynamically recalculate a formula, clear the Store Value box, and if needed, use the NULLIF function in your formula to prevent division by zero.

Important:

The Formula box must be checked for the field to be processed as a formula. Also, as with any defaulted field, the Store Value box must be cleared to dynamically recalculate the value each time the field is viewed. Additionally, when a record is loaded, custom formula fields are calculated. However, if changes to fields used in the formula definition are made during the time that the record is still loaded, the formula field is not recalculated to reflect these changes until the next time the record is loaded.

For more information about storing values, see Setting the Store Value Field.

During validation, the following inline errors can be returned:

When custom formula fields are returned in search results, the displayed value is the result of the dynamically calculated value at the time the search is performed. You can also define search criteria as formula fields without using a custom formula field. For more information, see Formulas in Searches.

Warning:

If a field on a record is referred to by a formula custom field, you cannot edit the referenced field with inline editing.

Note:

Knowledge of SQL will help you to fully leverage the flexibility and power of SQL functions to define complex formulas, but the Formula popup window can help you to correctly define formula expressions. The popup includes a Function list that lets you select SQL functions to be included in expressions, and Filter or Field lists that let you to select field names and have their IDs included in expressions. For more details, refer to SQL Expressions. Also, you can refer to the SuiteScript Reference Guide for tables of NetSuite field IDs.

Referencing Related Records in Formula Fields

When creating a formula field, you can reference data contained in fields on related records.

For example, you create a custom entity field to apply to customer records. You can add a formula field that references a field on the employee record of the sales rep assigned to the customer.

Note:

When referencing fields on other records, you are restricted to the records with search joins.

The format for formula field references is:

{‌fieldOnAppliedRecord.fieldOnJoinedRecord}

For example, if you wanted to display the partner email address on customer records, the format for the formula would be:

Validation & Defaulting subtab with email formulat format entered.

partner is the field ID for the Partner field on the customer record. email is the field ID for the email field on the partner record.

The following example displays the email address on the record for the partner assigned to each customer.

Sample Customer page with partner email highlighted on the Sales subtab.
Note:

Knowledge of SQL will help you to fully leverage the flexibility and power of SQL functions to define complex formulas, but you can click Set Formula next to the Formula box to add SQL functions or field IDs to your formula.

Custom Entity Field page with Default Value and Formula highlighted on the Validation & Defaulting subtab.
Note:

For more details, refer to SQL Expressions. Also, you can refer to the Working with the SuiteScript Records Browser for tables of NetSuite field IDs.

For information about field types in formulas, see Formulas with Various Field Types.

Formula Field Example

Suppose, for example, you want to display the remaining credit available to a customer on the customer record. Create a custom entity field of the type Currency called Remaining Credit. Apply the field to the Customer record and set it to display on the Financial subtab. Define the field with the following formula in the Validation & Defaulting subtab:

{creditlimit}-nvl({balance},0)

(where creditlimit and balance are standard customer fields and the nvl NULL handling function forces the value to be set to the second parameter when the field is NULL)

Make sure that you enable the Formula field and clear the Store Value box to ensure that the value is always dynamically recalculated as a formula.

When a customer record is viewed, the Remaining Credit field returns a calculated value based on the credit limit and customer balance fields.

For an additional detailed example of creating a formula field, see Example of Creating a Formula Field (SuiteAnswers ID 1014946).

Creating a Formula Field to Display Transaction Line Numbers

You can display line numbers on the Items subtab of transactions when they are viewed online and in printed transactions. To do so, create a custom field that uses the {linenumber} formula, and apply the field to transaction forms.

To create a custom field that uses the {linenumber} formula:

  1. To create a custom line number field, go to Customization > Lists, Records, & Fields > Transaction Column Fields > New.

  2. Enter a label for the field, select a Type of Integer Number, and clear the Store Value box.

  3. On the Applies to subtab, check boxes for the transactions that should display line numbers, and check the Print on Standard Forms box.

  4. On the Display subtab, select a Display Type of Disabled.

  5. On the Validation & Defaulting subtab, check the Formula box, and enter {linenumber} as the Default Value.

  6. Save the new field.

  7. To enable the line number field to be printed on a custom transaction form, edit the form. On the Printing Fields, Columns subtab, check the Print/Email box for the new field.

Note the following:

  • Line numbers display when a transaction record is in View mode. In Edit mode, line number value is shown as 1.

  • Line numbers correspond to the printed or viewed results, meaning they are contiguous even when transaction lines are omitted.

  • If you are using a line number formula field for viewed and printed transactions, and you also want to include the line number in search results, set up the search as follows. This setup ensures that search results match viewed and printed transaction items:

    • Set a criteria of Main Line = No (false).

    • Filter out transaction line items related to taxes.

    • Add the Item field as a results field.

    • Add the Amount (Gross) field as a results field; do not use the Amount field.

    • Add a Formula(Numeric) field as a results field, with the following formula expression: RANK() OVER (PARTITION by {internalid} ORDER BY {linesequencenumber}).

Using a Field Formula to Remove Extra Spaces After Date/Time Field Values

You can remove the extra spaces that appear after a Date/Time custom field value by using the {TO_CHAR(SYSDATE, 'FMMonth DD, YYYY')} formula.

For information about including line numbers in search results, see Including Line Numbers in Transaction Searches.

Related Topics

General Notices