Creating Installments
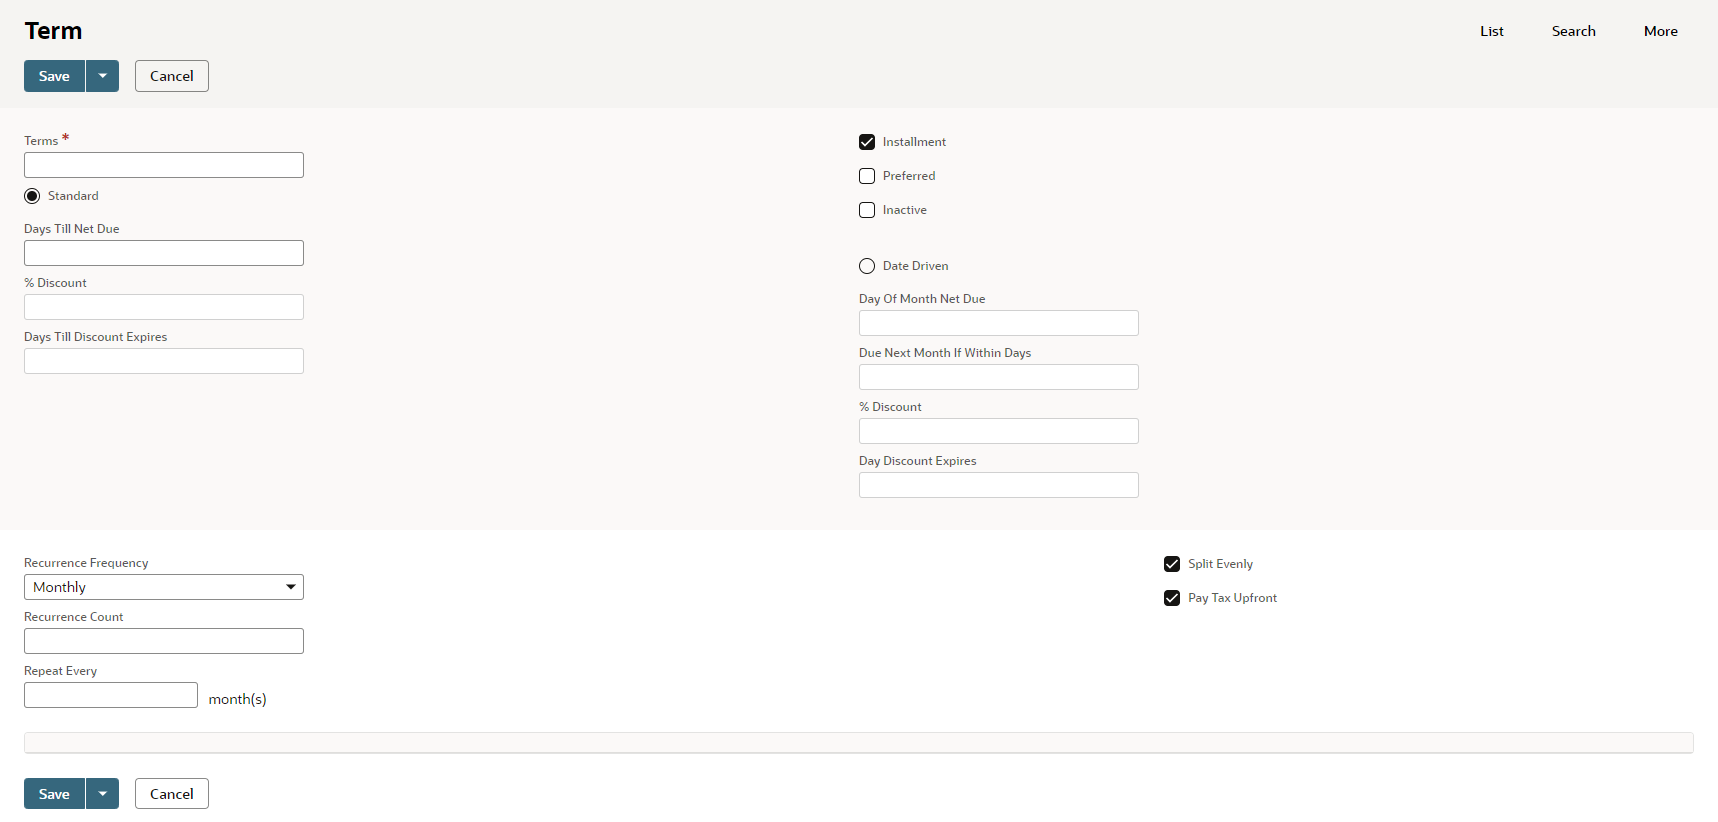
Create installments for your customers who pay for items over time using installment-based payments. The Installments feature is part of the term record. When you check the Installment box on the term record, installment-specific fields appear. Other installments-specific fields appear but you can't edit them.
Before using the Installments feature, enable it by going to Setup > Company > Enable Features. Select the Accounting subtab, and check the Installments box.
To create an installment term
-
Go to Setup > Accounting > Accounting Lists > New > Term.
-
On the term record, check the Installment box.
 Note:
Note:After you check the Installment box, new fields appear. Any non-installment fields become unavailable.
-
In the Terms field, enter the installment terms. For example, Three Month Term.
-
In the Days Till Net Due field, enter the number of days after the invoice date that the payment is due. For payments due upon receipt, enter 0.
-
From the list, select a recurrence frequency. Options are:
-
Annually
-
Daily
-
Monthly
-
Weekly
-
-
in the Recurrence Count field, enter the number of recurring payments. For example, 3.
-
To split the payments into equal amounts, check the Split Evenly box. If you don't want the payments split evenly, clear the box. A list of installment lines appears for you to enter the amount of payment for each installment.
-
To include the total tax amount with the first installment, check the Pay Tax Upfront box.
Note:If the Pay Tax Upfront box is checked, any shipping fees are split across the installments. However, the total of any shipping taxes is included in the first installment.
-
Click Save.
After you check the Installment box, fields that aren't supported by installments become unavailable, such as discounts.
After saving the installment term, you can add it to a sales order. On a sales order, you can only view installment details, and can't be edited. Any editing should be done on the invoice.
To add an installment term to a sales order, click the Billing subtab, and then select your term from the Terms list. When the sales order is fulfilled and billed, the installment terms appear on an invoice.
To view installment information, click the Billing subtab on the invoice. If you're creating a standalone invoice, select a term from the Terms list.

You have the option to override the installments. To make changes, check the Override Installments box. If you override any installments, make sure the total matches the invoice amount.
On the invoice, the header-level due date always indicates the next installment due date. In edit mode, you can't change the header-level due date, but you can change unpaid installments. You can't edit paid installments either. On the sales order, you can only view installments, but you can't edit them.
When you accept payments, the status of the payment changes. If a customer pays more than the amount due for an installment, the overage amount is applied to the next installment. When the overage amount doesn't completely cover the amount due for an installment, the status for that installment is partially paid. The same is true for the aging balance. The aging balance shows a late installment as past due, not the entire balance.
When an installment is unpaid after the due date, only the late installment is marked as past due, not the entire invoice.
Setting the Tax Allocation for a Subsidiary
If you have a OneWorld account, you can set the tax allocation method for each subsidiary by going to the Invoice Preferences page. When you set the tax allocation method for a subsidiary, all invoices with an installment term use the same method. Each subsidiary can only use one method. When you click the Installments subtab, your available subsidiaries appear in the Upfront Tax Allocation list and the Split Tax Allocation list. Select the subsidiaries that you want to use for one of the two allocation methods.
To set the tax allocation method for a subsidiary:
-
Go to Setup > Accounting > Preferences > Invoicing Preferences
-
Click the Installments subtab.
-
From the Split Tax Allocation list or the Upfront tax allocation list, select the subsidiaries you want to associate with a tax allocation method.
Note:You can select more that one subsidiary for each method. Each subsidiary can only have one tax allocation method.
-
Click Save.
If you need to change the tax allocation method for a subsidiary, you can do so from the Invoicing Preferences page. The change is applied from that date forward.
Related Topics
- Custom Workflow Based Invoice Approval
- Custom Workflow Based Invoice Approval
- Using the Billing Tab and Dashboard
- Global Invoicing Preferences
- Creating an Invoice
- Choosing an Invoice Type
- Billing Operations
- Billing or Invoicing a Sales Order
- Invoicing Billable Customers
- Closing or Voiding an Invoice
- Printing an Invoice
- Progress Invoices
- Billing Costs to Customers
- Displaying Deposit Balance on Customer Statements and Remittance Slips