Configuring OCI Credentials for AI
OCI configuration settings in AI Preferences are available only to customers who already have an Oracle Cloud Infrastructure (OCI) configuration saved in NetSuite. If you have not previously added an OCI configuration, you can't add new OCI credentials and the procedures in this topic do not apply.
If your company previously set up NetSuite to access Oracle Cloud Infrastructure (OCI) services with your own Oracle Cloud account, you can manage that configuration on the Settings subtab.
When using your company's Oracle Cloud account in NetSuite, your company pays for the OCI services it uses. You can manage whether an AI feature uses the OCI configuration by enabling or disabling them from the other subtabs in AI Preferences. OCI services include OCI Generative AI and, if you use the N/documentCapture module in SuiteScript, OCI Document Understanding. For more information, refer to the Calculating Cost in Generative AI section and the Billing and Cost Management section of the Oracle Cloud Infrastructure Documentation.
See these sections to manage your company's OCI configuration for AI features:
Before You Begin
If you have not previously saved an OCI configuration in AI Preferences, you can't add new OCI credentials and the information in this section does not apply. Refer to the Oracle Cloud Infrastructure Documentation for the linked topics in this section.
When configuring an Oracle Cloud account for use in NetSuite, the Oracle Cloud account must have the following services:
-
OCI Generative AI: IAM Policies for OCI Generative AI.
Follow the instructions in the "Give User Groups Access to All Generative AI Resources" section. Access to Generative AI resources is granted by group and compartment. When granting access:
-
Set up policies to
manageorusegenerative-ai-text-embedding and generative-ai-chat for the Generative AI service. -
The user OCID you plan to use in NetSuite must be in the group to which you grant access.
-
The compartment OCID you plan to use in NetSuite must match the compartment to which you grant access.
-
-
OCI Document Understanding: For instructions, refer to IAM Policies for User Permission in Document Understanding.
Access to Document Understanding resources is granted by group. API and input bucket access is granted for the tenancy. Output bucket access is granted for the compartment. When granting access, use the instructions linked in the previous paragraph to do the following:
-
Set up a policy to grant users access to the Document Understanding APIs.
-
Set up a policy to access input files in Object Storage from Document Understanding. Add the policy for setting up same-tenancy Object Storage access.
-
Set up a policy to let Document Understanding store results in Object Storage.
-
The user OCID you plan to use in NetSuite must be in the group to which you grant access for the policies.
-
The compartment OCID you plan to use in NetSuite must match the compartment to which you grant access.
-
After you add the OCI services you need, get the OCI configuration details from your Oracle Cloud account.
The configuration details you'll need are:
-
User OCID: For more information, refer to Managing Users.
-
Compartment OCID: For more information, refer to Managing Compartments.
-
Tenancy OCID: For more information, refer to Viewing Tenancy Details.
-
Fingerprint: The OCI fingerprint of the public key. For more information about the OCI fingerprint, refer to Required Keys and OCIDs.
-
Private Key: The OCI user's private key, which will be in a PEM file (for example,
oci_api_key.pem). For more information about the OCI user's private key, refer to Required Keys and OCIDs. -
Endpoint ID: Only needed if you've set up a dedicated AI cluster through Oracle Cloud. For more information, refer to Managing Endpoints.
If you plan to use your Oracle Cloud account for asynchronous document capture requests with the N/documentCapture module, you'll also need the following details. These details help the service find the documents you want to process and the place to store the output when your request is completed.
-
OCI Object Storage Namespace: This is the top-level container in your Oracle Cloud account that holds buckets and objects for other OCI services. A bucket inside an Object Storage namespace stores objects, such as files and documents. For more information, refer to Object Storage Namespaces
-
OCI Input Bucket: Name of the bucket where the service can find the inputs to be processed. For more information, refer to Object Storage Buckets
-
OCI Output Bucket: Name of the bucket where the service will store the outputs from processing. For more information, refer to Object Storage Buckets
Enabling and Configuring OCI Credentials for AI in NetSuite
Use the OCI configuration details from your Oracle Cloud account, described in the Before You Begin section, to complete the steps below.
To enable and configure OCI credentials:
-
Go to Setup > Company > AI > AI Preferences.
-
On the Settings subtab of the AI Preferences page, check the Use OCI Configuration to Get Unlimited Usage box.
After you check the box, you'll see the OCI configuration fields.
-
Fill in these fields with values from your Oracle Cloud account:
-
User OCID
-
Compartment OCID
-
Tenancy OCID
-
-
Next, you'll need to create NetSuite API secrets for the OCI fingerprint and OCI private key. Storing the OCI fingerprint and OCI private key as API secrets enhances security of these OCI credentials in NetSuite.
-
Click Create your API secrets here. The API Secrets page opens in a new browser tab.
-
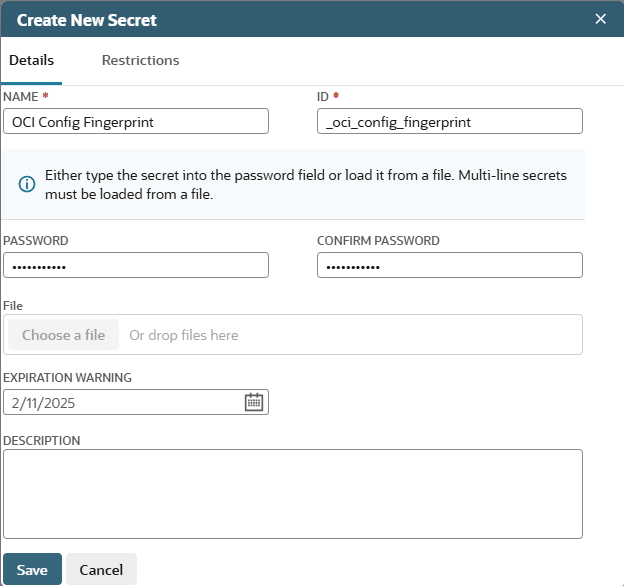
Click Create New. The Create New Secret dialog opens. Create the API secret for the OCI fingerprint as described below, then click Save.
-
On the Details tab:
-
Make sure the ID starts with an underscore, because the system adds a prefix custsecret when you save. For example, if you enter _oci_config_fingerprint, the ID will be custsecret_oci_config_fingerprint after you save.
-
Enter the OCI public key fingerprint value in both the Password and Confirm Password fields.
-
-
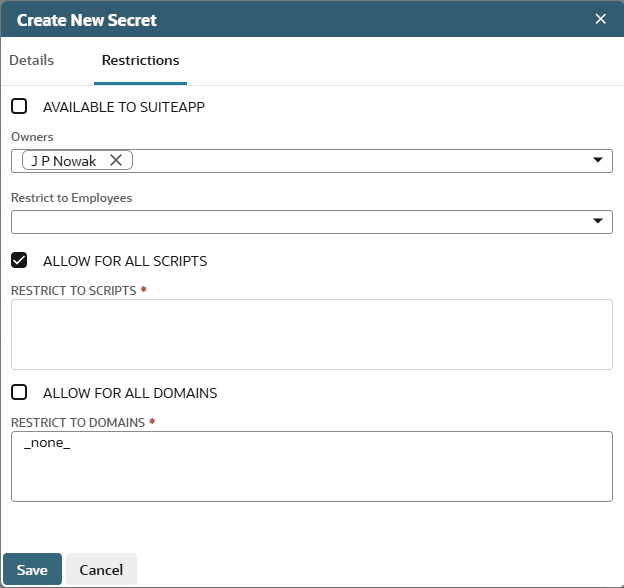
On the Restrictions tab, use the following settings so that any of the AI features managed from the AI Preferences page can use the API secret:
-
Check the Allow for All Scripts box.
-
Enter _none_ in the Restrict to Domains field.
-
-
-
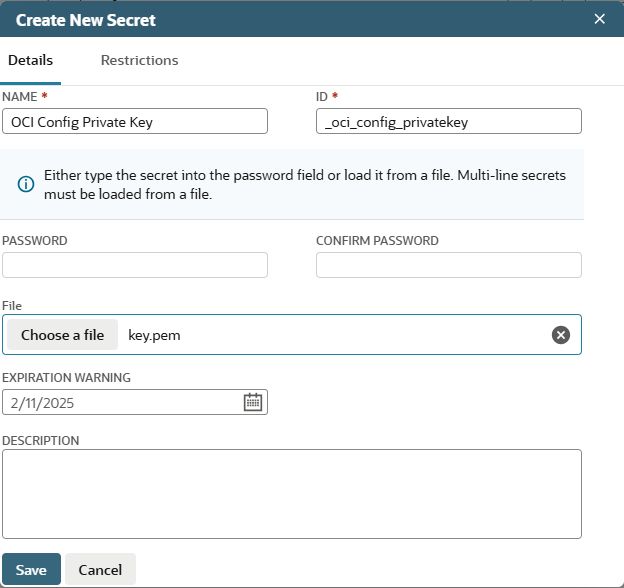
To create the API secret for the OCI private key, click Create New again. The Create New Secret dialog opens. Complete the fields as described below, then click Save.
-
On the Details tab, complete Name and ID similarly to how you did for the fingerprint, but upload the private key file instead of entering values in the Password and Confirm Password fields.
-
Use the same settings on the Restrictions tab.
-
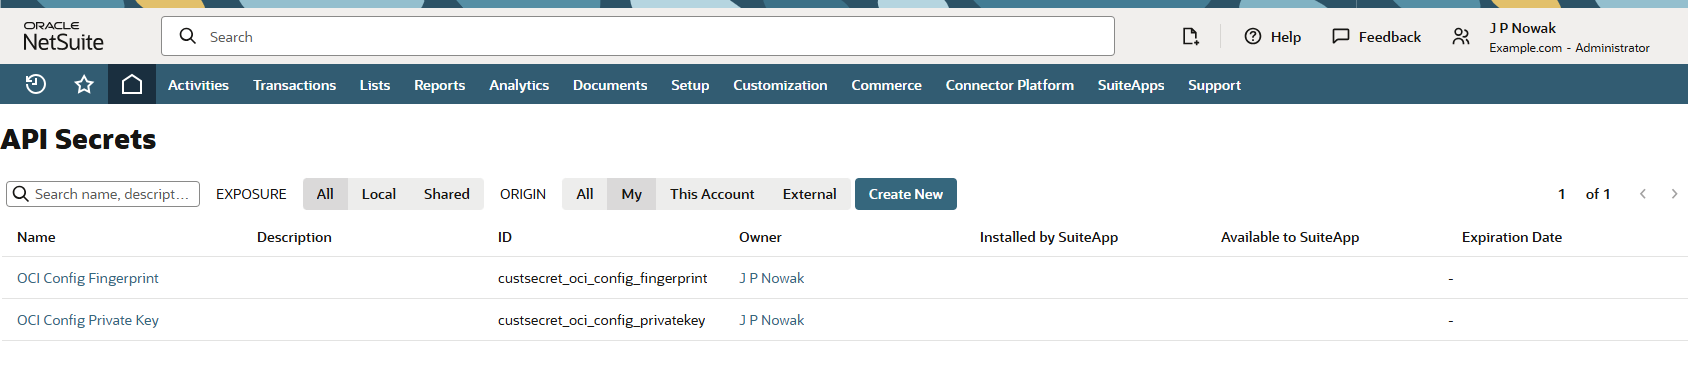
After you create the API secrets, they are shown on the API Secrets page.
-
-
Go back to the AI Preferences page. Enter the IDs of the API secrets in the API Secret for Fingerprint and API Secret for Private Key fields.
-
Fill in the Optional configuration for Asynchronous Document Capture fields if you plan to use asynchronous options for N/documentCapture. Use these values from your Oracle Cloud account:
-
OCI Object Storage Namespace
-
OCI Input Bucket
-
OCI Output Bucket
Note:Storing OCI configuration for asynchronous document capture is useful, but optional if:
-
You only want to provide credentials for other AI services on this page (such as Text Enhance or the SuiteScript N/llm module).
-
You only plan to use synchronous options for the N/documentCapture module.
-
You prefer to provide OCI details directly in your script as part of an
ociConfigobject. If you do, your script overrides the configuration stored here.
-
-
Click Validate credentials to test the OCI credentials you entered.
-
If everything's set up correctly, a confirmation message ("Credentials were successfully validated") is displayed.
-
If there are errors in the setup, an error message is displayed. Errors are displayed one at a time. Correct the error and click Validate credentials to test again. Repeat until the confirmation message is displayed.
Note:Each successful validation counts as one use of the OCI Generative AI service.
-
-
Click Save.
-
Next, set up the AI features to use the OCI credentials. Go to the subtab on the AI Preferences page to enable the feature to use the OCI credentials. You can choose to have some, all, or none of the AI features use OCI credentials.
For example, to use OCI credentials for Text Enhance, click the Text Enhance subtab on the AI Preferences page. Check the Use OCI Credentials for Text Enhance box, and click Save.
For each feature you set up to use OCI credentials, NetSuite stops using the NetSuite-supported AI infrastructure. NetSuite switches to the paid, unlimited usage mode through your Oracle Cloud account with OCI services.
For more information, see the following topics:
-
For each feature you set up to use OCI credentials, test the new setup.
Example: After setup of Text Enhance to use OCI credentials, go to a page that has a field with Text Enhance and try an action.
For more information, see Text Enhance.
-
If everything's set up correctly, the Text Enhance action works.
-
If there's a problem with the setup, you'll see a Task Unavailable error. Go back to the AI Preferences page, Settings tab. Click Validate credentials. Fix the error shown and repeat until you receive a successful confirmation message.
Common errors and how to resolve them:
-
On the AI Preferences page, Settings tab, verify that the OCI configuration parameters have the correct values for your Oracle Cloud account.
-
On the AI Preferences page, Settings tab, verify that NetSuite API Secret IDs entered correctly. Also verify that they match the secret IDs (not the secret names) shown on the API Secrets page.
-
On the API Secrets page, verify that the OCI fingerprint and OCI private key secrets were created correctly.
-
-
Disabling OCI Credentials for AI in NetSuite
You can disable OCI use by all NetSuite AI features managed from the AI Preferences page. This overrides all Use OCI credentials settings on the features' subtabs.
To disable OCI credentials:
-
Go to Setup > Company > AI > AI Preferences.
-
From the Settings subtab on the AI Preferences page, clear the Use OCI Configuration to Get Unlimited Usage box.
Note:The OCI configuration fields are hidden on the Settings subtab, but they're not deleted. If you check the Use OCI Configuration to Get Unlimited Usage box again, the fields are shown with your last saved values still there. If you want to remove the OCI credentials completely, clear each field one by one, then disable the OCI credentials.
-
Click Save.
-
After you disable OCI use on the Settings subtab, NetSuite goes back to the NetSuite-supported AI infrastructure. This affects all AI features managed from the AI Preferences page.
You'll see the monthly usage limits and used quantities in the usage tables on each feature's subtab.
-
When the OCI credentials are disabled, you can't change the Use OCI credentials settings for individual features. The settings on the feature subtabs are still shown, but they're overridden when OCI use is disabled on the Settings subtab.
-