Adding Resource Bookings to Your Project Plan
This functionality is available only if project center options are set to show resource booking information - See Project Center Options.
You can only add resources when viewing Hours in the booking grid and when the Actuals switch is toggled OFF. See Viewing Hours, Time Costs, or Time Charges in the Project Center.
You can add resource bookings to your tasks and project without having to open a form.
To add resource bookings to your project plan:
-
In the project center view, click the Add booking icon
 in the Actions column next to a task or next to the project root to add a new resource booking. The new booking row will be nested immediately under the task or the project root.
 -
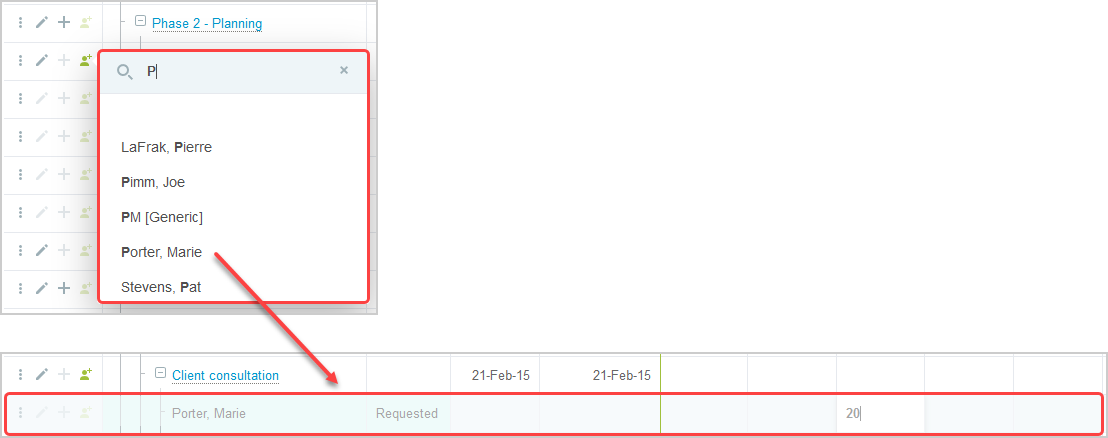
Type a few characters in the search box to refine the list of resources, if required, and select a resource from the list of options.
Note:You can change the selected resource to another named or generic resource for all bookings in the row at any time. To do so, click the Change Resource icon
 and select a new resource.
 -
Use inline-editing to enter information for all required fields and any additional information for your booking in the relevant project outline columns.
-
Double click the cell on the booking row corresponding to the week you want to book the resource for, and type the number of hours you want to book the resource for in that week. Repeat for each week you want to book the resource for the task.
 Tip:
Tip:Use Tab and Shift + Tab, or the right and left arrow keys to move to the next cell to the right or to the left of the cell you are currently editing. If the next cell is outside the horizontal scroll range, moving to that cell extends the scroll range by the number of visible columns.
You can use the Add multiple bookings action to fill multiple cells on the booking row covering a continuous period. See Creating a Booking and Distributing Hours Over a Multiple Week Period.
You can copy or cut values from the booking grid to the clipboard and paste values from the clipboard to the booking grid. See Copying, Cutting and Pasting Booking Row Cells.
You can copy a value into adjacent cells on the same booking row by dragging the fill handle to the left or right. See Copying Booking Row Cells Using the Fill Handle.
-
Click Save. A message appears confirming the bookings were created successfully. Booking cells with errors preventing the save operation are outlined with a black border. Point to the outlined booking cell to show a tooltip describing the error.
You can also click Discard to cancel all changes made in the booking grid after you last saved it.
General Guidelines
The following guidelines apply when adding bookings in the project center view:
-
A separate booking record is created for each booking grid cell containing hours. This enables you to distribute hours flexibly over multiple weeks and to include gaps if required.
-
If you want to create a booking over a specified period with hours distributed evenly across all weeks in the booking period, you can:
-
Create a single booking using the Create button. The booking will show as a single row in the project center even when the Grouped display option is off. If you edit any hours in the booking grid, separate booking records will be created for each week in the period.
-
Create multiple contiguous bookings in the Project Center using the Add multiple bookings action. See Creating a Booking and Distributing Hours Over a Multiple Week Period.
-
-
If you add a new booking row, you must enter some hours for that booking before you can save it.
-
You can add multiple booking rows before you add hours in the booking grid. However, you must add hours to all the booking rows before you can save your bookings. Note the Save button in the toolbar is disabled and shows in gray color if there are no hours in a booking row.
-
Use inline-editing to enter additional information for your booking in the relevant project outline columns.
-
You can create project templates complete with bookings then copy all bookings from your templates across to the new projects you create from these templates. Remember to choose the dates judiciously for your project and booking templates so they do not impact utilization or other reporting metrics. See Copying Bookings with Projects