Running the SuiteProjects Pro <> Exchange Integration
Support for Exchange Integration Manager (EIM) will end on January 13, 2026. After this date, you will not receive any updates, issue fixes, or customer support for EIM.
Effective October 1, 2026, you may not be able to use EIM to integrate SuiteProjects Pro with Exchange Online. The EIM installer and all access to SuiteProjects Pro from EIM may be removed in future.
If your organization uses the EIM desktop application to integrate SuiteProjects Pro with Exchange Online or Exchange Server, switch to an alternative solution before October 1, 2026. For more information, see End of Support for Exchange Integration Manager.
After you set up the SuiteProjects Pro <> Exchange integration, you can run Exchange Integration Engine to export task assignments, bookings, and time off requests (schedule requests) from SuiteProjects Pro to Exchange user mailboxes as calendar events and import calendar events from Exchange user mailboxes to SuiteProjects Pro as bookings if the bidirectional integration is enabled.
If you use Exchange Integration Manager 5.0 or later version, you can run Exchange Integration Engine as a Windows service. See Running Exchange Integration Engine as a Windows Service.
You should not use Task Scheduler to run Exchange Integration Manager 4.0 or later version.
Exchange Integration Engine uses the following process:
-
Exchange Integration Engine checks for new information in SuiteProjects Pro and fetches all new information from SuiteProjects Pro if found.
-
Exchange Integration Engine sends the new information from SuiteProjects Pro to Exchange.
-
Exchange Integration Engine waits for a response from Exchange and updates SuiteProjects Pro with the information received.
You can view console logs to check the status of your SuiteProjects Pro <> Exchange integration at any time. See Viewing Console Logs for the SuiteProjects Pro <> Exchange Integration.
Running Exchange Integration Engine
To run Exchange Integration Engine you must have:
-
Administrator role in Windows or Windows Server.
-
Read and write access to all Exchange user mailboxes the integration is configured to export to and import from
To run Exchange Integration Engine:
-
Launch SuiteProjects Pro Exchange Integration Setup. To do so, do one of the following:
-
Go to the application installation directory (the default installation directory is
C:\Program Files (x86)\SuiteProjectsPro\ExchangeManager). Click SuiteProjectsProExchangeEngine.exe. -
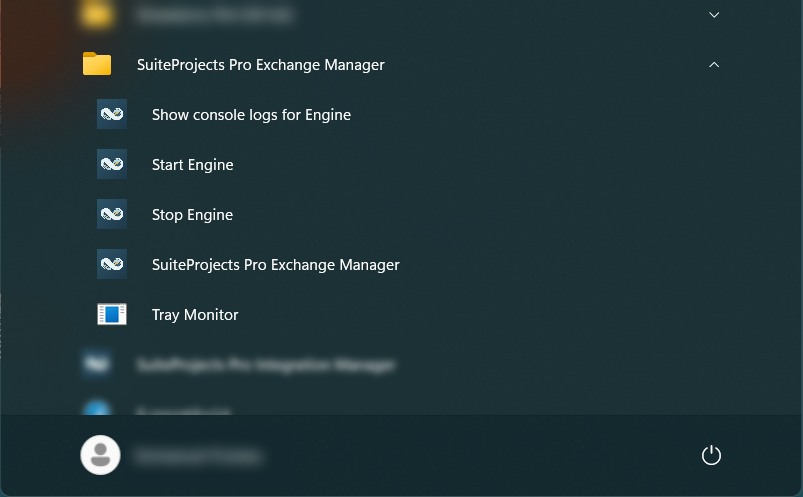
Go to the Windows start menu, scroll down to SuiteProjects Pro Exchange Manager, expand the program folder and click Start Engine.

A command line window opens and runs the Exchange Integration Engine as it has been configured. See Setting Up the SuiteProjects Pro Exchange Integration.
-
-
Exchange Integration Engine runs continuously in the background after you launch it. To stop Exchange Integration Engine, go to the Windows start menu, scroll down to SuiteProjects Pro Exchange Manager, expand the program folder and click Stop Engine.
Running Exchange Integration Engine as a Windows Service
If you use Exchange Integration Manager 5.0 or later version, you can run Exchange Integration Engine as a Windows service.
To run Exchange Integration Engine as a Windows service
-
Launch the Exchange Integration Tray Monitor. To do so, do one of the following:
-
Go to the application installation directory (the default installation directory is
C:\Program Files (x86)\SuiteProjectsPro\ExchangeManager). Click SuiteProjectsProExchangeTrayMonitor.exe. -
Go to the Windows start menu, scroll down to SuiteProjects Pro Exchange Manager, expand the program folder and click Tray Monitor.

-
-
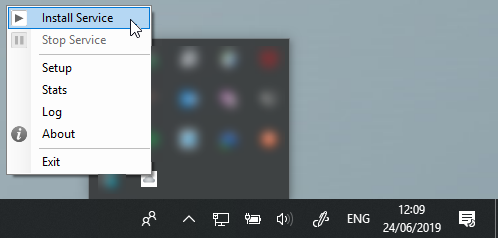
Go to the taskbar system tray, locate and the right-click the Exchange Integration Tray Monitor icon and click Install Service.

-
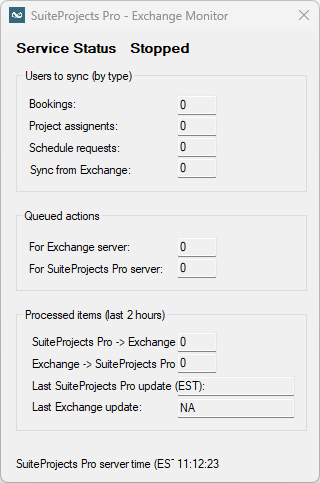
After the service installation completes, right-click the Exchange Integration Tray Monitor icon and click Start Service or Stop Service to control the service, or click Stats to open the Exchange Integration Monitor window and review the status and activity of the Exchange Integration Engine Windows service.

When Exchange Integration Manager 5.0 or later is installed, the following shortcuts are available from the Windows start menu:
-
Setup - Opens the Exchange Integration Setup
-
Start Engine - Runs the Exchange Integration Engine in the background
-
Stop Engine - Stops the Exchange Integration Engine
-
Show console logs for Engine - Opens a log file which describes Exchange Integration Engine's current progress if running, or a notification that it is not currently running.
-
Tray Monitor - Starts the taskbar System Tray utility to control and monitor the Exchange Integration Engine Windows service.
Viewing Console Logs for the SuiteProjects Pro <> Exchange Integration
You can view console logs to check the status of your SuiteProjects Pro <> Exchange integration at any time and audit changes to the integration configuration.
Two logs are available for the
-
The Setup log lists all setup and configuration actions performed using Exchange Integration Setup (
SuiteProjectsProExchange.log). -
The Engine log lists all Exchange Integration Engine actions with dates and times. (
SuiteProjectsProExchangeEngine.log).
You should attach a copy of both log files when contacting SuiteProjects Pro Support to report an issue with Exchange Integration Manager. See Troubleshooting Exchange Integration Manager.
To view console logs for the SuiteProjects Pro <> Exchange integration:
-
Do one of the following:
-
Go to the application installation directory (the default installation directory is
C:\Program Files (x86)\SuiteProjectsPro\ExchangeManager) and double-click the log file to open it in your default text editor. -
Go to the Windows start menu, scroll down to SuiteProjects Pro Exchange Manager, expand the program folder and click Show console logs for Engine to view the Engine log.

-
In SuiteProjects Pro Exchange Integration Setup, go to Help > Exchange Integration Logs > [Choose the log].
-
Right-click the Exchange Integration Tray Monitor icon and click Log to view the Engine log.
-