Add a Searchable List Action
The searchable list action can be used to automate the multiple actions required for a dynamic drop-down list using a single action.
Use case
oj-select-single in your RPA flows, you have to add the following actions:
| RPA flow step | RPA action to be added |
|---|---|
| Click drop-down list icon | Click Element |
| Wait for drop-down list items to load | Wait |
| Clear the drop-down list input | Clear Text |
| Click drop-down list icon | Click Element |
| Wait for drop-down list items to load | Wait |
| Enter text for filtering drop-down list input | Enter Text |
| Wait for the filtered list item to load | Wait |
| Click the first filtered list item | Click Element |
| Wait for the action to complete | Wait |
Instead, you can use the searchable list action to automate the dynamic drop-down list. It requires minimal configuration and simulates all the actions listed in the above table.
Add a Searchable List Action
Note:
You must use the low-code capabilities to add this action to a robot. Keep reading for step-by-step instructions.- Add the action
to the robot.
- On the canvas,
point to an action, and click
+.
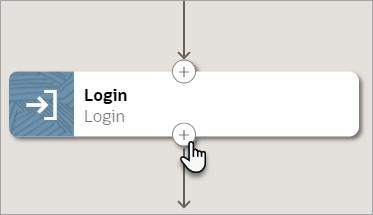
A menu of available actions appears.
- Select Searchable List.
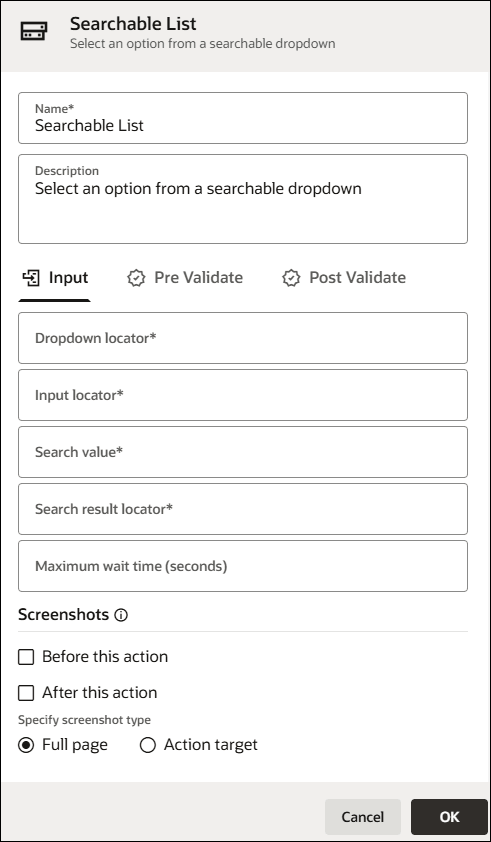
A List action appears on the canvas, and the List panel appears.
- On the canvas,
point to an action, and click
+.
- On the Input tab, specify
input details for the action.
Field Description Dropdown locator Drop-down list you want to automate the selection for. - In the robot, click within the Dropdown locator field, and select Target a page element

The Target a page element panel appears.
-
In the panel, from the Select browser tab to target drop-down, select the application where the robot works, and select Go. You might need to scroll down to find the application.
The application opens.
-
In the application that the robot needs to work in, point to the drop-down list that the robot needs to interact with, but don't select the list yet.
For example, if the field is shaded purple and the magnifying lens icon appears, don't click yet. The recorder is still collecting information.
Regardless of the operation that you chose, always point to the list itself.

-
Wait for the shading to turn green and the mouse icon to change to a hand, and then select the UI element.

For more tips, see Quick Start for Building Robots.
The recorder enters a value in the Dropdown locator field in the robot.
Tip:
Your settings determine whether Oracle Integration reuses targets for previously selected UI controls. You can override these settings, if needed. Reusing a target offers benefits. For example, you can update a target one time, and all actions that use the target get the update.
Input locator The text box for the drop-down list where we want to enter the search value. - In the robot, click within the Input locator field, and select Target a page element
The Target a page element panel appears.
-
In the panel, from the Select browser tab to target drop-down, select the application where the robot works, and select Go. You might need to scroll down to find the application.
The application opens.
-
In the application that the robot needs to work in, select the value you want to use as the input locator from the drop-down list that the robot needs to interact with, but don't select the list yet.
For example, if the field is shaded purple and the magnifying lens icon appears, don't click yet. The recorder is still collecting information.
-
Wait for the shading to turn green and the mouse icon to change to a hand, and then select the UI element.
For more tips, see Quick Start for Building Robots.
The recorder enters a value in the Input locator field in the robot.
Tip:
Your settings determine whether Oracle Integration reuses targets for previously selected UI controls. You can override these settings, if needed. Reusing a target offers benefits. For example, you can update a target one time, and all actions that use the target get the update.
Search value Enter the search value. Search result locator This field is auto-populated with the first element in the searchable list. You can change the value and add a different search result locator if required. Maximum wait time (seconds) Enter the maximum wait time in seconds. Screenshots Specify whether to capture any screenshots as part of the action. See Capture Screenshots in Robots.
If you choose an operation that gets a label or value, Oracle recommends taking a screenshot of the list.
- In the robot, click within the Dropdown locator field, and select Target a page element