Manage Accelerator Projects
You can install accelerator projects from the Integration Store. You can extend (customize) integrations in the accelerator project and later upgrade an accelerator project to a newer version automatically without losing any extensions you made to the previous version.
Extend an Integration in an Accelerator Project
You can extend (customize) an integration in an accelerator project by adding and configuring an extension group. An extension group enables you to extend your integration by adding invoke connections; data stitch, for-each, switch, map, robots, and integration actions; and global variables to the integrations in your accelerator project. When Oracle uploads newer versions of accelerator projects to the Integration Store, you can upgrade an accelerator project to this newer version automatically without losing your extensions.
- Learn About Accelerators Available in the Integration Store
- Extend an Integration Before or After an Invoke Connection or a Robotic Process Automation Action
- Add a Global Variable to an Extended Integration
- Add an Extension Group Before a Stage File Action Configured with a Write File Operation
- Add Connections to an Extended Integration
- Add Lookups and JavaScript Libraries to an Extended Integration
- Extend an Integration Before or After a Log or Notification Action
- Add an Extension Group Before or After a Parent Integration that Invokes a Child integration
- Merge Extension Group Changes into Updated Accelerator Projects
Learn About Accelerators Available in the Integration Store
The Integration Store provides accelerator projects that you can install and extend in a project. Newer, updated versions of accelerator projects can also become available in the Integration Store for you to re-install, as necessary.
See Find Recipes and Accelerators and Install a Recipe or Accelerator in Using Recipes and Accelerators in Oracle Integration 3.
Extend an Integration Before or After an Invoke Connection or a Robotic Process Automation Action
You can extend an integration to add the following before or after an invoke connection or a robotic process automation action:
- Data stitch action
- For-each action
- Switch action
- Map action
- Integration action (and associated map) for invoking a child integration
- Invoke connection (and associated map)
- Robot flow action (and associated map)
- In the navigation pane, click Projects.
- Find the accelerator project to extend. The
Accelerator and Oracle labels
identify these types of projects. You can also use the
Filter
 to display a specific project type (all, user-developed, accelerator,
extended accelerator, or recipe). For example:

- Click the project name or click
 .
.
- In the Integrations section, find the specific integration to extend.
- Click Actions
 , and select Extend. The
Extend option is only available in accelerator
projects. This option behaves similar to the Edit option
in non-accelerator integrations.
The integration is displayed in the canvas.

- Perform one of the following actions before or after an invoke
action or a robotic process automation action.
- Click Add
 at the location where you want to add the extension, then
select Extension Group.
or
- Click Actions
 inside the invoke action or the robotic process automation
action.
- Based on where you want to place the extension, select
Extend before or Extend
after. Both options are available if you have not yet
added an extension to either side of the invoke action or the robotic
process automation action.
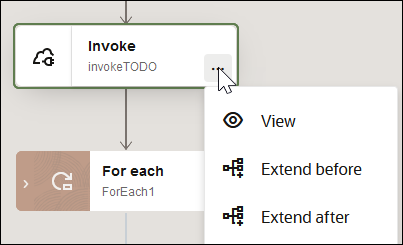
Note:
If Extend before and Extend after are not available for selection and you have not added an extension to either side of the invoke, your administrator has restricted the use of extensions on the invoke connection. You cannot extend restricted invokes.
The extension group is added to the integration.

- Click Add
- If you want to update the name, click Edit
 in Edit extension group.
- Click Integration actions
 and drag an invoke or action into the integration or click
Add
 inside the extension group to add an invoke or action to the
integration. For example, if you click Add
 , the following menu is displayed.
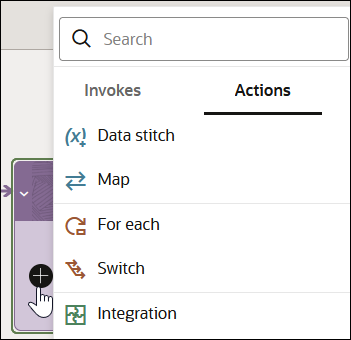
See the following sections for details:- Add a Data Stitch Action to an Extended Integration
- Add an Ad-Hoc Map Action to an Extended Integration
- Add a For-Each Action to an Extended Integration
- Add a Switch Action to an Extended Integration
- Add an Integration Action to an Extended Integration
- Add a Robot Flow Action to an Extended Integration
- Add an Invoke Connection and Associated Map to an Extended Integration
Add a Data Stitch Action to an Extended Integration
You can add a data stitch action to an extended integration. This section provides a use case.
- If you select Actions, then Data
stitch:
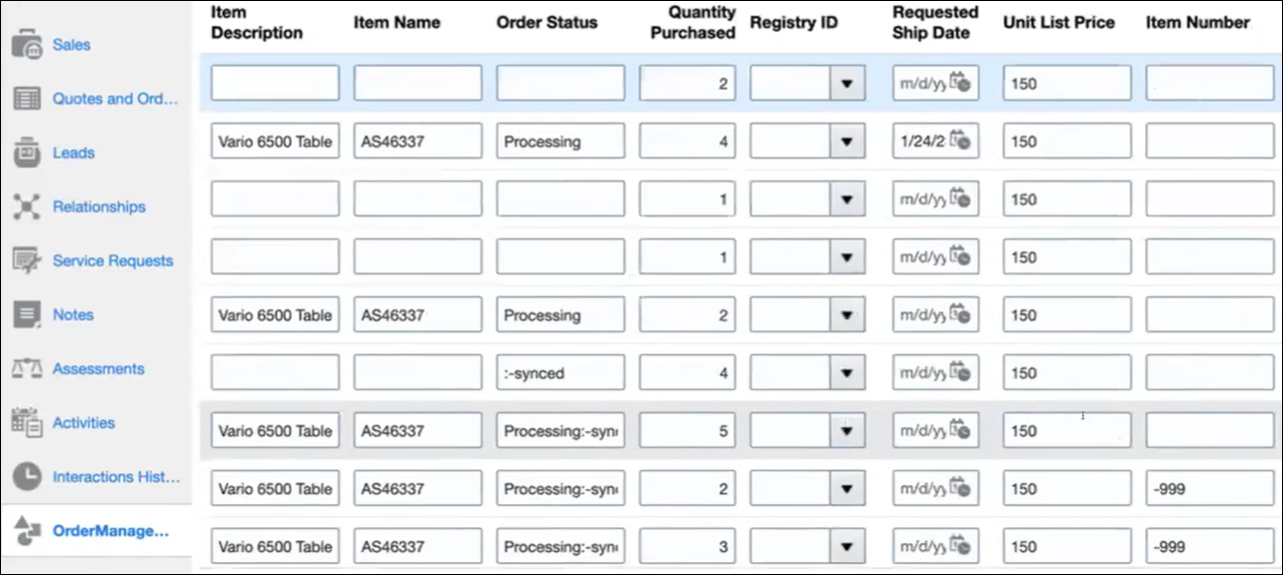
You can incrementally build a message payload from one or more existing payloads with a data stitch action. For example, a data stitch enables you to customize the sales order created in an inbound application. Assume you have a use case in which whenever a sales order is created in an inbound application, your integration must retrieve and push information in a custom object to an outbound application. In the inbound application, the custom object consists of the following attributes.
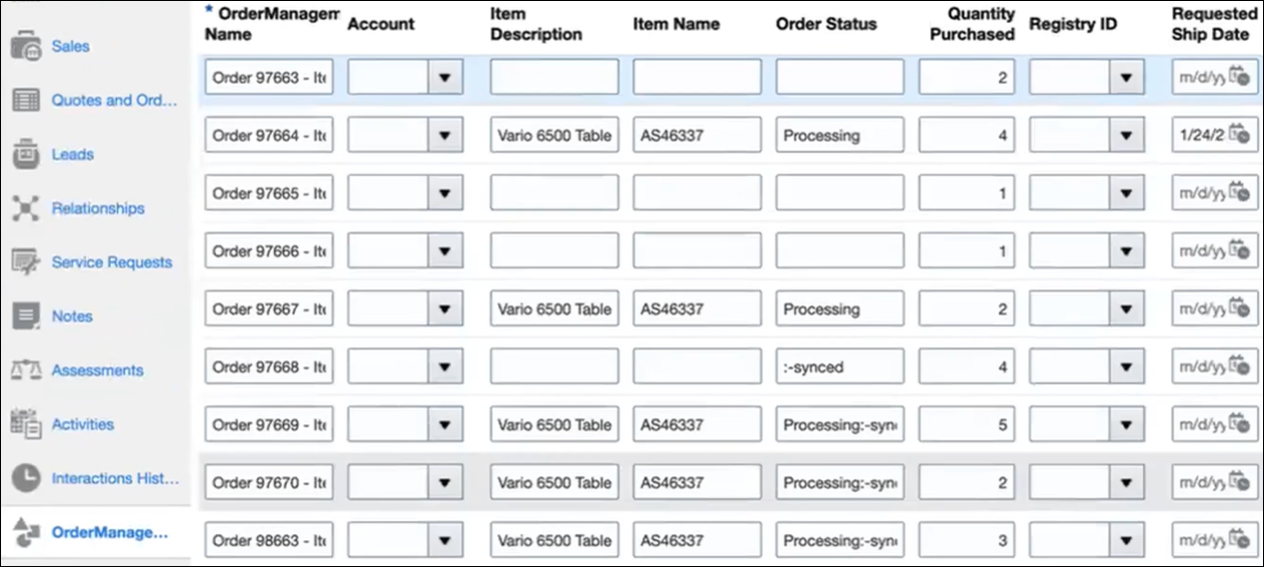
The Configure stitch panel opens.
- Configure the data stitch. This action enables you to
customize the integration with mappings to or from attributes of custom
objects. For this example, a data stitch variable is created to process
the order status attribute in the custom object.
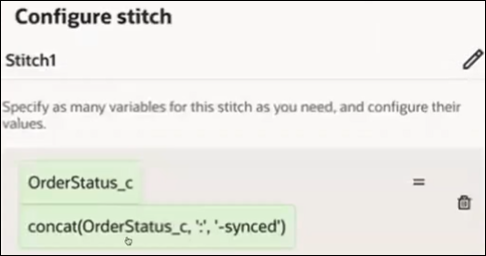
See Build Complex Assignment Statements with a Data Stitch Action.
- When integration design is complete, click
Save.
Assume you later need to further customize the custom objects in the inbound application that triggers your integration. For example, an additional field to handle the Item Number is added to the custom object.
This use case is not about installing a newer version of the accelerator project available from the Integration Store. Rather, this is an informal user update to the custom objects. You can handle this use case by refreshing the endpoints to pick up the new object and editing the data stitch action to process the new object. You must use a new identifier and/or version. You can also set the name, keywords, and description.
- Configure the data stitch. This action enables you to
customize the integration with mappings to or from attributes of custom
objects. For this example, a data stitch variable is created to process
the order status attribute in the custom object.
- Click Actions
 , then select Refresh Endpoints. This action
fetches the latest attributes added to the custom object.
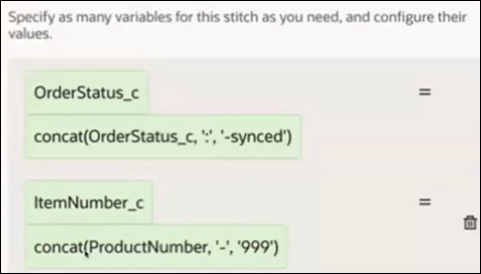
- Open the data stitch action in the extension group and add the
latest custom attribute mapping to the extension group. For this example, a
second stitch variable is created to process the item number attribute in the
custom object.
Add an Ad-Hoc Map Action to an Extended Integration
You can add an ad-hoc map to an extended integration.
- If you select Actions, then
Map:
The Add Map panel opens to show the endpoints available to which to map. Endpoints both inside and outside the extension group are shown.
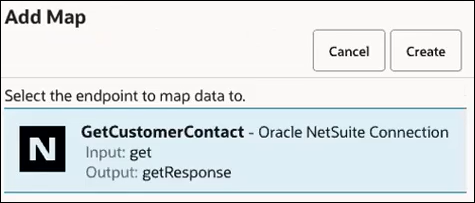
If there are no endpoints available to which to map, the following message is displayed:No outputs available to map to - Select the endpoint, and click Create.
The mapper opens.
- Map appropriate source elements to target elements.
A map action is visible in the Extension Group.

Add a For-Each Action to an Extended Integration
You can add a for-each action to an extended integration.
- If you select Actions, then For
each:
A for-each action is added to the Extension Group.
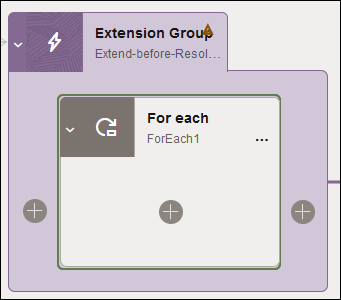
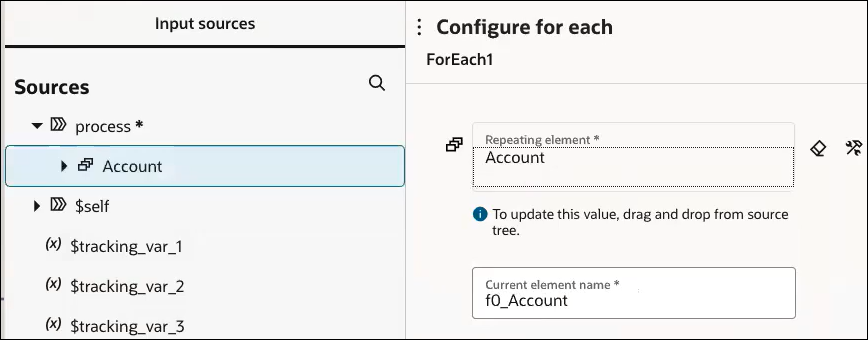
- Configure the for-each action. For this example, an
Account element is defined as the repeating action.
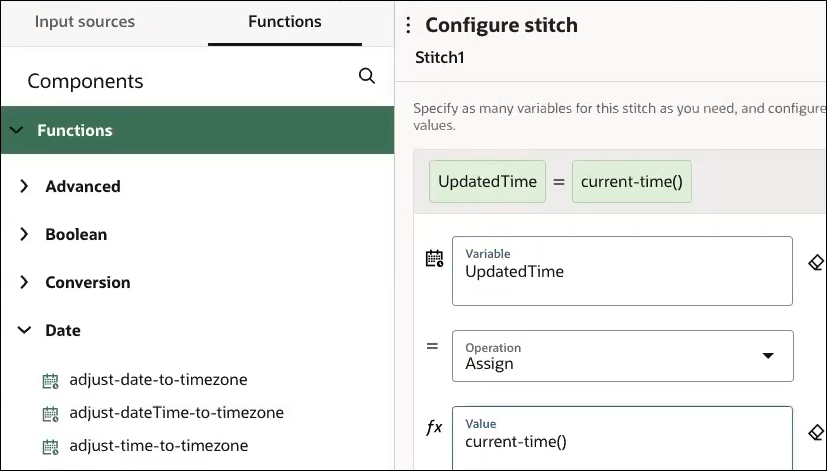
- Perform further configuration, as necessary. For this example, a
data stitch action is added. For each iteration of the
Account element, a value is updated to the current
time.
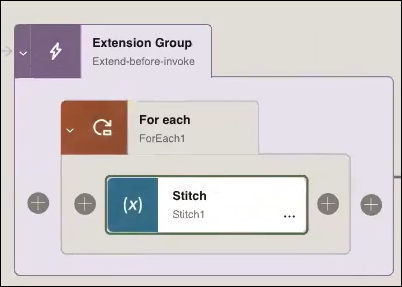
The extension group design looks as follows:
Add a Switch Action to an Extended Integration
You can add a switch action to an extended integration.
- If you select Actions, then
Switch:
A switch action is added to the Extension Group.
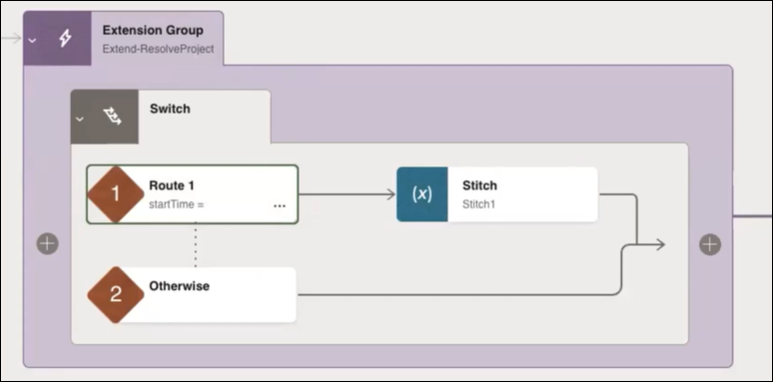
You can add routing expressions in an integration with a switch action.
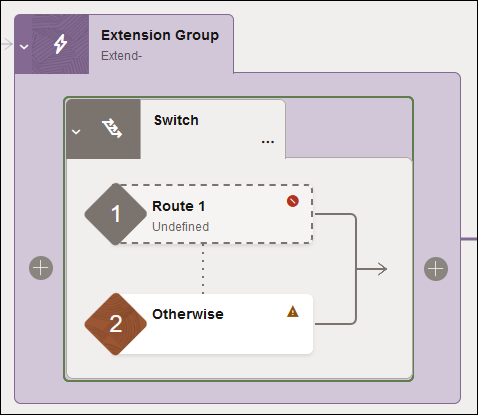
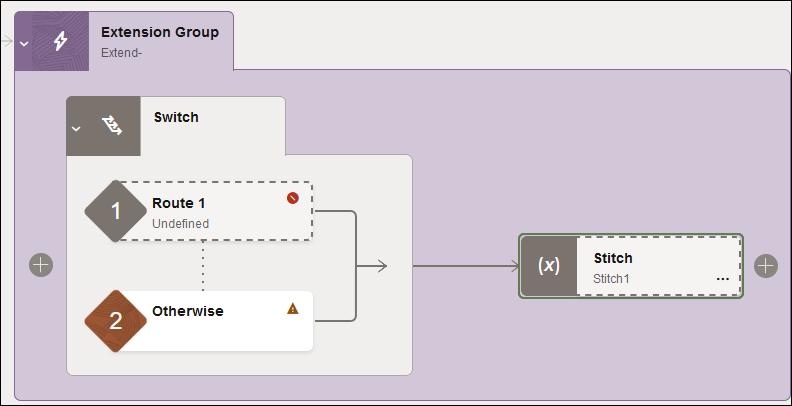
You can add a data stitch action inside the switch action.
- Click
 , then select Stitch.
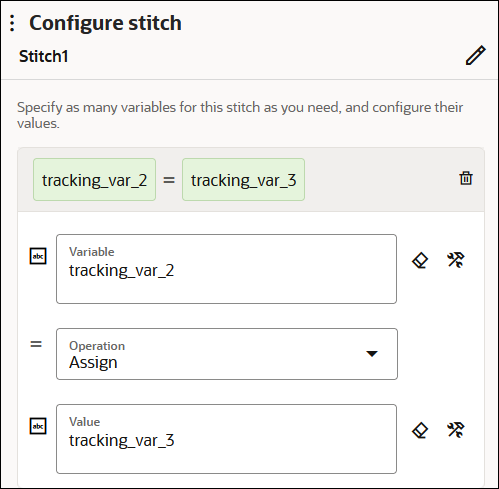
- Configure the data stitch action. For example:
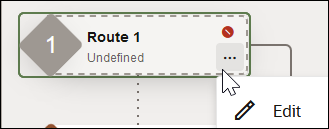
- Inside Route 1, click
Actions
 , then select Edit.
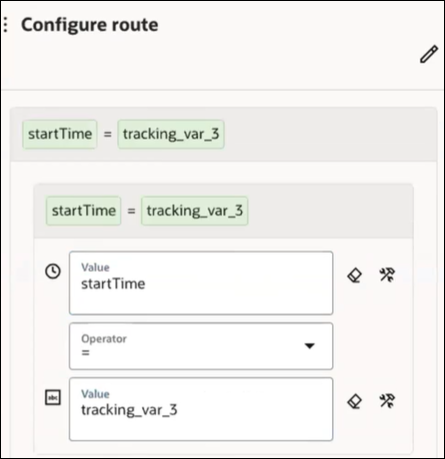
The Configure route panel opens.
- Configure the switch action. For example:
The extended portion of the integration looks as follows.
- Click
Add an Integration Action to an Extended Integration
You can add an integration action to an extended integration.
- If you select Actions, then
Integration:
The Integration Adapter Wizard is displayed.
- Click through the pages of the wizard to select the child integration to
invoke.
An integration action and associated map action are added to the Extension Group.

Add a Robot Flow Action to an Extended Integration
You can add a robot flow action to an extended integration.
-
If you select Robot flow, then configure the robot's basic information:
-
What do you want to call your endpoint?: Enter descriptive text for the robot, such as the robot's name or information about its business process.
- What does this endpoint do?: Provide a brief description of the robot.
-
-
Select Continue.
-
From the Flow Name drop-down, select the robot that the integration calls, including the appropriate version.
The drop-down lists all of the robots that are in the same project as the integration.
-
Select Continue.
-
Review the summary, and select Finish.
A Map object appears before the Robot process automation action.
-
Pass information from the integration to the robot.
-
Point to the Map action that is before the Robot process automation action, select
 , and select Edit.
The mapper opens.
-
In the Sources list on the left, expand the tree until you find the data element that you need to pass to the robot.
-
In the Target list on the right, expand the tree until you find the input that needs to receive the data.
-
Drag the source element to the target element.
For more help working in the mapper, see About Mapping Data Between Applications and Map Data in Using the Oracle Mapper with Oracle Integration 3.
-
If you need to pass more information to the robot, map additional elements.
-
After you finish mapping elements, test your mappings.
See Test Your Mappings in Using the Oracle Mapper with Oracle Integration 3.
-
Select Go back < to return to the canvas.
-
Add an Invoke Connection and Associated Map to an Extended Integration
You can add an invoke connection and associated map to an extended integration.
- If you select Invokes, then select an invoke
adapter connection:
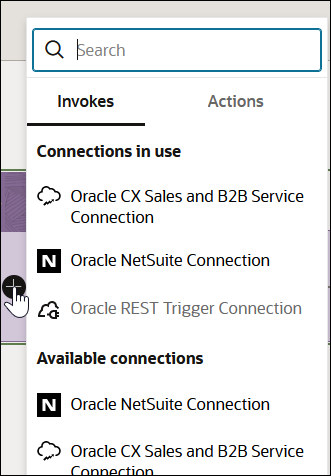
The Adapter Endpoint Configuration Wizard is displayed for the selected invoke connection.
- Click through the pages of the wizard and configure the invoke connection.
-
When complete, the configured invoke connection and an associated map action are added to the Extension Group.

- Double-click the map action and map appropriate source elements to target elements.
Add a Global Variable to an Extended Integration
You can add a global variable to an extended integration.
- In the Integrations section, find the specific integration to extend.
- Click Actions
 , and select Extend.
The integration is displayed in the canvas.
- In the right pane, click Global Variables
 .
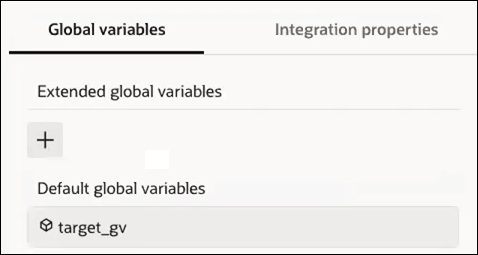
There are two types of global variables:
.
There are two types of global variables:- Extended global variables: Variables that you can create to extend the accelerator for your business requirements.
- Default global variables: Variables that are defined by the producer of the extended accelerator. You cannot edit these variables.
- Click
 to add your own extended global variable. For this example,
extended_global_variableis added.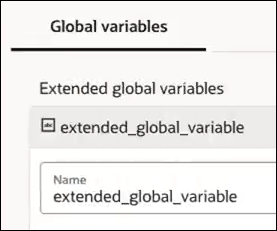
- Add an Extension Group to the integration.
- Add an action in which to use the extended global variable. For
this example, a data stitch action is added.
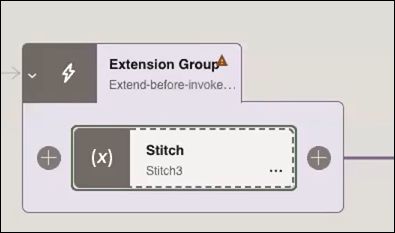
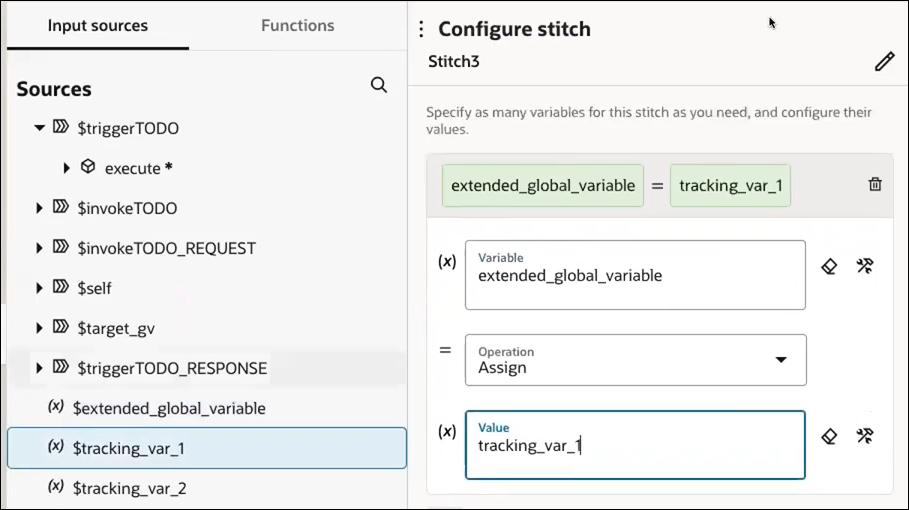
- Configure the data stitch action to use the extended global
variable.
Note:
If there is a naming conflict with global variables (for example, two global variables have the same name), the entire merge is canceled. This cancellation occurs because a global variable can be used in any extension group. For example, if you create an extended global variable named conflict_gv, and a default global variable of the same name already exists, the merge is canceled, and an error is displayed.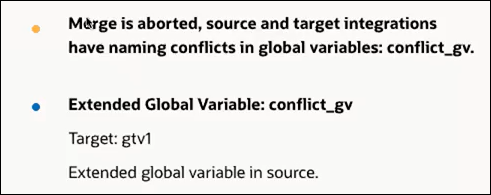
Add an Extension Group Before a Stage File Action Configured with a Write File Operation
You can add an extension group before a stage file action configured with a write file operation.
- Perform one of the following actions before the stage file
action.
- Click Add
 at the location where you want to add the extension, then
select Extension Group.
or
- Click Actions
 inside the stage file action and select Extend
before.
- Click Add
- Add the appropriate action.
Add Connections to an Extended Integration
You can add connections to an extended integration.
- In the navigation pane, click Projects.
- Find the accelerator project to extend.
- In the Connections section, click
Add
 .
.
- Select an adapter and click Create.
- Enter a name. Note that the prefix
BAEXT_is automatically added to the name in the Identifier field to indicate that this is an extended connection.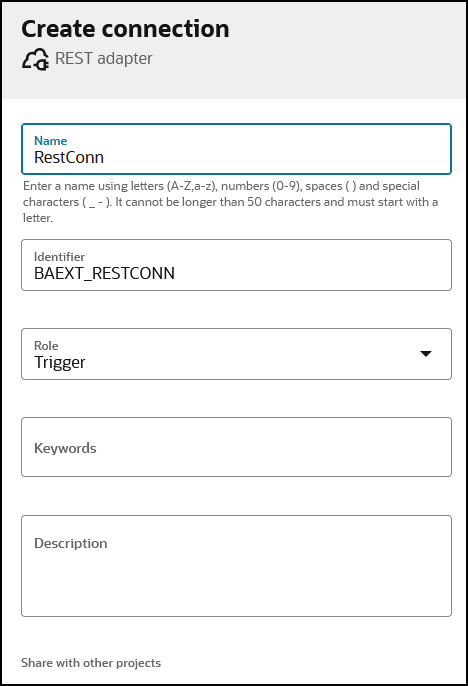
- Click Create, then define your connection
properties and security.
Once complete, the extended connection appears in the Connections section, and can be used in integrations.
Add Lookups and JavaScript Libraries to an Extended Integration
You can add lookups and Javascript libraries to an extended integration.
- In the navigation pane, click Projects.
- Find the accelerator project to extend.
- In the Lookups section, click
Add
 , then click Create.
Note that the prefix
BAEXT_appears by default in the Name field, An extended lookup name must be prefixed with this value. If you delete theBAEXT_prefix and attempt to create the lookup, you receive a warning.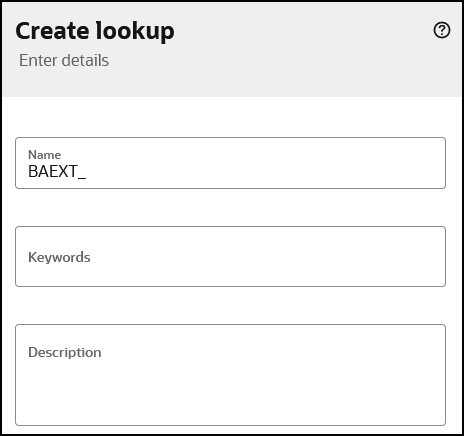
- Add a name after the prefix
BAEXT_. - Enter or select an existing keyword, and an optional description.
- Click Create.
- Design your lookup.
Once complete, the extended lookup appears in the Lookups section, and can be used in integrations.
- In the navigation pane, click Projects.
- Find the accelerator project to extend.
- In the Libraries section, click
Add
 .
.
- Drag a JavaScript library file into the Import panel.
The Name, Identifier, and Version fields are prepopulated with details from the file you imported. Note that the prefix
BAEXT_is automatically added to the function name in the Identifier field to indicate that this is an extended JavaScript library.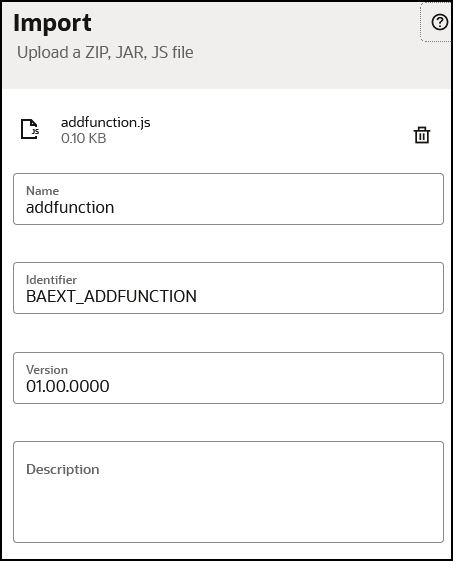
- Click Import.
- Complete design of your JavaScript library.
Once complete, the extended JavaScript library appears in the Libraries section, and can be used in integrations.
Extend an Integration Before or After a Log or Notification Action
You can extend an integration before or after a log or notification action. The log or notification action can either be inside of a fault handler or outside of a fault handler.
- Perform one of the following actions before or after a log or
notification action.
- Click Add
 at the location where you want to add the extension, then
select Extension Group.
or
- Click Actions
 inside the action and select Extend
before or Extend before.
For example, to add an extension group after a notification action inside a fault handler:
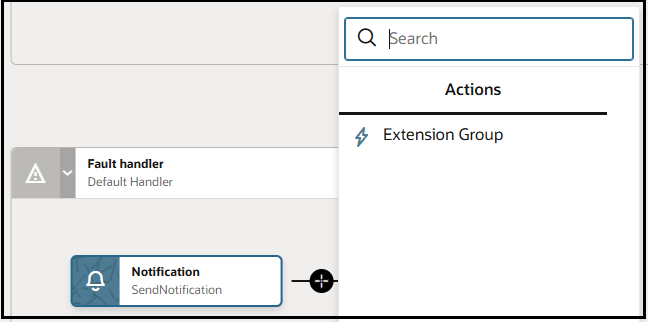
Or before a log action outside a fault handler:
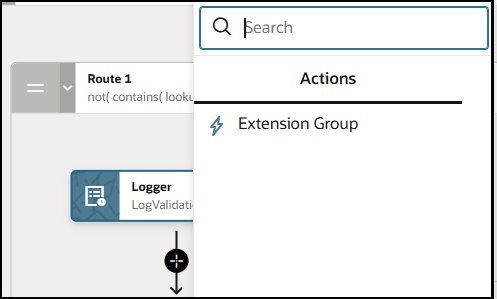
An extension group is added to the integration.
- Click Add
- Add the appropriate action in the extension group:
- Add a Data Stitch Action to an Extended Integration
- Add an Ad-Hoc Map Action to an Extended Integration
- Add a For-Each Action to an Extended Integration
- Add a Switch Action to an Extended Integration
- Add an Integration Action to an Extended Integration
- Add a Robot Flow Action to an Extended Integration
- Add an Invoke Connection and Associated Map to an Extended Integration
Add an Extension Group Before or After a Parent Integration that Invokes a Child integration
You can add an extension group before or after a parent integration that invokes a child integration.
- In the Integrations section, find the specific parent integration to extend.
- Click Actions
 , and select Extend. The
Extend option is only available in accelerator
projects. This option behaves similar to the Edit option
in non-accelerator integrations.
- Perform one of the following actions before or after the integration action.
- Click Add
 before or after the integration action, then select
Extension Group.
or
- Click Actions
 inside the integration action and select Extend
before or Extend after.

- Click Add
- Click
 and select the action to extend the integration.
For this example, an active integration action is selected and configured in the extension group in front of the integration action.

See the following sections for the actions and invoke connections you can add:- Add a Data Stitch Action to an Extended Integration
- Add an Ad-Hoc Map Action to an Extended Integration
- Add a For-Each Action to an Extended Integration
- Add a Switch Action to an Extended Integration
- Add an Integration Action to an Extended Integration
- Add a Robot Flow Action to an Extended Integration
- Add an Invoke Connection and Associated Map to an Extended Integration
Merge Extension Group Changes into Updated Accelerator Projects
Oracle can periodically update and upload newer versions of accelerator projects to the Integration Store for your consumption. You can upgrade an accelerator project to this newer version automatically without making manual changes to the existing installation.
During upgrade, you are prompted to automatically merge any customizations you performed in the extension group of the previous version into the newer version of the accelerator project. See Upgrade an Accelerator Project and Merge Extensions.
on an invoke connection also includes options for Extend before or Extend after. This enables you to install the supported accelerator actions before or after the invoke connection.Upgrade an Accelerator Project and Merge Extensions
You can install and then extend (customize) accelerator projects in your instance. Oracle can periodically update and upload newer versions of these accelerator projects to the Integration Store for your consumption. You can upgrade an accelerator project to this newer version automatically without losing any extensions you made to the existing installation.
Understand the Rules for Merging Extensions
Before upgrading an extended accelerator project, it is important to understand the rules for merging extensions.
| Rule | Example |
|---|---|
| When you have multiple extended (customized) versions of an accelerator project installed, and select to install a newer version, the installer checks for extensions in the previously installed highest version. If that version includes extensions, they are automatically merged into the newer version. | You currently have the following accelerator project versions
installed:
|
| When you have multiple versions of an accelerator project installed, and select to install a newer version, the installer checks for extensions in the previously installed highest version. If that version does not include extensions, nothing is merged into the newer version. | You currently have the following accelerator project versions
installed:
|
| When you have a single version of an accelerator project installed, and select to install a newer version, the installer checks for extensions in the previously installed highest version. If that version includes extensions, they are automatically merged into the newest version. | You currently have the following accelerator project
version installed:
If you install a higher version of the accelerator project (for example, version 2.0.0, 3.0.0, 4.0.0, or higher), the extensions are applied to the newly installed version. |
| When you have multiple extended versions of an accelerator project installed, and select to install an older version, the installer does not check for extensions because you are installing a lower version. | You currently have the following accelerator project versions
installed:
|
Automatically Merge Extensions
This section provides an overview of how to upgrade to a newer extended accelerator project and automatically merge your extensions (customizations). This process automatically merges the extensions in all integrations in the project.
Assume you have an accelerator project that includes two integrations on version 1.0.0.
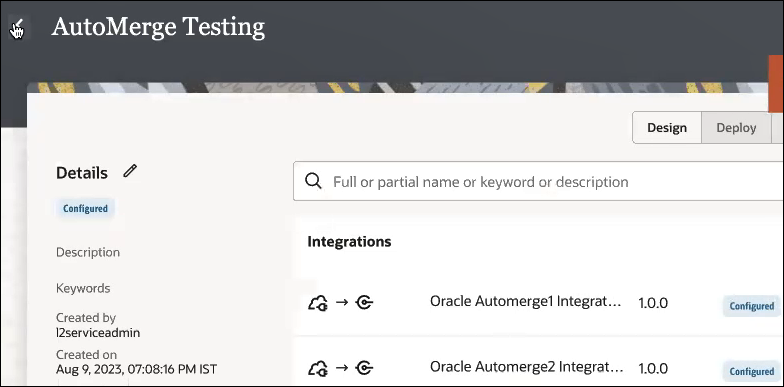
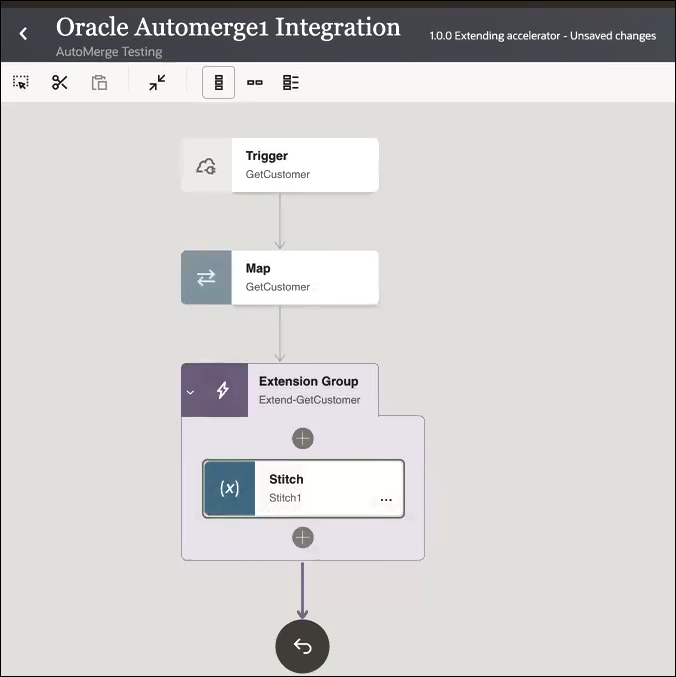
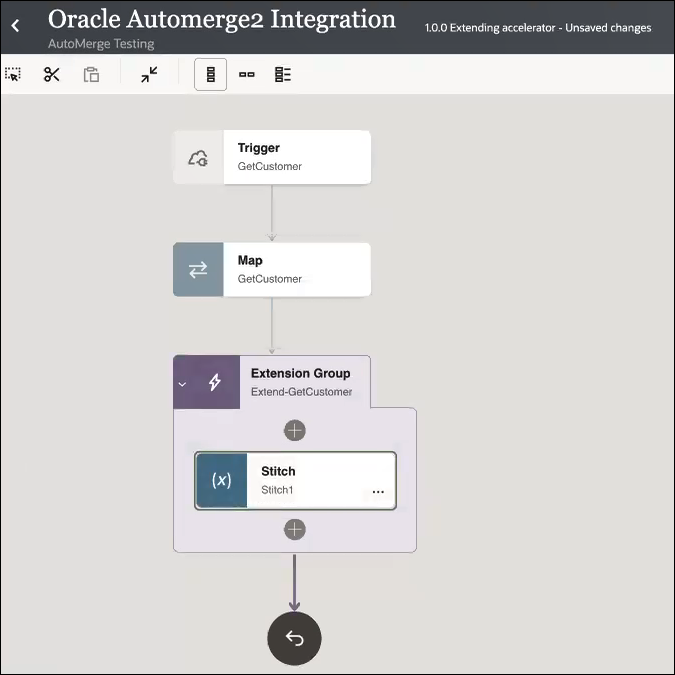
Both integrations include an extension group with a stitch action that you added.
| Oracle Automerge1 Integration | Oracle Automerge2 Integration |
|---|---|
 |
 |
Upgraded versions of this accelerator project are then uploaded to the Integration Store. You want to install a newer version and not lose the extensions you made to your current version (1.0.0).
- Access updated accelerators in either of the following ways:
- In the navigation pane, click Projects.
- Hover over the accelerator project, and click
Actions
 .
.
Or
- On the Oracle Integration Home page, click Browse store.
- Find the accelerator project to upgrade. You can use the
Filter
 to search for accelerators. The Get
latest label indicates that a new version of the
accelerator project is available for installation.
- Click Get latest.
You can also configure and delete installations from the Integration Store.
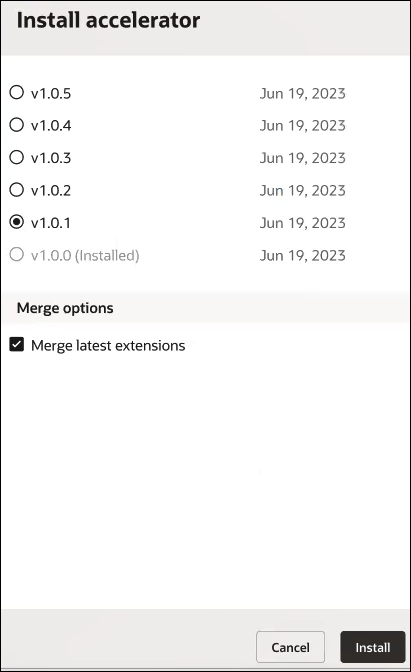
The Install accelerator panel opens and shows the latest accelerator versions to which you can upgrade.
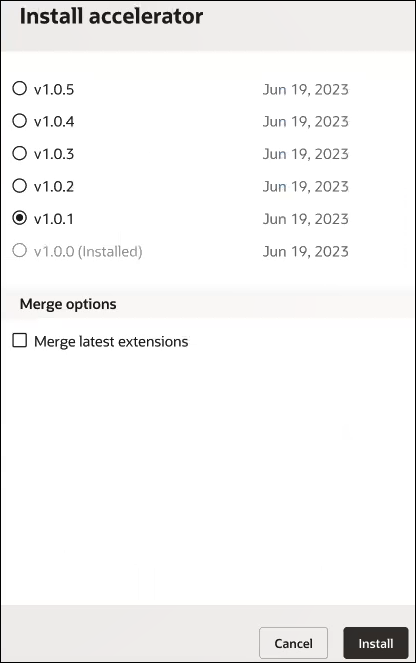
- Select the version to which to upgrade (for this example, v1.0.1 is selected).
- If you want to merge the extensions you added (for this example, the stitch actions you added to both version 1.0.0 integrations), then click Merge latest extensions.
- Click Install.
- Click the link in the Confirmation message that is displayed. This takes you to your project to view installation progress.
- Click Refresh
 periodically.
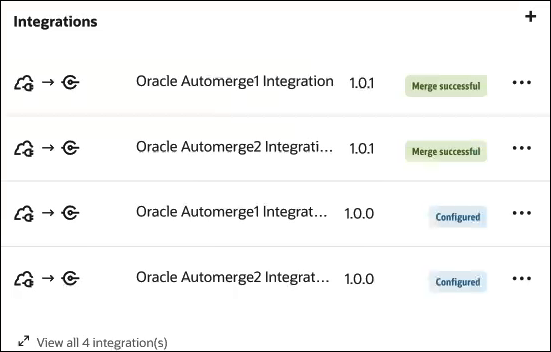
- Note that the latest installed versions (1.0.1) are successfully
merged above the initial integration versions (1.0.0).
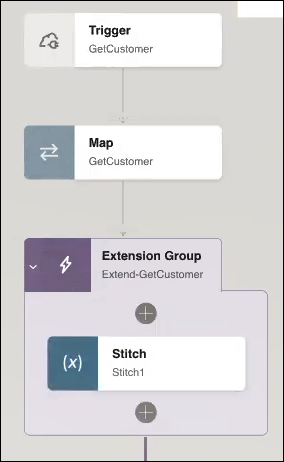
- Click the latest integrations (1.0.1) to see that your
customizations have been merged.
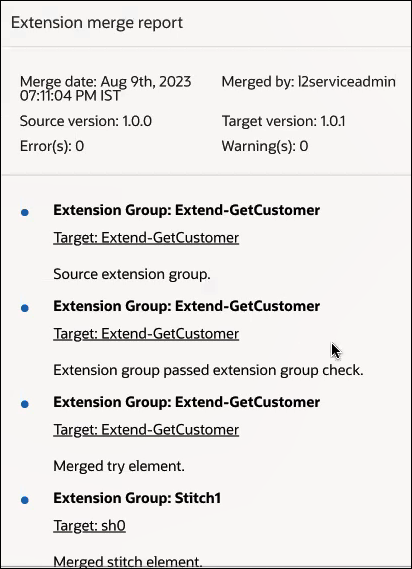
- Click Merge report
 to view a report about the merge.
- Exit the integration.
- Click Save when prompted.
Manually Merge Extensions
If you do not select the Merge latest extensions check box described in Step 5, your customizations are not applied. However, you still have the opportunity to manually merge your extensions.
- Select the version to install, but do not click Merge
latest extensions.
- Go to the project.
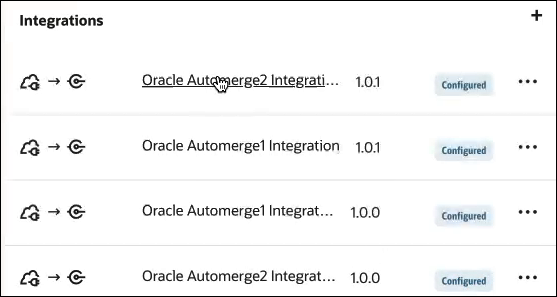
- In the Integrations section, click the newly
installed version. Note that the status label is listed as
Configured, and not Merge
Successful for the two newly-installed integrations.
The Extended accelerator versions dialog prompts you to select to merge your extensions.
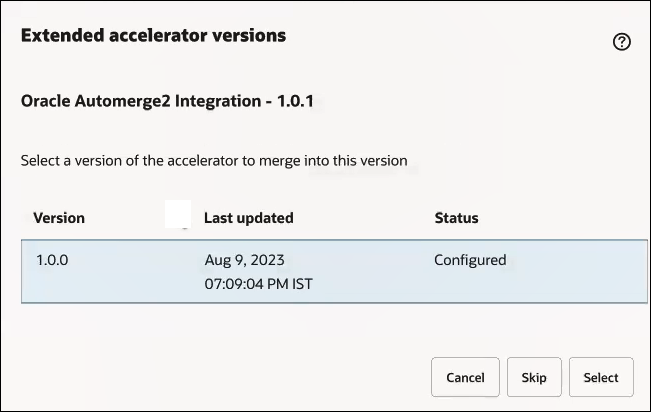
- Click Select to merge your extensions. You can also click Skip if you do not want to merge your extensions.
- Repeat these steps for any remaining integrations that include extensions you want to manually merge.
Create and Extend a Cloned Business Accelerator Project
- Labeled as an Accelerator in the Type column.
- Retains its business accelerator capabilities.
- Can be extended (customized).
- Can be automatically updated without losing any extensions when a newer version of the business accelerator is installed.
When you install a newer version of the business accelerator from the
Actions
![]() menu or the Integration Store, your business accelerator is upgraded
without losing your extensions.
menu or the Integration Store, your business accelerator is upgraded
without losing your extensions.
See Clone a Project.
Behavior When You Activate an Updated Accelerator Project Deployment with Newer Integration Versions
When you activate a newer project deployment version of an accelerator (for example, 1.0.1), the active integrations in the previously installed project deployment version of that accelerator (for example, 1.0.0) may be deactivated or remain activated based on the versions of the new integrations. Examples of this behavior are described below.
Let's look at several examples that involve importing different versions of an accelerator project deployment. The same behavior applies if you install accelerator project deployments from the Integration Store.
Activate Project Deployments
- Import and activate accelerator project deployment version 1.0.0.
This version consists of the following integration versions, which are activated
when the project deployment is activated:
- Integration1 1.0.0
- Integration2 1.0.0
- Integration3 1.0.0
At a later date, accelerator project deployment version 1.0.1 becomes available. This version consists of the following updated integration versions:- Integration1 1.0.1
- Integration2 1.0.1
- Integration3 1.0.1
- Import version 1.0.1 of the accelerator project deployment.
The Deployment page for the projects now shows both versions.
- Deployment version 1.0.0 of the accelerator project
- Deployment version 1.0.1 of the accelerator project
- Activate version 1.0.1 of the accelerator project deployment.
Note the following behavior of the integrations in both deployments when accelerator project deployment version 1.0.1 is activated:
Accelerator Project Deployment Version 1.0.0 Accelerator Project Deployment Version 1.0.1 - Integration1 1.0.0 is deactivated.
- Integration1 1.0.1 is activated.
- Integration2 1.0.0 is deactivated.
- Integration2 1.0.1 is activated.
- Integration3 1.0.0 is deactivated.
- Integration3 1.0.1 is activated.
At a later date, accelerator project deployment version 1.0.2 becomes available. This version consists of the following updated and new integration versions:- Integration1 1.0.1
- Integration2 1.1.0
- Integration3 2.0.0
- Integration4 1.0.0
- Import version 1.0.2 of the accelerator project deployment.
The Deployment page for the projects now shows all three versions.
- Deployment version 1.0.0 of the accelerator project
- Deployment version 1.0.1 of the accelerator project
- Deployment version 1.0.2 of the accelerator project
- Activate version 1.0.2 of the accelerator project deployment.
Note the following behavior of the integrations in both deployments when project deployment version 1.0.2 is activated:
Accelerator Project Deployment Version 1.0.1 Accelerator Project Deployment Version 1.0.2 - Integration1 1.0.1 shows a warning message because it's already active. This message can also appear if integration activation is in progress or not ready for activation. This message appears because Integration1 1.0.1 was active in the previous project deployment and cannot be activated again in the new project deployment.
- Integration1 1.0.1 remains activated.
- Integration2 1.0.1 is deactivated
- Integration2 1.1.0 is activated.
This is considered a minor version update. Therefore, Integration2 1.0.1 is deactivated.
- Integration3 1.0.1 remains activated
- Integration3 2.0.0 is activated.
This is considered a major version upgrade from 1.0.1 to 2.0.0. Therefore, the previous version of Integration3 1.0.1 is not deactivated. The new Integration3 2.0.0 version is also activated. Both major versions are active at the same time.
- N/A
- New Integration4 1.0.0 is activated.
At a later date, accelerator project deployment version 1.0.3 becomes available. This version consists of the following integration versions:- Integration1 1.0.1
- Integration2 1.1.0
- Integration3 2.0.0
- Import version 1.0.3 of the accelerator project deployment.
The Deployment page for the projects now shows four versions.
- Deployment version 1.0.0 of the accelerator project
- Deployment version 1.0.1 of the accelerator project
- Deployment version 1.0.2 of the accelerator project
- Deployment version 1.0.3 of the accelerator project
- Activate version 1.0.3 of the accelerator project deployment.
Note the following behavior of the integrations in both deployments when project deployment version 1.0.3 is activated:
Accelerator Project Deployment Version 1.0.2 Accelerator Project Deployment Version 1.0.3 - Integration1 1.0.1 remains
activated.
The warning message appears because the integration was already active and cannot be activated again in the new project deployment.
- Integration1 1.0.1 remains activated.
- Integration2 1.1.0 remains
activated.
The warning message appears because the integration was already active and cannot be activated again in the new project deployment.
- Integration2 1.1.0 remains activated.
- Integration3 2.0.0 remains
activated.
The warning message appears because the integration was already active and cannot be activated again in the new project deployment.
- Integration3 2.0.0 remains activated.
- New Integration4 1.0.0 remains
activated.
If an active integration is not updated or included in the latest project deployment, it is not deactivated. Excluded integrations are not deactivated if none of their versions are included in the newest project deployment.
- N/A
- Integration1 1.0.1 remains
activated.
Deactivating Project Deployments
| Project Deployment | Status |
|---|---|
| 1.0.0 |
Deactivate option is unavailable. When project deployment 1.0.1 was activated, all the integrations of project deployment 1.0.0 were deactivated and replaced with newer activated versions in project deployment 1.0.1. There are no active integrations in project deployment 1.0.0, which is why there is no option to deactivate. |
| 1.0.1 |
Deactivate option is available because there are
active integrations:
|
| 1.0.2 |
Deactivate option is available because there are
active integrations:
|
| 1.0.3 |
Deactivate option is available because there are
active integrations:
|
If a single integration of a project deployment is active, the deployment is also active and includes the option to deactivate.
- Hover over the row for project deployment 1.0.3, and select
Actions
 , then Deactivate.
This action deactivates the following integrations:
, then Deactivate.
This action deactivates the following integrations:- Integration1 1.0.1
- Integration2 1.1.0
- Integration3 2.0.0
Because these three integration versions also appear in project deployment 1.0.2, they are also deactivated in that deployment. When a project deployment is deactivated, all integrations in that deployment are deactivated, even if those integrations are also part of other deployments.
- Hover over the row for project deployment 1.0.2, and select
Actions
 , then Deactivate.
Integration4 1.0.0 is deactivated. However, warning messages indicate that Integration1 1.0.1, Integration2 1.1.0, and Integration3 2.0.0 are not active and cannot be deactivated. This is because each deactivation occurred when project deployment 1.0.3 was deactivated. When deactivating project deployment 1.0.2, an attempt is again made to deactivate the already inactive integrations.
- Hover over the row for project deployment 1.0.1, and
select Actions
 , then Deactivate.
Integration3 1.0.1 is deactivated. However, warning messages indicate that Integration1 1.0.1 is not active and cannot be deactivated. This is because that deactivation occurred when project deployment 1.0.3 was deactivated.