Invoke Child Integrations Inside or Outside of Projects
You can configure a parent integration to invoke a child integration in the same project, a child integration in a different project, or a child integration that is not part of any project (known as an integration that is globally available).
Capabilities
- A parent integration in a project can be configured
to invoke a child integration located:
- In the same project.
- In a different project, if that integration is set as public. See Set a Project Integration as Public.
- Globally available (that is, the integration is not included in any project).
During runtime, all integration behavior is consolidated into a single activity stream for viewing, regardless of the location of all the integrations.
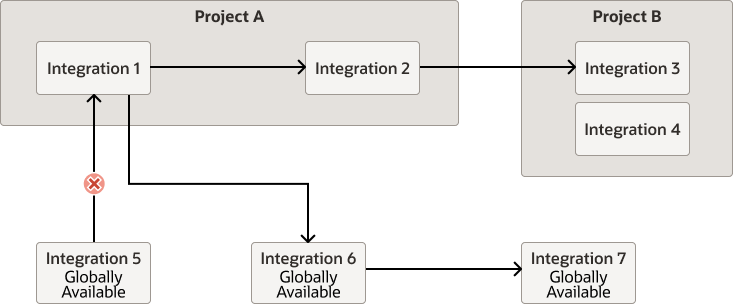
As an example, the following parent-to-child invokes are supported:- Parent Integration 1 in Project A invokes child integration 6 that is globally available (integration is not in any project). Child integration 6 then invokes child integration 7, which is also globally available.
- Parent Integration 2 in Project A invokes child integration 3 in Project B.
- Parent Integration 5, which is globally available, cannot invoke integration 1 in Project A because this type of invocation is not allowed.

- A parent integration in a project can dynamically invoke either of two child integrations at runtime, regardless of location. For example, both child integrations can be in the globally available or one child integration can be globally available and the other child integration can be in another project. See Dynamically Invoke a Child Integration.
Restrictions
- Only REST, SOAP, and schedule integration endpoints are supported.
- Only activated integrations are available when selecting a child integration in the Integration Adapter Wizard. See Invoke a Child Integration from a Parent Integration.
- A parent integration that is globally available (outside a project) cannot invoke a child integration inside any project. Parent integrations that are globally available can only invoke child integrations that are also globally available.
- If you select to activate or deactivate a project deployment, all child integrations outside that project (whether in another project or globally available) must already be activated or deactivated, respectively. The project deployment cannot activate or deactivate integrations outside that project. See Create and Manage a Project Deployment.
- When exporting a project deployment, none of the integrations from outside that project are included in the exported file. You must separately export those integrations and import them along with the referencing projects into the target instance.
- References to an integration in another project may specify an integration that itself has external references. A chain of references can span multiple projects.
Set a Project Integration as Public
Setting a project integration as public enables that integration to be invoked by a parent integration in a different project. If you don't set a project integration as public, it can only be invoked by a parent integration in the same project.
Set a project integration as public in either of two ways:
Create a new integration:
- In the Integrations section, click Add if no integrations currently exist or + if integrations already exist.
- Select the type of integration to create (application or schedule).
- Select the Available to other projects check box.
- Go to the integration canvas for the integration to make public.
- Click Primary Info
 .
.
- Select the Available to other projects check box.
When selected, the Available to other projects check box enables an integration in a different project to appear for selection in the Integration Adapter Wizard that is invoked when you drag the Integration action into the integration canvas. See Invoke a Child Integration from a Parent Integration.
Prerequisites to Dynamically Invoke a Child Integration from a Parent Integration After Import into a Project
To dynamically invoke a child integration from a parent integration in a project, you need the project ID, integration code, and integration version. This differs from globally-available integrations (integrations not included in any project), where you can dynamically invoke a child integration from a parent integration with only the integration code and integration version.
If you import a globally-available parent integration and its child integrations into a project and then attempt to dynamically call the second child integration from the parent integration, the child integration is not called from the project. Instead, the globally-available child integration is called. This occurs because only the integration code and integration version are available to configure in the mapper, and not the project code.
You must create and map a project code query parameter in the mapper for dynamic invocation of the second integration in a project to succeed.
- Configure a parent integration to invoke two child integrations. All three integrations are globally available, meaning they are not part of a specific project.
- Export the three integrations and import them into a project.
- Edit the mapper of the imported parent
integration.
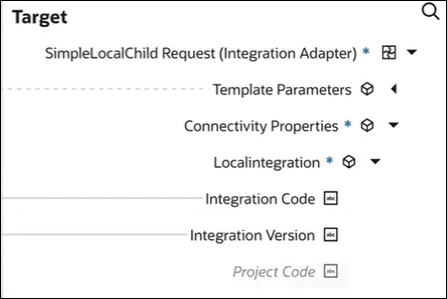
Note that there is no value for the target Project Code node under Localintegration to configure.

- In the integration canvas, select to edit the integration action.
- Click Continue on the pages of the Integration Adapter Wizard without making changes, then click Done on the final page. This action creates the project code entry in the mapper.
- Open the mapper and note that the target
Project Code node for the
project under
Localintegration is now
visible.

You must now create a target query parameter and map it to Project Code.
- Exit the mapper.
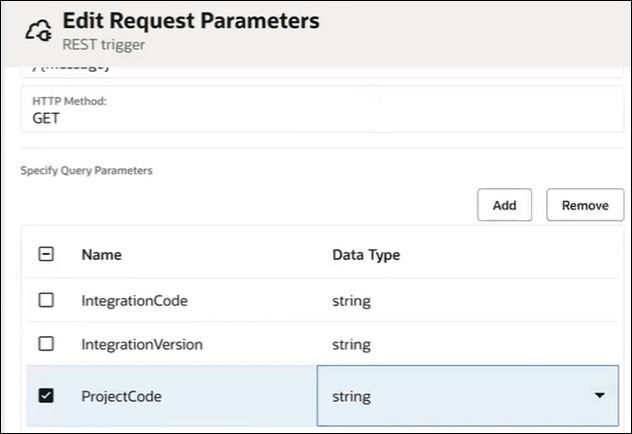
- Open the REST Adapter trigger connection for editing in the Adapter Endpoint Configuration Wizard.
- On the Request Parameters page, create a
new query parameter. For this example,
ProjectCodeis created.
- Click through the remaining pages of the wizard, then click Done.
- Return to the mapper.
The new source query parameter is now visible.
- Drag the source Project
Code query parameter to the target
Project Code.

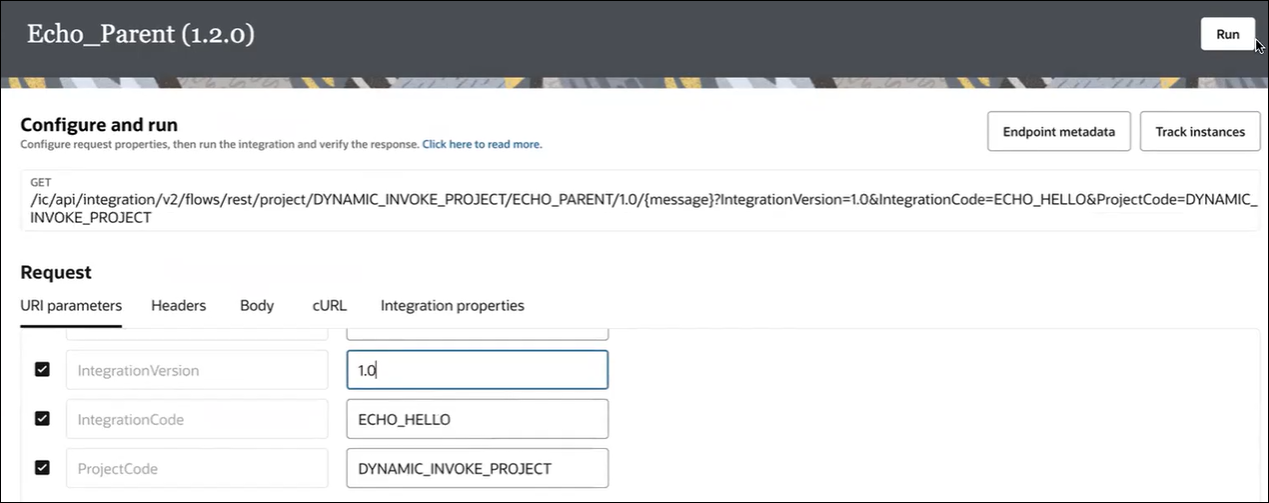
When you later run the parent integration from the Configure and run page, the integration version, integration code, and project code parameters are available.

- Click Run. The child integration in the project is now invoked, instead of the globally-available version.
Information about dynamically invoking a child integration is provided. See Dynamically Invoke a Child Integration.