Contents
This topic describes how to use the topology view in the web-based API Gateway Manager tool to manage an existing API Gateway domain. For example, you can perform tasks such as the following:
-
Create and delete API Gateway groups
-
Lock and unlock API Gateway groups
-
Create and delete API Gateway instances
-
Start and stop API Gateway instances
-
Create and edit API Gateway configuration tags
-
Deploy API Gateway configuration
![[Note]](../common_oracle/images/admon/note.png) |
Note |
|---|---|
|
When using API Gateway Manager to manage an existing domain, you must ensure that the host
was first registered in the domain using the |
The API Gateway Manager web console is available from the following URL:
https://HOST:8090/
For more details, see Start the API Gateway tools.
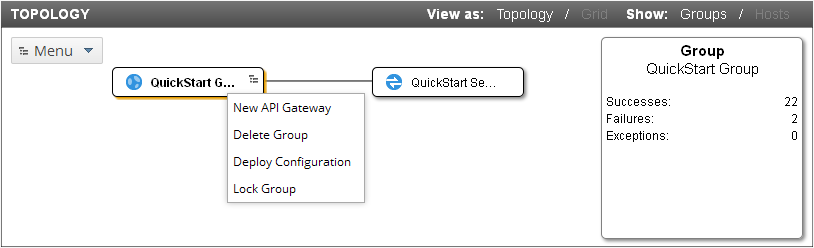
You can use the topology view in API Gateway Manager tool to create, delete, and lock API Gateway groups. The following example shows the options available at the group level:
To use the API Gateway Manager to create an API Gateway group, perform the following steps:
-
Click the Menu button in the topology view on the Dashboard tab.
-
Select Create New Group.
-
Enter a group name (for example,
Engineering). -
Click OK.
To delete a group, perform the following steps:
-
Ensure that the API Gateway instances in the group have been stopped.
-
Hover over the group in the topology view, and click the edit button on the right.
-
Select Delete Group.
-
Click OK.
To lock a group and prevent other users from editing its configuration, perform the following steps:
-
Hover over the group in the topology view, and click the edit button on the right.
-
Select Lock Group.
-
Click OK.
Similarly to unlock an API Gateway group, select Unlock Group. Only admin users can unlock groups locked by other users.
![[Tip]](../common_oracle/images/admon/tip.png) |
Tip |
|---|---|
| You can also use Policy Studio to delete or lock an API Gateway group. In the Policy Studio topology view, right-click the API Gateway group, and select Remove Group or Lock Group Access. |
You can use the topology view in API Gateway Manager to create, delete, start, and stop API Gateway instances.
To use the API Gateway Manager to create an API Gateway instance, perform the following steps:
-
Hover over the API Gateway group in the topology view, and click the edit button on the right.
-
Select New API Gateway.
-
Configure the following fields:
-
Name: API Gateway instance name (for example,
Server2). -
Management Port: Local management port (for example,
8086). -
Services Port: External traffic port (for example,
8081). -
Host: Host address (for example,
127.0.0.1). -
Domain CA Passphrase: The passphrase for the domain SSL certificate authority.
-
-
Click OK.
To delete an API Gateway instance, perform the following steps:
-
Ensure that the API Gateway instance has been stopped.
-
Hover over the API Gateway instance in the topology view, and click the edit button on the right.
-
Select Delete Server.
-
Click OK.
|
Tip |
|---|---|
| You can also use Policy Studio to create or delete an API Gateway instance. In the Policy Studio topology view, right-click the API Gateway group, and select Create API Gateway. Or right-click an existing API Gateway instance, and select Remove API Gateway. |
To start an API Gateway instance, perform the following steps:
-
Ensure that the API Gateway instance has been stopped.
-
Hover over the API Gateway instance in the topology view, and click the edit button on the right.
-
Select Start.
-
Click OK.
The following example shows how to start a stopped API Gateway instance:

To stop an API Gateway instance, perform the following steps:
-
Ensure that the API Gateway instance has been started.
-
Hover over the API Gateway instance in the topology view, and click the edit button on the right.
-
Select Stop.
-
Click OK.
API Gateway tags are name-value pairs that you can add to API Gateway instances, which then enable you to filter for API Gateway instances by tag in the API Gateway Manager Dashboard. To add an API Gateway tag, perform the following steps:
-
Hover over the API Gateway instance in the topology view, and click the edit button on the right.
-
In the dialog, click the green plus icon to add a tag.
-
Enter a Tag name (for example,
Department), and a Value (for example,Engineering). -
Click Apply.
To view the newly created tag in the in the API Gateway Manager topology view, click View as > Grid. To filter this view, enter a tag name or value in the Filter field.
You can use the API Gateway Manager web console to deploy API Gateway configuration packages to a group of API Gateway instances. This includes the following configuration packages:
-
deployment package (
.fed) -
policy package (
.pol) -
environment package (
.env)
For more details on configuration packages, see the API Gateway Promotion and Deployment Guide.
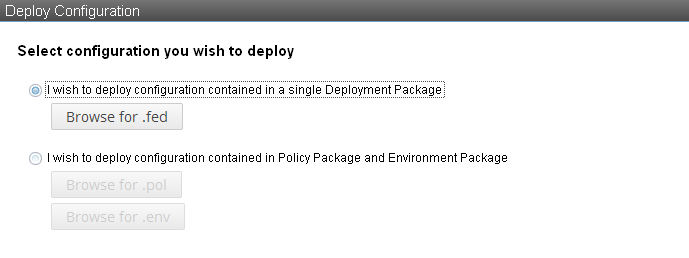
To deploy an existing deployment package to a group of API Gateways, perform the following steps:
- In the TOPOLOGY view, right-click the API Gateway group to which to deploy the package, and select Deploy Configuration.
- Select I wish to deploy configuration contained in a single Deployment Package.
-
Click Browse for .fed, and select the
.fedfile in the dialog. - Click Next.
- Select Deploy in the wizard, and the deployment package is deployed to the API Gateway group.
- Click Finish.
To deploy existing policy and environment packages to a group of API Gateways, perform the following steps:
- In the TOPOLOGY view, right-click the API Gateway group to which to deploy the packages, and select Deploy Configuration.
- Select I wish to deploy configuration contained in Policy Package and Environment Package.
-
Click Browse for .pol, and select the
.polfile in the dialog. -
Click Browse for .env, and select the
.envfile in the dialog. - Click Next.
- Select Deploy in the wizard, and the packages are deployed to the API Gateway group.
- Click Finish.
|
Tip |
|---|---|
| You can also use Policy Studio to deploy API Gateway configuration. For details, see Deploy API Gateway configuration. |
