Contents
- Overview
- Step 1: create an OpenLDAP group for RBAC roles
- Step 2: add RBAC roles to the OpenLDAP RBAC group
- Step 3: add users to the OpenLDAP RBAC group
- Step 4: create an LDAP connection
- Step 5: create an OpenLDAP repository
- Step 6: create a test policy for LDAP authentication and RBAC
- Step 7: use the OpenLDAP policy to protect management services
This topic explains how to use Local Directory Access Protocol (LDAP) to authenticate and perform Role-Based Access Control (RBAC) of management services. You can use the sample Protect Management and Interfaces (LDAP) policy instead of the Protect Management Interfaces policy. This means that an LDAP repository is used instead of the local Admin User store for authentication and RBAC of users attempting to access the management services. This topic describes how to reconfigure the server to use OpenLDAP as the LDAP repository, and to use the Apache Directory Studio as an LDAP browser.
![[Note]](../common_oracle/images/admon/note.png) |
Note |
|---|---|
|
This topic applies to both API Gateway and API Gateway Analytics. |
Prerequisites
This example assumes that you already have configured connection to the OpenLDAP server and setup your organization groups and users that you wish to use to perform RBAC. For example:
-
LDAP URL:
ldap://openldap.qa.oracle.com:389 -
User:
cn=admin,o=Vordel Ltd.,l=Dublin 4,st=Dublin,C=IE -
Password:
oracle
To create a new user group in OpenLDAP, perform the following steps:
-
Select the
cn=admin,o=Vordel Ltd.,l=Dublin 4,st=Dublin,C=IEdirectory. -
Right-click, and select New > New Entry.
-
Select Create entry from scratch.
-
Click Next.
-
Add an
organizationalUnitobject class. -
Click Next.
-
Set the Parent to
o=Vordel Ltd.,l=Dublin 4,st=Dublin,C=IE. -
Set the RDN to
ou = RBAC. -
Click Next.
-
Click Finish.
You can view the new group using an LDAP Browser. For example:
 |
You must add the following default RBAC roles to the
ou=RBAC,o=Vordel Ltd.,l=Dublin 4,st=Dublin,C=IE group
to give the LDAP users appropriate access to the API Gateway management
services:
-
API Gateway Administrator -
API Gateway Operator -
KPS Administrator -
Policy Developer -
Deployer
These RBAC roles are located in the roles section of the acl.json file.
Adding Roles to the RBAC Directory
To add these RBAC roles to the OpenLDAP RBAC group, perform the following steps:
-
Select the
cn=admin,o=Vordel Ltd.,l=Dublin 4,st=Dublin,C=IEdirectory. -
Right-click, and select New > New Entry.
-
Select Create entry from scratch.
-
Click Next.
-
Add a
groupOfNamesobject class. -
Click Next.
-
Set the Parent to
ou=RBAC,o=Vordel Ltd.,l=Dublin 4,st=Dublin,C=IE. -
Set the RDN to
cn = Policy Developer. -
Click Next.
-
In the DN Editor dialog, set
adminas first member of the following group:cn=admin,ou=R&D,o=Vordel Ltd.,l=Dublin 4,st=Dublin,c=IE. You can change the member Distinguished Name at any time. -
Click OK.
-
Click Finish.
 |
You can view the role in the OpenLDAP group in an LDAP Browser. For example:
 |
Add other roles to the RBAC directory
You can repeat these steps to add other roles to the RBAC directory. Alternatively, you
can copy the Policy Developer entry, and paste it into the RBAC
directory, renaming the entry with required RBAC role name. For example:
|
Note |
|---|---|
|
You should have the RBAC directory ready to add members to the role entries. By default, the
|
The following example shows the added roles:
Now you can add new users to the RBAC role entries. The member attribute value should contain the user Distinguished Name. This is explained in the next section.
To add a user to the OpenLDAP RBAC group, perform the following steps:
-
Select the required RBAC group (for example,
cn=API Gateway
                                           Administrator
) to view the group details. -
Right-click the list of group attributes, and select New Attribute.
-
Enter
memberin the attribute type.
-
Click Finish.
-
In the DN Editor dialog, enter the user Distinguished Name (for example,
cn=joe.bloggs,o=Vordel Ltd.,l=Dublin 4,st=Dublin,c=IE). -
Click OK.
The cn=joe.bloggs,o=Vordel Ltd.,l=Dublin 4,st=Dublin,c=IE new user has
been added to the RBAC API Gateway Administrator role.
To create an new LDAP Connection, perform the following steps:
-
In the Policy Studio, select Open File , and select the Admin Node Manager configuration file (for example,
INSTALL_DIR\apigateway\conf\fed\configs.xml). -
In the Policy Studio tree, select External Connections > LDAP Connections.
-
Right-click, and select Create an LDAP Connection.
-
Complete the fields in the dialog as appropriate. For example:

Note The specified User Name should be an LDAP administrator that has access to search the full directory for users.
-
Click Test Connection to ensure the connection details are correct.
To create an new OpenLDAP Repository, perform the following steps:
-
In the Policy Studio tree, select External Connections > Authentication Repository Profiles > LDAP Repositories.
-
Right-click, and select Add a new Repository.
-
Complete the following fields in the dialog:
Repository Name Enter an appropriate name for the repository. LDAP Directory Use the LDAP directory created in the section called “Step 4: create an LDAP connection”. Base Criteria Enter the LDAP node that contains the users (for example, see the LDAP Browser screen in the section called “Step 3: add users to the OpenLDAP RBAC group”). User Search Attribute Enter cn. This is the username entered at login time (in this case,admin).Authorization Attribute Enter cn. Theauthentication.subject.idmessage attribute is set to the value of this LDAP attribute (for example,cn=admin,ou=R&D,o=Vordel Ltd.,l=Dublin 4,st=Dublin,c=IE. Theauthentication.subject.idis used as the base criteria in the filter used to load the LDAP groups (the user’s roles). This allows you to narrow the search to a particular user node in the LDAP tree. For more details, see the Retrieve Attributes from Directory Server filter in the section called “Step 6: create a test policy for LDAP authentication and RBAC”.
Connect to other LDAP repositories
This topic uses OpenLDAP as an example LDAP repository. Other LDAP repositories such as Oracle Directory Server (formerly iPlanet and Sun Directory Server) and Microsoft Active Directory are also supported. For details on using a Microsoft Active Directory repository, see Active Directory for authentication and RBAC of management services. For an example of querying an Oracle Directory Server repository, see the Retrieve Attributes from Directory Server filter in the section called “Step 5: create a test policy for LDAP authentication and RBAC”.
To avoid locking yourself out of the Policy Studio, you can create a test policy for LDAP authentication and RBAC, which is invoked when a test URI is called on the server (and not a management services URI). For an example policy, select Policies > Management Services > Sample LDAP Policies > Protect Management Interfaces (LDAP) when the Admin Node Manager configuration is loaded.
Create the test policy
Perform the following steps:
-
Select Open File and load the Admin Node Manager configuration file in the Policy Studio. For example:
INSTALL_DIR/apigateway/conf/fed/configs.xml
-
Right-click the Policies node in the tree view of the Policy Studio, and select Add Policy .
-
Enter a suitable name (for example
Test Policy) for the new policy in the Name field, and click the OK button. The new policy is now visible in the tree view. -
Click the new policy in the tree view to start configuring the filters for the policy. You can easily configure the policy by dragging the required filters from the filter palette on the right of the Policy Studio, and dropping them on to the policy canvas.
For more details on creating policies, see the API Gateway Policy Developer Guide.
Configure the test policy
Configure the test policy with the following filters:
Scripting Language filter
This includes the following settings:
The Scripting Language filter performs the following tasks:
-
Returns true if the Node Manager is the Admin Node Manager, and passes control to the HTTP Basic Authentication filter.
-
Otherwise, calls the Call Internal Service (no RBAC) filter without adding the
authentication.subject.roleandauthentication.subject.idHTTP headers.
Call Internal Service (no RBAC) filter
This filter is called without adding any HTTP headers as follows:
HTTP Basic Authentication filter
This filter uses the LDAP repository configured in the section called “Step 5: create an OpenLDAP repository”, and includes the following settings:

The HTTP Basic Authentication filter performs the following tasks:
-
Connects to the LDAP directory using the connection details specified in the LDAP directory.
-
Finds the user using the specified base criteria and search filter.
-
If the user is found, verifies the user's name and password against the LDAP repository by performing a bind.
-
If authentication fails, always throws a 401. This allows retry for browser users.
-
The
distinguishedName(DName) is held in theauthentication.subject.idmessage attribute. This is specified by the Authorization Attribute field in the LDAP repository configuration. -
The user’s roles (LDAP groups) are not available yet.
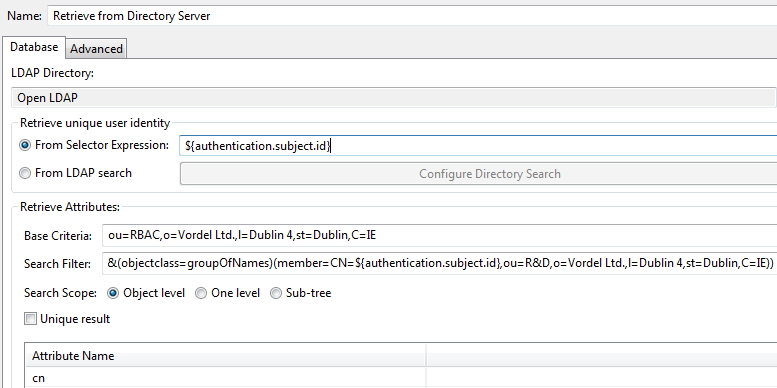
Retrieve Attributes from Directory Server filter
On the Database tab, this filter uses the LDAP directory configured in the section called “Step 4: create an LDAP connection”, and includes the following settings:
-
Retrieve Unique User Identity From Selector Expression:
${authentication.subject.id} -
Base Criteria:
ou=RBAC,o=Vordel Ltd.,l=Dublin 4,st=Dublin,C=IE -
Search Filter:
(&(objectclass=groupOfNames)(member=CN=${authentication.subject.id},ou=R&D,o=Vordel Ltd.,l=Dublin 4,st=Dublin,C=IE)) -
Attribute Name:
cn
|
Note |
|---|---|
|
On the Advanced tab, you must ensure that the Enable legacy attribute naming for retrieved attributes setting is selected. |
The Retrieve Attributes from Directory Server filter performs the following tasks:
-
Using the user’s DName as the search start point, finds the user’s
cnattribute, and loads the LDAP groups for the user. -
If the user is in one group, the group name is contained in the
user.cnmessage attribute. -
If the user is in multiple (n) LDAP groups, the group names are contained in
user.cn.1...user.cn.nmessage attributes.
Management Services RBAC filter
This filter includes a the following setting:
The Management Services RBAC filter performs the following tasks:
-
Reads the roles from the
user.cn.*message attribute. It understands the meaning of the wildcard, and loads the roles as required. It creates a string version of the roles, and places it in theauthentication.subject.rolemessage attribute for consumption by the Call Internal Service filter, which receives the roles as an HTTP header value. -
Determines which Management Service URI is currently being invoked.
-
Returns true if one of the roles has access to the Management Service currently being invoked, as defined in the
acl.jsonfile. -
Otherwise, returns false and calls the Return HTTP Error 403: Access Denied (Forbidden) policy. The message content of this filter is shown when a valid user has logged into the browser, but their role(s) does not give them access to the URI they have invoked. For example, this occurs if a new user is created and they have not yet been assigned any roles.
Call Internal Service filter
This filter includes a the following settings:

The Call Internal Service filter sends the message to the internal service with the following additional HTTP headers:
-
authentication.subject.role -
authentication.subject.role
|
Note |
|---|---|
|
The |
Test the policy configuration
To test this policy configuration, perform the following steps:
-
In the Policy Studio tree, select Listeners > Node Manager > Add HTTP Services, and enter a service name (for example,
LDAP
                                       Test
). -
Right-click the HTTP service, and select Add Interface > HTTP.
-
Enter an available port to test the created policy (for example,
8888), and click OK. -
Right-click the HTTP service, and select Add Relative Path.
-
Enter a relative path (for example,
/test). -
Set the Path Specify Policy to the Protect Management Interfaces (LDAP) policy, and click OK.
-
Close the connection to the Admin Node Manager file and reboot the Admin Node Manager so it loads the updated configuration.
-
Use API Gateway Explorer to call
http://localhost:8080/test. -
Enter the HTTP Basic credentials (for example, username
adminand passwordOracle123). If authentication is passed, the Admin Node Manager should return an HTTP 404 code (not found).
If the authentication and RBAC filters pass, you can now use this policy to protect the management interfaces. To ensure that you do not lock yourself out of the server, perform the following steps:
-
Make a copy of the
conf/feddirectory contents from the server installation, and put it into a directory accessible from the Policy Studio. -
Make another backup copy of the
conf/feddirectory, which will remain unmodified. -
In the Policy Studio, select File > Open, and browse to
configs.xmlin the first copy of thefeddirectory. -
Under the Listeners > Management Services node, select the
/and the/configuration/deploymentsrelative paths, and set the Path Specify Policy to the Protect Management Interfaces (LDAP) policy. -
Remove the previously created
LDAP TestHTTP Services. -
Close the connection to the file.
-
Copy the
feddirectory back to the Admin Node Manager’sconfdirectory. -
Reboot the Admin Node Manager.
-
Start the Policy Studio, and connect to the Admin Node Manager using
adminwith its LDAP password (for example,Oracle123). You should now be able to edit API Gateway configurations as usual.
