


|

|
|
|
|
Building Format Definitions
The following sections provide information on building format definitions using the Format Builder included with BEA WebLogic XML/Non-XML Translator (hereafter referred to as XML Translator):
The Format Builder included with XML Translator allows users to build format definitions for binary data that will be translated to or from XML. Format definitions are the metadata used to parse or create binary data.
Understanding the Data Formats Used with XML Translator
To understand how the Format Builder is used, it helps to understand the data formats used by XML Translator: binary data, XML, MFL, DTD and Schema.
About Binary Data (Non-XML Data)
Because computers are based on the binary numbering system, applications often use a binary format to represent data. A file stored in binary format is computer-readable but not necessarily human-readable. Binary formats are used for executable programs and numeric data, and text formats are used for textual data. Many files contain a combination of binary and text formats. Such files are usually considered to be binary files even though they contain some data in a text format.
Unlike XML data, binary data is not self-describing. In other words, binary data does not provide a description of how the data is grouped, divided into fields, or arranged in a layout. Binary data is a sequence of bytes that can be interpreted as an integer, a string, or a picture, depending on the intent of the application that generates the sequence of bytes. In order for binary data to be understood by an application, the layout must be embedded within each application that uses this data. Binary data may also be embedded using different character sets. For example, character data on an IBM mainframe is usually encoded using the EBCDIC character set while data from a desktop computer is either ASCII or unicode.
The Format Builder is used to create a Message Format Language (MFL) file that describes the layout of the binary data. MFL is an XML language that includes elements to describe each field of data, as well as groupings of fields (groups), repetition, and aggregation. The hierarchy of a binary record, the layout of fields, and the grouping of fields and groups are expressed in an MFL document. This MFL document is used by XML Translator at run-time to translate the data to and from an XML document.
Listing 2-1 Example of Binary Data
1234;88844321;SUP:21Sprockley's Sprockets01/15/2000123 Main St.; Austin;TX;75222;555 State St.;Austin;TX;75222;PO12345678;666123;150;Red Sprocket;
About XML Documents
Extended Markup Language, or XML, is a text format for exchanging data between different systems. It allows data to be described in a simple, standard, text-only format. In contrast to binary data, XML data embeds a description of the data within the data stream. Applications can share data more easily, since they are not dependent on the layout of the data being embedded within each application. Since the data is presented in a standard form, applications on disparate systems can interpret the data using XML parsing tools, instead of having to interpret data in proprietary binary formats.
Instances of XML documents contain character data and markup. The character data is referred to as content, while the markup provides hierarchy for that content. Markup is distinguished from text by angle brackets. Information in the space between the "<"and the">" is referred to as the tag that markup the content. Tags provide an indication of what the content is for, and a mechanism to describe parent-child relationships. Listing 2-2 shows an example of an XML document.
Listing 2-2 Example of XML Document
<?xml version="2.0"?>
<PurchaseRequest>
<PR_Number>1234</PR_Number>
<Supplier_ID>88844321</Supplier_ID>
<Supplier_Name>Sprockley's Sprockets</Supplier_Name>
<Requested_Delivery_Date>2000-01-15T00:00:00:000</Requested_Delivery_Date>
<Shipping_Address>
<Address>
<Street>123 Main St.</Street>
<City>Austin</City>
<State>TX</State>
<Zip>75222</Zip>
</Address>
</Shipping_Address>
</PurchaseRequest>
An XML document can conform to a content model. A content model allows Metadata about XML documents to be communicated to an XML parser. XML documents are said to be valid if they conform to a content model. A content model describes the data that can exist in an instance of an XML document. A content model also describes a top-level entity, which is a sequence of subordinate entities. These subordinate entities are further described by their tag names and data content. The two standard formats for XML content models are XML Document Type Definition (DTD) and XML Schema. A Schema is an XML document that defines what can be in an XML document. A DTD also defines what content can exist in an XML document, but the Schema definition is more specific than the DTD, and provides much finer-grained control over the content that can exist in an XML document.
Listing 2-3 shows an example of a Document Type Definition.
Listing 2-3 Example DTD
<!ELEMENT PurchaseRequest (PR_Number,Supplier_ID,Supplier_Name?,Requested_Delivery_Date,Shipping_Address,Billing_Address,Payment_Terms,Purchase_Items)>
<!ELEMENT PR_Number (#PCDATA) >
<!ATTLIST PR_Number type CDATA #FIXED "nonNegativeInteger">
<!ELEMENT Supplier_ID (#PCDATA) >
<!ATTLIST Supplier_ID type CDATA #FIXED "nonNegativeInteger">
<!ELEMENT Supplier_Name (#PCDATA) >
<!ATTLIST Supplier_Name type CDATA #FIXED "string">
<!ELEMENT Requested_Delivery_Date (#PCDATA) >
<!ATTLIST Requested_Delivery_Date type CDATA #FIXED "timeInstant">
<!ELEMENT Shipping_Address (Address)>
<!ELEMENT Address (Street,City,State,Zip)>
<!ELEMENT Street (#PCDATA) >
<!ATTLIST Street type CDATA #FIXED "string">
<!ELEMENT City (#PCDATA) >
<!ATTLIST City type CDATA #FIXED "string">
<!ELEMENT State (#PCDATA) >
<!ATTLIST State type CDATA #FIXED "string">
<!ELEMENT Zip (#PCDATA) >
<!ATTLIST Zip type CDATA #FIXED "nonNegativeInteger">
Listing 2-4 shows an example of an XML Schema.
Listing 2-4 Example XML Schema
<?xml version="1.0" encoding="UTF-8"?>
<xsd:schema xmlns:xsd="http://www.w3.org/1999/XMLSchema">
<xsd:annotation>
	<xsd:documentation>
		This schema created for MFL MessageFormat PurchaseRequest.
	</xsd:documentation>
</xsd:annotation>
<xsd:element name="PurchaseRequest">
<xsd:complexType content="elementOnly">
<xsd:sequence>
	<xsd:element ref="PR_Number" minOccurs="1" maxOccurs="1"/>
	<xsd:element ref="Supplier_ID" minOccurs="1" maxOccurs="1"/>
	<xsd:element ref="Supplier_Name" minOccurs="0" maxOccurs="1"/>
	<xsd:element ref="Requested_Delivery_Date" minOccurs="1" maxOccurs="1"/>
	<xsd:element ref="Shipping_Address" minOccurs="1" maxOccurs="1"/>
</xsd:sequence>
</xsd:complexType>
</xsd:element>
<xsd:element name="PR_Number" type="xsd:nonNegativeInteger"/>
<xsd:element name="Supplier_ID" type="xsd:nonNegativeInteger"/>
<xsd:element name="Supplier_Name" type="xsd:string"/>
<xsd:element name="Requested_Delivery_Date" type="xsd:timeInstant"/>
<xsd:element name="Shipping_Address">
<xsd:complexType content="elementOnly">
<xsd:sequence>
	<xsd:element ref="Address" minOccurs="1" maxOccurs="1"/>
</xsd:sequence>
</xsd:complexType>
</xsd:element>
</xsd:schema>
About MFL Documents
Message Format Language (MFL) is an XML language that describes the layout of binary data. This language includes elements to describe each field of data, as well as groupings of fields (groups), repetition, and aggregation. The hierarchy of a binary record, the layout of fields, and the grouping of fields and groups is expressed in an MFL document. MFL documents are created using Format Builder. These MFL documents are then used to perform run-time translation. MFL documents are created for you when you define and save definitions from within Format Builder.
The MFL documents you create using Format Builder can contain the following elements:
Analyzing the Data to be Translated
Before a message format can be created, the layout of the binary data must be understood. Legacy purchase order sample data and corresponding MFL and XML documents for a purchase order record are included on the XML Translator CD-ROM. The sample purchase order illustrates how XML Translator translates data from one format to another. For more information on this sample data, refer to Appendix C, "Running the Purchase Order Sample."
The key to translating binary data to and from XML is to create an accurate description of the binary data. For binary data (data that is not self-describing), you must identify the following elements:
The Format Builder (the design-time portion of XML Translator) is used to build the format definitions that are used for data translations. For details on the steps you need to perform to thoroughly analyze your data, refer to the BEA WebLogic XML/Non-XML Translator Samples Guide.
Using the Format Builder
Format Builder assists you in creating format descriptions for binary data. You use Format Builder to create hierarchical and detail information derived from structural and detailed analysis of your data. These format descriptions are stored in an MFL document. You can also use Format Builder to test your format descriptions before you apply them to your actual data.
Starting Format Builder
To start Format Builder, choose Start—>Programs—>BEA WebLogic E-Business Platform—>WebLogic Integration 2.0—>xmltranslator—> Format Builder. The Format Builder main window displays. If you did not use the installation directory defaults, your path may be different.
Using the Format Builder Main Window
The main window of Format Builder is split into two panes. The left pane (the Tree Pane) shows the structural information for the data format. The right pane (the Properties Pane) shows the detail for the item selected in the tree pane.
Details of the file you are editing display in the Title Bar of the Format Builder main window.
Figure 2-1 Format Builder Main Window
The structure of the binary data is defined in the tree pane using a combination of fields and groups that match the target data. The following topics discuss the parts of the main window and provide instructions for navigating and executing commands from the main window of Format Builder: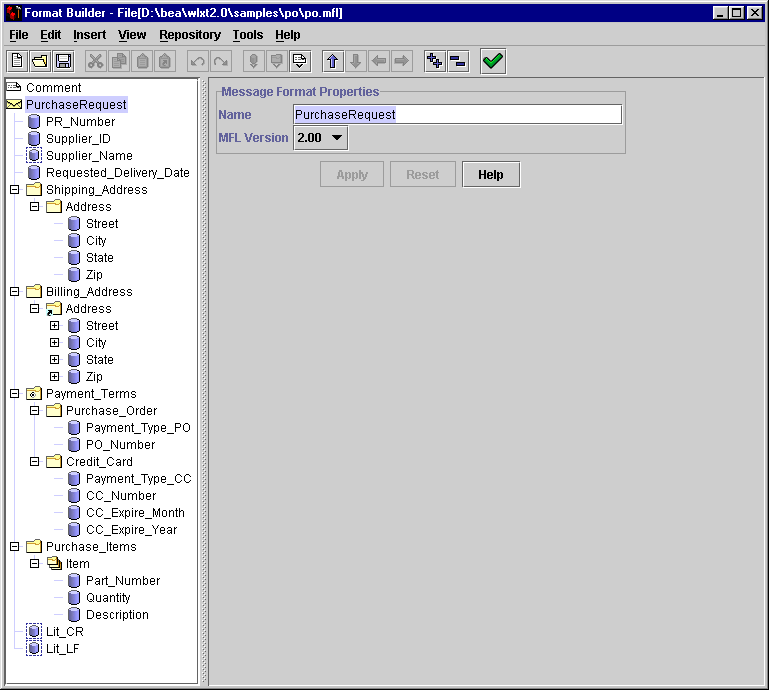
Using the Tree Pane
The Tree Pane represents hierarchical/structural information about the format of the binary data in a tree. The root node of the tree will correspond to the MFL document being created or edited. The root node is referred to as the Message node. Child nodes are labeled with group or field names. Fields are represented by leaf nodes in the tree. Groups contain fields or other groups and are represented by non-leaf nodes in the tree.
The icon for each node encapsulates information about the node. The icon indicates whether the node represents a message, a group, a field, a comment, or a reference. The icon also indicates whether a group or field is repeating, whether a group is a Choice of Children, and whether a group or field is optional or mandatory. You also have the ability to add, delete, move, copy, or rename nodes in the tree. This is done through the menus or the toolbar (see Using the Menu Bar and Using the Toolbar).
The icons that appear in the Tree Pane are described in the following table.
Using the Menu Bar
The Menu bar displays the menu headings. The menu items that are available depend on what is selected in the tree pane and the state of the tree. Click a menu heading to open the menu and choose a command.
Figure 2-2 Format Builder Menu Bar
All Format Builder menus are expandable from your keyboard by pressing Alt + mnemonic keys. Some menu commands are also executable using Ctrl + letter accelerator keys. Note: Menu items that appear in gray are unavailable for the current selection. For a complete description of the menu commands, see Format Builder Menus. Using the Toolbar The toolbar provides buttons that access some of the frequently used commands in the menus. To activate a command, click its toolbar button. If a command is unavailable, its button appears grayed-out. Figure 2-3 Format Builder Toolbar
The toolbar buttons provided with Format Builder are described below:
Using the Shortcut Menus
Instead of using the standard menus to find the command you need, use the right mouse button to click an item in the tree pane. The menu that appears shows the most frequently used commands for that item.
The following commands are available from the Shortcut Menus.
Note: Some commands may be unavailable, depending on the item you have selected in the tree, or the state of the tree at the time.
Table 2-2 Shortcut Menus
Using Drag and Drop You can use the drag and drop feature of XML Translator to copy and/or move the items in the tree pane. Note: The node being copied or moved is always inserted as a sibling of the selected node during the drag and drop process. If you drag and drop the node onto the message format node, it is inserted as the last child. To use drag and drop to move an item:
To use drag and drop to copy an item:
Creating a Message Format
The first step in creating a Message Format Definition file is to create a message format (the root node of a message format file).
To create a message format:
Figure 2-4 Message Format Properties

Note: The examples that follow are based on MFL version 2.01 documents.
Table 2-3 Message Format Properties
Valid Names Message Formats, Fields, and Groups are identified by a Name. The name that is specified is used as the XML tag when binary data is translated to XML by XML Translator. Thus the name must conform to the XML rules for a name. The rules for names are as follows:
The following are valid name examples:
MyField
MyField1
MyField_again
MyField-again
The following are invalid name examples:
1MyField - may not start with a digit
My>Field - the greater-than sign (>) is an illegal character
My Field - a space is not permitted
Creating a Group
Groups are collections of fields, comments, references and other groups that are related in some way (for example, the fields PAYDATE, HOURS, and RATE could be part of the PAYINFO group). You can create a group as a child of the message format item, as a child of another group, or as a sibling of a group or field.
To create a group:
Figure 2-5 Group Details
Note: The following example applies to MFL version 2.1. Table 2-4 Group Detail Properties
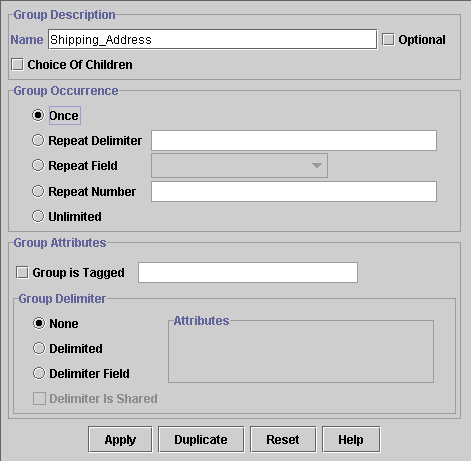
Note: The Apply and Reset buttons are only enabled once changes are made to the detail panel's components.
Creating a Field
Fields are a sequence of bytes that have some meaning to an application. (For example, the field EMPNAME contains an employee name.) You can create a field as a child of the message format item, as a child of a group, or as a sibling of a group or another field. The field name is used as the element name in the XML document and must comply with XML naming conventions.
To create a field:
Figure 2-6 Field Details
Note: The following example applies to MFL version 2.01. Table 2-5 Field Detail Properties
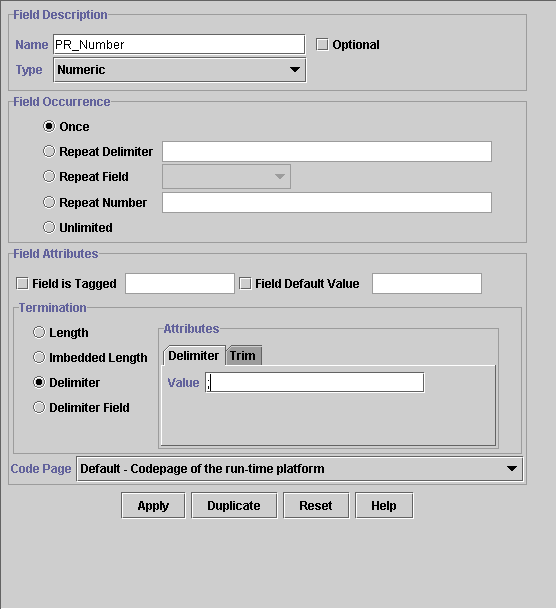
Note: The Apply and Reset buttons are only enabled once changes are made to the detail panel's components.
Creating a Comment
Comments contain notes about the message format or the data translated by the message format. Comments are included in the message format definition for documentation and informational purposes only. You can create a comment as a child or sibling of any message format, group, or field. Comments are unnumbered in the MFL document and are not transformed to the XML or Binary data.
Note: Conventionally, the comment usually precedes the node it intends to document.
To create a comment:
Figure 2-7 Comment Details
Table 2-6 Comment Detail Properties
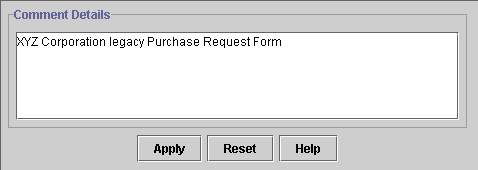
Note: The Apply and Reset buttons are only enabled once changes are made to the detail panel's components.
Creating References
References indicate that the description of the field or group format has been previously defined and you want to reuse this description without re-entering the data. Reference fields or groups have the same format as the original field or group, but you can change only the optional setting and the occurrence setting for the reference field or group. For example, if you have a "bill to" address and a "ship to" address in your data and the format for the address is the same, you only need to define the address format once. You can create the "bill to" address definition and create a reference for the "ship to" address.
Note: References are named exactly the same as the original item. For example, the "bill to" address definition and the "ship to" address definition would be named the same. If you want to reuse a group definition, create a generic group and embed it within a specific group. For example, in the previous example, you can create an address group within a bill_to group and reference address within a ship_to group.
To create a reference:
Figure 2-8 Reference Details
Table 2-7 Reference Detail Properties
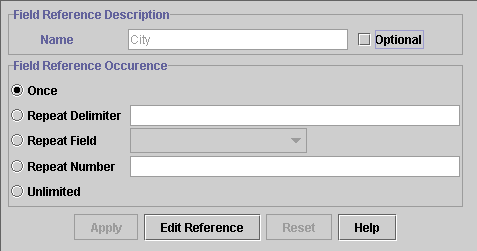
Note: The Apply and Reset buttons are only enabled once changes are made to the detail panel's components.
Working with Palettes
The palette allows you to store commonly used message format items and insert them into your message format definitions. These items are stored in an MFL document, and you can use the drag and drop feature (see Using Drag and Drop) to copy items from the palette into your message format definition. You can also open any MFL document in the palette and reuse any message format items.
Opening the Palette
To open the palette:
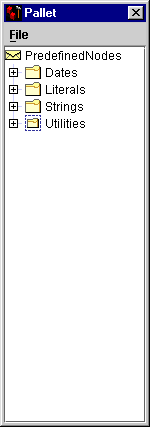
You may reorder or change the hierarchy within the palettes by using drag and drop or the Context menu. The contents of the palette are automatically saved when you exit Format Builder.
Note: You can only copy items from the tree pane to the palette and vice versa. You cannot move items between the windows.
The XML Translator palette contains some common date formats, literals, and strings. You can use these items in the message formats you create, as well as adding your own items to the palette.
Using the File Menu
The following commands are available from the palette's File menu.
Table 2-8 File Menu Commands
Using the Shortcut Menu The following commands are available from the palette's shortcut menu. You can access the shortcut menu by right-clicking within the palette window. Note: Some commands may be unavailable, depending on the time you have selected in the tree. Table 2-9 Shortcut Menu Commands
Adding Items to the Palette To add items to the palette:
Note: If the Palette window is already displayed, skip this step.
Notes: You cannot add any node that depends on the existence of another node to the palette. For example, you cannot add Field or Group References, and you cannot add items that have a Repeat Field specified.
Adding comments is possible, but not recommended since comments do not have unique names and therefore are indistinguishable on the palette.
Deleting Items From the Palette
To delete items from the palette:
Adding Palette Items to a Message Format
To copy items from the palette to a message format:
Note: If the Palette window is already displayed, skip this step.
Saving a Message Format to a File
To save a message format file for the first time:
Figure 2-9 Save As Dialog
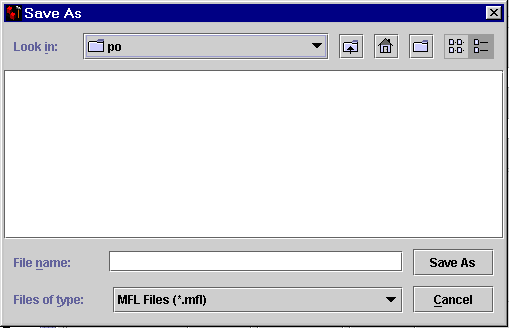
To save a message format file using the same name, choose File—>Save. The file is saved in the same location with the same name and extension.
To save a message format file using a different name, choose File—>Save As and follow steps 1 through 5 above.
Opening an Existing Message Format File
To open an existing message format file:
Figure 2-10 Open Dialog
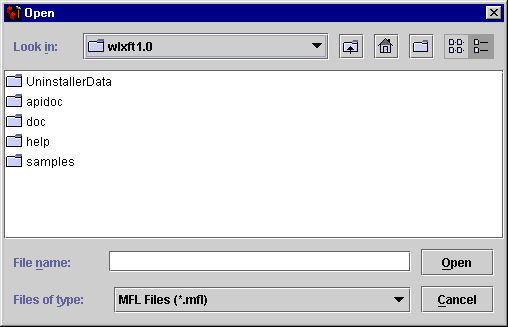
Working With the Repository
The XML Translator repository provides a centralized document storage mechanism that supports the following four document types:
The repository allows the supported documents to be shared between the components of WebLogic Integration. The repository provides access to these document types and provides manipulation of repository documents including access to the document text, description, notes, and removal of the document. The repository allows the supported documents to be shared between XML Translator, WebLogic Process Integrator (Process Integrator), WebLogic Server (WLS), and WebLogic Collaborate (WLC). The repository also includes a batch import utility that allows previously constructed MFL, DTD, XML Schema, and XSLT documents residing on a different file system to be easily migrated into the repository.
For more information on using the repository, refer to the Retrieving and Storing Repository Documents section.
Retrieving Repository Documents
Perform the following steps to retrieve an MFL document from the repository:
Once you have retrieved the specified document, you can edit it as you would any MFL document within Format Builder, store the document back into the repository, store the document back into the repository with a different name, or save as a local file.
Anytime you open a document that is stored in the repository, a read-only Document Repository Properties box displays in the Message Format detail panel when the message format node is selected. This properties box provides you with a document description and any notes that were attached to the document.
Storing Repository Documents
Perform the following steps to store a MFL document in the repository:
If your Format Builder options specify generation of a DTD/XML Schema, these documents will also be stored in the repository using the supplied name.
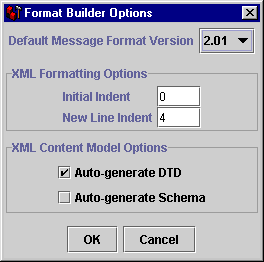
Setting Format Builder Options
You can set several options to control the overall operation of Format Builder.
To set Format Builder options:
Figure 2-11 Format Builder Options Dialog
Table 2-10 Format Builder Options Properties
Format Builder Menus
The following menus are available in Format Builder.
File Menu
The following commands are available from the File Menu.
Note: Some commands may be unavailable, depending on the actions you have taken.
Table 2-11 File Menu Commands
Edit Menu The following commands are available from the Edit Menu. Note: Some commands may be unavailable, depending on the actions you have taken and the state of the tree pane and its items. Table 2-12 Edit Menu Commands
Insert Menu The following commands are available from the Insert Menu. Table 2-13 Insert Menu Commands
View Menu The following commands are available from the View Menu. Table 2-14 View menu Commands
Repository Menu The following commands are available from the Repository Menu. Table 2-15 Repository Menu Commands
Tools Menu The following commands are available from the Tools Menu. Table 2-16 Tools Menu Commands
Help Menu The following commands are available from the Help Menu. Table 2-17 Help Menu Commands

|

|

|
|
|
|
Copyright © 2001 BEA Systems, Inc. All rights reserved.
|