
|
|
|
|
|
|
Installing BEA WebLogic XML/Non-XML Translator
This chapter describes the steps required to install the BEA WebLogic XML/Non-XML Translator (hereafter referred to as XML Translator). The following topics are discussed:
Preinstallation Considerations
The following actions are necessary before installing XML Translator:
Software Requirements
The XML Translator Version 2.0 requires the following products:
To run the XML Translator Plug-In, the following applications are also required:
Installing on UNIX Platforms in Console Mode
To install the XML Translator software on UNIX in console mode, you run the install.bin program. A UNIX installation installs the runtime classes that translate data between XML and non-XML, as well as a plug-in for interfacing with WebLogic Process Integrator.
Perform the following steps to install the XML Translator software in console mode on a certified UNIX platform:
$ su -
Password:
# ls -l /dev/cdrom
total 0
brw-rw-rw- 1 root sys 22, 0 July 1 10:55 c1b0t010
# mount -r -F cdfs /dev/cdrom/c1b0t0l0 /mnt
If you are installing on an HP-UX system, use a command similar to the following command:
# mount -r -F cdfs -o cdcase /dev/cdrom/c1b0t010 /mnt
# cd /mnt/wlintegration2.0/unix/xmltranslator
# ls
install.bin
# sh install.bin -i console
Listing 1-1 UNIX Console Mode Installation Example
Preparing to install...
Preparing CONSOLE Mode Installation...
=================================================================
BEA WebLogic XML/Non-XML Translator 2.0(created with InstallAnywhere by Zero G)
-----------------------------------------------------------------
=================================================================
Introduction
------------
This installer will guide you through the installation of 'WebLogic XML Non-XML Translator'. On each step, answer the questions provided. Type "quit" at any time to exit the installer.
PRESS <ENTER> TO CONTINUE:
=================================================================
License Agreement
-----------------
Please read before installing:
BEA SYSTEMS, INC. SOFTWARE LICENSE AGREEMENT
USE OF SOFTWARE ORDERED FROM BEA SYSTEMS, INC. ("BEA") IS PROVIDED ONLY UNDER LICENSE FROM BEA. PLEASE READ THE FOLLOWING LICENSE CAREFULLY AND INDICATE YOUR ACCEPTANCE BY CLICKING THE ACCEPTANCE BOX. CERTAIN CAPITALIZED TERMS ARE DEFINED IN SECTION 11.1. LICENSE TERMS
a. Evaluation Use. The terms of this Section 1(a) are applicable to you if you have registered as an Evaluation customer. Subject to the terms of this Agreement, BEA grants to you a non-exclusive, non-transferable, license to use the evaluation version of the Software solely for Evaluation Use. Third party software products or modules supplied by BEA, if any, may be used solely with the Software. This license begins upon downloading and ends thirty (30) days thereafter (the "Evaluation Period"). When the license expires you must stop using the Software. All rights not specifically granted to you herein are retained by BEA.
.
.
.
. . .an Upgrade or a new product or feature, BEA's opinion will prevail, provided that BEA treats the product offering as a new product or feature for its end user customers generally.
DO YOU AGREE WITH THE TERMS OF THE LICENSE? (Y/N): y
=================================================================
Choose BEA Home Directory
-------------------------
1- Create a New BEA Home
2- Use Existing BEA Home
Enter a number: 2
1- /usr/bea
2- /usr2/bea
Existing BEA Home: 1
=================================================================
Choose Product Directory
------------------------
1- Modify Current Selection (/usr/bea/wlintegration2.0)
2- Use Current Selection (/usr/bea/wlintegration2.0)
Enter a number: 2
=================================================================
Select a Database
-----------------
1- Oracle
2- Cloudscape
3- Microsoft SQL Server
: 1
Database Host Name: server_name
Database Name: database_name
Database User: user_name
Database Password: password
Email: email_address
EmailHost: email_server_name
=================================================================
Installing...
-------------
[===============|===============|===============|===============]
[---------------|---------------|---------------|---------------]
=================================================================
Install Complete
----------------
Congratulations. 'WebLogic XML Non-XML Translator' has been successfully installed to:
/usr/bea/wlintegration2.0/xmltranslator
PRESS <ENTER> TO EXIT THE INSTALLER:
Installing on Windows Platforms or UNIX in Graphics Mode
Perform the following steps to install the XML Translator software on a Windows platform or on a UNIX platform in Graphics Mode:
On Windows:
On UNIX:
$ su -
Password:
> ls -l /dev/cdrom
total 0
brw-rw-rw- 1 root sys 22, 0 July 1 10:55 c1b0t010
> mount -r -F cdfs /dev/cdrom/c1b0t0l0 /mnt
If you are installing on an HP-UX system, use a command similar to the following command:
> mount -r -F cdfs -o cdcase /dev/cdrom/c1b0t010 /mnt
> cd /mnt/wlintegration2.0/unix/xmltranslator
/mnt/wlintegration2.0/unix/xmltranslator> ls
install.bin
/mnt/wlintegration2.0/unix/xmltranslator> sh install.bin
The Introduction screen (see Figure 1-1) is displayed.
Figure 1-1 Introduction Screen
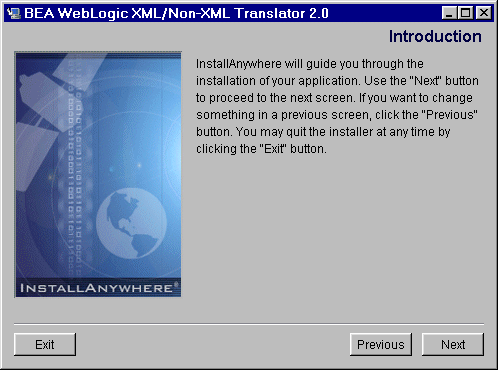
Figure 1-2 License Agreement Screen
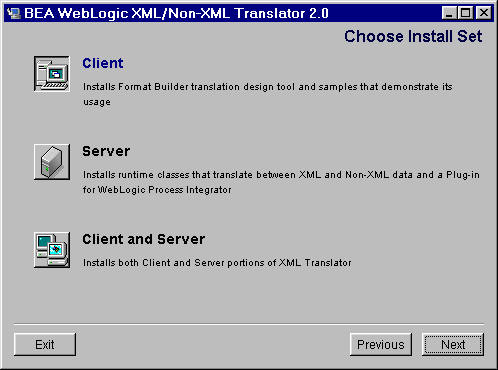
Note: If you click the No option button, you will not be able to continue with the installation. You must either exit the installation or go back to the Introduction screen. Figure 1-3 Choose Install Set Screen
Click Next to proceed with the installation. The Choose BEA Home Directory screen is displayed (see Figure 1-4).
Figure 1-4 Choose BEA Home Directory Screen
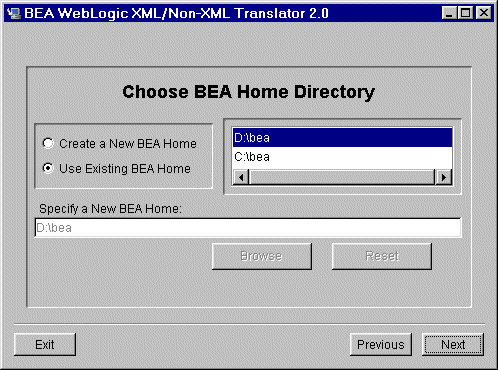
Note: If you are performing a Server installation, you must install XML Translator in the same BEA Home directory where you have WebLogic Server and WebLogic Process Integrator installed.
If you do not already have a BEA Home directory, you can create one by following these steps:
If you already have one or more BEA Home directories on your system, you can use one of those directories as follows:
Figure 1-5 Previous Installation Found Message Box
From this message box, do one of the following: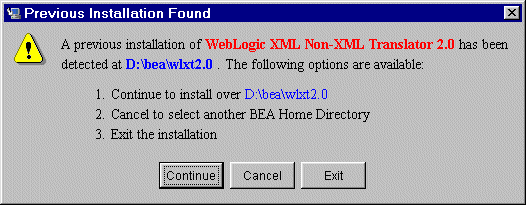
Figure 1-6 WebLogic Process Integrator Not Installed Message Box
From this message box, do one of the following:
Figure 1-7 Choose Product Directory Screen
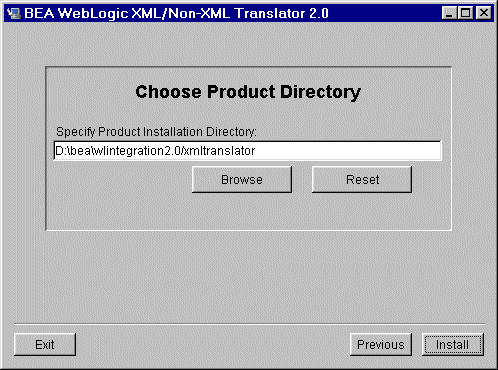
Note: Clicking Reset resets the installation directory to the previous value (before you made any changes).
Note: If you chose a Client Install, proceed with step 14.
Figure 1-8 Database Selection Screen
Note: Because a common database is used by all WebLogic Integration components, you should specify the same database and provide the same access information as you provided for any previously installed component. To facilitate this, the information you provided when you installed any other WebLogic Integration component is carried forward to the XML Translator installation. Figure 1-9 Database Configuration Screen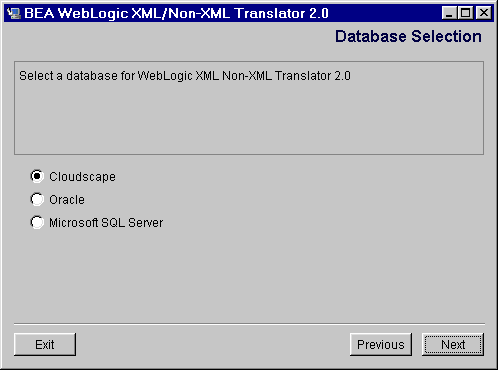
If, when you installed the WebLogic Process Integrator component of WebLogic Integration, you specified a Sybase database for the custom domain, you must reinstall the WebLogic Process Integrator component and select a database that is supported by XML Translator. Click Exit, to exit the XML Translator installation program. After you have reinstalled WebLogic Process Integrator, you may restart the XML Translator installation program.
If you chose Cloudscape as the database type, proceed to step 13.
Note: Clicking Reset resets the database configuration values to the previous values (before you made any changes). Figure 1-10 Database Confirmation Screen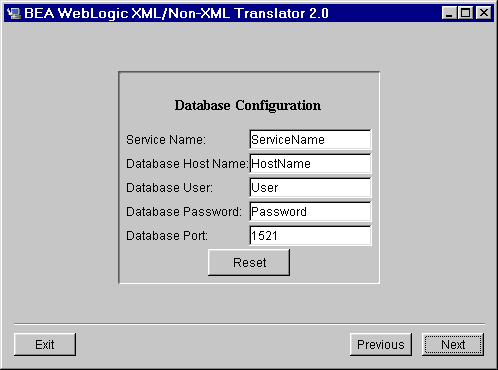
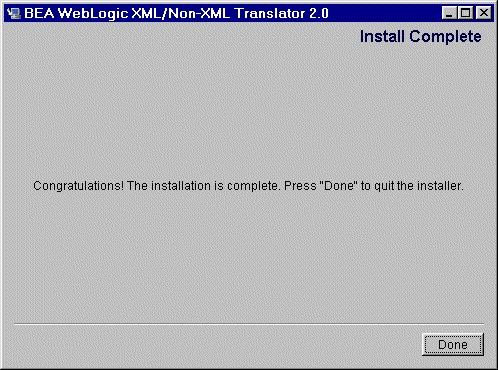
Note: Clicking Exit exits the installation program. Upon installation completion, the Install Complete screen is displayed (Figure 1-11). Figure 1-11 Install Complete Screen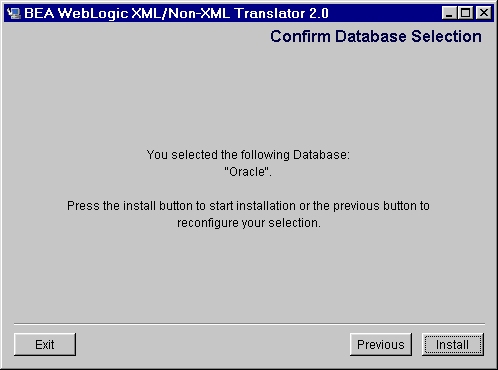
Installing Your Software License
The components of WebLogic Integration cannot be used without a valid software license. A 30-day license file is automatically installed when you install the first WebLogic Integration component. When you purchase the software, a permanent WebLogic Integration license file will be provided to you by BEA. Follow the directions below to update your license file on the target system.
To update the WebLogic Integration software license:
On Windows:
c:\bea> UpdateLicense [license_file_name]
On UNIX:
/usr/bea> sh updatelicense.sh [license_file_name]
Uninstalling XML Translator
This section provides instructions for uninstalling XML Translator. The following topics are discussed:
Uninstalling on UNIX Platforms in Console Mode
To uninstall XML Translator on a UNIX platform:
> cd /usr/bea/wlintegration2.0/unix/xmltranslator/UninstallerData
/usr/bea/wlintegration2.0/unix/xmltranslator/UninstallerData> sh Uninstall -i console
Listing 1-2 displays an XML Translator uninstallation.
Note: The single-dash bar just beneath the double-dash bar in Listing 1-2 is a progress indicator. When the single-dash bar becomes the same length as the double-dash bar, uninstallation is complete.
Listing 1-2 UNIX Uninstallation Example
Preparing CONSOLE Uninstall...
=================================================================
BEA WebLogic XML/non-XML Translator 2.0 (InstallAnywhere Uninstaller by Zero G)
-----------------------------------------------------------------
About to uninstall...
BEA WebLogic XML/non-XML Translator 2.0
This will completely remove all components installed by InstallAnywhere. It will not remove files and folders created after the installation.
PRESS <ENTER> TO BEGIN THE UNINSTALL, OR 'QUIT' TO EXIT THE UNINSTALLER: <ENTER>
=================================================================
Uninstall...
------------
[==================|==================|==================|======]
[------------------|------------------|------------------|------]
================================================================
Uninstall Complete
------------------
All items were successfully uninstalled.
PRESS <ENTER> TO EXIT THE UNINSTALLER: <ENTER>
Note: Some files may not be uninstalled because they are required for another WebLogic Integration product.
Uninstalling on Windows Platforms
Perform the following steps to uninstall the XML Translator software on a Windows platform:
Figure 1-12 XML Translator Uninstaller Screen
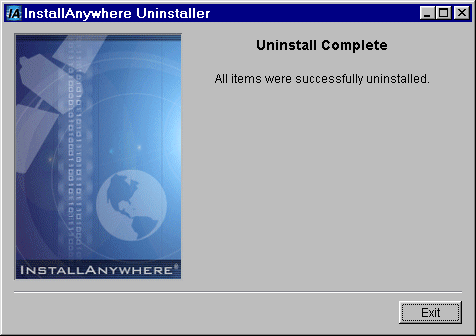
Figure 1-13 XML Translator Uninstallation Complete Screen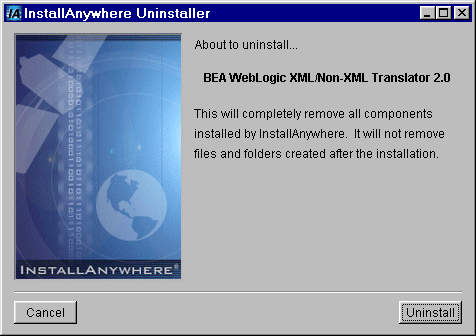
Note: Some files may not be uninstalled because they are required for another WebLogic Integration product.
Distribution Directories and Files
The XML Translator CD-ROM contains the following directories and files. After running the installation program, verify that the directories and files appropriate for the type of installation you performed are installed on your system.
Server Installation
Table 1-1 lists the files and directories that get installed when you perform a Server Installation.
Table 1-2 lists the files and directories that get installed when you install the XML Translator Plug-In.
|
Directory |
Files |
|---|---|
|
<BEA_Home>\wlintegration2.0\ |
wlxtmb.jar |
Client Installation
Table 1-3 lists the files and directories that get installed when you perform a Client Installation.

|

|

|
|
|
|
Copyright © 2001 BEA Systems, Inc. All rights reserved.
|