

| Download Docs | |
|
| bea.com | products | dev2dev | support | askBEA |
 |

|
|
| e-docs > WebLogic Java Adapter for Mainframe > Installation Guide > Verifying Your Installation |
|
Installation Guide
|
Verifying Your Installation
When you have completed the installation process, BEA WebLogic Java Adapter for Mainframe (WebLogic JAM) provides the following ways to verify your installation
Verifying Installation of Files and Directories
After you have installed WebLogic JAM, you can verify the files and directories that are installed on your system. For a list of these files, see BEA WebLogic Java Adapter for Mainframe Installation Files and Directories.
Using the Installation Verification Samples
After you have installed WebLogic JAM, run the installation verification sample that corresponds to your system:
About the Installation Verification Samples
As the name implies, the installation verification samples are designed to allow you to verify that WebLogic JAM is installed and running on your system. The samples allow a client to make a request of a mainframe server program on either IMS or CICS.
The samples are designed to run "out of the box" with very limited modification. The installation verification samples include:
Note: JCL to compile the mainframe sample programs is included as examples to provide completeness. The JCL that is shipped may not conform to your standards or installations. The sample JCL may need to be modified or replaced to meet your needs.
Program definitions and other configuration for your IMS or CICS region may require coordination with the IMS or CICS system programmer.
Most configuration tasks are preconfigured or completed during the installation process. Working from the WebLogic Administration Console, you can make the modifications required for the sample to run on your system. When these modifications are complete, you can run the simple client supplied by the sample to verify that WebLogic JAM is installed and running properly. The installation verification sample runs in the supplied verify domain. The client uses the Gateway to send a request from the WebLogic Server environment to the mainframe. The mainframe server converts the supplied string from mixed case to uppercase.
The only difference between the IMS and the CICS sides of this sample is that for IMS, TOUPPER is an APPC Service that is mapped to an IMS transaction; for CICS, TOUPPER is a DPL Service that is mapped to a CICS program.
How to Use the Samples
While the WebLogic JAM samples contain precompiled source for the Java portion of the sample, you may choose to generate and compile source. Depending on your skill, experience, and time-constraints, you may choose to work with the Java portion of the samples in the following ways:
Because of the contents shipped with the samples, in most cases, you can simply run the sample with minimal configuration to run on your system. The sample will use the supplied .class files.
Each sample provides build scripts that allow you to compile the source. This option allows you to see how the source is compiled and run the sample.
Each sample provides eGen scripts. This option allows you to use eGen Application Code Generator to generate source. Afterward, the build scripts can be run. By using this option, you can see how the eGen utility generates source and run the sample.
Preconfigured WebLogic Server Domains
The WebLogic JAM installation includes a directory named config. This config directory contains subdirectories for two preconfigured WebLogic Server domains:
WebLogic Server domain that is set up for running the installation verification. verify is the directory that contains the files necessary to configure and run the verify domain
WebLogic Server domain that is set up for examples of WebLogic JAM running with WebLogic Server and mainframe applications
Roadmap for Installation Verification Samples
To run each of the installation verification samples, follow the roadmap listed below:
Before You Use the Samples
Before you run the samples, the following tasks must be completed:
For information about installing WebLogic Server, see the BEA WebLogic Server documentation.
For information about installing WebLogic JAM, see the Installing WebLogic Java Adapter for Mainframe section of this guide.
For information about defining the Logical Unit, see the BEA WebLogic Java Adapter for Mainframe Configuration and Administration Guide.
For information about APPC communication with WebLogic JAM, see the BEA WebLogic Java Adapter for Mainframe Configuration and Administration Guide.
For information about CICS connection with WebLogic JAM, see the BEA WebLogic Java Adapter for Mainframe Configuration and Administration Guide.
Using the Installation Verification Sample for IMS
After completing the tasks in the Before You Use the Samples section, you are ready to set up and run the sample.
How the Sample Works
The program TOUPIMS is a simple COBOL IMS server program that dequeues the request data, converts the data to uppercase, then inserts the data back on the message queue. The copybook CHARDATA provides the structure of the user data in the request and response messages. No special considerations are required in this program as a result of being used in an application with a Java client making requests through WebLogic JAM.
Understanding the Sample Configuration
For this simple sample, no special configuration is required. The Java client calls the service TOUPPER.
The APPC Service TOUPPER is mapped to the name of the IMS transaction program, TOUPIMS.
The server program TOUPIMS is defined to the IMS region in the usual way any program is defined to an IMS region.
Understanding the Sample Programming
The programming for this sample is described in the following sections.
WebLogic Application
Three classes compose the WebLogic side of this sample application:
Chardata is a DataView class that is generated by the eGen Application Code Generator. The data member in the Chardata class corresponds to the data field in the CHARDATA copybook. The Chardata class is responsible for all data translation between the mainframe format of the data and the Java format of the data.
The BaseClient class that is generated by the eGen Application Code Generator is an extension of the EgenClient class. BaseClient is the class that implements the actual calls to the TOUPPER mainframe service in its toupper method. The toupper method is a wrapper for the callService method of the EgenClient class with the TOUPPER service as a parameter.
The Client class is the actual user interface. The Client class has a BaseClient member. The Client class receives string input as a command line argument. You may also enter a URL if the WebLogic JAM Gateway is running on a different machine or the corresponding instance of WebLogic Server is listening on a different port than 7001. The URL is set in the BaseClient member. In the Client class, a Chardata DataView is initialized with the input data. The toupper method of the BaseClient member is called with this DataView as a parameter. The converted string value encapsulated in the returned DataView is then displayed.
IMS Program
The program TOUPIMS is a simple COBOL IMS server program that dequeues the request data, converts the data to uppercase, then inserts the data back on the message queue. The copybook, CHARDATA, provides the structure of the user data in the request and response messages. No special considerations are required in this program as a result of being used in an application with a Java client making requests through WebLogic JAM.
Sample Files
The files for the WebLogic side of the sample are installed in the following directory:
<BEA_HOME>/<JAM_INSTALL_DIR>/samples/verify/gateway/outbound
The following table lists the sample files and their purpose:
Table 5-1 Files for the WebLogic JAM Application
The files for the IMS side of the sample are installed in the following directory: The following table lists the samples files and their purpose: Table 5-2 Files for IMS Application <BEA_HOME>/<JAM_INSTALL_DIR>/samples/verify/IMS/outbound/source
Setting Up the Sample To set up the installation verification sample for IMS, perform the following steps. Step 1: Start the CRM Before starting the WebLogic JAM Gateway, start the CRM. The CRM must be configured with certain parameter values at startup. These parameter values include:
For running the samples, you must set the machine address and port. The values that you set for the machine address and port when the CRM is started, must agree with the values that you set for the CRM in the WebLogic Administration Console for the samples CRM. The name of the CRM that is preconfigured for running all of the samples is CRM1. Use this name when the CRM is started to run any of the samples.
The way you start the CRM depends on whether the CRM will be started under a Unix or MVS system. On Unix, start the CRM using a shell script. On MVS, start the CRM using JCL.
Starting the CRM on z/OS or OS/390 Unix
On z/OS or OS/390 Unix, you may use a script to start the CRM. Scripts are installed with the Gateway in the <BEA_HOME>/<JAM_INSTALL_DIR>/samples/crm/unix directory. The script, crm.env, appends the necessary values to your environment variables. The script, startcrm.sh, starts the CRM. To use these scripts, complete the following steps:
. ./startcrm.sh
Compare Figure 4-1 with the script in Listing 4-1. Notice how the parameters in the script correspond to the fields in the WebLogic Administration Console. The script illustrates the values for startcrm.sh script parameters for running the samples.
Note: The port number is 7101. You can change the port number; however, if the port number is changed make sure to change it in the corresponding field in the Gateway configuration CRM1 pane of the WebLogic Administration Console.
Figure 5-1 Fields for the CRM
Listing 5-1 Command to Run the CRM Starting the CRM on z/OS or OS/390 MVS On z/OS or OS/390 MVS, start the CRM by submitting the CRMSTART JCL that is installed with the CRM. The CRMSTART JCL must be modified for your environment. For information about modifying the CRMSTART JCL, see the BEA WebLogic Java Adapter for Mainframe Configuration and Administration Guide. As you modify the CRMSTART JCL, make sure that you note the following parameters in the value of the STARTCMD parameter in the JCL. These parameters correspond to fields in the WebLogic Administration Console. These values must be the same in the JCL and in the WebLogic Administration Console.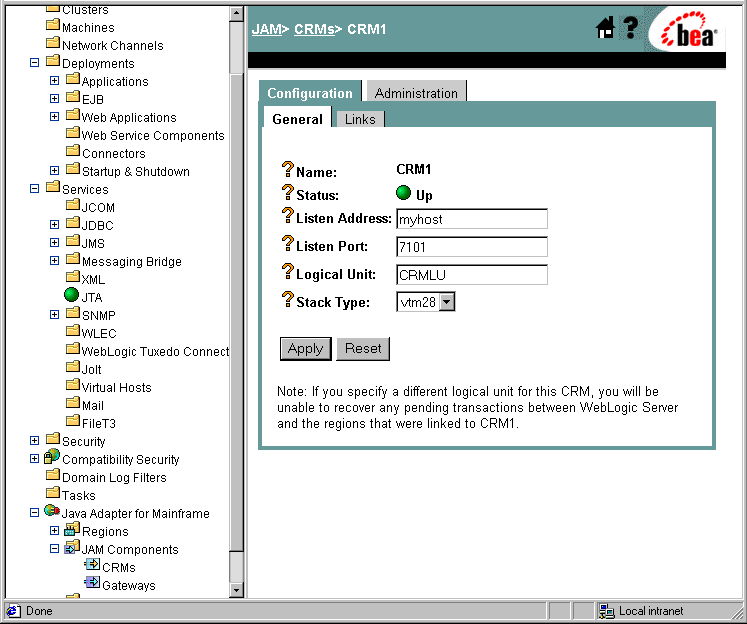
$CRMDIR/bin/CRM //127.0.0.1:7101 CRM1 < /dev/null > std.out 2>std.err &
Compare Figure 4-1 with the JCL in Listing 4-2. Notice how the parameters in the JCL correspond to the fields in the WebLogic Administration Console. The JCL illustrates the values for STARTCMD parameters for running the samples.
Note: BEA recommends that you do not change the CRM name from CRM1, because this name for the CRM is preconfigured for all of the samples.
Listing 5-2 The STARTCMD parameter in the CRMSTART JCL
// SET STARTCMD='"//myhost:7101" CRM1'
Step 2: Update the WebLogic JAM Configuration File
On the machine where the Gateway is located, update the WebLogic JAM configuration file from the command prompt by completing the following steps:
<BEA_HOME>/<JAM_INSTALL_DIR>/config/verify
Step 3: Start the verify Domain
From the command prompt, execute the following command from the same directory to start the verify domain:
startVerifyServer.cmd
. ./startVerifyServer.sh
Step 4: Configure the WebLogic JAM Gateway
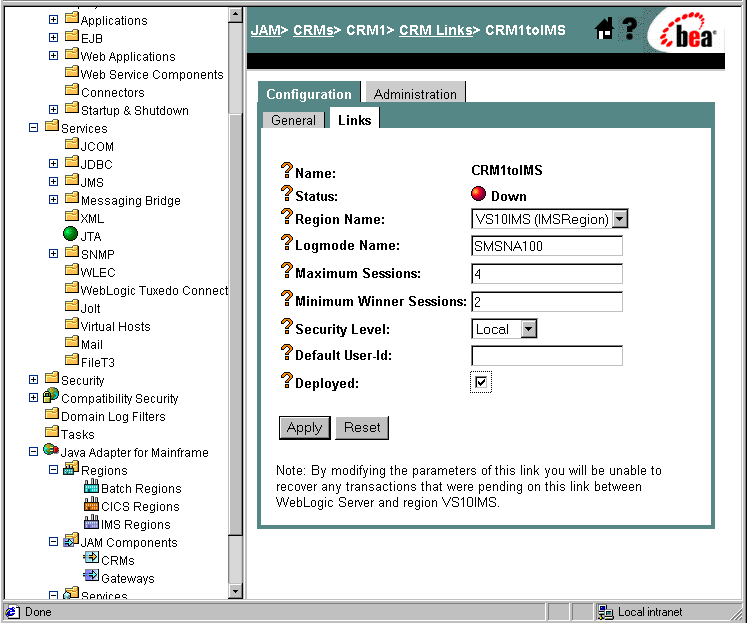
Most configuration tasks were preconfigured or were completed during the installation process by the installer program. For additional information about configuring WebLogic JAM, see the BEA WebLogic Java Adapter for Mainframe Configuration and Administration Guide. Make the following configuration changes for the installation verification sample for IMS to run on your system. These changes can be made in the WebLogic Administration Console in the following way.
http://hostname:7001/console
Step 5: Enable the Service
To enable the APPC service, click Services
Step 6: Set the environment On the machine where the Gateway is installed, set the environment by completing the following step: 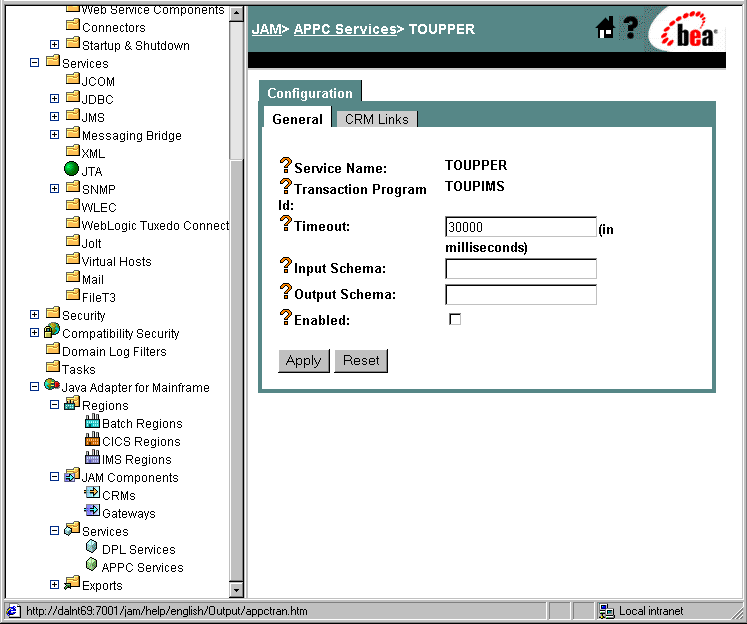
For Microsoft Windows:
setVerifyEnv.cmd
For Unix:
. ./setVerifyEnv.sh
The following message will display:
"Your environment has been set."
Step 7: Generate and Build Source (Optional)
The WebLogic JAM samples provide generated source. Compiled .class files are also provided. If you want to see how the source is generated and the classes are built, change to the <BEA_HOME>/<JAM_INSTALL_DIR>/samples/verify/gateway/outbound directory and complete the following steps.
Warning: Using the following options will overwrite files that are installed with the WebLogic JAM samples.
This option will generate the source. To compile the source, use the previous option to run the build.cmd (sh)script.
For information about running the eGen Application Code Generator, see the BEA WebLogic Java Adapter for Mainframe Programming Guide.
Step 8: Complete Mainframe Tasks
On the machine with the IMS region:
Running the Sample
To run the installation verification sample for IMS, type the following command in the window used in step 6:
java verify.gateway.outbound.Client hello
This command will convert the string 'hello' to uppercase: HELLO.
If the client is being run on a different machine than the Gateway or if the WebLogic Server instance is listening on a port other than 7001, you may enter a URL as a second command line argument. For example:
java verify.gateway.outbound.Client hello "t3://hostname:port"
In this statement, the following definitions apply:
hostname is the address of the machine where WebLogic Server is running.
port is the port for WebLogic Server.
If you have successfully run the installation verification sample for IMS, your installation is complete and verified. To complete the post-installation tasks, see the Performing Post-Installation Tasks section.
Using the Installation Verification Sample for CICS
After completing the tasks in the Before You Use the Samples section, you are ready to set up and run the sample.
How the Sample Works
The program TOUPCICS is a simple COBOL CICS server program that is linked to and passed a COMMAREA. The characters in the COMMAREA are converted to uppercase. The structure of the data in the COMMAREA is given in the copybook CHARDATA. No special considerations are required in this program as a result of being used in an application with a Java client making requests through WebLogic JAM.
Understanding the Sample Configuration
For this simple sample, no special configuration is required. The Java client calls the service TOUPPER.
The DPL service TOUPPER is mapped to the name of the CICS program TOUPCICS.
The server program TOUPCICS is defined to the CICS region, in this case using RDO, in the usual way any program is defined to a CICS region.
Understanding the Sample Programming
The programming for this sample is described in the following sections.
WebLogic Application
Three classes compose the WebLogic side of this sample application:
Chardata is a DataView class that is generated by the eGen Application Code Generator. The data member in the Chardata class corresponds to the data field in the CHARDATA copybook. The Chardata class is responsible for all data translation between the mainframe format of the data and the Java format of the data.
The BaseClient class that is generated by the eGen Application Code Generator is an extension of the EgenClient class. The BaseClient is the class that implements the actual calls to the TOUPPER mainframe service in its toupper method.The toupper method is a wrapper for the callService method of the EgenClient class with the TOUPPER service as a parameter.
The Client class is the actual user interface. The Client class has a BaseClient member. The Client class receives string input as a command line argument. You may also enter a URL if the WebLogic JAM Gateway is running on a different machine or the corresponding instance of WebLogic Server is listening on a different port than 7001. The URL is set in the BaseClient member. In the Client class a Chardata DataView is initialized with the input data. The toupper method of the BaseClient member is called with this DataView as a parameter. The converted string value encapsulated in the returned DataView displays.
CICS Program
The program TOUPCICS is a simple COBOL CICS server program that is linked to and passed a COMMAREA. The characters in the COMMAREA are upper-cased. The structure of the data in the COMMAREA is given in the copybook CHARDATA. No special considerations are required in this program as a result of being used in an application with a Java client making requests through WebLogic JAM.
Sample Files
The files for the WebLogic side of the sample are installed in the following directory:
<BEA_HOME>/<JAM_INSTALL_DIR>/samples/verify/gateway/outbound
The following table lists the sample files and their purpose:
Table 5-3 Files for the WebLogic JAM
The files for the CICS side of the sample are installed in the following directory: The following table lists the sample files and their purpose: Table 5-4 Files for CICS Application <BEA_HOME>/<JAM_INSTALL_DIR>/samples/verify/CICS/outbound/source
Setting Up the Sample To set up the installation verification sample for CICS, perform the following steps. Step 1: Start the CRM Before starting the WebLogic JAM Gateway, start the CRM. The CRM must be configured with certain parameter values at startup. These parameter values include:
For running the samples, you must set the machine address and port. The values that you set for the machine address and port when the CRM is started, must agree with the values that you set for the CRM in the WebLogic Administration Console for the samples CRM. The name of the CRM that is preconfigured for running all of the samples is CRM1. Use this name when the CRM is started to run any of the samples.
The way you start the CRM depends on whether the CRM will be started under a Unix or MVS system. On Unix, start the CRM using a shell script. On MVS, start the CRM using JCL.
Starting the CRM on z/OS or OS/390 Unix
On z/OS or OS/390 Unix, you may use a script to start the CRM. Scripts are installed with the Gateway in the <BEA_HOME>/<JAM_INSTALL_DIR>/samples/crm/unix directory. The script, crm.env, appends the necessary values to your environment variables. The script, startcrm.sh, starts the CRM. To use these scripts, complete the following steps.
. ./startcrm.sh
Compare Figure 5-2 with the script in Listing 5-3. Notice how the parameters in the script correspond to the fields in the WebLogic Administration Console. The script illustrates the values for startcrm.sh script parameters for running the samples.
Note: The port number is 7101. You can change the port number; however, if the port number is changed make sure to change it in the corresponding field in the Gateway configuration CRM1 pane of the WebLogic Administration Console.
Listing 5-3 Command to Run the CRM
$CRMDIR/bin/CRM //127.0.0.1:7101 CRM1 < /dev/null > std.out 2>std.err &
Starting the CRM on z/OS or OS/390 MVS
On z/OS or OS/390 MVS, start the CRM by submitting the CRMSTART JCL that is installed with the CRM. The CRMSTART JCL must be modified for your environment. For information about modifying the CRMSTART JCL, see the BEA WebLogic Java Adapter for Mainframe Configuration and Administration Guide.
As you modify the CRMSTART JCL, make sure that you note the following parameters in the value of the STARTCMD parameter in the JCL. These parameters correspond to fields in the WebLogic Administration Console. These values must be the same in the JCL and in the WebLogic Administration Console.
Compare Figure 5-2 with the JCL in Listing 5-4. Notice how the parameters in the JCL correspond to the fields in the WebLogic Administration Console. The JCL illustrates the values for STARTCMD parameters for running the samples.
Note: BEA recommends that you do not change the CRM name from CRM1, because this name for the CRM is preconfigured for all of the samples.
Figure 5-2 Fields for the CRM
Listing 5-4 The STARTCMD parameter in the CRMSTART JCL
// SET STARTCMD='"//myhost:7101" CRM1'
Step 2: Update the WebLogic JAM Configuration File On the machine where the Gateway is located, update the WebLogic JAM configuration file from the command prompt by completing the following steps:
<BEA_HOME>/<JAM_INSTALL_DIR>/config/verify
Step 3: Start the verify Domain
From the command prompt, execute the following command from the same directory to start the verify domain:
startVerifyServer.cmd
. ./startVerifyServer.sh
Step 4: Configure the WebLogic JAM Gateway
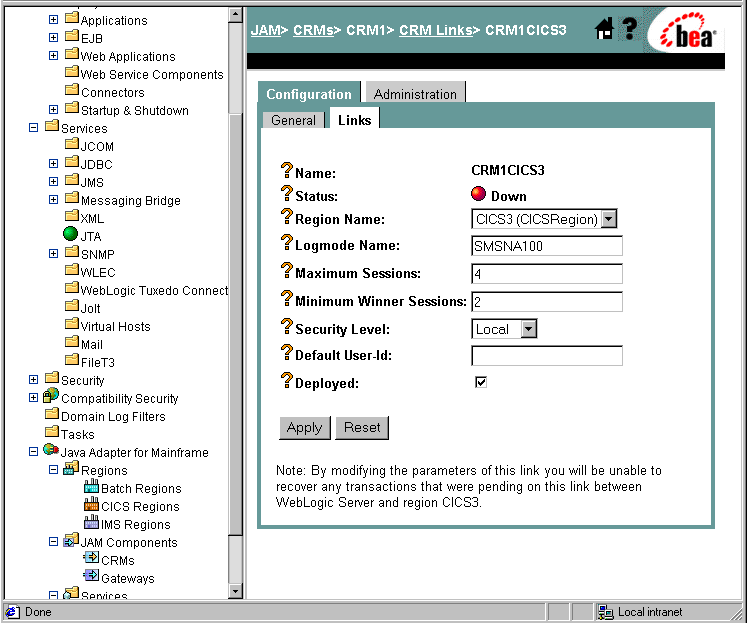
Most configuration tasks were preconfigured or were completed during the installation process by the installer program. For additional information about configuring WebLogic JAM, see the BEA WebLogic Java Adapter for Mainframe Configuration and Administration Guide. Make the following configuration changes for the installation verification sample for CICS to run on your system. These changes can be made in the WebLogic Administration Console in the following way.
http://hostname:7001/console
Step 5: Enable the Service
To enable the DPL service, click Java Adapter for Mainframe
Step 6: Set the Environment On the machine where the Gateway is installed, set the environment by completing the following step: 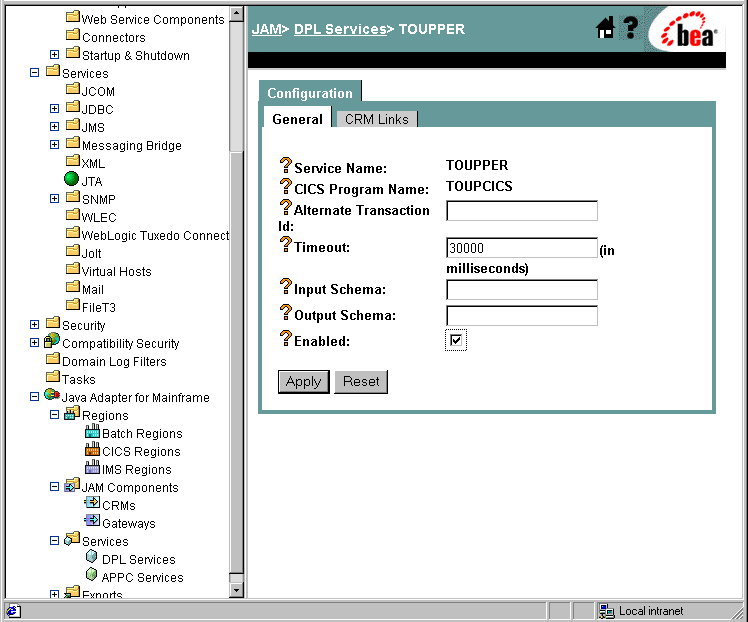
For Microsoft Windows:
setVerifyEnv.cmd
For Unix:
. ./setVerifyEnv.sh
The following message will display:
"Your environment has been set."
Step 7: Generate and Build Source (Optional)
The WebLogic JAM samples provide generated source. The samples also provide classes to run the samples. If you want to see how the source is generated and the classes are built, change to the <BEA_HOME>/<JAM_INSTALL_DIR>/samples/verify/gateway/outbound directory and complete the following steps.
Warning: Using the following options will overwrite files that are installed with the WebLogic JAM samples.
This option will generate the source. To compile the source, use the previous option to run the build.cmd (sh)script.
For information about running the eGen Application Code Generator, see the BEA WebLogic Java Adapter for Mainframe Programming Guide.
Step 8: Complete Mainframe Tasks
On the machine with the CICS region:
CEDA INSTALL GROUP(JAMVRFY)
CEMT INQUIRE PROG(TOUPCICS)
Running the Sample
To run the installation verification sample for CICS, type the following in the command prompt in the window you used to set the environment:
java verify.gateway.outbound.Client hello
This command will change the string, 'hello', to uppercase: HELLO.
If the client is being run on a different machine than the Gateway or if the WebLogic Server instance is listening on a port other than 7001, you may enter a URL as a second command line argument. For example:
java verify.gateway.outbound.Client hello "t3://hostname:port"
In this statement, the following definitions apply:
hostname is the address of the machine where WebLogic Server is running.
port is the port for WebLogic Server.
If you have successfully run the installation verification sample for CICS, your installation is complete and verified. To complete the post-installation tasks, see the Performing Post-Installation Tasks section.

|

|

|