


|

|
|
|
|
Defining Rules
This chapter describes Information Integrator Rules. The following topics are discussed:
Understanding Information Integrator Rules
Rules determine the runtime behavior of Information Integrator. Rules enable you to evaluate the data contained in a message and determine the Actions or tasks that will be performed based on the evaluation of that data.
A Rule consists of two parts: an Expression and a Subscription List. An Expression is the evaluation criteria for a Rule. It consists of a Boolean expression created from the fields in a message and comparison operators. A Subscription List contains multiple Subscriptions. Each Subscription consists of one or more Actions. An Action is an atomic task that is performed on the data in the message, such as, Reformatting the data or Enqueing the data to a queue. When a Rule's Expression evaluates to TRUE, the Subscriptions in the Rule's Subscription List will be executed.
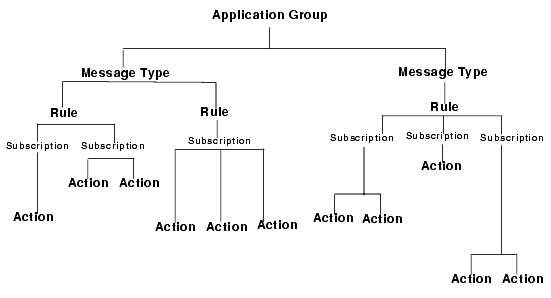
Application Groups and Message Types categorize Rules. The coarsest division of Rules is into Application Groups. Application Groups are logical divisions of sets of Rules for different business needs. For example, there might be an Application Group for each department in a company. The Message Type further categorizes Rules. It is the same as the Input Format that is used to parse the message (see Building Format Definitions for more information on Input Formats). Each Application Group can have multiple Message Types, and each Message type may contain multiple Rules.
A service advertised by the Information Integrator Server is associated with a unique Application Group and Message type. When a client to the IISERVER makes a request for a particular service, the Expression for each Rule associated with that Message Type under the given Application Group is evaluated. The subscriptions associated with each TRUE Expression are then executed.
Using the Rules graphical user interface (GUI) you can define the various components of Rules in the following order:
Rules are defined within an application group/message type pair, and are uniquely identified by the application group/message type/rule name. Figure 6-1 illustrates the Rules hierarchy.
Figure 6-1 Rules Hierarchy Diagram
Using the Rules Interface
You use the Rules graphical user interface (GUI) to define the rules components. The following sections describe the Rules GUI.
Starting Rules
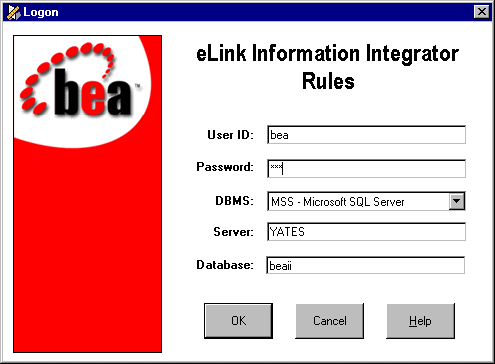
Start the Rules GUI as follows.
Note: If you do not have an assigned user ID and password, ask your system administrator to create them for you.
Figure 6-2 Rules Logon
Using the Rules Window
This section gives you instructions and tips for navigating through the Rules GUI. Refer to it for assistance in working in the Rules application as needed.
Each Rules window is split into two panes (see Figure 6-3). The left pane is a navigation tool and the right pane displays details about components selected in the left pane.
Figure 6-3 Rules Main Window
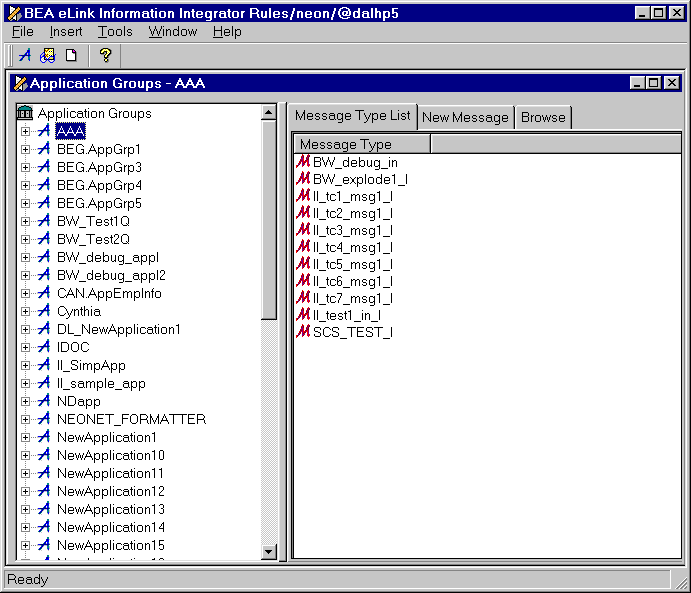
The left pane displays a list of all Application Groups and their associated Message Types, Rules, and Subscriptions. Single-click each category to just display a list of its contents in the right pane. Double-click each category to display its contents in the tree. For example, double-click to expand an Application Group. You can then double-click a Message Type name (or click on the + sign to its left) to display its associated Rules and Subscriptions.
The right pane, or Property Sheet, is where you will add the majority of information. It uses tabbed sheets to display the details for whichever object is currently selected. For example, if you have an Application Group selected, you can view the Message Type List and New Message tabs.
Note: You can open more than one Rules window at a time for access to multiple component types at the same time.
Opening a New Window
To open a new window, select New from the File menu.
Tip
When the Rules window opens, it may default to a size too small to display all window components, including the Apply and Cancel on some property sheets. Maximize the application or resize the window to see all window components.
Renaming Components
Rules components can be renamed in the left pane of the Rules window. To rename a component, follow these steps.
Note: Since Message Types are the same as the Input Formats created using Formatter or MsgDefAdmin, you cannot change Message Type names from the Rules window. Message Types must be renamed in Formatter. For more information, see Using the Formatter Interface.
Duplicating Components
Rules components can be duplicated in the left pane of the Rules window. To duplicate a component, follow these steps.
Deleting Components
Rules components can be deleted in the left pane of the Rules window. To delete a component, follow these steps.
Using Drag and Drop
You can use drag and drop to:
Drag and drop works across both windows and panes. To copy an object using drag and drop, you must drag the object from the first window's tree to the second window's property sheet.
Building Rules
This section describes how to build the following Rules components:
An application group allows you to logically organize rules associated with a particular subject. For example, an application group could be the accounting department of a company.
To add an application group, follow these steps.
A text box appears at the top of the application group list. The cursor is positioned in the application group text box where you can type an application group name.
Note: The application group name must be 32 characters or less.
The application group is highlighted and alphabetically positioned in the list in the left pane, and the New Message property sheet appears in the right pane.
An application group should contain at least one message type, which corresponds to your input formats. For the procedure to add a message type, refer to Message Types.
Message Types
The message type is the input format name from Formatter. A rule is evaluated based on the message type.
An application group should contain at least one message type. For the procedure to add an Application Group, see Application Groups.
To add a message type, follow these steps.
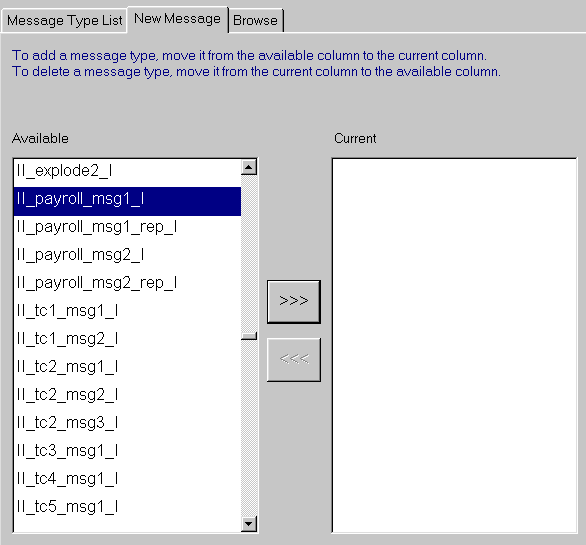
Figure 6-4 New Message Property Sheet
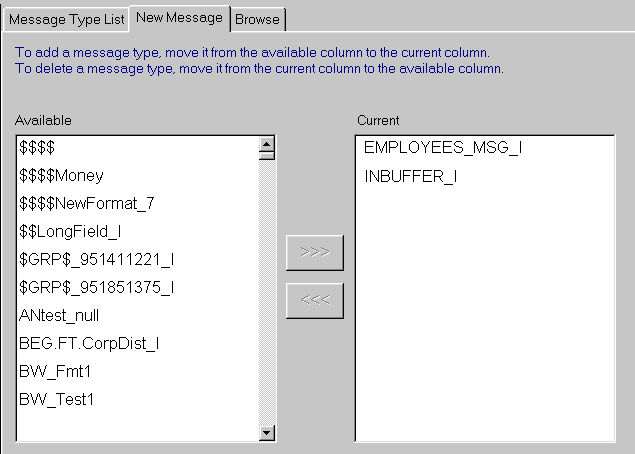
The Available box on the left displays available message types. This list contains the input format names defined in Formatter.
The Current box on the right displays the message types currently associated with the application group.
Rules
A rule contains subscriptions that allow you to define message destination IDs, receiver locations, message formats, and any processes initiated upon message delivery.
To add a rule, follow these steps.
Note: The rule name must be 32 characters or less.
Note: When the first rule is created, a subscription list is automatically created for the application group.
For the Rules engine to correctly process a rule, you must define the rule's expression and subscription(s) or subscription list. The procedure to add an expression to a rule is described in Expressions. The procedure to add a subscription to a rule is described in Subscriptions.
Disabling and Enabling a Rule
You can temporarily "turn off" a rule by disabling it. This means that the message will not be evaluated against the disabled rule.
To disable a rule, follow these steps.
When you want to "turn on" the rule again, follow these steps.
Notes: Rules are automatically enabled when you create them, and remain enabled until you disable them. Rules remain disabled until you enable them again.
Expressions
The Expression tab is used to create, modify, or delete an expression for a selected rule. You can create an expression by entering it directly in the Expression text area, or by building it interactively using the sub-tabs at the bottom of the Expression tab (see Figure 6-5). The following sub-tabs appear within the Expression tab:
The evaluation criteria for a rule consists of a Boolean expression containing the Boolean operators & (AND) and | (OR), expressions, and parentheses to control the order of evaluation. You can use | to explicitly direct what Boolean operations do together.
Notes: There must be at least one space between the field name and the Rules operator, as well as between the Rules operator and the comparison value.
The EXIST and NOT_EXIST operators should be followed by at least one space before a parenthesis or a Boolean operator.
Creating or Modifying an Expression
To create or modify an expression, follow these steps.
Figure 6-5 Expression Tab
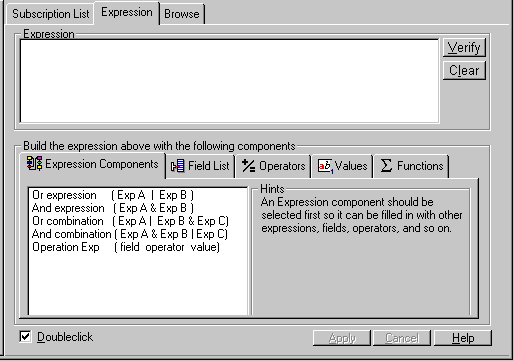
Note: Click Clear to erase the contents of the Expression text area.
Notes: The literals AND and OR do not evaluate correctly in a rules expression. If you enter these values, a message box appears stating the expression is valid; however, AND is changed to &, and OR is changed to |.
If you move out of the Expression tab by using the mouse or the keyboard, the expression is automatically saved.
Examples of expressions are shown in Table 6-1.
|
Description |
Layout |
Expression |
|---|---|---|
|
Default to TRUE |
|
TRUE |
|
Single Argument |
A |
F1 STRING= Acct |
|
Arguments use AND |
A & B & C |
F1 STRING= Acct & F2 INT= 100 & F3 INT= 150 |
|
Arguments use OR |
A | B | C |
F1 STRING=Acct | F2 INT= 100 | F3 INT= 150 |
|
Precedence |
A | B & C |
F1 STRING= Acct | F2 INT= 100 & F3 INT= 150 |
|
Nested Parens |
(A | ((B & (C)) | D)) |
(F1 STRING= Acct | ((F2 INT= 100 & (F3 INT= 150)) | F4 INT= 200)) |
Subscriptions are lists of actions to take when a message evaluates true. Each rule must have at least one associated subscription. Subscriptions enable you to define message destination IDs, subscriber locations, message formats, and any processes initiated on message delivery.
Subscriptions are created in Subscription Lists. There are two types of subscription lists. There is a subscription list for each application group/message type. This list is created when the first rule is added to the message type. There is also a subscription list for each rule. This list contains only those subscriptions that are associated with the rule (see Associating Subscriptions with Rules for more information).
To add a subscription, follow these steps.
Note: The subscription name must be 64 characters or less.
Notes: Each subscription must have at least one action. For the procedure to add an action, see Actions.
For hints on creating subscriptions by using a combination of actions, refer to Combining Actions to Create Subscriptions.
Associating Subscriptions with Rules
Creating a subscription does not automatically associate the subscription with a rule. In order for the actions in the subscription to be executed, you must associate the subscription with a rule by doing the following:
Note: Subscriptions may only be assigned to a rule within the same message type and application group pair. A subscription can be assigned to several rules if the rules are in the same application group and message type.
Actions
Actions hold subscription instructions. The Actions affecting subscriptions are as follows:
For instructions on adding an Explode action, refer to Adding an Explode Action.
Note: The Reformat, Call, Cast, Explode, and Return actions cannot be used after an Explode action.
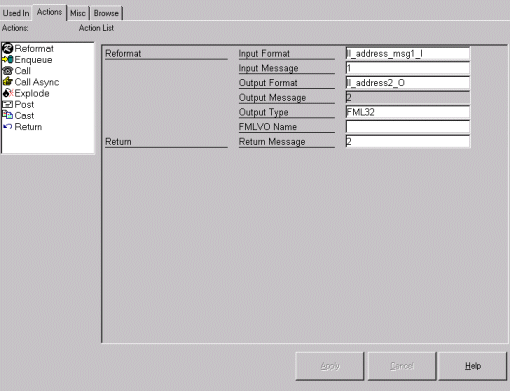
To add an action to a subscription, follow these steps.
Figure 6-6 Actions Tab
Adding a Reformat Action
Adding an Enqueue Action
Adding a Post Action
Adding a Call Action
Adding a Call Async Action
Note: No reply is returned from the called service.
Adding an Explode Action
Note: The Explode action cannot be followed by any action that creates new buffers, such as Reformat, Call, or Cast. Explode is used for messages in which there are some variable number of identical parts. The action that immediately follows the Explode action is applied to each of the items in the exploded message.
Adding a Cast Action
Adding a Return Action
To delete an action, follow these steps.
Note: If you delete an action that generates a new buffer (Reformat, Call, or Cast), the message numbers for subsequent actions in the subscription may change. This is to account for the fact that the output message from the deleted action no longer exists. All input and output message numbers greater than the deleted output message numbers are decremented. Any input messages that used that output message number will be blank, and you must manually reset these to valid message numbers.
Combining Actions to Create Subscriptions
The Information Integrator Rules application allows you to accomplish multiple tasks on messages using subscriptions. Subscriptions are simply actions that you combine in the appropriate order to achieve the desired results. Any number of actions can be combined to create a subscription. Therefore, the incoming message must be able to be successfully parsed with the Input Format for the first action in a subscription. The Input Format for the first action in a subscription will generally be the same as the Application Group's Message Type. The Input Message for the first action in the subscription is automatically set to 1, signifying that the input buffer for this action is the original message buffer.
The Reformat, Call, and Cast actions generate new buffers. When any one of these actions is added to a subscription, the Output Message is automatically set to one number greater than the highest Message number in the subscription. The new message number is added to the drop down list of possible Input Message numbers for all actions added after that action.
The Explode action is used for messages with a variable number of identical parts. The action that immediately follows the Explode action is applied to each of the component pieces of the exploded message. The Input Message parameter for the action following Explode can be any of the possible values. Since it is the action following an Explode, the results of the Explode are automatically used as the Input Message for this action. Explode cannot be followed by any action that creates new buffers, such as Reformat, Call, or Cast. If the results of an Explode action need to be reformatted, this reformatting must be configured in a separate subscription.
If a Return action is included in a subscription, it must be the last action in the subscription. This is because rule evaluation terminates at the end of all rules or at the first Return action encountered.
Example
This section outlines the procedure required to complete Step 6 in Using Information Integrator. In Step 6, you define the actions required to perform the data translation for the sample application.
In the steps that follow, we will create a new application group, message type, rule, and subscription list, and assign the subscription list to the rule.
To create an new application group, follow these steps.
Figure 6-7 New Message Tab
We will now create a new message type in the new application group.
Figure 6-8 New Message Type

We will now create a new rule within in the new message type.
Figure 6-9 New Rule

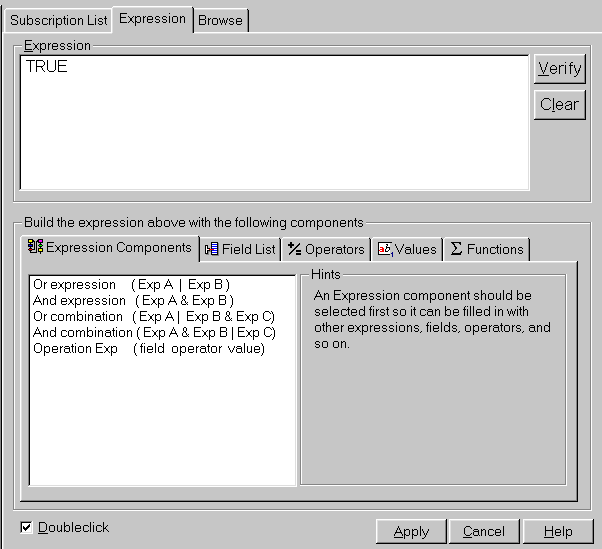
We will now create an expression for the new rule.
Figure 6-10 Expression for II_Sample_Rule
We will now create a subscription list to hold the actions we want Information Integrator to perform.
Figure 6-11 New Subscription

We will now add actions to the new subscription. We want to reformat the input data and return the reformatted data.
Note: The Output Message defaults to 2, assigning the number "2" to the output data.
Figure 6-12 Subscription for II_Sample_Sub

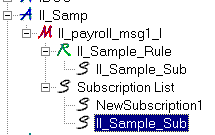
We will now add the subscription we just created to the II_Sample_Rule.
Note: This must be done in order for the actions in the subscription to be executed. Simply creating the subscription does not associate it with a rule.
Figure 6-13 II_Sample_Sub Associated with II_Sample_Rule

|

|

|
|
|
|
Copyright © 2000 BEA Systems, Inc. All rights reserved.
|