HOME | SEARCH | CONTACT | PDF FILES | WHAT'S NEW
TABLE OF CONTENTS | PREVIOUS TOPIC | NEXT TOPIC
|
|
BEA eLink Adapter for PeopleSoft 1.1 Information Center | |
|
HOME | SEARCH | CONTACT | PDF FILES | WHAT'S NEW |
||
|
TABLE OF CONTENTS | PREVIOUS TOPIC | NEXT TOPIC |
||
When the eLink Adapter for PeopleSoft software starts up, it must determine which PeopleSoft Message Definitions are available via ATMI services. To do this, the eLink Adapter component requires a definition, BEA_CPS, which queries all the available definitions. You create this definition within the PeopleSoft configuration using the PeopleTools Application Designer. This section explains how to create the BEA_CPS Message Definition within PeopleSoft.
These are the steps used to create the BEA_CPS message Definition in PeopleTools:
Start the PeopleTools Application Designer
| Creating a BEA_CPS Message Definition |
|---|
|
Create a Panel to Acces the BEA_CPS Message Definition (Optional) |
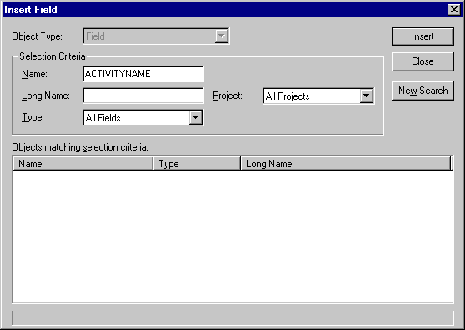
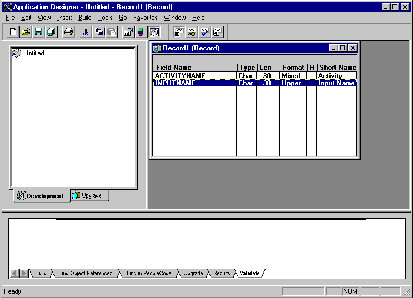
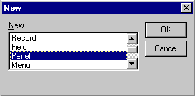
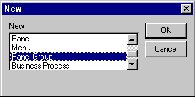
Select File -> New. This brings up a dialog that allows the selection of a new PeopleSoft object. Highlight Record from the available choices (Figure 2-1) and click OK.
The record will contain two fields: ACTIVITYNAME, and INPUTNAME.
Create a New Record Definition
Figure 2-1 Add a new record definition in PeopleTools.

Add Fields To The Record Definition
Change the Name field from ACTIVITYNAME to INPUTNAME and click Insert. Figure 2-3 shows how the Record Definition displays with both fields.
Figure 2-3 View of record after inserting the required records.
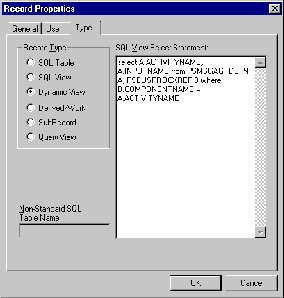
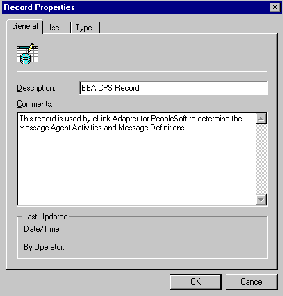
After you have defined the record, you must define its properties. Select File -> Object Properties from the menu to bring up the Record Properties dialog.
On the General tab add the general information about the record. In Figure 2-4, the Description and Comment fields are filled in as follows:
Description: BEA CPS Record
Comment: This record is used by eLink Adapter for PeopleSoft to determine the Message Agent Activities and Message Definitions.
Figure 2-4 Adding general information.
select A.ACTIVITYNAME, A.INPUTNAME from PSMSGAGTDEFN A,
PSBUSPROCXREF B where B.COMPONENTNAME = A.ACTIVITYNAME
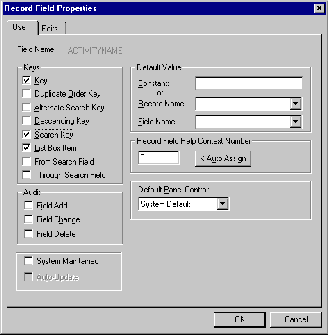
Figure 2-6 Define the properties of the ACTIVITYNAME field.
Insert the record into the project by selecting Insert -> Current Object into Project from the menu (or by pressing <F7>). The Record window may now be closed: select File->Close from the menu.
The tasks in this section are optional and define the PeopleSoft Panel and Menu items that allow the eLink Adapter for PeopleSoft Message Definition to be graphically executed from within PeopleTools.
Note: The eLink Adapter for PeopleSoft component will function without these items being created.
When using PeopleTools, a panel must be defined to allow access to the ACTIVITYNAME and INPUTNAME fields defined in the BEA_CPS record. Select File->New and highlight Panel in the New dialog to create a new panel. Select OK (Figure 2-8).
Figure 2-8 Create a new panel definition.
Adding fields consists of adding two edit boxes and defining the properties of each.
Figure 2-9 Add the first text entry field to the panel.
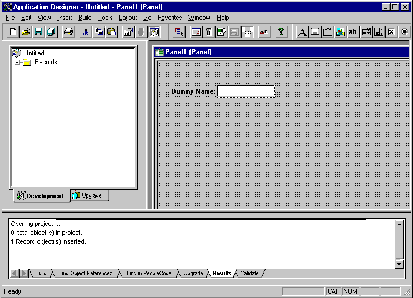
Figure 2-10 Set the panel field properties for the ACTIVITYNAME field.
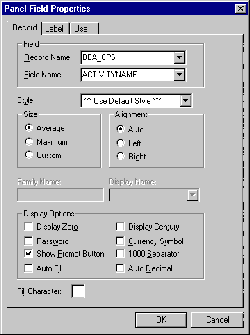
Figure 2-11 Set the panel field properties for ACTIVITYNAME to display only.

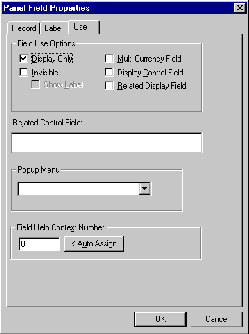
Following the same method used for the ACTIVITYNAME, add a second entry field for INPUTNAME. Place this entry field in the center of the bottom half of the panel window. Select Insert -> Edit Box from the menu (pointer changes to crosshair), position the crosshair in the center of the lower half of the panel window and click on the panel window, double click on the new entry field to bring up the Panel Field Properties dialog. For the Record Name specify BEA_CPS. For the Field Name specify INPUTNAME (Figure 2-12). Under the Use tab check Display Only in the Field Use Options section (Figure 2-13). Select OK.
Figure 2-12 Define the panel field properties for the INPUTNAME field.
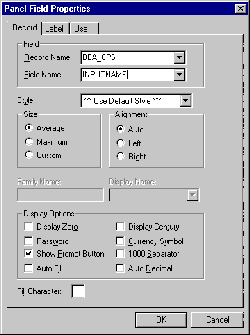
Figure 2-13 Set the panel field properties for INPUTNAME to display only.
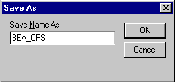
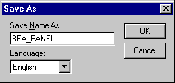
Save the panel definition by selecting File -> Save As from the menu and typing BEA_PANEL as the Save Name as (Figure 2-14). Select OK. The panel has been created. Add the Panel to the Project, <F7>. Select File -> Close from the menu to close the panel definition window.
Figure 2-14 Save the newly created panel as BEA_PANEL.
A panel group must be defined to contain the panel that was just defined. From the menu select File -> New, and choose Panel Group in the New dialog (Figure 2-15). Select OK.
Figure 2-15 Create a new panel group.
From the menu select Insert -> Panel into Group to bring up the Insert Panel dialog. Specify BEA_PANEL in the Name field and press the Insert button (Figure 2-16). Select Close to close the Insert Panel dialog (Figure 2-17).
Figure 2-16 Insert the BEA_PANEL into the panel group.
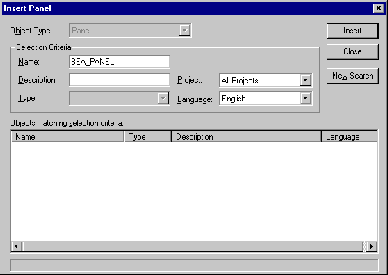
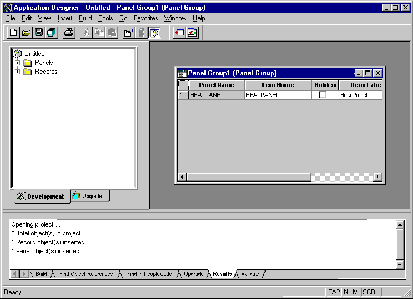
Figure 2-17 The panel group with BEA_PANEL inserted.
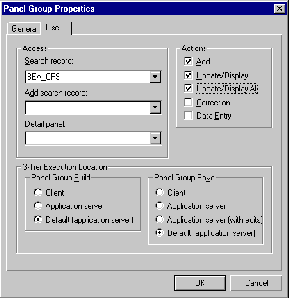
A search record must be added to the panel group. This is the method by which eLink for PeopleSoft determines the names of available Message Agent Activities and Message Definitions:
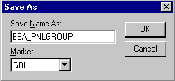
Save the panel group by selecting File -> Save As from the menu. Type BEA_PNLGROUP as the Save Name As (Figure 2-19). Select OK to save and return to the Panel Group definition window. Add the panel group to the project by pressing <F7>. Close the Panel Group Definition window by selecting File -> Close from the menu.
Figure 2-19 Save the newly created panel group as BEA_PNLGROUP.
The panel group must now be associated with a menu.
To create the menu select File -> New from the menu and select Menu from the New dialog. Select OK.
Choose Standard as the Menu type and select OK (Figure 2-20).
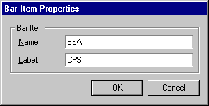
This will display a menu window with the new menu in it. In the menu, between Favorites and Language, is an empty space outlined with a dashed rectangle (Figure 2-21). Double click within this rectangle to bring up the Bar Item Properties dialog.
Type BEA in the Name field and eLink for PeopleSoft in the Label field (Figure 2-22).
Select OK.
Figure 2-20 Create a new standard menu.
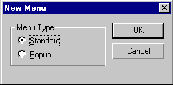
Figure 2-21 The newly created menu.
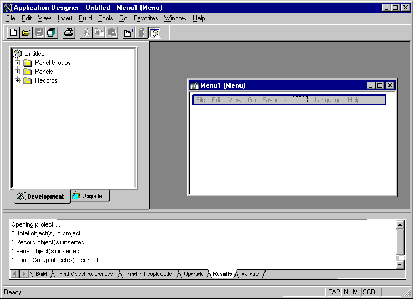
Figure 2-22 Add a new bar item, CPS, to the menu.
The menu now needs a menu item. Double click in the new dashed rectangle that is below the heading "CPS" to bring up the Menu Item Properties dialog. Enter CPS1 in the Name field and Definitions in the Label field (Figure 2-23).
Figure 2-23 Add a menu item, "Definitions," to the bar item "CPS."
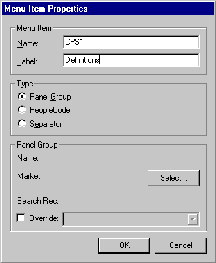
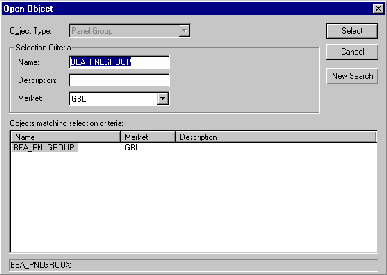
The panel group created previously is added to the menu by pressing the Select button on the Menu Item Properties dialog. Press the Select button to bring up the Open Object dialog. Specify BEA_PNLGROUP as the Name (Figure 2-24). Press the Select button in the Open Object dialog to return to the Menu Item Properties dialog. Select OK in the Menu Item Properties dialog.
Figure 2-24 Add BEA_PNLGROUP to eLink for PeopleSoft.
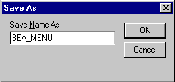
Save the Menu by selecting File -> Save As from the menu. Specify BEA_MENU as the Save Name as (Figure 2-25). Select OK. Add the panel group to the project by pressing <F7>. Close the Menu Definition window by selecting File -> Close from the menu.
Figure 2-25 Save the newly created menu as BEA_MENU.
A business process must be created to contain the Activity and Message Definition that eLink for PeopleSoft uses.
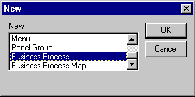
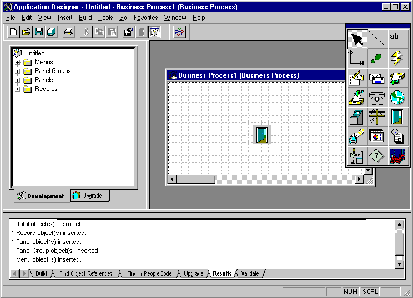
Create a new business process by selecting File -> New from the menu and selecting Business Process from the New dialog (Figure 2-26). Select OK. This will bring up the Business Process window and a small, detached activity window.
Figure 2-26 Create a business process with the Activity and Message Definition.
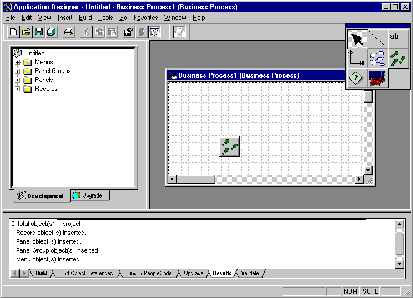
Click on the button with three footprints. Move the pointer over the Business Process window (pointer will change to a box) and press the mouse button. The Activity Choices dialog will be displayed. Select Create New Activity (Figure 2-27). Select OK. This will place an icon of the three footprints in the Business Process window (Figure 2-28).
Figure 2-27 Create a new activity within the business process.
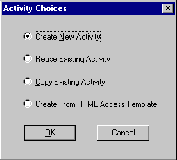
Figure 2-28 The business process with the newly created activity.
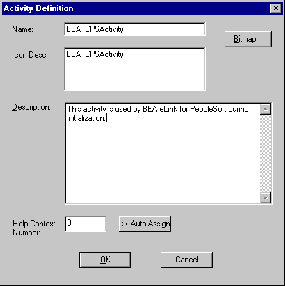
Right click on the three footprint icon in the Business Process window. This will display the Activity Definition dialog. In the Name field type BEA_CPSActivity and then press <Tab>.
Note: The Icon Description will be filled in automatically with the data from the Name field when focus is shifted from the Name field.
In the description field type "This activity is used by BEA eLink for PeopleSoft during initialization." (Figure 2-29). Select OK. Be sure to use the same capitalization as documented.
Figure 2-29 Define the activity as BEA_CPSActivity.
Figure 2-30 The business process now contains the BEA_CPSActivity definition.

Double click on the BEA_CPSActivity icon in the Business Process window (Figure 2-30). The Business Process window will be blank and the small floating window will now contain several more, different icons (Figure 2-31). Click on the icon that appears to be a door and move the pointer into the Business Process window (the pointer will change to a small box) and click in the Business Process window. This will place the door icon in the window (Figure 2-32).
Figure 2-31 Add a Message Agent Message Definition.

Figure 2-32 The Message Agent Message Definition is added, but not yet defined.
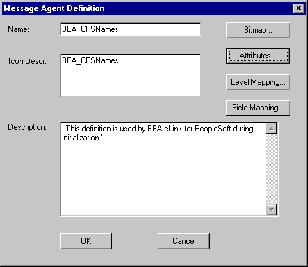
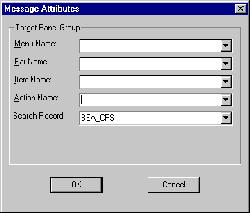
Right click on the door icon in the Business Process window to bring up the Message Agent Definition dialog. Specify BEA_CPSNames in the Name field and press <Tab> (the Icon Description field will be filled in automatically after focus changes from the Name field). For the Description field type: "This definition is used by BEA eLink for PeopleSoft during initialization." Be sure to use the specified capitalization.
Figure 2-33 Name the new Message Agent Message Definition BEA_CPSNames.
Select the Attributes button to bring up the Message Attributes dialog. Specify the following for each of the fields (either by typing in the values or selecting them from the drop-down lists) (Figure 2-34):
If the optional steps were performed as described in "Create a Panel to Access the BEA_CPS Message Definition (Optional)," specify the following values:
Figure 2-34 Attributes for BEA_CPSNames when not for use within PeopleTools.
Select OK to return to the Message Agent Definition dialog.
Select the Level Mapping button on the Message Agent Definition dialog. In the If Row Found section select the Update radio button. In the If Row Not Found section select the Insert radio button (Figure 2-35). Select OK to return to the Message Agent Definitions dialog.
Select the Field Mapping button to bring up the Message Agent Field Map dialog (Figure 2-36). Select the Add button to bring up the Map Field dialog.
In the Value section highlight (Search Record) in the Record box and then ACTIVITYNAME in the Field box. In the Field Name specify ACTIVITYNAME (Figure 2-37). Select OK to return to the Message Agent Field Map dialog. Select the Add button again to bring back the Map Field dialog.
In the Value section highlight (Search Record) in the Record box and then INPUTNAME in the Field box. In the Field Name specify INPUTNAME (Figure 2-38). Select OK to return to the Message Agent Field Map dialog.
Select OK from the Message Agent Field Map dialog (Figure 2-39) to return to the Message Agent Definition dialog. Select OK in the Message Agent Definition dialog to return to the Business Process window.
Save the Business Process by selecting File -> Save As from the menu. Type BEA_CPSBUSPROC in the Save Name As field (Figure 2-40). Select OK. Add the Business Process to the Project by pressing <F7>. Close the Business Process by selecting File -> Close from the menu.
Save the Project by selecting File -> Save Project from the menu. Enter BEA_CPS as the name to save as (Figure 2-41).
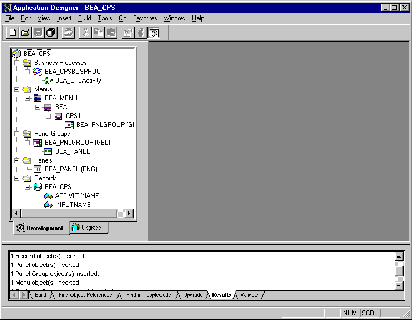
Figure 2-42 shows the BEA_CPS project with all the components visible.
Select File -> Exit from the menu to exit the application designer. The PeopleSoft definitions required by eLink Adapter for PeopleSoft have now been created.
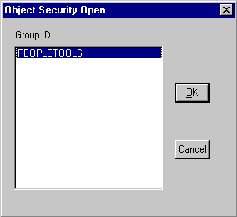
To make the eLink for PeopleSoft menu visible within the PeopleSoft GUI, permissions must be granted to authorized users. Launch the PeopleTools Object Security application.
Open the PeopleTools group by selecting File -> Open -> Group, highlighting PeopleTools, and pressing OK.
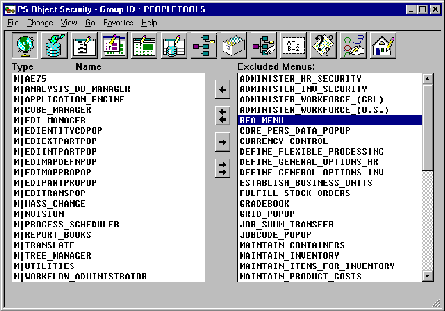
From the menu select View -> Menus.
In the Excluded Menus list, on the right side of the window, the BEA_MENU will be listed. Highlight BEA_MENU by clicking on it.
Add it to the usable list by clicking on the single left arrow in the middle of the window.
Save the changes by selecting File -> Save from the menu.
Exit PeopleSoft Object Security by selecting File -> Exit.
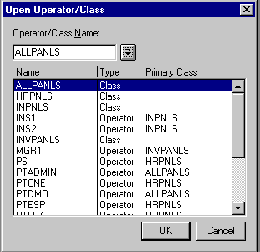
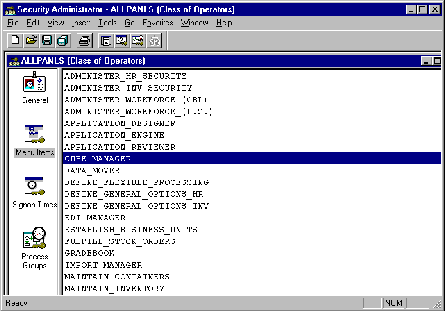
To launch the Security Administrator, select File -> Open. Press the arrow to the right of the Operator/Class Name input field. ALLPANLS will be inserted into the Operator/Class Name field.
Select OK and the ALLPANLS Class displays.
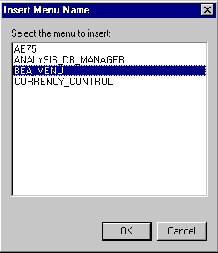
Click on the Menu icon on the left side of the window. Insert the BEA_MENU by selecting Insert -> Menu Name from the menu. This brings up the Insert Menu Name dialog.
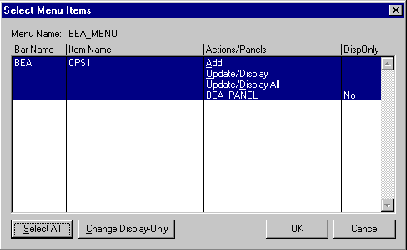
Highlight BEA_MENU from the list and select OK to bring up the Select Menu Items dialog.
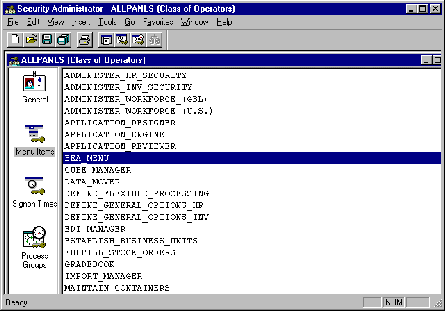
Press the Select All button and then press the OK button to return to the Security Administrator main window, which now should include BEA_MENU in the menu list.
Save the changes by selecting File -> Save from the menu and then exit the Security Administrator selecting File -> Exit.The BEA Menu will now be available from within the PeopleTools GUI. In order for the menu item to appear, any running PeopleTools Applications must be restarted (e.g. If Security Administrator was launched from within the Application Designer, the Application Designer must be exited and re-started). The BEA Menu will appear under the Go menu item.
Figure 2-35 Define the Level Mapping attributes.
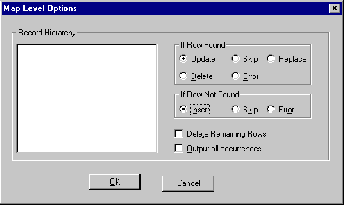
Figure 2-36 Add field mapping to the BEA_CPSNames Message Definition.

Figure 2-37 Field mapping without ACTIVITYNAME Message Definition.
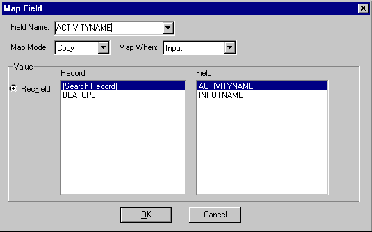
Figure 2-38 Field mapping without INPUTNAME Message Definition.
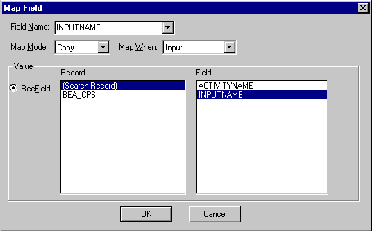
Figure 2-39 Message Definition BEA_CPSNames with required field mappings.
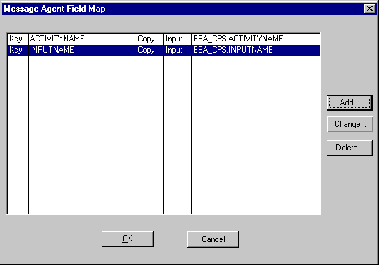
Figure 2-40 Save the newly created Business Process as BEA_CPSBUSPROC.
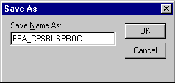
Figure 2-41 Save the eLink for PeopleSoft project as BEA_CPS.
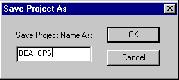
Figure 2-42 All items defined in the eLink for PeopleSoft project.
Configuration Validation

Launching the Security Administrator
![]()