Exposing PeopleSoft Panels to TUXEDO Applications
     BEA eLink Adapter for PeopleSoft 1.1   Information Center     

        HOME   |   SEARCH   |   CONTACT   |   PDF FILES |   WHAT'S NEW 
 
        TABLE OF CONTENTS   |   PREVIOUS TOPIC   |  
7 . Exposing PeopleSoft Panels to TUXEDO Applications

7 . Exposing PeopleSoft Panels to TUXEDO Applications


This chapter provides instructions for determining internal names for a PeopleSoft GUI dialog box components. This information is then used to create a Message Definition for TUXEDO applications to access the PeopleSoft database in the same manner as the PeopleSoft dialog box.

Throughout this chapter you will need to record dialog box information on the two worksheets located at the end of this chapter.

You must determine the following dialog box internal information in order to create the Message Definition:

Determining PeopleSoft Internal GUI Component Names

Perform the following steps to gather internal names for PeopleSoft GUI dialog box components.

The PeopleSoft dialog box used in this integration example is the "Disciplinary Action" panel. This panel is created as part of PeopleSoft's demonstration application, PTDMO.

Displaying the Disciplinary Action Dialog Box

Perform the following steps to display the Disciplinary Action dialog box.

  1. Select Start -> PeopleSoft7.5 -> PeopleTools. You will see the following dialog box; however, the title bar may display a different title.

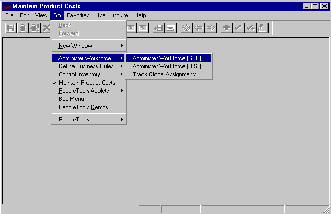
  2. Select Go -> Administer Workforce -> Administer Workforce (GBL) from the menu.

    Figure 7-1 Select Administer Workforce (GBL)
  3. From the Administer Workforce dialog box, select Use -> Disciplinary Action. You will see the following dialog box.

    Figure 7-2 Employee ID Dialog Box

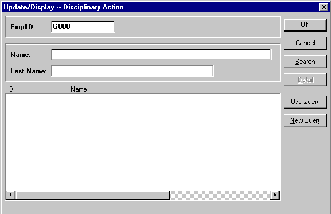
  4. Type the employee number G000 in the EmpID box and click OK. The Administer Workforce (GBL) - Use - Disciplinary Action dialog box displays.

    Figure 7-3 Disciplinary Action Dialog Box
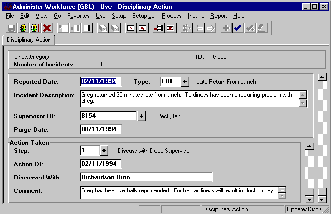
    For the purposes of this example, the Disciplinary Action dialog box is the object from which PeopleSoft internal information will be gathered.

    Using the Message Definition Attributes worksheet in the back of this chapter, record the following information in the GUI name column.

Obtaining the Internal Menu Name

Perform the following steps to obtain the internal menu name.

  1. Select Start -> PeopleSoft7.5 -> Application Designer. You will see the Application Designer dialog box.

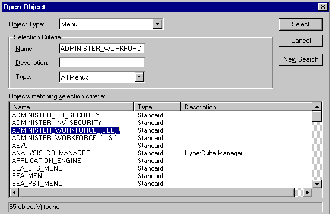
  2. Select File -> Open. You will see the following Open Object dialog box.

    Figure 7-4 Open Object Dialog Box

  3. In the Object Type drop-down list, select Menu.

  4. Type % in the Name box and click Select. The "Objects matching selection criteria" field populates with a list of items.

  5. Select the menu name that is similar to the GUI menu name. In this case, you select ADMINISTER_WORKFORCE_(GBL).

  6. Click Select. The Application Designer development environment opens with the ADMINISTER_WORKFORCE_(GBL) dialog box displayed in the right pane. This serves as verification that you selected the correct object.

    Figure 7-5 Application Designer Dialog Box
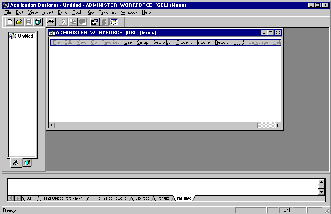
  7. Using the Message Definition Attributes worksheet in the back of this chapter, record the following Menu Name information in the PeopleSoft Internal Name column.

Obtaining the Internal Panel Name and Group

To obtain the panel name and panel group, you must open and examine the panel within the PeopleTools Application Designer.

Perform the following steps to obtain the internal panel name and group.

  1. From within Application Designer, select File -> Open. You will see the Open Object dialog box.

  2. In the Object Type drop-down list, select Menu.

  3. Type ADMINISTER_WORKFORCE(GBL) in the name box and click Select. The "Objects matching selection criteria" field populates with a list of items.

  4. Select the menu name that is similar to the GUI menu name. In this case, you select ADMINISTER_WORKFORCE_(GBL).

  5. Click Select. The Application Designer development environment opens with the ADMINISTER_WORKFORCE_(GBL) dialog box displayed in the right pane. This serves as verification that you selected the correct object.

  6. From within the ADMINISTER_WORKFORCE_(GBL) dialog box displayed in the right pane, select Use -> Disciplinary Action.

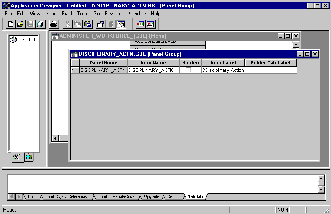
  7. Right-click on Disciplinary Action and select View Definition from the menu. The following DISCIPLINARY_ACTN.GBL panel displays in the Application Designer dialog box.

    Figure 7-6
    Panel Group Dialog Box

  8. Using the Message Definition Attributes worksheet in the back of this chapter, record the following Panel Name and Panel Group information in the PeopleSoft Internal Name column.

Obtaining the Search Record

Perform the following steps to obtain the Search Record.

  1. From within the Application Designer with the DISCIPLINARY_ACTN.GBL panel displayed, select File -> Object Properties. The Panel Group Properties dialog box displays.

  2. Select the Use tab.

  3. Using the Message Definition Attributes worksheet in the back of this chapter, record the following Search Record information in the PeopleSoft Internal Name column.

    Figure 7-7 Panel Group Properties Dialog Box
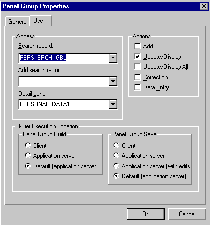
  4. Click Cancel to close the Panel Group Properties dialog box.

  5. Click Cancel to close the Panel Group dialog box.

  6. Close the ADMINISTER_WORKFORCE_(GBL) Menu. If prompted to save changes, click No.

Obtaining the Record and Field Names

Perform the following steps to obtain Record and Field names.

  1. Select Start -> PeopleSoft7.5 -> Application Designer. The Application Designer dialog box displays.

  2. Select File -> Open. The Open Object dialog box displays.

  3. In the Object Type drop-down list, select Panel.

  4. In the Name box, type DISCIPLINARY_ACTN.

  5. Click Select. The DISCIPLINARY_ACTN.ENG panel displays as shown.

    Figure 7-8 DISCIPLINARY_ACTN.ENG Panel
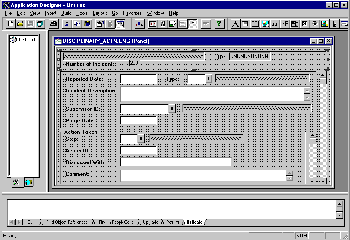
  6. To obtain the Record and Field information associated with the GUI object, double-click on the field of interest. The Panel Field Properties dialog box displays with the Record and Field information.

    Figure 7-9 Panel Field Properties Dialog Box
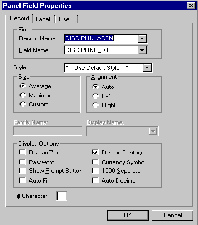
  7. Select the Use tab to determine if the field is used for Display Only. If the field is Display Only, then TUXEDO applications are only able to retrieve the information, not update it.

  8. Using the Message Definition Fields worksheet in the back of this chapter, record the Record Name, Field Name, and Display Only information.

  9. Repeat steps 6 through 8 for every dialog box component of interest.

  10. Select File -> Close to close the DISCIPLINARY_ACTN.ENG when you are finished. If prompted to save changes, click No.

Creating the Activity and Message Definition

Once you have obtained the Message Definition attributes and the field names associated with the GUI controls, you can create a Message Definition to access the panel's information from a TUXEDO application.

Perform the following steps to create the activity and message definition.

  1. Select Start -> PeopleSoft7.5 -> Application Designer. The Application Designer dialog box displays.

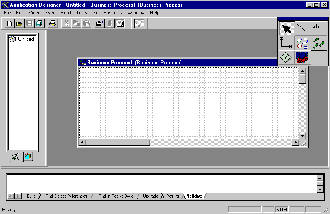
  2. Select File -> New -> Business Process. The following panel displays within the Application Designer main window.

    Figure 7-10 Business Process Panel

  3. Click the "Three Footprints" icon to begin adding a new activity.

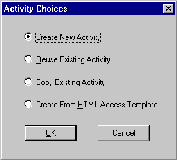
  4. Click anywhere on the grid to display the Activity Choices window.

    Figure 7-11 Activity Choices Window

  5. Click the Create New Activity button.

  6. Click OK. The "Three Footprints" icon displays on the grid window.

  7. Place your cursor over the `Three Footprints" icon and right-click. The Activity Definition dialog box displays.

    Figure 7-12 Activity Definition Dialog Box
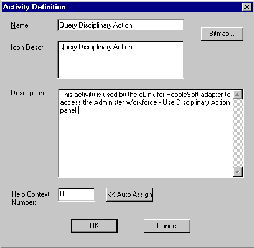
  8. Use the dialog box to describe the new activity using the Name, Icon Descr, and Description fields.

  9. Click OK. The icon for the new activity displays on the Business process grid.

  10. Double-click the new activity icon to open the activity.

  11. Click the Door icon to select it and then click somewhere on the grid to add a Message Definition.

  12. Right-click the Message Definition to open the Message Agent Definition dialog box.

    Figure 7-13 Message Agent Definition Dialog Box
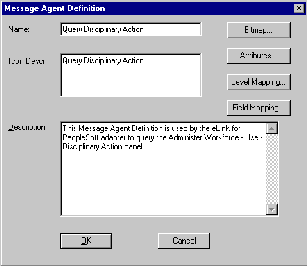
  13. Type the appropriate descriptive information.

  14. Click Attributes to open the Message Attributes dialog box.

    Figure 7-14 Message Attributes Dialog Box
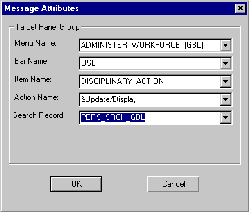
  15. From the Menu Name drop-down list, select ADMINISTER_WORKFORCE-(GBL).

  16. Using the Message Definition Attributes worksheet in the back of this chapter, select the corresponding values from the Message Attributes drop-down lists.

  17. Click OK to return to the Message Agent Definition dialog box.

  18. Click Level Mapping to open the Map Level Options dialog box.

    Figure 7-15 Map Level Options Dialog Box
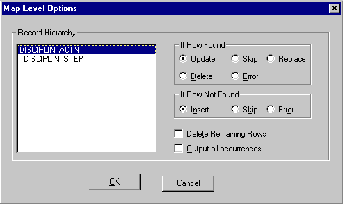
  19. Accept all the defaults and click OK to return to the Message Agent Definition dialog box.

  20. Click Field Mapping to open the Message Agent Field Map dialog box.

    Figure 7-16 Message Agent Field Map Dialog Box
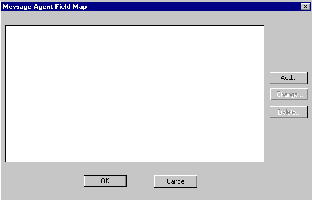
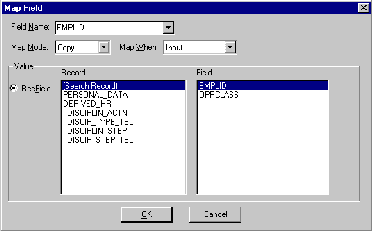
  21. Click Add to open the Map Field dialog box.

    Figure 7-17 Map Field Dialog Box

    Using the information recorded in the Message Definition Fields worksheet at the back of this chapter, map each field in the Message Agent Field Map so that this information can be retrieved by TUXEDO applications.

  22. To add the field EMPLID, select Search Record in the Record pane.

  23. Select EMPLID in the Field pane.

  24. Type EMPLID in the Field Name box.

  25. Accept the map Mode default.

  26. Select Input from the Map When drop-down list.

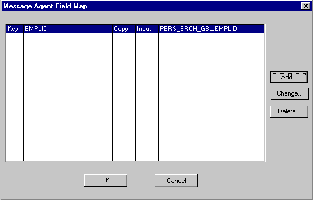
  27. Click OK to return to the Message Agent Field Map. The EMPLID field should be added to the Message Agent Field Map as shown below.

    Figure 7-18 Message Agent Field Map

  28. Add the remaining fields to the Message Agent Map definition. Since this message definition is for a query request, all other fields should be of type "Output". These fields will not be sent in the query request, but will only be received in the query response.

    Note: Notice that the Field Name defined in the Message Agent map does not have to match the field name of the record.

  29. Continue adding output fields as necessary. A sample Message Definition follows.

    Figure 7-19 Complete Message Agent Map Definition
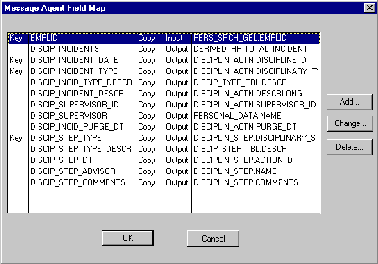
  30. Click OK to close the Message Agent Field Map dialog box.

  31. Click OK to close the Message Agent Definition dialog box.

  32. Select File -> Save to save the new business process, activity, and message definition.

Defining FML32 Fields

In order to use the new message definition, you must create the associated FML field identifiers.

For more information on defining FML32 fields, refer to the BEA TUXEDO FML Programmer's Guide.

Perform the following steps to define the FML32 fields.

  1. Edit the MsgAgtEx.fml.

  2. Add each field from the Message Agent Field Map to the FML file. Each field should be of type string. The following table is the FML used for this example.
    Table 7-1 FML Example

    #name rel-number type flags comment

    EMPLID

    18

    string

    -

    Employee ID

    DISCIP_INCIDENTS

    19

    string

    -

    Number of incidents

    DISCIP_INCIDENT_DATE

    20

    string

    -

    Date of incident

    DISCIP_INCIDENT_TYPE

    21

    string

    -

    Incident type

    DISCIP_INCID_TYPE_DESCR

    22

    string

    -

    Incident type description

    DISCIP_INCIDENT_DESCR

    23

    string

    -

    Incident description

    DISCIP_SUPERVISOR_ID

    24

    string

    -

    Employee ID of supervisor

    DISCIP_SUPERVISOR

    25

    string

    -

    Supervisor name

    DISCIP_INCID_PURGE_DT

    26

    string

    -

    Date that incident is forgotten

    DISCIP_STEP_TYPE

    27

    string

    -

    Type of discipline taken

    DISCIP_STEP_TYPE_DESCR

    28

    string

    -

    Descrip of discipline step type

    DISCIP_STEP_DT

    29

    string

    -

    Date of discipline action

    DISCIP_STEP_ADVISOR

    30

    string

    -

    Discipline advisor

    DISCIP_STEP_COMMENTS

    31

    string

    -

    Comments on discipline action

Testing the New Message Definition

Perform the following steps to test the new Message Definition.

  1. Reboot the eLink for PeopleSoft adapter to take advantage of the new FML fields and the new Message Definition.

    tmshutdown -s cps
    tmboot -s cps

  2. Create a script for the ud32 utility. The ud32 utility can read tab-delimited text and create a FML32 buffer request. Use the following ud32 script to test this example.

    SRVCNM  QryDscp.DscActn
    BEA_CPSOprID   PTDMO
    BEA_CPSOprPswd PTDMO
    EMPLID   G000

  3. Send the script to the indicated service and print out the FML32 response.

    This script will invoke service "QryDscp.DscActn", sending an operator ID, ad operator password, and an employee id to return Disciplinary information on. The following is the output for the example.

    $ud32 < disp.ud
    SENT pkt(1) is:
    SRVCNM QryDscp.DscActn
    BEA_CPSOprId   PTDMO
    BEA_CPSOprPswd PTDMO
    EMPLID   G000
    RTN pkt(1) is:
    BEA_CPSRows     1
    DISCIP_INCIDENTS     1
    DISCIP_INCIDENTS_DATE 02/11/1994
    DISCIP_INCIDENT_TYPE LRF
    DISCIP_INCID_TYPE_DESCR   Late return from lunch
    DISCIP_INCIDENT_DESCR   Greg returned 30 minutes late from lunch
    Tardiness has been a recurring problem with Greg.
    DISCIP_SUPERVISOR_ID 8154
    DISCIP_SUPERVISOR   Peck, Jan
    DISCIP_INCID_PURGE_DT   08/11/1994
    DISCIP_STEP_TYPE    1
    DISCIP_STEP_TYPE_DESCR   Discuss with dept. Supervisor
    DISCIP_STEP_DT 02/11/1994
    DISCIP_STEP_ADVISOR  Richardson, Dion
    DISCIP_STEP_COMMENTS Greg has been verbally reprimanded. Further tardiness will result in dock in pay.

Message Definition Worksheets

Use the following worksheets to record the information needed to create a Message Definition.

Table 7-2


GUI Name

PeopleSoft Internal Name


Menu Name


Men Bar


Menu Item


Action


Panel Name


Panel Group


Search Record


Message Definition Attributes

Table 7-3 Message Definition Fields

Record Name


Field Name


Display Only


Description


Copyright © 1999 BEA Systems, Inc. All Rights Reserved.
Required browser version: Netscape Communicator version 4.0 or higher, or Microsoft Internet Explorer version 4.0 or higher.
Last update: October 5, 1999.