16 Using RealTime Publishing
When you configure the RealTime publishing process, you define the publishing destination and mirror site configuration data to that destination. You can also set the publishing schedule and use the RealTime process to synchronize site data.
The following topics describe how to configure RealTime publishing and monitor the feedback from publishing processes:
16.1 RealTime Publishing Overview
RealTime publishing is a dynamic publishing method named for its user interface, as publishing status messages update in real time. Progress bars and mouse-over tooltips illustrate the progression of a publishing session with status information from both source and destination systems.
The RealTime user interface is also interactive. From the approved assets list you can select as many items as you like for immediate publication by placing the items into the On Demand queue. You can also remove assets from the approved assets list using Unapprove. In both On Demand publishing and asset unapproval, asset dependencies are taken into account to ensure against broken links or missing assets on the destination system website.
In addition to status messages and asset approval functions, the RealTime user interface features interactive logging forms. On the logging form, you can search, page through, and filter log entries. Mousing over a summary log message's show all link expands the entry to a detailed report.
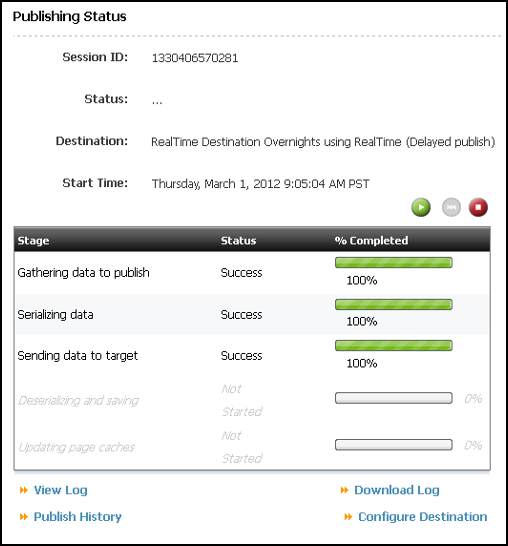
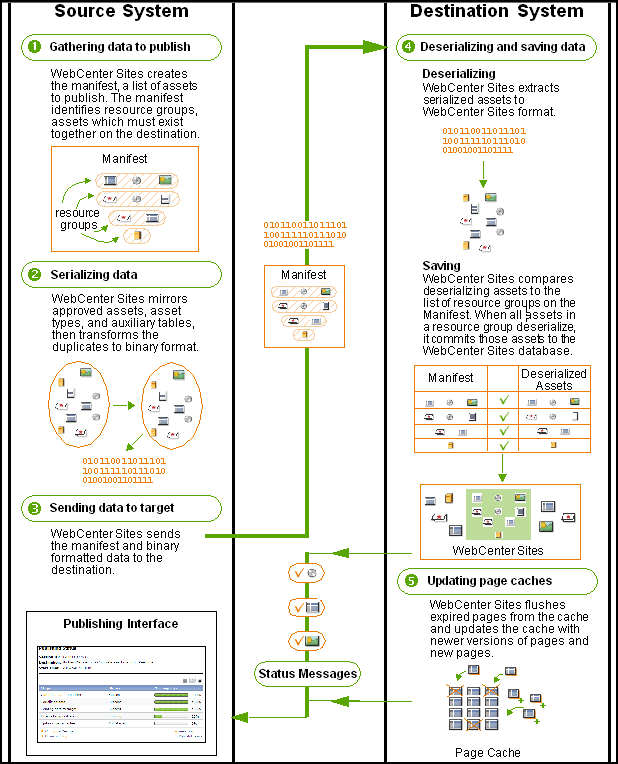
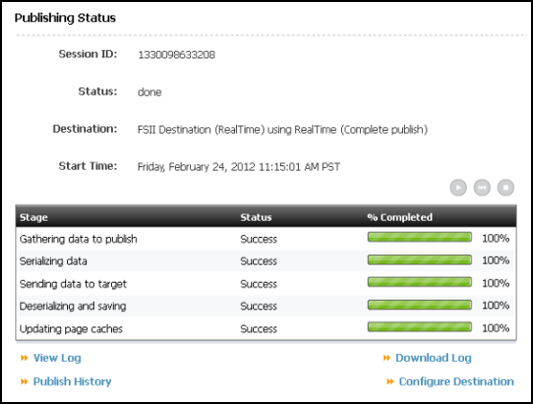
Underlying the RealTime user interface is a multi-stage publishing process. WebCenter Sites replicates, transfers, and stores web site data in five stages. The Publishing Status form shows the five stages of publishing. These stages are described in detail in Working with RealTime Publishing.
One advantage of breaking RealTime publishing into discrete stages is that it introduces the option of stopping the publishing process after a stage completes and picking up the publishing session from the next stage.
RealTime publishing includes two modes of publishing: complete and delayed. In complete publishing mode, WebCenter Sites runs all stages of publishing in one continuous sequence. In delayed publishing mode, there is a pause midway through the process so the administrator can control when the system begins writing assets to the WebCenter Sites destination database.
Delayed publishing can be used to minimize the impact of publishing on web server performance. Using delayed publishing, the administrator can time a destination system update to occur during off-peak traffic hours, an option that is particularly useful when publishing a large number of assets.
Another advantage of the multi-stage publishing process is the ability to cancel a running session at will and then, if you wish, restart the cancelled session from just after the last successfully completed stage of publishing. You can also redo a publishing session that does not complete due to errors or power interruptions.
When you use the RealTime publishing method, you can:
-
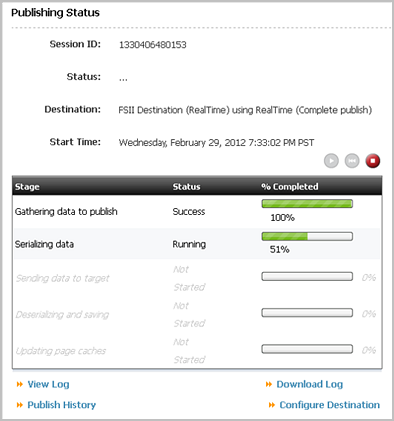
Monitor an active publishing session. Progress bars on the Publishing Status form show the current progress of the session on both source and destination WebCenter Sites systems.
-
Selectively publish approved assets using On-Demand publishing.
-
Selectively unapprove assets.
-
Review interactive, sortable session logs.
-
Configure your destination for Complete Publishing mode to run the entire publishing process in an uninterrupted session.
-
Configure your destination for Delayed Publishing mode to pause the publishing session midway so you can control when the system begins writing assets to the destination database.
-
Cancel an active publishing session.
-
Restart a cancelled publishing session from just after the last completed stage.
-
Redo a failed publishing session.
Dynamic publishing is the process of copying assets and their underlying schema from one WebCenter Sites system to another. In order for the RealTime publishing process to work, both the source and target systems must be set up for RealTime publishing.
16.1.1 Source System Configuration for Publishing
The source system requires the following items to be configured:
-
A batch user account. This user allows publishing to run as a background process and designates the location of publishing logs.
-
If there is a proxy, the identity of the local proxy server. This is identified to WebCenter Sites in the
wcs_propeties.jsonfile. -
For large publishes (such as the initial publication of a site), the session timeout may have to be increased beyond the default 900 seconds (for example, 9000 seconds). To do so, open the Property Management Tool in the Admin interface and change
cs.timeoutto 9000, then restart WebCenter Sites. When the publish is completed this value can be reset. -
The publishing destination, which identifies:
-
The destination URL and port
-
The publishing method
-
Publishing log and email notification options
-
User roles with approval and publishing privileges
-
The RealTime user, who has publishing privileges on the destination
-
Note:
When WebCenter Sites is integrated with Oracle Traffic Directory (OTD), change the following setting in the server.xml file of the OTD while publishing:
<http>
    <server-header>default</server-header>
    <max-unchunk-size>102400000</max-unchunk-size>
    <unchunk-timeout>-1</unchunk-timeout>
    <io-timeout>600</io-timeout>
<http>
Additionally, though not required for publishing to work, you can configure a publishing schedule which will publish approved assets on a regular basis.
16.1.2 Destination System Configuration for Publishing
The destination system requires the following items to be configured:
-
A RealTime user account, which has publishing privileges on the destination.
-
Mirrored site configuration data from the source system for the sites to publish:
-
WebCenter Sites
-
PublicationandSitePlanTreetable data -
Auxiliary tables (such as
SourceandMimeType) -
Asset types
-
Roles
-
Start menu items *
-
Workflow groups and processes *
-
Tree tabs *
-
Saved searches *
Items marked with an asterisk are typically not necessary on a delivery system.
-
If you will not publish from the destination system, we recommend turning off asset invalidation.
16.2 Working with RealTime Publishing
Dynamic publishing is the process of copying assets and their underlying schema from one WebCenter Sites system to another. In RealTime publishing, this process is broken up into five stages.
WebCenter Sites always performs the five stages in order. When the destination is configured for complete publishing mode, the process proceeds without interruption. When configured for delayed publishing mode, the process pauses before the fourth step. User interaction is required for the session to complete.
As the publishing session proceeds, you can monitor the progress of each stage on the Publishing Status form. Instructions for monitoring a publishing session can be found in Working with Active Publishing Sessions.
The stages of publishing are:
-
Gathering data to publish:
-
The WebCenter Sites source system locks the assets that are approved for this publishing session. Locking approved assets prevents them from being edited during publishing.
-
On the source system, RealTime publishing uses data from the approval system to create a manifest, a list of assets to publish. The manifest identifies resource groups, groups of assets that must exist together on the destination to prevent broken links and incomplete pages.
-
-
Serializing data:
-
The WebCenter Sites source system mirrors the following items:
-
Asset types
-
Auxiliary tables (identified in the destination configuration)
-
Approved assets
-
-
The source system serializes (translates to binary format) the mirrored data.
Note:
This step can require considerable space to complete. It is recommended that the temporary space assigned to the JVM (using
java.io.temp) is at least three times the size of the data to be published. The source and destination databases must also have enough space for the tableFW_PUBDATASTOREto grow. Since this can be equal to the size of the entire source site (both objects stored on disk and the database), the space required is can exceed what WebCenter Sites is using, particularly when large binaries are included. -
-
Sending data to the target:
-
The destination WebCenter Sites database locks assets approved for this publishing session. When assets on the target are locked, they cannot be edited.
-
The WebCenter Sites source system sends the manifest and all serialized data to the destination. The data is not yet been committed to the destination database.
A delayed publishing session pauses at this point. It continues to stage 4 only after the administrator selects the Resume button on the Publish Console or Publishing Status form.
-
-
Deserializing and saving data:
-
The WebCenter Sites destination system deserializes (inflates back to WebCenter Sites format) the mirrored asset types, auxiliary tables, and approved assets.
-
The destination database updates asset types and auxiliary tables with the deserialized ones, or adds them as new data.
-
The destination system uses the manifest to determine when to commit assets to its database. Assets in a resource group are committed only when every asset in the group has deserialized.
-
When the destination system commits all assets in a resource group:
-
It unlocks the assets in its database for editing. As the publishing session runs, the number of published, editable assets in the destination database increases.
-
The destination system sends a message to the source system identifying assets that have been successfully published. Assets in that resource group are unlocked on the source system for editing. As the publishing session runs, the number of editable assets on the source system increases.
-
-
-
Updating page caches:
The destination system completes the publication process:
-
Flushes the page cache, which removes expired pages.
-
Adds new pages to the cache.
-
16.3 Configuring Your System for RealTime Publishing
The following topics provide instructions for configuring a RealTime publishing environment with information specific to your WebCenter Sites installation and your business practices:
16.3.1 Creating the Batch User Account (If One Does Not Exist)
This procedure must be performed only one time on each source system, regardless of the number and types of publishing destinations you are configuring.
If you have not done so, create the batch user account. A batch user account is required before any type of publishing can take place. If a batch user account exists on your source system, skip to Setting Up the Destination System.
The purpose of a batch user account is two-fold:
-
Enable the publishing process to run as a background process on the source system.
-
Specify the location where publish logs are stored.
Note:
Set xcelerate.batchhost property to the host name of the application server that is hosting the source system. The source system is the batch host. If the port number of the web server is anything other than 80, you must also include the port number. For example, myserver:7001. In a clustered WebCenter Sites environment, only one batch host is supported. The xcelerate.batchhost property must be set on each cluster member to point to the dedicated host.
To create the batch user account:
16.3.2 Setting Up the Destination System
Data cannot be dynamically published unless the same database schema exists on the source and destination systems. In this step, you ensure that the structure of auxiliary tables on the source database is reproduced in the destination database.
The destination also requires a mirror user to complete database transactions on the destination system during publishing. You ensure that a mirror user exists on the destination. (The mirror user is different from the batch user, which exists on the source system.)
To set up the destination system:
16.3.3 Identifying a Proxy Server to the Source System
This procedure must be performed only one time on each source system, regardless of the number and types of publishing destinations you are configuring.
If the local proxy has been identified to your source system, or a proxy server is not used, skip to Creating a RealTime Destination Definition on the Source System.
To identify a proxy server to the source system, see one of the following topics:
16.3.4 Creating a RealTime Destination Definition on the Source System
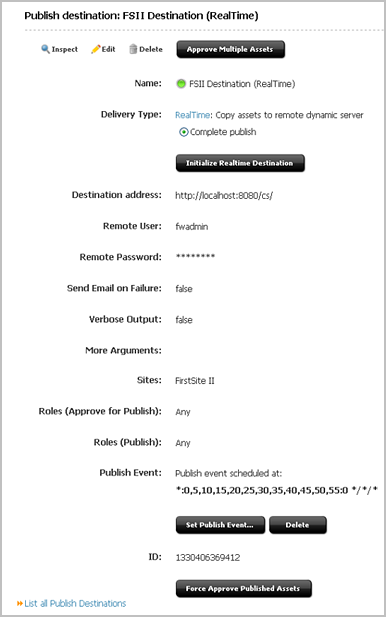
In this step, you will define the publishing destination to the source system:
Note:
While you can define multiple destinations, bear in mind that only sequential publishing is supported.
16.3.5 Initializing the Destination Database
You must initialize the destination database before you can publish to it. To initialize, you mirror two constructs: WebCenter Sites, and data in auxiliary tables (which support the types of assets users are publishing)
The Publication and PublicationTree tables are updated with the site names and table data you have chosen to mirror.
To initialize the destination:
Note:
Adding a new page under an existing page asset in SitePlanTree will mark the parent page as modified (that is, it needs approval). However, the dependency is not reflected in the cache, and the child page asset can be published without publishing the parent. This can result in the parent page asset not flushed from the cache, and the child page asset will not show up on any navigation the parent may have.
16.3.6 Mirroring the Site Configuration Data to the Destination Database
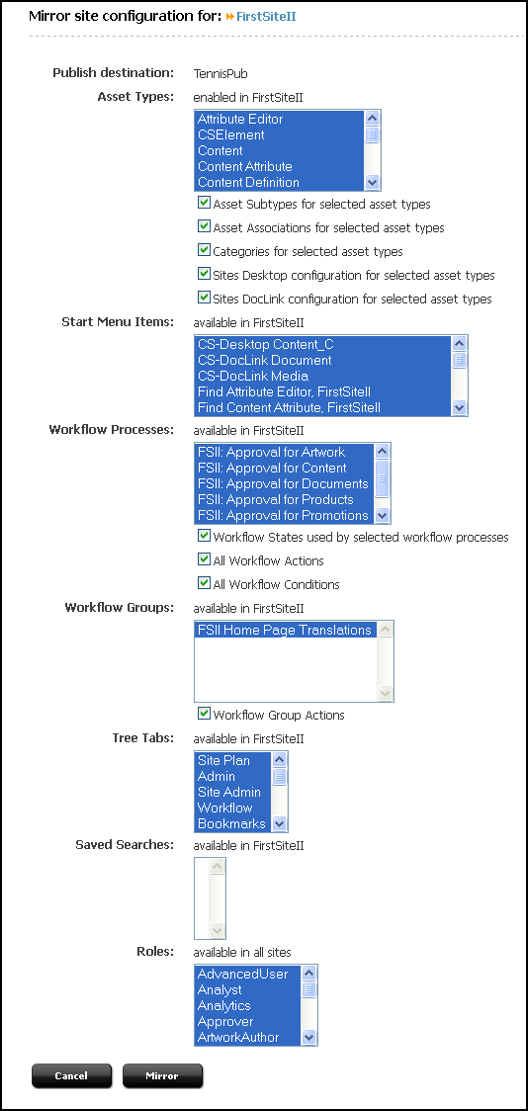
In this step, you will mirror the source's site configuration data (such as asset types and start menu items) to the destination database:
16.3.7 Testing the Publishing Process
You can test your publishing process by using all publishable assets or a smaller collection. To publish assets to a test environment, you must first approve the assets you want to publish. The following topics provide instructions for approving and publishing assets:
16.3.7.1 Approving Assets
To approve assets, complete either of the following:
-
To fully test your publishing process, you must approve all the assets that you intend to publish. See Approving Multiple Assets.
-
If you wish to perform a simple test of your configuration, temporarily create a home page asset with just a few dependents.
16.3.8 Testing the Published Site
To test your published site, point your browser to the home page asset on the destination system and examine the site.
If you have not done so, you must first determine the home page asset's URL. A WebCenter Sites URL is constructed by concatenating the following values, as shown:
http://<targetserver:port>/<cgipath>/ContentServer?pagename=<your_home_page>/<other_info>
In this example:
-
<targetserver:port>is the host name or IP address (and sometimes the port number) of the destination system. -
<cgipath>is the value of theft.cgipathproperty in thewcs_properties.jsonfile. For example,<cgipath>is/servlet/for Oracle WebLogic Server and other application servers with servlet architectures. -
ContentServer?pagename=sets the name of the page to be displayed at this URL. -
<your_home_page>is the home page's name from theSiteCatalogentry. -
<other_info>is additional information that is passed in with the WebCenter Sites page criteria variables,c,cid,tid, andp(for information about these variables, see Configure SiteEntry in Developing with Oracle WebCenter Sites).
For example, the URL for the Burlington Financial home page looks like this when it is rendered by the WebCenter Sites JumpStart Kit:
http://localhost:7001/servlet/
   ContentServer?pagename=BurlingtonFinancial/Page/Home
To determine the URL of your home page and test the site:
-
In the Admin interface, open the Property Management Tool. For help with this step, see Properties in the Core Category in Property Files Reference for Oracle WebCenter Sites.
-
In the Category drop-down menu, select Core, and then click Search
-
Locate the
ft.cgipathandft.approotproperties and note their values.
-
-
Open a text editor and assemble the URL:
-
Enter
http://orhttps://followed by:<targetserver:port>/<cgipath>/For example:
http://example.com:8080/servlet/(for Oracle WebLogic Server and IBM WebSphere)
-
After the string, add the following text:
ContentServer?pagename=
<your_home_page>Now the URL should look similar to the following example (for Oracle WebLogic Server and IBM WebSphere):
http://bigfatsun.fatwire.com:8080/servlet/ContentServer?pagename=ExampleSite/Page/Home
-
-
Point your browser to the URL you assembled.
-
Scan the page for errors and test all links to ensure they work.
Note:
If you detect an error related to content that is not stored as assets (the content is stored outside WebCenter Sites), use the appropriate transfer protocol to publish that content.
It is recommended that you conduct a complete test of the system at strategic times: under peak load conditions after you have mirrored the entire site for the first time, and at regular points thereafter.
16.3.9 Setting Up the Schedule
When you have ensured that your destination is correctly set up, finish configuring your source's publishing system.
-
On the source system, schedule times running publishing sessions to the destination. For help with this step, see Scheduling a Publish Event.
-
If your site uses image files that are stored on the web server as images, not as assets, plan how you will move the image files from the CM system web server to the delivery system web server. For example, FTP.
-
If you are using elements and SiteCatalog page entries that are not CSElement and SiteEntry assets, you must use the CatalogMover tool to mirror them to the destination system. For help with CatalogMover, see CatalogMover in Developing with Oracle WebCenter Sites.
16.3.10 Turning Off Asset Invalidation on the Delivery System
By default, the destination invalidates chain publishing. That is, the destination publishing system marks each published asset as changed, solely because the asset was published. Hence, an asset must be approved from the current destination before it can be published to yet another destination.
Asset invalidation should be turned off for assets on a final destination, such as a delivery system, because assets are not published from it. To turn off asset invalidation, do the following:
- Open the Property Management Tool, in the Admin interface, on the final destination system. (For instructions on accessing the Property Management Tool, see Properties in the Publish Category in the Property Files Reference for Oracle WebCenter Sites.)
- In the Name field, enter
xcelerate.publishinvalidate. - Click Search.
- In the Properties section of the form, select the name of the property.
- Set the value of this property to
false. - Click Save.
16.4 Adding a New RealTime Destination Definition
After you have configured your source system to publish to one RealTime destination, you can define other RealTime destinations, if necessary. Use only the following steps:
16.5 About Synchronizing Site Configuration Data
In addition to publishing assets, you can synchronize site configuration between the source and destination. For example, you can synchronize site configuration data from a development system to a management system or to a delivery system.
Use the Mirror Type Configuration page:
-
To move configuration items that support asset types (start menu items, associations, asset types, and so on).
-
If you or your developers add categories or subtypes for existing asset types.
-
To move workflow configuration data from a development system to a management system.
For instructions on using the Site Configuration form, see Mirroring the Site Configuration Data to the Destination Database.
Use the Initialize Mirror Destination page:
-
If you or your developers add sites, or auxiliary tables to your system that you wish to publish.
-
When you have to troubleshoot your configuration. If you can successfully initialize a RealTime destination, the source and the destination systems are communicating.
For instructions on using the Initialize Mirror Destination form, see Initializing the Destination Database.
16.6 How to Differentiate Complete and Delayed Publishing
A publishing session can run in one of two modes: complete or delayed. The mode must be explicitly specified.
-
In a complete publishing session, the five stages of RealTime publishing run in one uninterrupted sequence. You have the option to stop and resume a session, or cancel it.
-
In delayed publishing, the session pauses after the second stage (data serialization). For the session to run to completion, you must resume the session. The final stages follow automatically.
Delayed publishing enables you to control when the system begins writing to the destination database. For example, if you are publishing a large number of assets to a heavily trafficked web site, delayed publishing offers you the option to wait for a low-traffic period, when saving data to the destination database is a more efficient process.
This chapter contains instructions for monitoring complete and delayed publishing sessions, adjusting publishing schedules, and retrieving the histories of past sessions.
16.7 About the Publish Console
Throughout RealTime publishing, you will use the Publish Console. In the Publish Console, the system communicates information about current, scheduled, and past publishing sessions for all configured publishing destinations.
To open the Publish Console, log in to the Admin interface and click Publishing on the button bar.
-
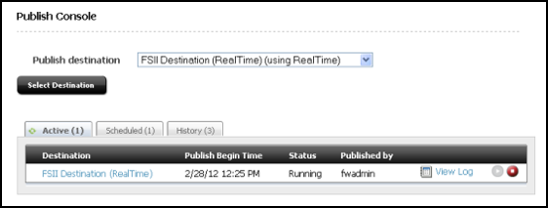
The Active tab shows a summary of ongoing publishing sessions that were triggered from the Admin and Contributor interfaces. While a publishing session is underway, you can open the Publishing Status form to learn detailed information about the publishing process in real-time. You can also explore interactive logs. Upon completion of the publishing session, you can download text logs. See Working with Active Publishing Sessions and Viewing and Searching Logs.
-
The Schedule tab displays the number of approved assets for each destination and the schedule of publishing sessions. See Working with Scheduled Publishing Sessions.
-
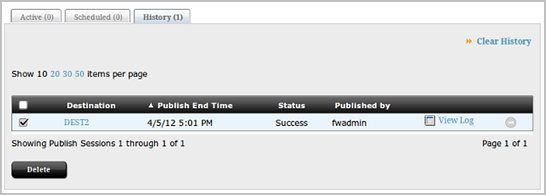
The History tab shows summary information on prior publishing sessions. See Working with Prior Publishing Sessions. From this tab, you can also access logs of prior publishing sessions. See Working with Publishing Logs.
16.8 Working with Active Publishing Sessions
The Active tab of the Publish Console shows information about all publishing sessions, triggered from the Admin and Contributor interfaces, currently running. From the Active tab, you can click a destination name to access the Publishing Status form for the selected session. On the Publishing Status form you can monitor the progress of the session as it runs.
Instructions in this section apply to both modes of publishing: complete and delayed.
The following topics provide information about working with active publishing sessions:
-
Canceling a Publishing Session
Note:
When a delayed publishing session pauses, it remains listed in the Active tab. Canceled sessions are moved to the History tab.
16.8.2 Resuming a Delayed Publishing Session
Delayed publishing allows you to control when the system begins writing to the destination WebCenter Sites database. This mode of publishing can be used if you are publishing a large number of assets and wish to wait for a low traffic period on your web site before you begin saving data to the destination database.
When a session runs in delayed publishing mode, it pauses after the second stage (data serialization). Although the session pauses, no other publishing session can run to the destination until the current session completes. For the session to complete, you must resume the session. The final stages follow automatically.
To resume a delayed publishing session:
-
Open the Publish Console (in the Admin interface, click Publishing in the menu bar).
-
Stay in the Active tab and navigate to the destination where the publishing session is running. (If the destination name is not displayed, no session is running on that destination.)
-
Read the destination's Status column and complete either:
-
If the status is paused, it means that the first three stages of publishing are complete. To continue the session, click the Resume button (which is enabled only during a pause).
-
If the status is running, you can determine which stage is in progress. Open the Publishing Status form:
-
Select the destination where the session is running.
-
In the Publishing Status form, note the progress bars and wait for the second stage to complete. If the second stage is not allowed to complete, the session cannot be resumed.
Note that the status bars are interactive.
To view the percent completion of a stage, hold your cursor over the stage's status bar.
As you hover, another tooltip opens showing the current asset type being processed. If you continue to hover, you will see the tooltip updating in real-time, always displaying the publishing system's last action.
(While a session is running, you can also view its log.)
-
When the second stage is complete, click the Resume button.
The Resume button is located between the Start and Cancel buttons.
-
When the publishing session is complete, all five stages display "Success" in the Status column.
-
-
-
When a session is complete, you can access its summary information and complete log on the History tab of the Publish Console. To access the History tab:
-
Return to the Publish Console (click Publishing, on the button bar).
-
Click the History tab. More information about options on the History tab can be found in Working with Prior Publishing Sessions.
-
16.8.3 Canceling a Publishing Session
Ongoing publishing sessions can be canceled (and restarted) by any user with publishing rights. When a session is canceled, session information is moved from the Active tab to the History tab. Here, the session can be rerun, but only if at least the second publishing stage was completed successfully before the cancellation and the session is the most recently canceled.
Note:
You can cancel a publishing session from the Publish Console or from the Publishing Status form. Be careful about which option you choose. If you prematurely cancel a session that you intend to redo, that session cannot be redone. When in doubt, cancel sessions from the Publishing Status form, where you can verify that at least the second stage has been completed.
For instructions about canceling a publishing session, see the following topics:
16.9 Working with Scheduled Publishing Sessions
If a destination is configured for scheduled publishing, its schedule is listed in the Schedule tab of the Publish Console. For instructions on configuring publishing schedules, see Scheduling a Publish Event.
Use the Schedule tab to:
-
View a destination's publishing schedule
-
Edit publishing schedules
To view or edit publishing schedules for all configured destinations:
16.10 Working with Prior Publishing Sessions
The Publishing Console's History tab provides summary information and detailed logs on every publishing session that has run in the past. Past sessions include completed, canceled, and failed sessions, but not delayed publishing sessions that have paused.
Note:
When delayed publishing sessions pause, they remain listed on the Active tab. They are considered to be active sessions.
The History tab is interactive. You can hold your cursor over each destination to view the destination's summary information in a pop-up window, or you can select a destination to obtain its session log. To locate information quickly, you can sort the list of destinations by the following criteria: Destination, Publish End Time, Status, and Published by.
On the History tab, you can:
-
View summary information about past publishing sessions. See Viewing Past Publishing Sessions.
-
Access the final Publishing Status form for completed sessions.
-
Redo a canceled session. See Redoing a Publishing Session.
-
Access session logs.
-
Clear the entire history list or delete selected sessions.
16.10.1 Viewing Past Publishing Sessions
Previous publishing sessions, triggered from both the Admin or Contributor interfaces, are stored in a history. Accessing the history will bring up the logs of each publishing session. The history can be cleared.
To view past publishing sessions:
-
Open the Publish Console (in the Admin interface, click Publishing in the menu bar).
-
Click the History tab.
-
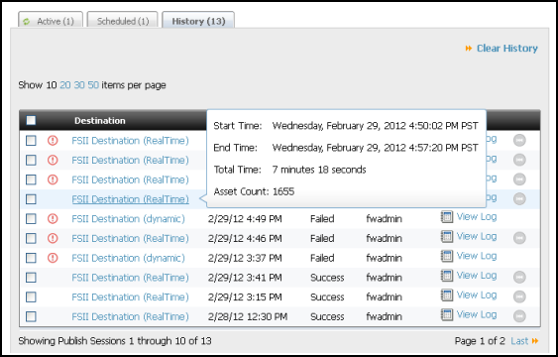
To view a session's summary information, hold your cursor over the destination where the session ran. (You can sort the Destination column by clicking its title.)
A pop-up window displays summary information, as shown in Figure 16-9.
The pop-up window shows when the session started and ended, how long it took to publish the assets, and the number of assets published.
Figure 16-9 History Tab on Publish Console Form, Showing Context Window
Description of "Figure 16-9 History Tab on Publish Console Form, Showing Context Window" -
To view and download a session log:
-
Select the destination where the session ran.
-
In the Publishing Status form, click View Log.
If a log entry exceeds 200 characters, click the show all link to display the entire entry. You can also search the log for specific entries.
-
To download the log, click the Download Log link.
-
16.10.2 Redoing a Publishing Session
When a session stops (because of system error or user cancellation), you can rerun the session, meaning that you start the session again. When the session starts, it continues the publishing process from the last successfully completed stage. The option to redo a session is available if all of the following conditions hold:
-
The data to be published was successfully gathered and serialized (that is, the first two stages of publishing were successfully completed).
-
The session is the most recently failed or canceled publishing session.
The Redo option is useful when a disruption, such as a power failure, interferes with publishing.
To redo a publishing session:
-
Open the Publish Console (in the Admin interface, click Publishing on the menu bar).
-
Click the History tab to view past publishing sessions.
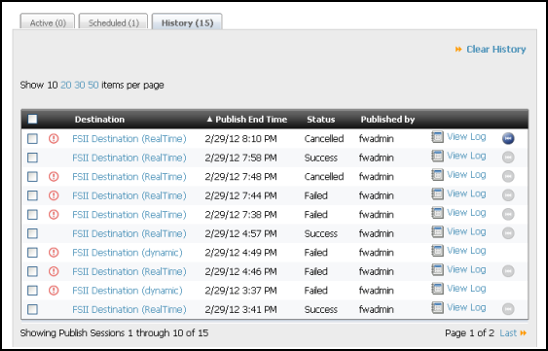
The list of past publishing sessions opens. The Redo button is active (in the right-hand column) only for the sessions that can be redone.
If the Redo button is disabled, then either this publishing session did not progress far enough to be redone, or it is not the most recently canceled (or failed) session. In the following figure, Redo button is visible at the end of the line detailing the first destination. Click the Redo button to begin a publishing session at the point of sending data to the target.
Figure 16-10 History Tab, showing Redo Button
Description of "Figure 16-10 History Tab, showing Redo Button" -
Complete either:
-
Click the Redo button to restart the publishing session.
-
Redo the session from the Publishing Status form:
-
Click the destination link for the session you wish to redo.
The final Publishing Status form for the session opens.
-
Click the Redo button to restart the publishing session.
The message Restart request has been sent opens and the session moves from the History tab to the Active tab. The circling green arrows rotate in the corner of the Active tab, indicating a publishing session is active.
-
-
-
To monitor the session as it completes, click the Active tab followed by the destination name. (See Working with Active Publishing Sessions.)
16.11 Working with Publishing Logs
The following topics provide information and instructions about viewing, downloading, and deleting publishing logs:
16.11.1 Viewing and Searching Logs
RealTime publishing logs store a detailed account of the transactions that take place during a publishing session. The logs are viewable for active and past publishing sessions. They are also available for download, at any time, while sessions run and when they end.
Note:
WebCenter Sites can be configured to generate verbose log files, containing more detailed information than regular log files. Because verbosity lengthens the publishing process, this option should be used only when required (typically for troubleshooting).
WebCenter Sites can also be configured to automatically email text-formatted log files at the completion of a publishing session.
To configure log files and specify the email option, see Creating a RealTime Destination Definition on the Source System.
To view publishing logs:
-
Open the Publish Console (in the Admin interface, click Publishing on the menu bar).
The Publish Console opens with the Active tab open, displaying all currently running RealTime sessions.
-
To view the log of a current session, stay in the Active tab, navigate to the session, and click View Log. To view the log of a past session, click the History tab, navigate to the session, and click View Log.
-
The Publish Session Log form opens. Additional pages are added as the session continues.
-
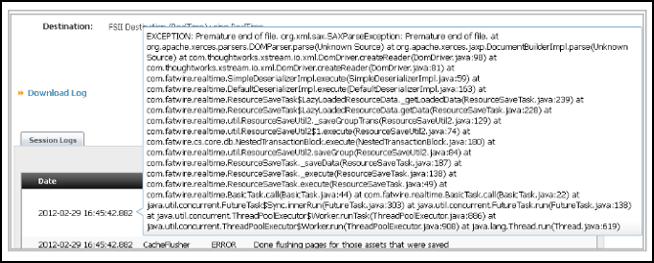
If a log entry exceeds 200 characters, an ellipsis (three periods) will appear at the end. To see the entire entry, hover the mouse cursor over the entry. The entire entry opens in a window that floats over the log file. Note that the cause of the log event is identified.
Figure 16-11 Pop-Over Window Showing Information for the Log Event
Description of "Figure 16-11 Pop-Over Window Showing Information for the Log Event"
-
-
You can search the log file in several ways:
-
To search for specific entries, enter a search term in the Search field (at the top right of the form).
Note:
The search utility recognizes terms that are used in the following columns: Stage, Status, and Details. Wildcards and Boolean operators are not recognized.
-
To view only error messages, select the Show only errors check box and leave the Search field empty.
-
To filter error messages by specific terms, select the Show only errors check box and enter a search term in the Search field.
-
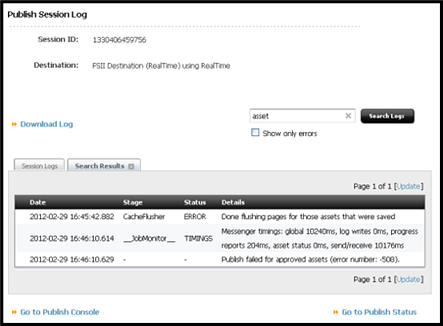
Click Search.
The Search Results tab opens (next to the Session Logs tab).
Figure 16-12 Search Results Tab on the Publish Session Log Form
Description of "Figure 16-12 Search Results Tab on the Publish Session Log Form" -
To exit the Search Results tab, click the X on the tab.
You are returned to the Session Logs tab.
-
16.11.2 Downloading Logs
A publishing log is available for download at any time during the session and when the session ends. You can download a log file from several places in the RealTime publishing interface, as shown in the following steps:
16.11.3 Deleting Publish History
It is recommended that you delete the publish history regularly ensure proper operation and performance, as all data related to publishing is stored in the database, and the size of these tables can become a performance problem over time. While regular publishes do not greatly increase the size of this table, large publishes (such as the initial publish of a site, especially when it has failed) can leave large amounts of data behind.
Deleting a publish session will do the following:
-
Delete all messages associated with the session from the database tables.
-
Clear out any data associated with it from
FW_PUBDATASTOREon this system (data is often left in this table when a publish fails). -
Attempt to access the destination and clear associated data from
FW_PUBDATASTORE(data is often left in this table when a publish fails).
To delete a session log:
