17 Scheduling Publish Events
Because publish events run as background processes and there is no publish queue, you can set up publish events for different destinations that run at the same time.
17.1 Scheduling a Publish Event
When you schedule a publish event, there are two things you should be aware of:
-
There can be only one publish event schedule for each destination.
-
If any of your systems serve as both source and destination, be sure that incoming and outgoing publishing sessions do not overlap. For example, you publish from the development system to the management system and you publish from the management system to the delivery system. Never schedule a publish event from the development system to the management system for a time when the management system is publishing to the delivery system.
To schedule a publish event:
-
In the General Admin tree, expand the Admin node, expand the Publishing node, and then expand the Destinations node.
-
Double-click the destination to schedule a publish event for.
-
In the Publish Destination form, click the Set Publish Event button.
The Edit Publish Event form opens.
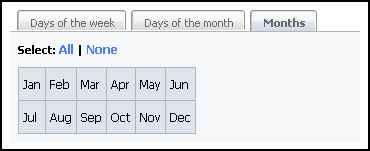
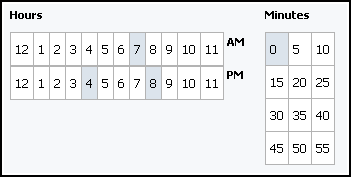
Now you select days, months, hours, and minutes to set a schedule.
The form for setting a publish event is similar to the form for setting a timed action event in workflow. See Setting Up the Timed Action Event.
Example schedule:
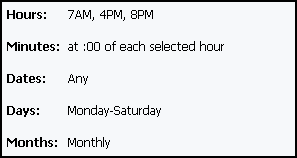
For example, to set a schedule so that WebCenter Sites publishes the assets approved for this destination at 7 a.m., 4 p.m., and 8 p.m. every day of the week except Sunday, you would complete these steps:
17.2 Reading the Schedule Abbreviations
When scheduled events are created, these events are displayed in string format in the WebCenter Sites interface.
In the Edit Publish Events form the schedule opens in easy-to-read format on the Enabled Dates and Times section at the top of the page. In the Publish Destination forms, the schedule opens in the Publish Event field as a string.
Here is the key to the schedule string:
hours:minutes:seconds weekdays/days of month/months of year
This information opens as follows:
-
Hours are displayed as numbers from 0 (midnight) through 23 (11 p.m.) and are separated from the minutes with a colon.
When multiple hours are selected, the selected hours display with commas separating them.
In the example schedule (in Scheduling a Publish Event), 7 a.m., 4 p.m., and 8 p.m. were set as the times to publish. This displays as 7,16,20:
-
Because you can set minutes in increments of 5, minutes are displayed as numbers 0 – 55 in five minute increments. Minutes are separated from the seconds with a colon.
If the schedule describes multiple minutes increment, the scheduled increments are listed with commas separating them.
When minutes are displayed as a 0, it means the event runs on the hour.
The hours and minutes for the example are displayed like this: 7,16,20:0:
-
Seconds are always set to zero. Therefore, the complete expression of the time in the display of the example is: 7,16,20:0:0
-
The time and the days are separated with a space.
-
Days of the week are expressed as numbers 0 (Sunday) through 6 (Saturday) and end with the slash (/) character.
-
If either no days or all days were selected, the publish event runs every day of the week. An asterisk (*) character is in the field in that case.
-
If multiple days are scheduled, the selected days are displayed with commas separating them.
The example schedule includes all the days of the week except Sunday. Therefore, the days of the week are appended to the display as follows: 7,16,20:0:0 1,2,3,4,5,6/
-
-
Days of the month are also displayed as numbers (1–31) and end with the slash (/) character.
-
The list of days is separated with a comma.
-
If no days of the month were selected, the publishing event runs every day of the month. An asterisk (*) character is in the field in that case.
-
If you specify both days of the week and days of the month, the event runs when either setting matches the current day.
The example schedule does not specify days of the month. Therefore, the value for this item is appended to the display as an asterisk: 7,16,20:0:0 1,2,3,4,5,6/*/
-
-
After the string are the months, displayed as numbers from 1 (January) through 12 (December).
-
The list of months is separated with a comma.
-
If all the months are selected, the publishing event will run every month. An asterisk (*) character is in the field in that case.
The example schedule specified all the months. Therefore, the final result is:
7,16,20:0:0 1,2,3,4,5,6/*/*
-
17.3 Editing Publish Events
Publishing schedules can be edited as necessary. This helps keep the number of schedules low, revising a schedule rather than incorporating newer schedules. To edit a publish event:
17.4 Overriding the Schedule
Schedule overrides are used when it is necessary to immediately publish a site. To start a publishing session immediately:
17.5 Assigning Approval or Preview Templates
When assets are approved for a Export to Disk publishing destination, the approval system examines the template assigned to the asset to determine its dependencies.
However, when the system publishes the asset, it does not necessarily use the template that is assigned to the asset. This is because the code in another element could determine that a different template is used for that asset in certain cases.
Consider the sample site. An article asset from this sample site can be rendered by several different templates, depending on the context.
So when users approve article assets for the site, they should use the template that contains the most representative set of dependencies for all of the templates to determine the dependencies for the article. If the template that contains the most representative set of dependencies is not the template to assign to the asset, it should be set as the Default Approval Template for assets of that type.
Note that when you assign default templates to assets that are published to mirror destinations, those templates are not used to calculate dependencies, but they are used when someone previews the asset from the Status form.
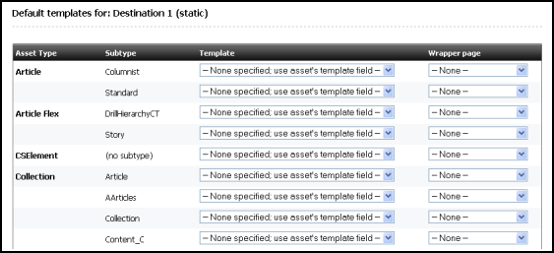
To set a default template:
17.6 Monitoring Sessions in the Publishing Console
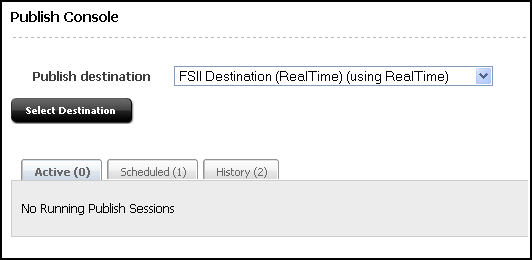
You use the Publish Console to monitor publishing sessions. To open the Publish Console, click the Publishing button at the top of the WebCenter Sites interface. The Publish Console form will open.
The console displays a summary of all the publishing activity, including any sessions that are currently running, scheduled, or completed.
17.7 Verifying Publishing Readiness
To determine whether a publishing session is ready or whether there are any problems with unapproved assets:
-
To place assets in the On-Demand Queue, select them and click Add to On-Demand Queue. To remove assets from the On-Demand Queue (from the On-Demand Queue tab) select the assets and click Remove from On-Demand Queue.
-
To publish the assets in the On-Demand Queue, click Publish On-Demand Queue from either tab.
-
See Table 19-4.
-
For procedures that describe how to work with assets, see Working with Assets in Using Oracle WebCenter Sites.
17.8 About Publish History
Publishing sessions that are completed are listed in the Publish History section of the Publish Console, which opens when you click the Publishing button. Each publish session in the list has a status; Running, Done, or Failed.
Each item in the list has two icons:
-
The inspect icon (the circled letter "i"), which displays a summary of that session. Examining the summary is the first step in troubleshooting a failed session.
-
The delete icon (the trash can), which deletes the session. When you click this icon, WebCenter Sites deletes the row from the
PubSessiontable, the publishing log file for the session, and any messages for the session from thePubMessagetable.
The greater the number of publishing sessions listed in this section, the longer it takes WebCenter Sites to open the Publish Console.
If a session shows its status to be Failed, click the inspect icon, note any error messages, and then consult Troubleshooting.
17.9 About Session History
The publishing history log files are displayed in the History tab of the Publishing Console as summaries of publishing sessions.
The text in a history file is a list of all the references that were published during that session. The term reference means something different for each publishing method:
-
For Mirror to Server publishing, a reference is an asset. Each asset that is published is listed by its asset type and its ID.
-
For Export to Disk publishing and Export Assets to XML, a reference is a generated file. Each file that is created is listed by its file name.
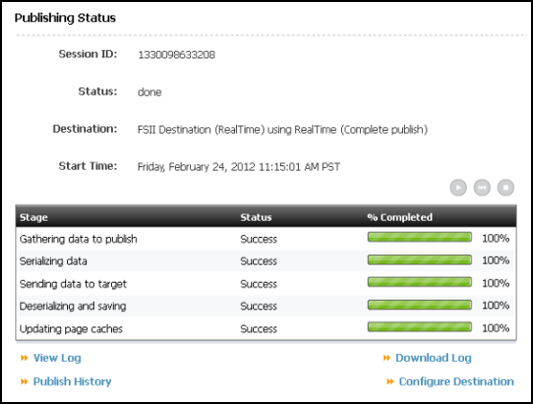
To see the Publishing History log, select the particular session from the History tab to view the Publishing Status form for that session.
Click View Log to see the history log. You can also click Download Log to download the log and view it separately.
If there was a problem with the session, an error message is written to the PubMessage table and it opens as the history instead. If you see an error message in the history for a publishing session, see Troubleshooting and attempt to resolve the problem.
17.10 About Publishing All Approved Assets
The publishing system conducts incremental publishing sessions. That is, during any session, only those assets that have been approved since the last session for this destination are published.
However, you may find a situation in which you have to publish all the approved assets in your entire site. (For example, after data repair on the delivery system.) When this is the case, use the Force Publish All Items Next Time button in the Edit Destination form.
When you click this button, it is the equivalent of changing the status of all approved assets to that of "never been published." That means that the next publishing session to the destination will publish all approved assets, regardless of whether they have been published and have not changed since they were published.
17.11 Troubleshooting
This section describes error messages and other system indicators that reveal configuration, system, or data errors and suggests corrective actions for each. It contains the following topics:
17.11.1 Understanding Publishing System Error Messages
The publishing system reports information about publishing sessions in the following ways:
-
Displays a status for each session in the Publish History list in the Publish Console. If you see a status of Failed, Not Found, or false, there was a problem with the publishing session.
-
Writes information about the assets that were published to the log file for the publishing session. When you click the inspect icon for a publishing session in the Publish Console, the history log file for that session opens.
The
request.folderproperty in the in thewcs_properties.jsonfile, categorized under Publish, defines where the publishing history log files are located. Each log file is named as follows:PubSession ID + Output.html
For example, if the PubSession ID for the session you are interested in is 9876544, then the log file is named
9876544Output.html, and it is located in the directory specified by therequest.folderproperty. -
Writes error messages about the publishing session to the
PubMessagetable. These messages are displayed in the Messages text area when you examine the publishing history in the Publishing Console for a specific publishing session.You can use the PubSession ID to look up messages in the
PubMessagetable about a specific publishing session. Note that when you select theVerboseparameter on the destination configuration, status messages are also written to thePubMessagetable. -
Writes other information about the session to the
PubSessiontable. For example, to determine what time a publishing session started, look up the session by its PubSession ID in thePubSessiontable. -
Writes error messages to the
futuretense.txtfile on both the source and the destination (target) systems.
You can also find error messages about failed publishing sessions in the following locations:
-
The application server log files on both the source and the destination systems.
-
The
stdoutandstderrlogs on both the source and the destination system.
17.11.2 Understanding Numeric Messages
Table 17-1 provides descriptions and suggested corrective actions for the numeric error messages that the publishing system could report in any of the log files mentioned in the list above.
Note:
The table does not contain a complete list of all the error messages that your WebCenter Sites system can report. For a complete list of all error messages, see the error conditions chapter in the Tag Reference for Oracle WebCenter Sites.
Table 17-1 Numeric Error Messages
| Error Number | Description | Corrective Action |
|---|---|---|
|
-2 |
This error indicates that either the mirror user name or password is not identified correctly. The publishing system on the source began the publishing process, but the destination system couldn't authenticate the user that is identified as the mirror user. |
Correct the mirror user information. For help, see the procedure in Identifying the Mirror User to the Source System. |
|
-3 |
This error indicates that the mirror user does not have the correct permissions to save the assets to the WebCenter Sites database on the destination system. In other words, the destination system user identified to the source as the mirror user does not have all the ACLs it requires. |
Edit the mirror user's account and assign it the appropriate ACLs. See the procedure in Setting Up the Destination System for a list of the ACLs that the mirror user requires. If you still cannot determine which ACL is missing from the mirror user's account, examine the For example, if the mirror session is failing on a visitor table, it is likely that your mirror user does not have the Visitor or |
|
-103 |
This error indicates that a table whose data is being mirror published does not exist on the destination system. This error typically occurs when there is an asset type on the source that does not yet exist on the destination. It is also possible that someone created a custom table to support a function that was custom designed for your site but that table has not yet been created on the destination system. |
Examine the Then use the appropriate tool to create the table on the destination system. If it is a basic asset type, use AssetMaker. If it is a flex asset type, use Flex Family Maker. If it is a custom table, use Oracle WebCenter Sites Explorer. |
|
-611 |
This error message is a generic mirror publishing error message (the other is -12011). Typically -611 means that there was a problem when the publishing system tried to access the destination system and there should be other error messages reported, too. |
Examine the |
|
-612 |
This error message indicates that the definition of a mirror destination is incorrect in some way. Perhaps the syntax of the destination address is incorrect or there is a typographical error of some kind. |
Log in to the WebCenter Sites interface on the source, examine the definition of the destination, and determine that it is correct. For help, see Creating a Mirror Destination. |
|
-12011 |
This error message is a generic message (along with -611) which mean that the mirror process failed. It is unlikely that this message will appear without other error messages being reported. Typically the other errors will give more information about what went wrong. |
Examine the messages in the |
|
-12044 |
This error indicates that the publishing system could not begin the publishing session because it could not contact the destination to start the session. That is, there was no response from the destination; some part of the destination system is offline. |
Start by verifying that the web server and application server are running on the destination system. If they are not, start them. Verify that the two systems can connect to each other through the network (perhaps the network went off-line, for example). |
|
-12045 |
This error indicates that the publishing system was able to start the session, but it then failed in some way. |
Examine the |
|
-12046 |
This error indicates that there was a problem after a publishing session when the publishing system began to clean up the temporary tables that it creates for each session. When the cleanup process began, the connection with the destination failed. That is, the source system could get no response from the destination when the publishing process tried to clean up the temporary tables. |
Determine whether the web server and application server on the destination system are running. If they are not, start them. Check for network connection problems, as well. |
|
-12047 |
This error indicates that the publishing system was able to begin the cleanup process but it then failed in some way during the operation. |
Examine the |
|
-13054 |
This error occurs for only complex and flex assets. In this case, the publishing system began publishing a complex or flex asset but the data did not reach the destination. It can mean that the data itself was corrupt or that the HTTP request connection failed. |
Check the |
|
-13055 |
This error occurs for only complex and flex assets. In this case, the data for the flex or complex asset was delivered, but the destination system could not save the asset to its WebCenter Sites database. This message indicates that there is a problem with your data. For example, if you are attempting to publish from multiple sources to the same destination, there can be ID collisions and other problems with data integrity that will cause this error. |
Examine the |
17.11.3 Indicating Other System or Configuration Issues
This section describes symptoms your WebCenter Sites system may exhibit when the publishing system discovers configuration errors or system problems.
This section covers the following topics:
-
Publishing Session Does Not End and Displays an Odd Status
-
The System Stops Altogether
-
Pages Are Not Refreshed After the Publishing Session Ends
-
DB2 Systems, Troubles When Publishing Assets with Associations
Publishing Session Does Not End and Displays an Odd Status
When a publishing session cannot begin or end, typically the batch user has not been configured correctly. Examine the Status listed for the publishing session. If the Status is Not Found or false, it is likely that your batch host is not configured correctly.
Note that the Initialize Mirror Destination feature does not use the batch user. If you can initialize a destination correctly, but the publishing session has errors, it is likely that the batch user settings are incorrect.
Corrective Action:
See Creating the Batch User Account (If One Does Not Exist) and verify that you have configured the batch user correctly:
-
The batch user identified by the
xcelerate.batchuserproperty must have the appropriate read/write privileges. These are listed in that procedure. -
The name of the batch user identified by the
xcelerate.batchuserproperty must be spelled correctly and the password identified by thexcelerate.batchpassproperty must be correct. -
The server identified by the
xcelerate.batchhostproperty must identify the correct server. This property should identify the application server that hosts the source system, not the destination, and not the load balancer if you are using a load balancer. Note that if the port number is something other than 80, you must also specify the port number. For example:myserver:7001.If the WebCenter Sites environment is clustered, only one batch host is supported. The
xcelerate.batchhostproperty must be set on each cluster member to point to the dedicated host.If you see the message "Cannot retrieve output for publish session" in the publishing history, it is likely that the server name is incorrect.
-
The port number for the batch host server must also be identified correctly. If you see the message "Cannot retrieve output for publish session" in the publishing history, it is likely that either the port number is incorrect, or if a port number is not specified, that the default port (80) is incorrect.
The System Stops Altogether
If your system simply stops, this behavior indicates that there may not be enough disk space available for the publishing system to function.
Corrective Action:
Check the stdout and stderr files. If there are any Java write errors, you are out of disk space.
-
For Export to Disk publishing and Export Assets to XML, you must have enough disk space in your file system to store all the files that are being generated.
-
For Mirror to Server publishing, you must have space equal to four times the size of the data that is being mirrored available on both the source and the destination system or the mirror operation will fail.
Note that the publishing process will also fail if the Java temp directory is not large enough.
Pages Are Not Refreshed After the Publishing Session Ends
If you are using Satellite Server—either the co-resident Satellite on a management or development system or a remote Satellite Server for a delivery system—and you notice that cached pages are not being regenerated after a publishing session, it is likely that you have configured Satellite Server incorrectly.
Corrective Action:
Examine the sites.log file on the destination system and look for messages like these:
-
"Number of satellite servers must match number of user names and passwords."
This message indicates that there is something wrong with the values specified for the
cs.satellitehosts,cs.satelliteusers, andcs.satellitepasswordproperties in thewcs_properties.jsonfile. -
"-100.FormPoster failed flushing URL."
This message indicates that either a Satellite servlet wasn't running or that the destination system couldn't reach a Satellite servlet that it tried to reach:
In the Property Management Tool, examine the cs.Pastramiengine and satellite.blob.cachecontrol.default properties, and note the values set for the user names, passwords, and host names. Then, note the values specified for the cs.satellitehosts, cs.satelliteuser, and cs.satellitepassword properties. Compare these values with the values set for the username and password properties in the wcs_properties.json file for remote satellite server (located under the <WCSites_Shared_Dir> for clustered environments and under <WCSites_Product_Home> for non-clustered environments). They must match.
Remember that the order in which you specify host names in the wcs_properties.json file must match the order in which you identify user names and passwords.
DB2 Systems, Troubles When Publishing Assets with Associations
When you notice that there are problems with publishing assets that have associations and your system uses a DB2 database, it is likely that the LOCKLIST parameter is not set correctly.
Corrective Action:
Oracle recommends that this property be set to at least 1000. If you find that you are having difficulties publishing assets with associations, increase this value.

