2 Configuring the Oracle E-Business Suite Plug-In
Configuring the Oracle E-Business Suite portion of AXF requires an active connection to the Oracle E-Business Suite database, general database experience, knowledge of Oracle E-Business Suite Forms Builder, and familiarity in personalizing the OAF pages.
Note:
If installing adapter solutions for Oracle PeopleSoft but not Oracle E-Business Suite, skip this chapter and complete the steps described in Configuring the Oracle PeopleSoft Plug-In.
This chapter covers the following topics:
2.1 Configuring the Oracle E-Business Suite Database
The adapter uses an Oracle E-Business Suite database to store PL/SQL procedures and Oracle E-Business Suite configuration information. Consult your local DBA for assistance with these tasks. The instructions in this section assume the use of SQL*PLUS, but you can use any tool capable of querying the Oracle Database.
2.1.1 Creating the AXF Oracle E-Business Suite Configuration Schema User (AXF)
Follow these steps to create a database user for use by AXF within the Oracle E-Business Suite database.
Note:
If using Oracle E-Business Suite 11i and Oracle Database 9i, you must install the Oracle XML Database XDB Package into the Oracle E-Business Suite database. (This requirement applies only when using Oracle E-Business Suite 11i and Oracle Database 9i.) For information about installing the Oracle XML Database XDB Package, see the Oracle Database 9i documentation.
2.1.2 PL/SQL Procedures Provided
Table 2-1 lists the PL/SQL scripts to run. In some cases, separate Oracle E-Business Suite release 11 and 12 scripts are provided. Scripts whose names begin with OAF apply to OAF configurations.
It is recommended that you run all scripts for your Oracle E-Business Suite release as described in Running the PL/SQL Scripts regardless of whether you are configuring Forms and/or OAF applications.
Table 2-1 PL/SQL Procedures Provided With Oracle E-Business Suite Plug-In
| PL/SQL Procedure | Applies To | Description |
|---|---|---|
|
AXF_CREATE_TABLES_SYNONYM OAF_AXF_CREATE_TABLES_SYNONYM |
Forms OAF |
These scripts create the tables and synonyms used by AXF for Forms and OAF applications. In addition, OAF_AXF_CREATE_TABLES_SYNONYM.sql populates the OAF_AXF_PROPERTIES table. |
|
AXF_EBS_PROPERTIES_DATA |
Forms |
Populates the AXF_PROPERTIES table with security information for various Oracle E-Business Suite calls to AXF. |
|
AXF_APPS_INIT |
Forms |
Required for Oracle E-Business Suite attachment for Forms applications. |
|
AXF_ADD_EBS_ATTACHMENT_PROC_R11 AXF_ADD_EBS_ATTACHMENT_PROC_R12 |
Forms |
Creates a stored procedure that adds an attachment to a transaction in Oracle E-Business Suite Forms applications. |
|
AXF_MANAGED_ATTACHMENT_DATA AXF_MANAGED_ATTACH_AVAIL AXF_MANAGED_ATTACH_VALUES |
Forms |
Required for document attachment, for Forms applications. |
|
AXF_SOAP_CALL_PROC |
Forms OAF |
This script creates a stored procedure to make SOAP calls from PL/SQL. |
2.2 Compiling Oracle E-Business Suite Forms
To enable a seamless integration of custom actions with existing Oracle E-Business Suite Forms, certain files are uploaded to the Oracle E-Business Suite system for the adapters. The adapters use user interface .PLL extension modules to access workflow tasks (Imaging Solution) and documents associated with business records (both solutions).
The Custom.PLL module is slightly modified during configuration to call AXF functions. It notifies AXF each time an Oracle E-Business Suite event occurs, allowing AXF to determine if it relates to AXF functionality.
The AXF_Custom.PLL component performs the following functions:
-
Calls out to a web service to execute an AXF Command
-
Responds to the following AXF response commands:
-
Open Browser
-
Terminate Conversation
-
-
Renders menus to expose AXF functionality based on the Oracle E-Business Suite configuration database.
Follow these steps to copy the AXF_CUSTOM.pld file, convert it to an AXF_CUSTOM.pll file, make modifications, and then compile it to an AXF_CUSTOM.plx file.
Note:
It is recommended to compile AXF_CUSTOM.pll using an alternative command line method (applicable for Oracle E-Business Suite 12 Forms use only). For more information, see Compiling AXF_CUSTOM.pll Using the Command Line.
Note:
For information on using Oracle Forms Builder, see its Oracle E-Business Suite documentation.
2.2.1 Compiling AXF_CUSTOM.pll Using the Command Line
There is an alternative command line method for compiling Oracle E-Business Suite Forms for adapter use. It applies only to Oracle E-Business Suite Suite 12 Forms and does not apply to Oracle E-Business Suite 11.
Follow the steps below to copy the AXF_CUSTOM.pld file, convert it to an AXF_CUSTOM.pll file, make modifications, and then compile it to an AXF_CUSTOM.plx file. Then follow the steps in Compiling Oracle E-Business Suite Forms as indicated to modify the other file, CUSTOM.pll, and complete the Forms configuration.
2.3 Configuring Oracle Application Framework (OAF) Pages Via Personalization
Managed Attachments functionality for OAF pages works as follows:
-
You manually add a Managed Attachments button to the OAF page using OAF personalization, positioning the button in a custom flex region imported into the MDS repository.
-
The button is associated with a generic extended controller class which redirects the call from Oracle E-Business Suite to a custom intermediate OAF page, passing the required Oracle E-Business Suite mapping entities.
-
The controller class analyzes which OAF page called it. The OAF page's key identifiers (name, view object, primary key attributes, and labels) are stored in the database tables. Based on the OAF page calling the controller, the solution fetches the appropriate rows from the database tables along with the required business entity values, which it adds as parameters to the custom intermediate OAF page's URL.
-
When the user clicks the Managed Attachments button, the custom intermediate OAF page opens, its ProcessRequest method is called, and the SOAP packet is created. The SOAP call fetches the Content Server URL, and upon loading, the page is redirected to the Content Server URL.
Note:
In addition to configuring OAF pages for Managed Attachments functionality, you can also provide imaging access on OAF pages, as described in Configuring Other Services on OAF Pages (Optional).
To configure the Oracle E-Business Suite OAF plug-in, follow the instructions in these sections:
2.3.1 Compiling Java Files, Copying Class Files, and Importing XML Files
Follow these steps to compile Java files, copy class files, and import XML files to the MDS repository, to enable adding the Managed Attachments button to OAF pages. In Personalizing OAF Pages to Add Managed Attachments, you will add the button to a custom flex region from the MDS repository.
Note:
This procedure assumes you are familiar with using JDeveloper to compile Java files. For basic information, see the section on building your first program with JDeveloper 10g at:
http://download.oracle.com/otndocs/tech/ias/portal/files/RG/OBE/FirstStep/FirstStep.htm
2.3.2 Personalizing OAF Pages to Add Managed Attachments
Perform these steps for each OAF page on which you want to display a Managed Attachment button. You create a flexible layout via personalization and add the Managed Attachment button file you previously imported into the MDS repository as flexible content.
Note:
Add one Managed Attachments button per OAF page only; including multiple buttons causes the same controller code to execute multiple times.
The Managed Attachments functionality cannot be implemented for attachments for line items on OAF pages.
-
Log in to Oracle E-Business Suite as the OPERATIONS user.
-
Display the OAF page on which to add a Managed Attachment button, and click the Personalize the page link at the top of the page.
-
Under Personalization Structure on the Personalize Page page, select the Complete View option, and click the Expand All link. A full hierarchical view of all regions on the OAF page displays.
-
Create and configure the flexible layout.
-
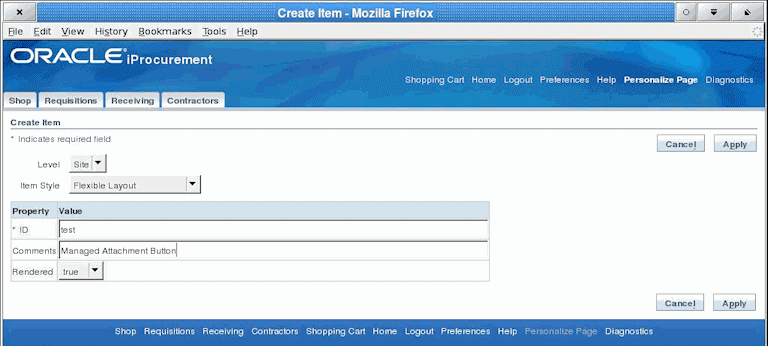
Scroll down the hierarchical listing below the region where the button will display on the OAF page and click the Create Item icon. A Create Item page displays, as shown in Figure 2-1.
-
In the Level field, select Site.
-
In the Item Style field, select Flexible Layout.
-
In the ID field, enter any value (
test, for example). -
Click Apply.
-
-
Create and configure the flexible content.
-
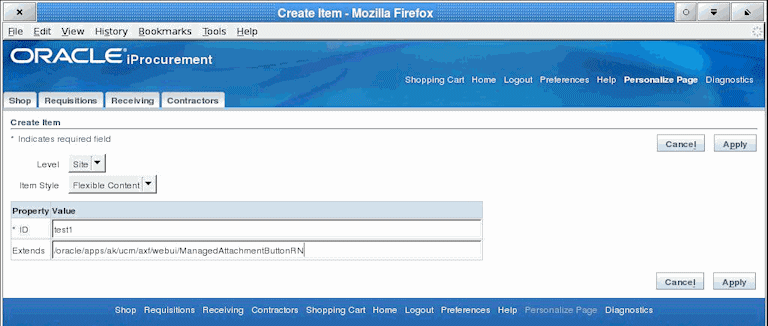
In the hierarchical list, locate the flexible layout you just added and click its Create Item icon. A Create Item page displays, as shown in Figure 2-2.
-
In the Item Style field, select Flexible Content.
-
In the ID field, enter any value (
test1, for example). -
In the Extends field, enter the package for the flex region you imported into the MDS repository (in Compiling Java Files Copying Class Files and Importing XML Files):
/oracle/apps/ak/ucm/axf/webui/ManagedAttachmentButtonRN -
-
Click the Apply button.
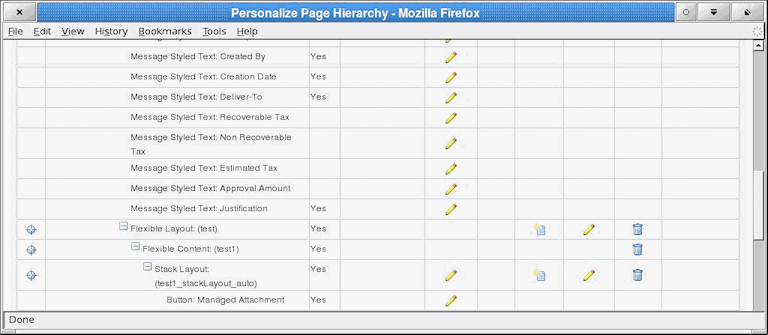
Figure 2-3 Page Hierarchy After Adding Managed Attachments Button Via Personalization

Description of "Figure 2-3 Page Hierarchy After Adding Managed Attachments Button Via Personalization"
2.3.3 Regenerating Product JAR Files for Oracle E-Business Suite 12.2.x
- Source the APPS environment file and run the adadmin tool.
- In the adadmin tool, select Regenerate all the product jar files.
- When adadmin tool finishes regenerating the product jar files, restart the Oracle E-Business Suite servers.
2.3.4 Modifying the Configuration File for OAF Pages to Work with Oracle E-Business Suite 12.2.6+
Managed Attachments on OAF pages do not work with Oracle E-Business Suite 12.2.6. To make this work, you need to manually add the whitelist of host names to the configuration file:
2.3.5 Configuring Other Services on OAF Pages (Optional)
You can provide access to the Imaging solution instead of the Managed Attachments solution on OAF pages. For example, you might include a button that allows users to access the supplier maintenance functionality available in the Imaging solution.
The procedure below provides several steps to follow to add a custom button (instead of the Managed Attachment button) and to identify the button's action in the database table as Imaging instead of Managed Attachments.
2.3.6 Configuring UCM Web Service Implementation Webkey on OAF Pages
If you are using UCM web service implementation and the value of the webkey is anything other than cs, configure the following in OAF_AXF_CMD_PARAMS table:
Insert into OAF_AXF_CMD_PARAMS (AXF_CMD_PARAMS_ID, AXF_CMDS_ID, AXF_PARAM_NAME,AXF_DATASOURCE,AXF_VIEW_OBJ_NAME, AXF_ATTRIBUTE_NAME,AXF_CONSTANT_VALUE) values (OAF_AXF_CMD_PARAMS_SEQ.NEXTVAL,v_cmdId,'CS_WEBKEY','CONSTANT',null, null,'<WEBKEY_VALUE>');
2.4 Securing Adapter Communications for Oracle E-Business Suite
You can secure adapter communications for the Oracle E-Business Suite through SOAP security and SSL.
This includes:
2.4.1 Securing Communications Through SOAP Security
Follow these steps to configure SOAP security, in which the application sends the SOAP user and password in the header for authentication.
Note:
Configuring SOAP security is required.
2.4.2 Securing Communications Through SSL (Oracle E-Business Suite)
Perform the following procedures to specify Oracle E-Business Suite system settings for SSL configuration for AXF.
2.4.2.2 Configuring the Integration for SSL
For more information, see Configuring SSL in Administering Security for Oracle WebLogic Server.
-
On the Oracle E-Business Suite database, run the SQL statements listed below.
-
For Oracle E-Business Suite Forms applications:
update AXF_PROPERTIES set propvalue='file:walletpath' where propname = 'AXFWalletPath'; update AXF_PROPERTIES set propvalue='ON/OFF' where propname = 'SecureMode'; commit; -
For Oracle E-Business Suite OAF applications:
update OAF_AXF_PROPERTIES set propvalue='file:walletpath' where propname = 'AXFWalletPath';
update OAF_AXF_PROPERTIES set propvalue='ON/OFF' where propname = 'SecureMode';
commit;
-
-
Update tables to reflect the SecureMode setting and secure port. When SecureMode is on, the integration attempts to connect to the AXF application using SSL (https).
-
In the Oracle E-Business Suite AXF_CONFIGS table, update the SOLUTIONENDPOINT value to begin with
https://if SecureMode is on, or begin withhttp://if SecureMode is off. ChangePortto match the secure port on the Oracle WebCenter Content side. -
In the Oracle E-Business Suite OAF_AXF_CONFIGS table, update the SOLUTIONENDPOINT value to begin with
https://if SecureMode is on, or begin withhttp://if SecureMode is off. ChangePortto match the secure port on the Oracle WebCenter Content side.
For an Imaging configuration, see AXF_CONFIGS Table (Oracle E-Business Suite). For a Managed Attachments Forms configuration, see AXF_CONFIGS Table (Oracle E-Business Suite Forms). For a Managed Attachments OAF configuration, see OAF_AXF_CONFIGS Table (Oracle E-Business Suite OAF).
-
-
Store the Wallet password in the database vault by executing the following command as APPS schema:
execute fnd_vault.put('AXF','AXFWalletKey','WalletPassword');Where WalletPassword is the wallet password.
-
Verify the previous command with this statement:
select fnd_vault.get ('AXF','AXFWalletKey') from dual; -
Import the AXF certificate into the wallet.
-
Enable SSL on Oracle WebLogic Server on the Oracle WebCenter Content side.
For information, see Configuring SSL for the Middle Tier in Administering Oracle Fusion Middleware.
-
Exchange server certificates between the web servers.
This step involves exporting the certificate from Oracle Wallet and importing it into the Oracle WebLogic Server keystore on the Oracle WebCenter Content side of the integration. This keystore must be enabled for both the Administration and Imaging servers. In addition, you must export the server certificate from the Oracle Weblogic Server and import it into the Oracle Wallet.
2.5 Configuring Oracle E-Business Suite Logging
2.5.1 Configuring Logging for Forms Applications
Enable logging for specific forms in the AXF_CONFIGS table. For the Imaging solution, see AXF_CONFIGS Table (Oracle E-Business Suite); for the Managed Attachments solution, see AXF_CONFIGS Table (Oracle E-Business Suite Forms).
To enable logging for a particular Form function, set the LOGENABLED field to either 1, YES or TRUE to create the file in the UTL_FILE_DIR folder. Consult with your DBA to verify that the UTL_FILE_DIR folder is available and accessible. Log files are named Username_MASTER_LOG.txt, and continue to grow as items are appended.
2.5.2 Configuring Logging for OAF Applications
Follow these steps to enable diagnostics on a specific OAF page.
-
Click the Diagnostics link at the top of the OAF page.
-
On the Diagnostics page, select the following settings:
-
In the Diagnostic field, select Show Log on page.
-
In the Log Level field, select Statement (1).
-
-
Click Go.
-
Navigate to the page with an error. Search for the string
Debug-->on the page.
2.6 Setting User Locales
To prevent issues with different locales when invoking AXF, Oracle E-Business Suite users should set the same values for their user locale preference and their browser locale. If using the Managed Attachments Solution, set the same value for the Content Server locale.
2.7 Configuring Solutions for Oracle E-Business Suite
See the information below for additional tasks to configure each solution.
For the Imaging Solution
Configure the Imaging solution as described in Configuring the BPEL Imaging Solution. Configure AXF-related Oracle E-Business Suite tables as described in Oracle E-Business Suite Forms Tables For the BPEL Imaging Solution or apply a solution accelerator as described in Configuring the AXF Tables or Applying a Solution Accelerator.
Note:
The Oracle E-Business Suite imaging solution is supported for Forms-based applications only, not OAF applications.
For the Managed Attachments Solution
-
Configure the Managed Attachments solution as described in Configuring the Managed Attachments Solution. In addition to configuring Content Server components and running the AXF_ATTACHMENTS_CONFIG.sql script, which configures AXF elements such as solutions and commands, you must run scripts to populate the tables for Forms and OAF applications:
-
For Forms applications, running the AXF_EBS_ATTACHMENTS_CONFIG.sql configures the Zoom menu to enable the Managed Attachments solution. For details, see Enabling Managed Attachments for Oracle E-Business Suite Forms Applications.
-
For OAF applications, running the OAF_AXF_EBS_ATTACHMENTS_CONFIG.sql script populates the tables listed in Oracle PeopleSoft Tables For the Managed Attachments Solution for the Managed Attachments solution for selected OAF pages, which you can modify for your OAF pages. For details, see Enabling Managed Attachments for Oracle E-Business Suite OAF Applications.
-
2.8 Post-Upgrade Steps for Managed Attachments Solution
If you are upgrading from Imaging based Managed Attachments solution 12c to 14c and want to use the UCM web service implementation for Managed Attachments, use the scripts available at the following location:
For Oracle E-Business Suite Forms:
EbsUpdateScript.sh and EbsUpdateTables.sql in the MW_HOME/wccontent/axf/adapters/ebs/R12 directory
For Oracle E-Business Suite OAF:
EbsOafUpdateScript.sh and EbsOafUpdateTables.sql in the MW_HOME/wccontent/axf/adapters/ebs/oaf
The EBS tables contain the Imaging/IPM URL as the endpoint for Managed Attachments solution 12c. Using the same endpoint for Managed Attachments solution 14c might result in errors. You can run the above scripts to modify the endpoint for Managed Attachments solution to point to Oracle WebCenter Content 14c.

