- Developing SOA Applications with Oracle SOA Suite
- Sharing Functionality Across Service Components
- Creating Transformations with the XSLT Map Editor
- Substituting Elements and Types
Substituting Elements and Types
You can substitute elements and types in the source and target trees.
Use element substitution when:
-
An element is defined as the head of a substitution group in the underlying schema. The element may or may not be abstract. Any element from the substitution group can be substituted for the original element.
-
An element is defined as an
anyelement. Any global element defined in the schema can be substituted.
Use type substitution when:
-
A global type is available in the underlying schema that is derived from the type of an element in the source or target tree. The global type can then be substituted for the original type of the element. Any type derived from an abstract type can be substituted for that abstract type.
-
An element in the source or target tree is defined to be of the type
anyType. Any global type defined in the schema can then be substituted.
Type substitution is supported by use of the xsi:type attribute in XML.
To substitute an element or type in the source and target trees:
- In the source or target tree, right-click the element for which substitution applies. If you are working in the XSLT pane, the element you select must exist in the XSLT before substitution.
- From the context menu, select Substitute Element or Type. If this option is disabled, no possible substitutions exist for the element or its type in the underlying schema.
The Substitute Element or Type dialog shown in Figure 41-45 appears.
Figure 41-45 Substitute Element or Type Dialog
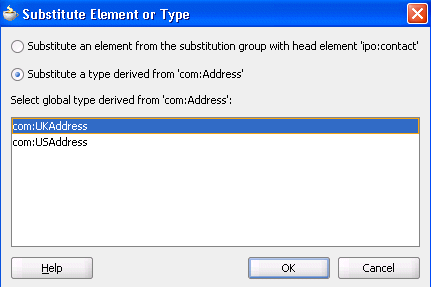
Description of "Figure 41-45 Substitute Element or Type Dialog" - Select either Substitute an element or Substitute a type (only one may be available depending upon the underlying schema).
A list of global types or elements that can be substituted displays in the dialog.
- Select the type or element to substitute.
- Click OK.
The element or type is substituted for the originally selected element. This selection displays differently depending upon the type of substitution and where the substitution is done, as described in the following sections:
-
For Type Substitutions
-
Type substitutions in the source tree
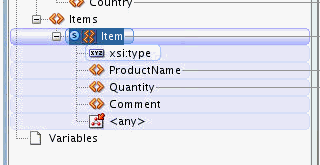
The xsi:type attribute is added beneath the original element, as shown in the preceding figure. An S icon is displayed against the element to indicate that the node was substituted. You can map from any structural elements in the substituted type, including the xsi:type attribute.
Note:
Unlike element substitution, only one type substitution at a time can be displayed in the source tree. However, this does not prevent you from writing a map that allows the source to switch between the original type and the substituted type.
If a node is not visible in the source tree, and the node is mapped to an XPath expression, the XPath expression mapped to the node is still displayed in the center canvas pane.
-
Type substitutions in the Map View target tree
The xsi:type attribute is added beneath the original element, as shown in the preceding figure. The attribute is disabled in Map View, and set to the type value that was selected. An S icon is displayed against the element to indicate that the node was substituted. You can map to any structural elements in the substituted type, except the xsi:type attribute.
-
Type substitutions in the XSLT pane of the XSLT View
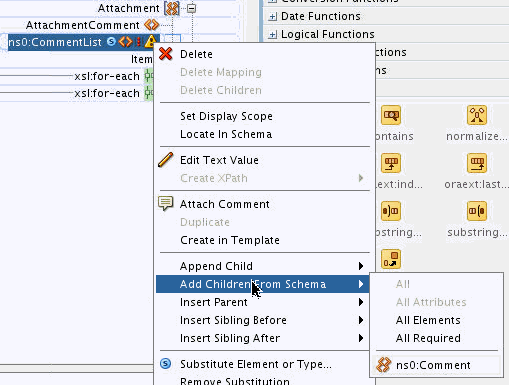
The xsi:type attribute is added beneath the original element. It's value is set to the type value that was selected, but may be mapped to. An S icon is displayed against the element to indicate that the node was substituted. You can add any structural elements through the Add Children From Schema context menu option.In some cases, it may be necessary to set the value of the xsi:type field dynamically using an XPath statement. If you need to dynamically set the value of the xsi:type, you can use type substitution to temporarily provide access to the structural elements that are needed for the expected value at runtime.
Add the elements that are needed, then map the desired XPath statement to the xsi:type attribute to set the value dynamically. As the runtime value for xsi:type is not available at design time, question-mark icons (?)are displayed on elements that depend upon the type value, if it is set dynamically.
-
Type substitutions in the target pane of the XSLT View
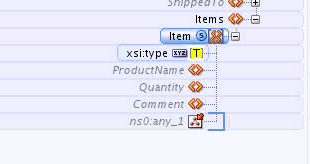
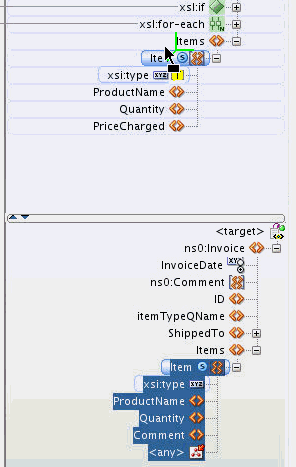
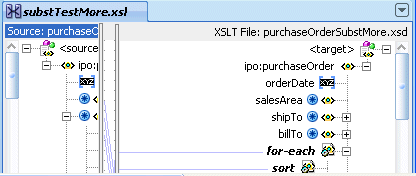
You can also make substitutions in the target pane of the XSLT View. This pane represents the target schema document. After you make a type substitution in the target pane, the xsi:type attribute is added beneath the original element along with any structural elements associated with that type, as shown in the following figure.
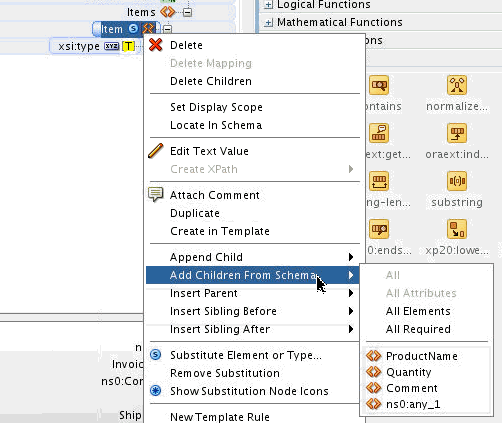
You can select these elements and drop them into the XSLT pane, as needed. These elements also show up in the Add Children From Schema context menu option available in the XSLT pane.
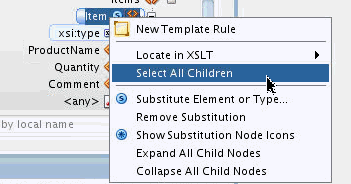
For example, in the following figure, we select all children of a substituted element (Item).
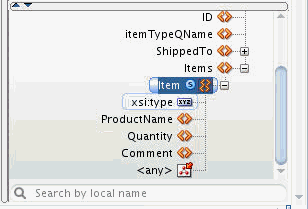
We then drop the new Item node as a child of the Items node in the XSLT pane, as shown in the following figure.
The Item node and its children are added as children of the Items node. You can similarly create different structures from different substitutions in the target pane.
-
-
For Element Substitutions
-
Element substitutions in the source tree
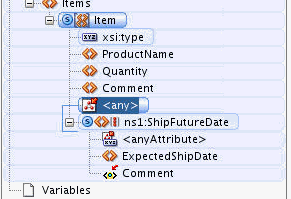
Both the original element and the substituted element are displayed in the source tree, and are connected by a blue bracket. An S icon is displayed against the node that is substituted. You can map from any structural elements in the substituted element.
In the preceding figure, the ns1:ShipFutureDate is substituted for the any element.
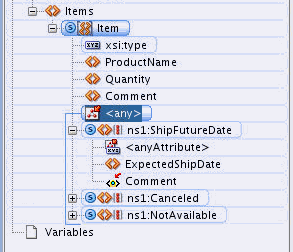
You can also substitute multiple elements at the same time, as shown in the following figure.
-
Element substitutions in the Map View target tree
As shown in the preceding figure, both the original element and the substituted element are connected with a blue bracket. An S icon is displayed against the node that was substituted. You may map to any structural elements in the substituted element.
-
Element substitutions in the XSLT pane of the XSLT View
In order to substitute an element in the XSLT pane, the original element must be one that can appear in the XSLT.
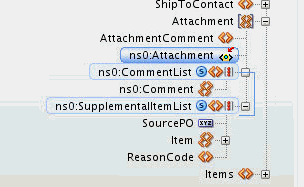
Anyelements cannot appear in the XSLT pane, and must be substituted in the XSLT View target pane, as discussed in the next section. Abstract elements can be added to the XSLT pane temporarily, but should not be used as final output. Elements that are the head of a substitution group and are not abstract can be used as normal elements, and also be substituted.In the following figure, the ns0:attachment element is an abstract element that is also the head of a substitution group. When a substitution is made for this in the XSLT pane, the element is replaced with the substitution.
After substitution, the abstract element is replaced with the selected element. The S icon indicates the substitution. You can add child elements to the substituted element using the Add Children From Schema context menu. This is depicted in the following figure.
-
Element substitutions in the target pane of the XSLT View
You can also make substitutions in the target pane of the XSLT View. The target pane represents the target schema document. After making an element substitution in the target pane, the elements substituted are added beneath the original element along with any structural elements associated with that type, as shown in the following figure.
You can select these elements and drop them into the XSLT pane, as needed. These elements also show up in the Add Children From Schema context menu option available in the XSLT pane.
-
-
- To remove a substituted node, right-click any node with an S icon and select Remove Substitution from the context menu.
- To see all possible nodes where substitution is allowed, right-click the source or target tree and select Show Substitution Node Icons.
All nodes where substitution is possible are marked with an * icon, as shown in Figure 41-46.
- To hide the icons, right-click and select Hide Substitution Node Icons.
