- Developing SOA Applications with Oracle SOA Suite
- Sharing Functionality Across Service Components
- Oracle SOA Suite Templates and Reusable Subprocesses
- Creating Oracle SOA Suite Templates
- Managing Templates
Managing Templates
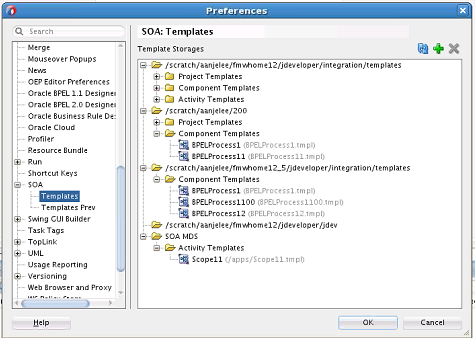
You can manage all available template types from the Preferences dialog.
To manage templates:
- From the Oracle JDeveloper main menu, select Tools > Preferences > SOA > Templates.
The Preference dialog is displayed, as shown in Figure 40-19.
Templates can be stored in two locations:
-
Folders: Templates are stored in the file system.
-
SOA-MDS: Templates are stored in the MDS Repository and can be shared.
-
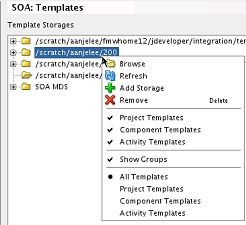
- Right-click a folder to display a list of management tasks, as shown in Figure 40-20.
Table 40-3 describes the management tasks you can perform.
Table 40-3 Template Management Tasks
Element Description Browse
Browses for a specific template name.
The Browse option uses Windows Explorer on Windows or the file browser on Linux for the storage folder. Templates are stored as files, so you may want to operate with them as with files (that is, upload with FTP, send by email, copy to another folder to back up, and so on).
Refresh
Refreshes the list of templates.
Add Storage
Adds existing templates to the Preferences - SOA Templates dialog.
Remove
Deletes the folder and its templates only from the Preferences - SOA Templates dialog. The templates are not physically deleted from the file system or MDS Repository. You can add them to this dialog again by selecting Add Storage or clicking the Add icon. The template context menu contains a Delete option that physically deletes a template.
All Templates
Displays all templates.
Project Templates
Displays only SOA project templates.
Component Templates
Displays only service component templates.
Activity Templates
Displays only BPEL scope activity templates.
- If you want to import a template to the
jdeveloper/integration/templatesdirectory, select File > Import > SOA Template. The file can then be added to the Preferences dialog by clicking the Add icon or right-clicking a folder and selecting Add Storage.

