How to Translate Native Data to XML Data
This section describes how to configure the translate activity in a BPEL process to receive an inbound message in native XSD format (for this example, string data) and translate it to XML format. The Native Format Builder wizard is used to create a new schema file.
To translate native data to XML data:
-
Right-click a BPEL process in the SOA Composite Editor, and select Edit.
Oracle BPEL Designer is displayed.
-
Expand the Oracle Extensions section of the Components window and drag a Translate activity into the BPEL process. Figure 6-7 provides details.
Figure 6-7 Translate Activity in a BPEL Process
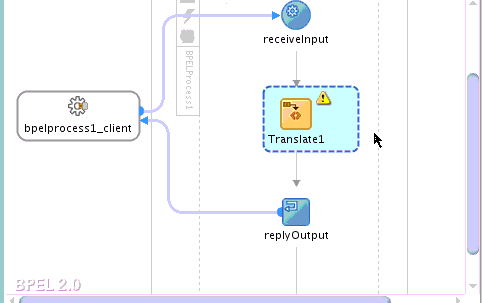
Description of "Figure 6-7 Translate Activity in a BPEL Process" -
Right-click the translate activity and select Edit.
The Translate dialog is displayed for editing.
-
Select Native to XML to receive inbound native data (for this example, in a single string).
-
To the right of the Input field, click the Browse icon.
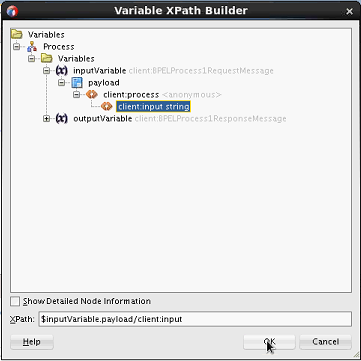
The Variable XPath Builder dialog is displayed.
-
Select the native string that is part of the inbound payload to translate into XML format, and click OK. Figure 6-8 provides details.
-
To the right of the NXSD Schema field, select the schema to use:
-
If the schema already exists, select the Search (first) icon to invoke the Type Chooser dialog.
-
If the schema does not exist, select the second icon to invoke the Native Format Builder wizard to create the schema.
The following example describes how to use the Native Format Builder wizard to create a new schema from a text file that uses a comma-separated delimiter.
-
In the File Name field of the File Name and Directory dialog, enter a name, and click Next.
-
In the Choose Type dialog, select Delimited (Contains records whose fields are delimited by a special character), and click Next.
-
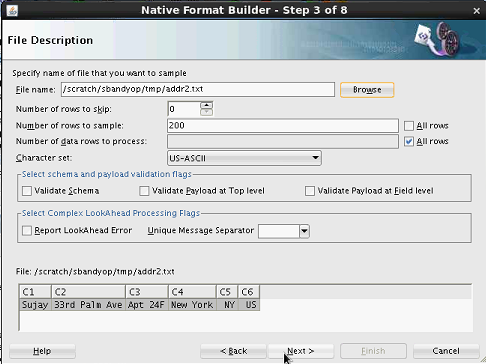
In the File Description dialog, click Browse to select the text file that uses the comma-separated delimiter.
The Select sample file dialog is displayed.
-
Select the file to use, and click OK.
The file contents are displayed at the bottom of the File Description dialog. Figure 6-9 provides details.
-
Click Next.
-
In the Record Organization dialog, click Next.
-
In the Specify Elements dialog, enter a name for the element to represent the record (for this example,
addris entered), and click Next. -
In the Specify Delimiters dialog, accept the default value of a comma as the special character that delimits the fields in the text file, and click Next.
-
In the Name column of the Field Properties dialog, enter the appropriate values in place of C1, C2, C3, C4, C5, and C6, and click Next. Figure 6-10 provides details.
Figure 6-10 Name Column Default Values Replaced with Specific Values
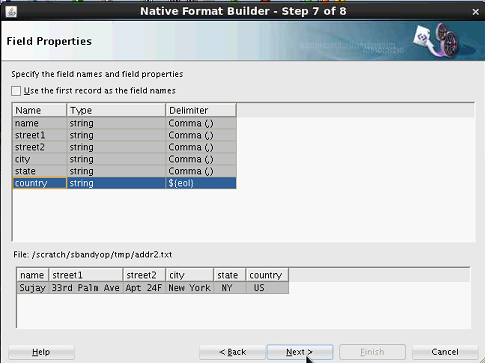
Description of "Figure 6-10 Name Column Default Values Replaced with Specific Values"The new schema is displayed in the Generated Native Format Schema dialog.
-
Click Test to test the schema.
-
In the Result XML section, click the green arrow.
The native schema and resulting XML are displayed. Figure 6-11 provides details.
Figure 6-11 Output From Testing the Native Schema
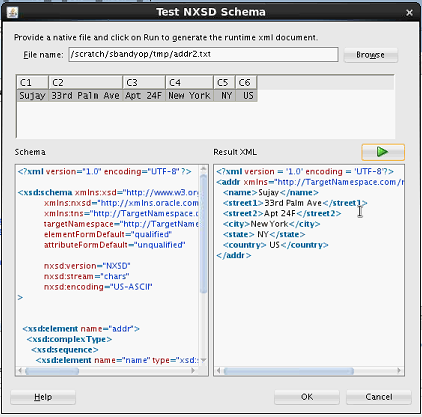
Description of "Figure 6-11 Output From Testing the Native Schema" -
Click OK to return to the Generated Native Format Schema dialog.
-
Click Next, then Finish.
The addr_schema1.xsd file is created and displayed in the NXSD Schema field of the Translate dialog.
-
-
From the Output Type list, select DOM. Both DOM and SDOM supported if you select DOM.
-
To the right of the Output field, select the variable for the schema.
-
If you have an output variable that adheres to the schema specified in Step 7, click the Search (first) icon to select the existing variable.
-
If you do not have an existing variable, click the Add (second) icon to invoke the Create Variable dialog. Accept the default values or rename the variable to create an output variable, and click OK. The variable automatically points to the schema created in Step 7.
When complete, the Translate dialog looks as shown in Figure 6-12.
-
-
Figure 6-12 Translate Dialog Configured for Native to XML Translation
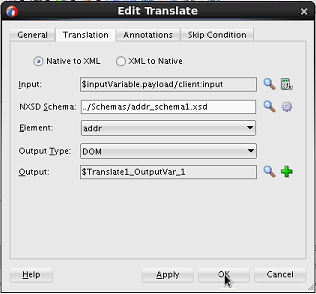
Description of "Figure 6-12 Translate Dialog Configured for Native to XML Translation"The output for the synchronous request must now be changed to point to the new schema.
-
In the Applications window, select the BPEL process WSDL file (for this example, named BPELProcess1.wsdl).
-
At the bottom of Oracle BPEL Designer, click Source.
-
Scroll to the <wsdl:message> section of the WSDL file.
-
Click the response element (for this example, named processResponse) for the message BPELProcess1ResponseMessage to invoke the Property Inspector in the lower right corner. Figure 6-13 provides details.
Figure 6-13 Root Element Selection in the WSDL File

Description of "Figure 6-13 Root Element Selection in the WSDL File" -
In the Property Inspector, select the new root element (for this example, ns1:addr). Figure 6-14 provides details.
Figure 6-14 Root Element Selected in Property Inspector
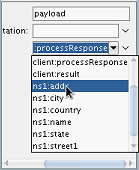
Description of "Figure 6-14 Root Element Selected in Property Inspector"The ns1:addr root element is added to the WSDL file. Figure 6-15 provides details.
Figure 6-15 New Root Element Appears in WSDL File

Description of "Figure 6-15 New Root Element Appears in WSDL File" -
Drag an Assign activity into the BPEL process beneath the translate activity.
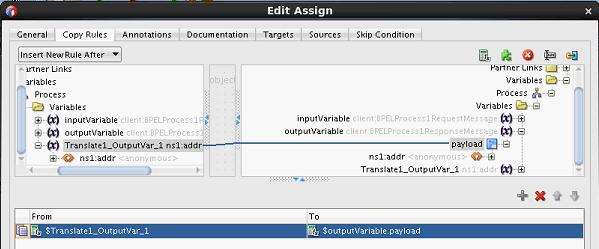
You now assign the translation output variable to the BPEL output variable.
-
In the Copy Rules tab of the assign activity, map the variables, and click OK. Figure 6-16 provides details.
Design is now complete.
