How to Deploy an Existing SOA Archive in Oracle JDeveloper

You can deploy an existing SOA archive from the Application Servers window in Oracle JDeveloper.

Note:

  • The archive must exist. You cannot create an archive in the Deploy SOA Archive dialog.

  • These instructions assume you have created an application server connection to an Oracle WebLogic Administration Server or another supported application server on which the SOA Infrastructure is deployed. Creating a connection to an Oracle WebLogic Administration Server enables you to browse for SOA composite applications deployed in the same domain. From the File main menu, select New > Application > Connections > Application Server Connection to create a connection.

To deploy an existing SOA archive from Oracle JDeveloper:

  1. From the Window menu, select Application Servers.
  2. In the Applications window, expand your connection name.
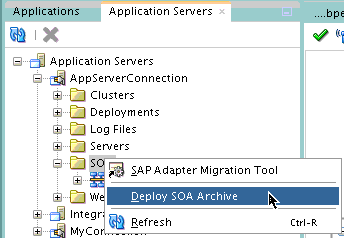
  3. Right-click the SOA folder.
  4. Select Deploy SOA Archive.

    Figure 48-27 SOA Archive Deployment from the Applications Window

    Description of Figure 48-27 follows
    Description of "Figure 48-27 SOA Archive Deployment from the Applications Window"

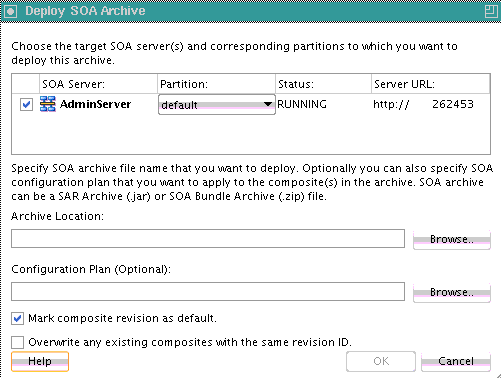
    The Deploy SOA Archive dialog shown in Figure 48-28 appears.

    Figure 48-28 Deploy SOA Archive Dialog

    Description of Figure 48-28 follows
    Description of "Figure 48-28 Deploy SOA Archive Dialog"
  5. Provide responses appropriate to your environment, as described in Table 48-9.

    Table 48-9 Deploy SOA Archive Dialog Fields and Values

    Field Description

    SOA Server

    Select the SOA server to which to deploy the archive.

    Partition

    Select the partition in which to deploy the archive. If the server contains no partitions, you cannot deploy this archive. By default, a partition named default is automatically included with Oracle SOA Suite.

    Status

    Displays the status of the server. If the server is not in a running state, you cannot deploy this archive.

    Server URL

    Displays the URL of the server.

    Archive Location

    Click Browse to select a prebuilt SOA composite application archive. The archive consists of a JAR file of a single application or a SOA bundle ZIP file containing multiple applications.

    Configuration Plan (Optional)

    Click Browse to select a configuration plan to attach to the SOA composite application archive. The configuration plan enables you to define the URL and property values to use in different environments. During process deployment, the configuration plan is used to search the SOA project for values that must be replaced to adapt the project to the next target environment.

    For information about creating configuration plans, see How to Create a Configuration Plan in or How to Create a Configuration Plan with the WLST Utility.

    Mark composite revision as default

    If you do not want the new revision to be the default, you can deselect this box. By default, a newly deployed composite revision is the default. This revision is instantiated when a new request comes in.

    Overwrite any existing composites with the same revision ID

    Select to overwrite (redeploy) an existing SOA composite application with the same revision ID. The consequences of this action are as follows:

    • A new version 1.0 of the SOA composite application is redeployed, overwriting a previously deployed 1.0 version.

    • The older, currently-deployed version of this revision is removed (overwritten).

    • If the older, currently-deployed version of this revision has running instances, the state of those instances is changed to aborted.

  6. Click OK.

For more information on deploying and testing SOA composite applications from the Application Servers window, see Managing and Testing a SOA Composite Application.