How To Create a Task Form Using the Custom Task Form Wizard

This wizard enables you to create a task form using ADF page templates and standardized task regions. The page templates can be either of the following:

  • Default page templates that are automatically provided at the following location:

    [JDeveloper_Home}/jdeveloper/soa/modules/oracle.soa.worklist_11.1.1/adflibWorklistComponents.jar
    

    The default page templates are:

    • Nontabbed, default template: taskDetailsTemplate.jspx

    • Tabbed templates in which the payload and comments, attachment, and history sections are displayed on a separate tab: taskDetailsTemplate2.jspx

    In the Name and Definition page of the Custom Task Flow wizard, select Packaged, then select either Default or Tabbed.

  • Custom page templates that you define. In the Name and Definition page of the Custom Task Flow wizard, select Custom, then select the library name and the template name.

    You package a page template and its artifacts into an ADF library JAR file. These JAR files can be packaged, deployed, discovered, and used like any other Oracle library component. The wizard prompts you to specify the JAR name and template location in the JAR.

Page templates let you define entire page layouts, including values for certain attributes of the page. When pages are created using a template, they all inherit the defined layout. When you make layout modifications to the template, all pages that consume the template automatically reflect the layout changes.

The templates used in the wizard generate content for the following six facets:

  • Actions

  • Attachments

  • Body

  • Comments

  • Header

  • History

For the action, header, and body facets, you can pick the content and attributes to be displayed and then fine tune the layout.

All six facets are defined in the default page templates. In the case of custom templates, you use these exact facet names in your template. If your template does not include these facets, then the facet content is not generated in the JSPX file.

To create a custom task form:
  1. Open the BPEL process within the SOA composite application.
  2. Double-click the human task activity, and click the Edit icon.

    The Human Task Editor appears.

  3. Above the editor, click Form and select Launch Task Form Wizard.
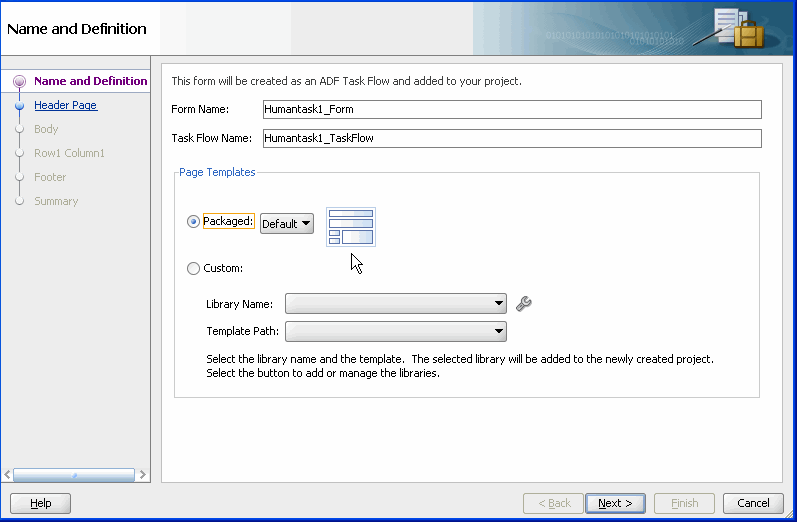
  4. Provide a project name and a directory path (or use the default), and click OK. The Custom Form Wizard displays the Name and Definition screen as shown in Figure 30-9.

    Figure 30-9 Custom Task Form Wizard: Form Name and Definition

    Description of Figure 30-9 follows
    Description of "Figure 30-9 Custom Task Form Wizard: Form Name and Definition"
  5. In the Form Name field, provide the name of the form (.jspx file) that is to be generated at the end of the wizard. If you do not provide a name, then the default name, Humantasknumber_Form, is provided. Ensure that valid characters are used in the name. Spaces are not permitted.
  6. Specify the Task Flow Name, that is, the name of the ADF task flow that is generated at the end of the wizard. Accept the default name of Humantasknumber_TaskFlow or specify a different name.
  7. In the Page Templates section, select either:

    Click Next. The Header page appears.

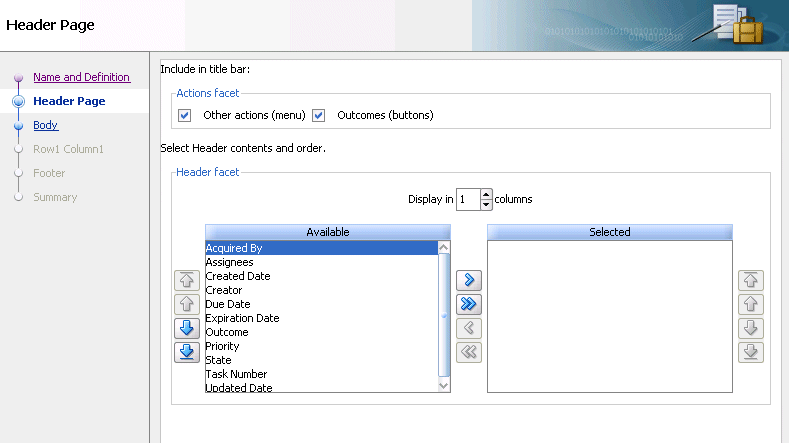
  8. On the Header page, shown in Figure 30-10, perform the following procedures and click Next.
    • In the Actions facet section, select the options to include in the title bar of the task form:

      Other actions (menu): Lists the system actions that are possible for the task, such as Request Information, Reassign, Renew, Suspend, Escalate, and Save.

      Outcomes (buttons): Displays buttons for task actions that are defined in the human task, such as setting task outcomes.

    • In the Header facet section, enter the number of display columns. If you want each header label to display in its own column, then enter the same number as the number of headers you move into the Selected list. If you enter 1, but select 7 headers, all 7 headers appear in one column.

    • Move header labels into the Selected list and reorder them as needed.

      Figure 30-10 Custom Task Form Wizard: Setting Up the Header

      Description of Figure 30-10 follows
      Description of "Figure 30-10 Custom Task Form Wizard: Setting Up the Header"
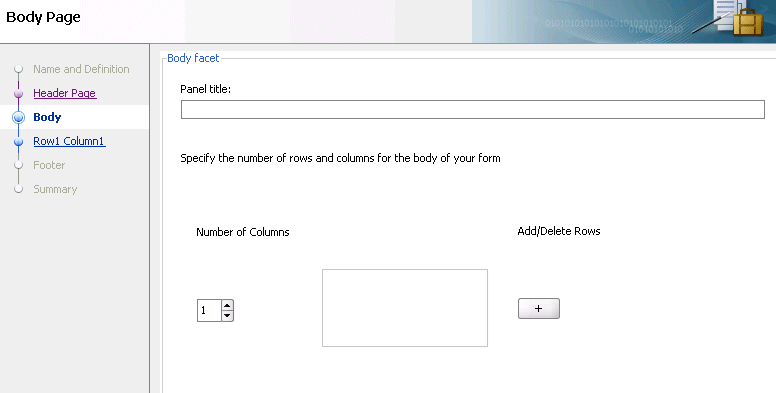
  9. On the Body page, shown in Figure 30-11, perform the following procedures in the Body facet section to set up the form, and click Next:
    • Enter a title that describes the body panel.

    • Enter the number of columns for row 1. For a simple form, you may want to enter the same number as you entered for the number of header columns.

    • Click the Add (+) button to add more rows. For each new row, you can also specify the number of columns. Each row can have its own column layout. For each column in each row, a body page is created, labeled Row1, Column1, and so on.

      Figure 30-11 Custom Task Form Wizard: Setting Up the Body

      Description of Figure 30-11 follows
      Description of "Figure 30-11 Custom Task Form Wizard: Setting Up the Body"

      Note:

      If you specify rows or columns for which no payload data appears, then an empty panel group is displayed. You can use this blank section to add content to the form later by using data controls.

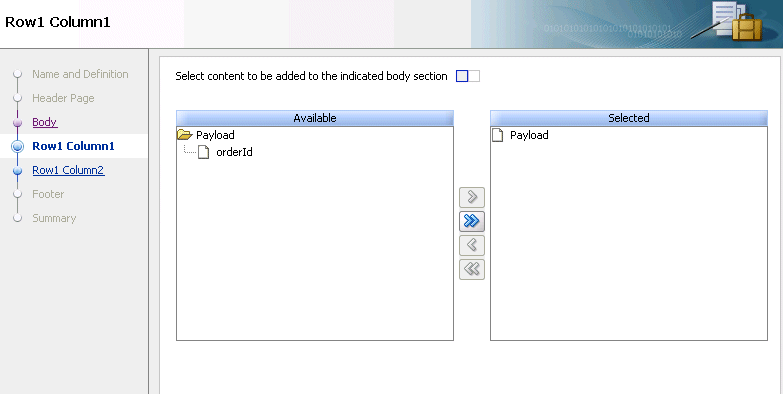
  10. On the Row1 Column1 page, shown in Figure 30-12, move all or part of the payload to the Selected list and click Next.

    Figure 30-12 Custom Task Form Wizard: Selecting the Body Fields

    Description of Figure 30-12 follows
    Description of "Figure 30-12 Custom Task Form Wizard: Selecting the Body Fields"
  11. For any Rown Columnn page after Row1 Column1, repeat Step 10 and click Next.

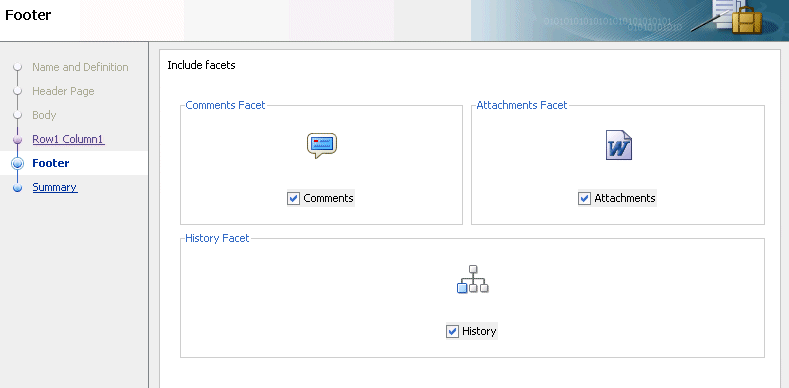
    The Footer page that displays is based upon the page template you selected on the Name and Definition page in Step 6 (either Default Page Template or Custom Page Template).

    If you selected Default Page Template, the Footer page shown in Figure 30-13 is displayed. Deselect any comments, attachments, or history facet that you do not want to include in the footer, and click Next. By default, the comments, attachments, and history facets are all selected.

    Figure 30-13 Custom Task Form Wizard: Selecting the Footer Fields for the Default Page Template

    Description of Figure 30-13 follows
    Description of "Figure 30-13 Custom Task Form Wizard: Selecting the Footer Fields for the Default Page Template"
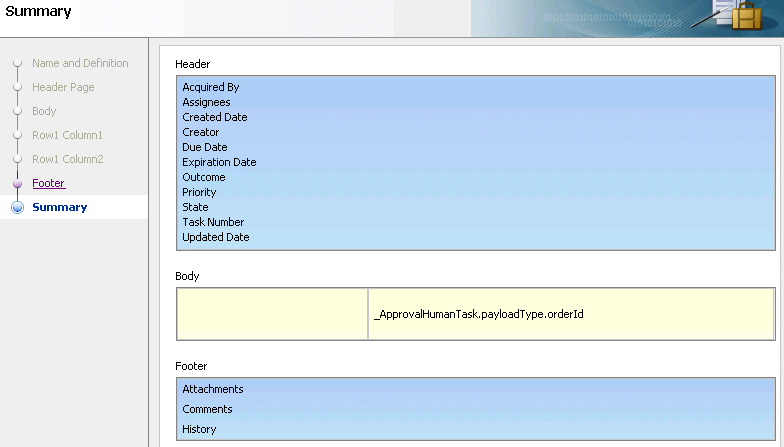
  12. On the Summary page, shown in Figure 30-14, inspect your selections. Click Back to make changes or click Finish.

    This form is created as an ADF task flow and added to the project.

    Figure 30-14 Custom Task Form Wizard: Summary

    Description of Figure 30-14 follows
    Description of "Figure 30-14 Custom Task Form Wizard: Summary"

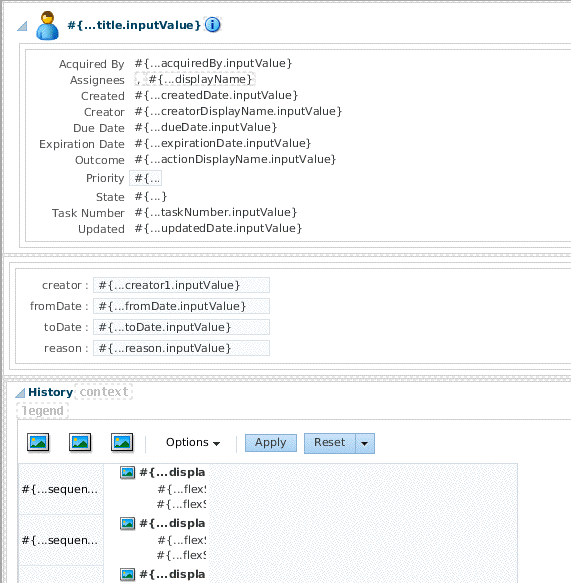
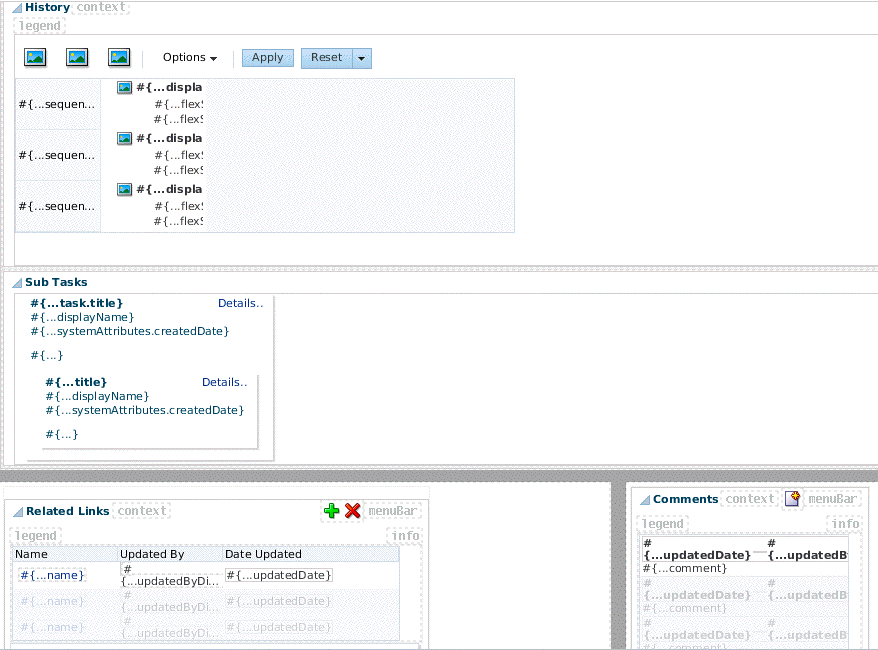
    The Designer initializes and the form_name.jspx tab is displayed, as shown in Figure 30-15 (upper part of tab) and Figure 30-16 (lower part of tab).

    Figure 30-15 Custom Task Form (Upper Part of Tab)

    Description of Figure 30-15 follows
    Description of "Figure 30-15 Custom Task Form (Upper Part of Tab)"

    Figure 30-16 Custom Task Form (Lower Part of Tab)

    Description of Figure 30-16 follows
    Description of "Figure 30-16 Custom Task Form (Lower Part of Tab)"