How to Create a Spring Service Component in Oracle JDeveloper
To create a spring service component in Oracle JDeveloper:
-
From the Components window, drag a Spring service component into the SOA Composite Editor, as shown in Figure 56-1.
Figure 56-1 Spring Context Service Component
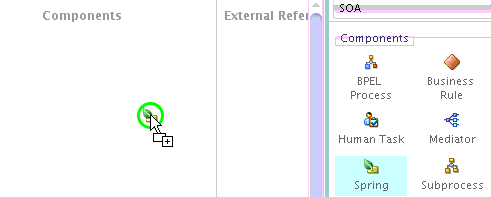
Description of "Figure 56-1 Spring Context Service Component"The Create Spring dialog is displayed.
-
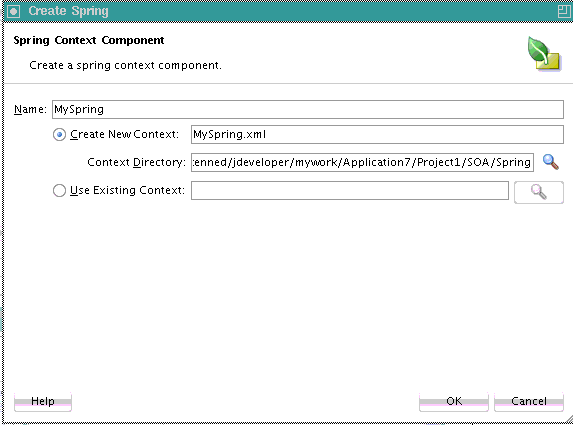
In the Name field, enter a name for the spring service component. The name becomes both the component name and the spring context file name. Figure 56-2 provides details.
You can also select Use Existing Context and click Browse to select an existing spring file. For example, you may want to import a spring context that was created in Oracle JDeveloper, but outside of Oracle SOA Suite. If you browse and select a spring context from another project, it is copied to the SOA project.
Note:
A standalone spring version of WebLogic SCA is also available for use. This version is typically used outside of Oracle SOA Suite. This version is accessible by selecting Spring 2.5 JEE from the Components window while inside the spring editor.
-
Click OK.
A spring icon is displayed in the SOA Composite Editor.
-
If the contents are not automatically displayed, double-click the icon to display the contents of the spring context in the spring editor.
-
From the Components window, select Weblogic SCA from the dropdown list.
The list is refreshed to display the selections shown in Figure 56-3.
-
Drag a Service icon into the spring editor.
The Insert Service dialog appears.
-
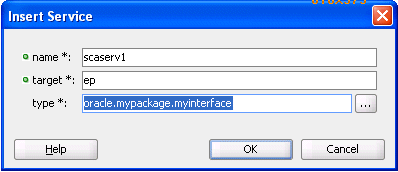
Complete the fields shown in Table 56-1 to define the target bean and Java interface.
Table 56-1 Insert Service Dialog
Field Description name
Enter a name.
target
Enter the target bean. This action enables you to expose the bean as a service.
Note: Ensure that this target exists. There is no validation support that checks for the existence of this target.
type
Enter the Java interface.
When complete, the Insert Service dialog looks as shown in Figure 56-4.
-
Click OK.
The target bean becomes the service interface in the spring context.
<?xml version="1.0" encoding="UTF-8" ?>
<beans xmlns="http://www.springframework.org/schema/beans"
 xmlns:util="http://www.springframework.org/schema/util"
       xmlns:jee="http://www.springframework.org/schema/jee"
 xmlns:lang="http://www.springframework.org/schema/lang"
       xmlns:aop="http://www.springframework.org/schema/aop"
 xmlns:tx="http://www.springframework.org/schema/tx"
       xmlns:sca="http://xmlns.oracle.com/weblogic/weblogic-sca"
 xmlns:xsi="http://www.w3.org/2001/XMLSchema-instance"
       xsi:schemaLocation="http://www.springframework.org/schema/beans
 http://www.springframework.org/schema/beans/spring-beans.xsd
 http://www.springframework.org/schema/tool
 http://www.springframework.org/schema/tool/spring-tool.xsd
 http://www.springframework.org/schema/util
 http://www.springframework.org/schema/util/spring-util.xsd
 http://www.springframework.org/schema/aop
 http://www.springframework.org/schema/aop/spring-aop.xsd
 http://www.springframework.org/schema/cache
 http://www.springframework.org/schema/cache/spring-cache.xsd
 http://www.springframework.org/schema/context
 http://www.springframework.org/schema/context/spring-context.xsd
 http://www.springframework.org/schema/task
 http://www.springframework.org/schema/task/spring-task.xsd
 http://www.springframework.org/schema/jee
 http://www.springframework.org/schema/jee/spring-jee.xsd
 http://www.springframework.org/schema/lang
 http://www.springframework.org/schema/lang/spring-lang.xsd
 http://www.springframework.org/schema/tx
 http://www.springframework.org/schema/tx/spring-tx.xsd
 http://www.springframework.org/schema/jdbc
 http://www.springframework.org/schema/jdbc/spring-jdbc.xsd
 http://www.springframework.org/schema/jms
 http://www.springframework.org/schema/jms/spring-jms.xsd
 http://www.springframework.org/schema/oxm
 http://www.springframework.org/schema/oxm/spring-oxm.xsd
 http://www.springframework.org/schema/mvc
 http://www.springframework.org/schema/mvc/spring-mvc.xsd
 http://xmlns.oracle.com/weblogic/weblogic-sca META-INF/weblogic-sca.xsd">
  <!--Spring Bean definitions go here-->
  <sca:service name="scaserv1" target="cp"
 type="oracle.mypackage.myinterface"/>
</beans>
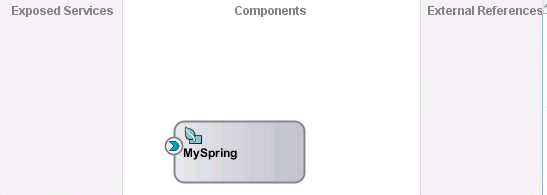
If you close the spring editor and return to the SOA Composite Editor, you see that a handle has been added to the left side of the spring service component, as shown in Figure 56-5.
-
Return to the spring editor.
-
Drag a Reference icon from the list shown in Figure 56-3 into the spring editor.
The Insert Reference dialog is displayed.
-
Complete the dialog, as shown in Table 56-2, and click OK.
Table 56-2 Insert Reference Dialog
Field Description name
Enter a name.
type
Enter the Java interface.
When complete, the spring context displays the service and reference in the spring editor.
<?xml version="1.0" encoding="UTF-8" ?> <beans xmlns="http://www.springframework.org/schema/beans" xmlns:util="http://www.springframework.org/schema/util" xmlns:jee="http://www.springframework.org/schema/jee" xmlns:lang="http://www.springframework.org/schema/lang" xmlns:aop="http://www.springframework.org/schema/aop" xmlns:tx="http://www.springframework.org/schema/tx" xmlns:sca="http://xmlns.oracle.com/weblogic/weblogic-sca" xmlns:xsi="http://www.w3.org/2001/XMLSchema-instance" xsi:schemaLocation="http://www.springframework.org/schema/beans http://www.springframework.org/schema/beans/spring-beans.xsd http://www.springframework.org/schema/tool http://www.springframework.org/schema/tool/spring-tool.xsd http://www.springframework.org/schema/util http://www.springframework.org/schema/util/spring-util.xsd http://www.springframework.org/schema/aop http://www.springframework.org/schema/aop/spring-aop.xsd http://www.springframework.org/schema/cache http://www.springframework.org/schema/cache/spring-cache.xsd http://www.springframework.org/schema/context http://www.springframework.org/schema/context/spring-context.xsd http://www.springframework.org/schema/task http://www.springframework.org/schema/task/spring-task.xsd http://www.springframework.org/schema/jee http://www.springframework.org/schema/jee/spring-jee.xsd http://www.springframework.org/schema/lang http://www.springframework.org/schema/lang/spring-lang.xsd http://www.springframework.org/schema/tx http://www.springframework.org/schema/tx/spring-tx.xsd http://www.springframework.org/schema/jdbc http://www.springframework.org/schema/jdbc/spring-jdbc.xsd http://www.springframework.org/schema/jms http://www.springframework.org/schema/jms/spring-jms.xsd http://www.springframework.org/schema/oxm http://www.springframework.org/schema/oxm/spring-oxm.xsd http://www.springframework.org/schema/mvc http://www.springframework.org/schema/mvc/spring-mvc.xsd http://xmlns.oracle.com/weblogic/weblogic-sca META-INF/weblogic-sca.xsd"> <!--Spring Bean definitions go here--> <sca:service name="scaserv1" target="cp" type="oracle.mypackage.myinterface"/> <sca:reference name="scaref1" type="external.bean.myInterface"/> </beans> -
Close the spring context file, as shown in Figure 56-6.
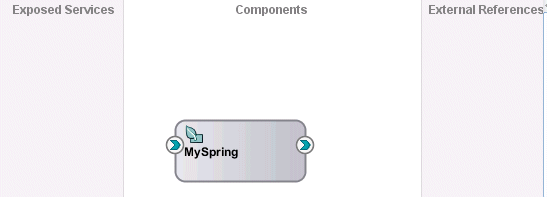
A handle is added to the right side of the spring service component, as shown in Figure 56-7.
-
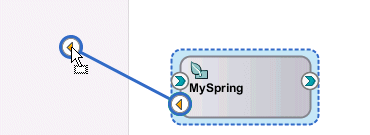
Drag the left handle into the Exposed Services swimlane to create a service binding component, as shown in Figure 56-8.
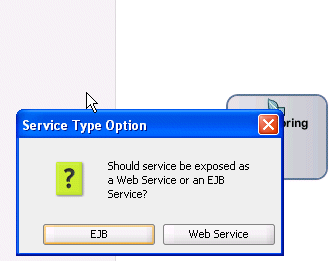
You are prompted to select to expose the service as either a web service or as an EJB service, as shown in Figure 56-9.
-
EJB: This exposes the EJB service through a Java interface; this selection does not require the use of a WSDL file.
-
Web Service: This exposes the web service through a SOAP WSDL interface. If you select this option, a WSDL is generated from the Java Interface for compatibility with the spring service component.
-
-
Select to expose this service as either an EJB or web service. A service is automatically created in the Exposed Services swimlane and wired to the spring service component (for this example, EJB is selected). Figure 56-10 provides details.
Figure 56-10 EJB Service Binding Component Wired to the Spring Service Component
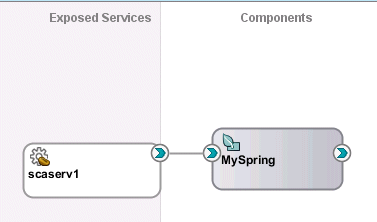
Description of "Figure 56-10 EJB Service Binding Component Wired to the Spring Service Component" -
Double-click the EJB service to display the automatically completed configuration, as shown in Figure 56-11. The configuration details were created from the values you entered in the Insert Service dialog in Step 7.
Figure 56-11 EJB Service Dialog in Exposed Services Swimlane
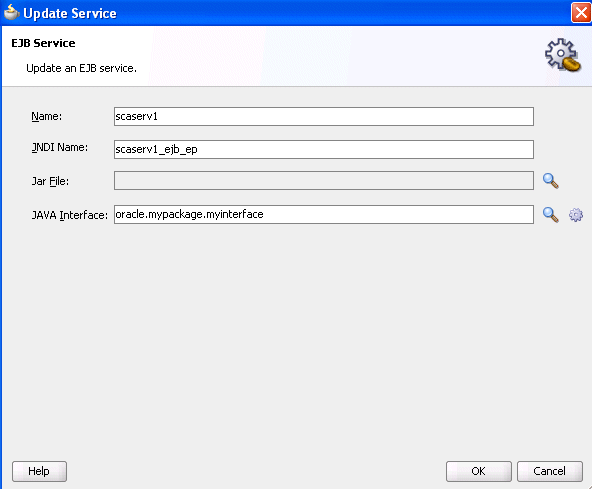
Description of "Figure 56-11 EJB Service Dialog in Exposed Services Swimlane" -
Replace the default JNDI name that was automatically generated with the name applicable to your environment.
-
Close the dialog.
-
Drag the right handle of the spring service component into the External References swimlane to create a reference binding component.
You are prompted with the same spring type option message as shown in Step 13.
-
Select an option to expose this reference. A reference is automatically created in the External References swimlane and wired to the spring service component (for this example, EJB is selected). Figure 56-12 provides details.
Figure 56-12 EJB Reference Binding Component Wired to the Spring Service Component
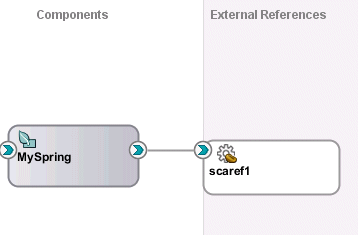
Description of "Figure 56-12 EJB Reference Binding Component Wired to the Spring Service Component" -
Double-click the EJB reference to display the automatically completed configuration, as shown in Figure 56-13. The configuration details were created from the values you entered in the Insert Reference dialog in Step 11.
Figure 56-13 EJB Reference Dialog in External References Swimlane
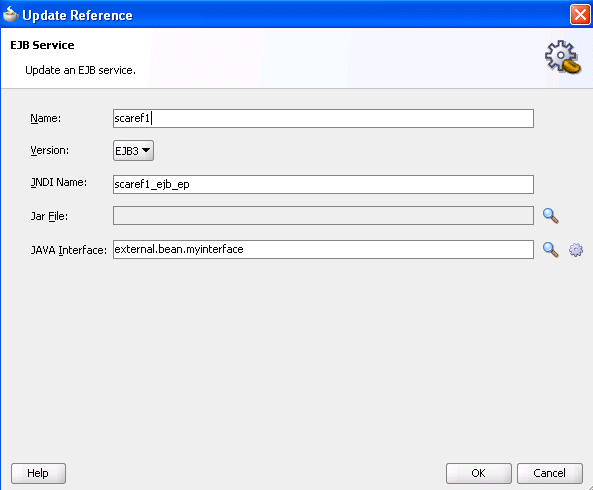
Description of "Figure 56-13 EJB Reference Dialog in External References Swimlane" -
Close the dialog and return to the SOA Composite Editor, as shown in Figure 56-14.
Figure 56-14 Java Interface-Based EJB Service and Reference Binding Components

Description of "Figure 56-14 Java Interface-Based EJB Service and Reference Binding Components" -
Place the cursor over both the right handle of the service (as shown in Figure 56-15) and the left handle of the spring service component (as shown in Figure 56-16). The Java interface is displayed.
Figure 56-16 Java Interface of Spring Service Component

Description of "Figure 56-16 Java Interface of Spring Service Component" -
Perform the same action on the right handle of the spring service component and the left handle of the reference binding component to display its Java interface.
-
Select Source view for the
composite.xmlfile to display similar details.<?xml version="1.0" encoding="UTF-8" ?> <!-- Generated by Oracle SOA Modeler version 12.1.3.0.0 at [5/16/14 3:05 AM]. --> <composite name="Project1" . . . . . . <service name="scaserv1"> <interface.java interface="oracle.mypackage.myinterface"/> <binding.ejb uri="scaserv1_ejb_ep" ejb-version="EJB3"/> </service> <property name="productVersion" type="xs:string" many="false">12.1.3.0.0</property> <property name="compositeID" type="xs:string" many="false">4c07dbf0-5c01-450e-bde6-8c3866f45edc</property> <component name="MySpring"> <implementation.spring src="Spring/MySpring.xml"/> <componentType> <service name="scaserv1"> <interface.java interface="oracle.mypackage.myinterface"/> </service> <reference name="scaref1"> <interface.java interface="external.bean.myInterface"/> </reference> </componentType> </component> <reference name="scaref1"> <interface.java interface="external.bean.myInterface"/> <binding.ejb uri="scaref1_ejb_ep" ejb-version="EJB3"/> </reference> <wire> <source.uri>scaserv1</source.uri> <target.uri>MySpring/scaserv1</target.uri> </wire> <wire> <source.uri>MySpring/scaref1</source.uri> <target.uri>scaref1</target.uri> </wire> </composite> -
If you wire the right handle of the spring service component to an XML-based component such as Oracle Mediator instead of the Java interface-based EJB reference, a Java interface is generated from the Oracle Mediator's existing WSDL interface. The following steps provide details.
-
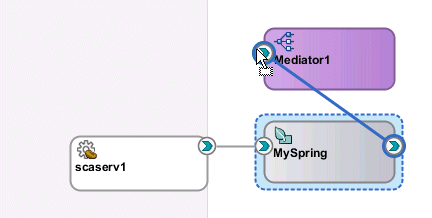
Drag the right handle of the spring service component to the Oracle Mediator, as shown in Figure 56-17.
Figure 56-17 Integration of Spring Service Component and Oracle Mediator
Description of "Figure 56-17 Integration of Spring Service Component and Oracle Mediator" -
Click OK when prompted to acknowledge that a compatible interface was created from the Oracle Mediator WSDL file.
Figure 56-18 Java File Creation from the Oracle Mediator WSDL File
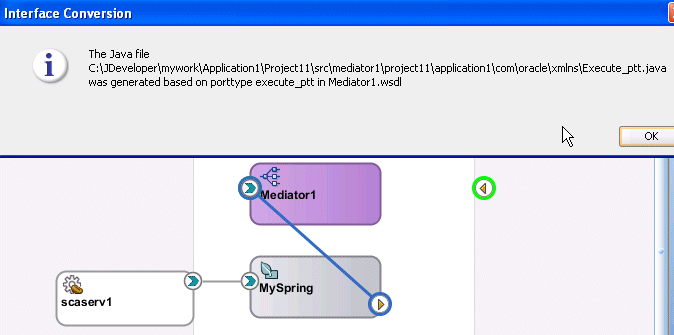
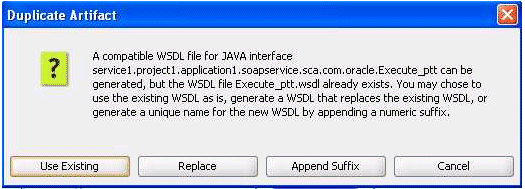
Description of "Figure 56-18 Java File Creation from the Oracle Mediator WSDL File"If you drag a wire between a Java interface and a WSDL-based component, and the WSDL file with the default name (based on the Java Interface name) already exists, you are prompted with four options. Click Cancel to cancel creation of the wire. Figure 56-19 provides details.
-
Place the cursor over both the right handle of the spring service component (as shown in Figure 56-20) and the left handle of the Oracle Mediator (as shown in Figure 56-21) to display the compatible interface.
Figure 56-20 Spring Service Component Interface

Description of "Figure 56-20 Spring Service Component Interface" -
Double-click the spring service component to display the contents of the spring context file in the spring editor.
<?xml version="1.0" encoding="windows-1252" ?>
<beans xmlns="http://www.springframework.org/schema/beans"
       xmlns:util="http://www.springframework.org/schema/util"
       xmlns:jee="http://www.springframework.org/schema/jee"
       xmlns:lang="http://www.springframework.org/schema/lang"
       xmlns:aop="http://www.springframework.org/schema/aop"
       xmlns:tx="http://www.springframework.org/schema/tx"
       xmlns:sca="http://xmlns.oracle.com/weblogic/weblogic-sca"
       xmlns:xsi="http://www.w3.org/2001/XMLSchema-instance"
       xsi:schemaLocation="http://www.springframework.org/schema/beans
        http://www.springframework.org/schema/beans/spring-beans-2.5.xsd
        http://www.springframework.org/schema/util
        http://www.springframework.org/schema/util/spring-util-2.5.xsd
        http://www.springframework.org/schema/aop
        http://www.springframework.org/schema/aop/spring-aop-2.5.xsd
        http://www.springframework.org/schema/jee
        http://www.springframework.org/schema/jee/spring-jee-2.5.xsd
        http://www.springframework.org/schema/lang
        http://www.springframework.org/schema/lang/spring-lang-2.5.xsd
        http://www.springframework.org/schema/tx
        http://www.springframework.org/schema/tx/spring-tx-2.5.xsd
        http://www.springframework.org/schema/tool
        http://www.springframework.org/schema/tool/spring-tool-2.5.xsd
        http://xmlns.oracle.com/weblogic/weblogic-sca META-INF/weblogic-sca.xsd">
  <!--Spring Bean defintions go here-->
  <sca:service name="scaserv1" target="ep" type="oracle.mypackage.myinterface"/>
  <sca:reference type="mediator1.project1.application4.com.oracle.xmlns.Execute_
ptt" name="Mediator1.Mediator1"/>
</beans>
-
Note:
-
When integrating a component that uses a Java interface with a component that uses a WSDL file in the SOA Composite Editor, if a specific interface class is not found in the classpath (including the JAR files in the
SCA-INF/libdirectory), but the source file does exist in the SOA project, you are prompted to automatically compile the source. -
You can also create BPEL process partner links with services that use Java interfaces. You select this type of service in the Service Explorer dialog when creating a partner link. For more information, see Introduction to Partner Links.
