Generating the Patch XML File

When you make changes to your composite in the SOA Patch Developer mode of Oracle JDeveloper, and save the changes, a patch.xml file is automatically generated. The patch.xml file indicates the changes that you have made to the composite.

The following steps discuss creating and viewing the patch.xml file in JDeveloper
Make sure that you are in the SOA Patch Developer mode and your SOA composite is open for editing.
  1. Affect the changes, or fixes, required to the composite.
    Only limited changes are allowed in the SOA Patch Developer mode. These are changes that can be deployed to the runtime without affecting running instances.
    For example, you might want to make fixes to an XSLT map associated with a BPEL transformation activity.
  2. Save all your files in JDeveloper.
    You can click on the Save All button in the JDeveloper main toolbar, for example.
    A patch.xml file is automatically created under project_directory/SOA/SCA-INF directory. The patch.xml file gets updated every time you make and save changes to your composite in the SOA Patch Developer mode.
  3. Optionally view the patch.xml file.
    You can select Application > Overview from the main menu bar and select patch.xml under XML Files. Click Edit to open the patch.xml file.
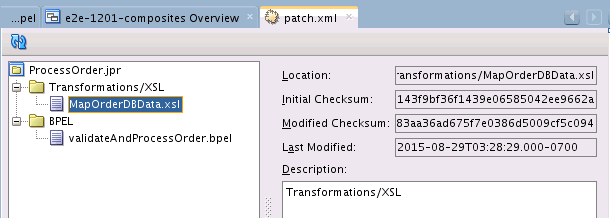
    The following image shows a sample patch.xml file. You can see that an XSL transformation and a BPEL process have been patched.

    sample patch.xml

    Note:

    The patch also includes any sensor information. This ensures that any Design-Time at Runtime (DT@RT) related changes are retained.