2 Getting Started with Oracle B2B
This chapter describes the Web-based interface provided by Oracle B2B for creating B2B transactions. It also discusses the process flow of creating an Oracle B2B transaction and how to use Oracle B2B in the Oracle JDeveloper environment.
This chapter includes the following sections:
2.1 What You Need to Get Started with Oracle B2B
In addition to installing Oracle SOA Suite, which includes Oracle B2B, you will need to install Oracle Document Editor and Oracle JDeveloper.
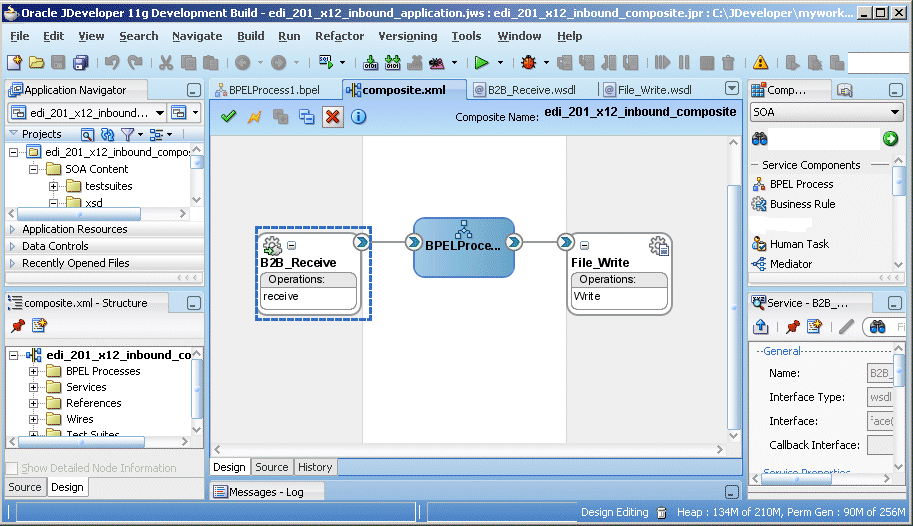
Use the standards-based templates of Oracle Document Editor to create guideline files. Then, using Oracle B2B, you create and deploy the transaction as part of a B2B agreement. To include the B2B transaction in a SOA composite application, use Oracle JDeveloper, as shown in Figure 2-1.
Figure 2-1 Oracle JDeveloper: A SOA Composite Application with a B2B Binding Component
Description of "Figure 2-1 Oracle JDeveloper: A SOA Composite Application with a B2B Binding Component"
See the following for more information:
-
Oracle B2B Document Editor Help menu
-
Oracle JDeveloper Help menu
2.2 Logging in to Oracle B2B
Once you have installed Oracle SOA Suite, including Oracle B2B, you can follow these instructions to log in to Oracle B2B.
You must use a supported Web browser:
-
Microsoft Internet Explorer 7.x and 8.x
-
Mozilla Firefox 2.x and 3.x
-
Apple Safari 4.x
2.2.1 Finding Port Information
You can find port number information in the following ways:
-
From Oracle WebLogic Server Administration Console
-
Log in to the console.
-
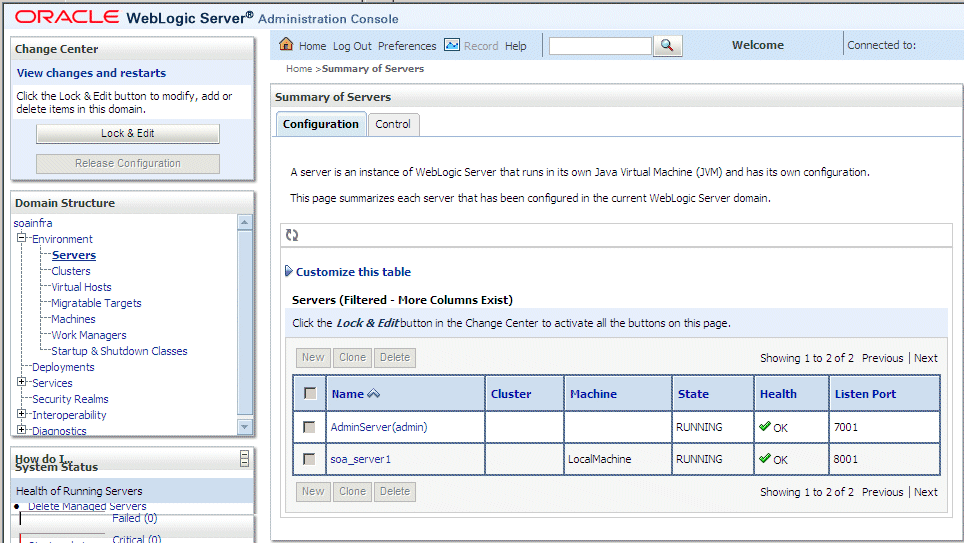
In the Domain Structure pane, shown in Figure 2-2, expand Environment and click Servers.
Figure 2-2 Domain Structure Nodes in Oracle WebLogic Server Administration Console
Description of "Figure 2-2 Domain Structure Nodes in Oracle WebLogic Server Administration Console" -
Note the Listen Port column for your server.
-
-
Or from
MW_HOME/user_projects/domains/your_domain_name/config/config.xml<server> <name>soa_server1</name> <ssl> <name>soa_server1</name> <listen-port>8002</listen-port> </ssl> <machine>LocalMachine</machine> <listen-port>8001</listen-port> <listen-address/> </server>
2.2.2 Accessing Oracle B2B Through Single Sign-On (SSO)
To log in, log out, and relog in to Oracle B2B using SSO in Oracle Identity Management, the /b2bconsole location must be added to the mod_wl_ohs.conf file in Oracle HTTP Server as follows:
<Location /b2bconsole>
   SetHandler weblogic-handler
#     PathTrim /weblogic
   ErrorPage  http:/WEBLOGIC_HOME:WEBLOGIC_PORT/
</Location>
This is in addition to the setting required for the /b2b location:
<Location /b2b>
   SetHandler weblogic-handler
#     PathTrim /weblogic
   ErrorPage  http:/WEBLOGIC_HOME:WEBLOGIC_PORT/
</Location>
2.2.3 Enabling the weblogic User for Logging in to Oracle B2B
For the weblogic user in Oracle Internet Directory (OID) to log in to Oracle B2B as an administrator and search for users, the OID Authenticator must have an Administrators group, and the weblogic user must be a member of that group.
2.3 Using the Oracle B2B Interface
B2B activities are grouped as Administration, Partners, Reports, and Metrics.
The following sections describe these activities.
2.3.1 Administration
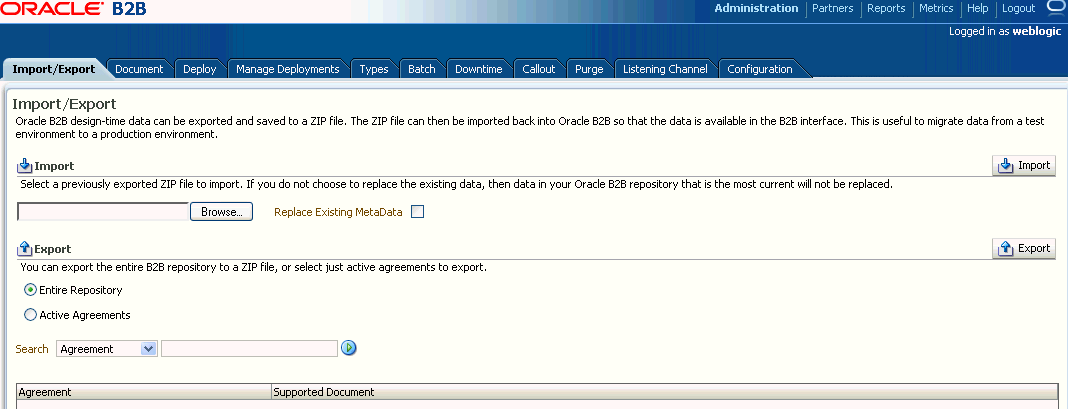
Use the tabs of the Administration page, shown in Figure 2-3, to manage importing and exporting, document protocols, deployments, types, batching, callouts, purging, listening channels, and B2B configuration.
See Oracle B2B Administration for more information.
2.3.2 Partners
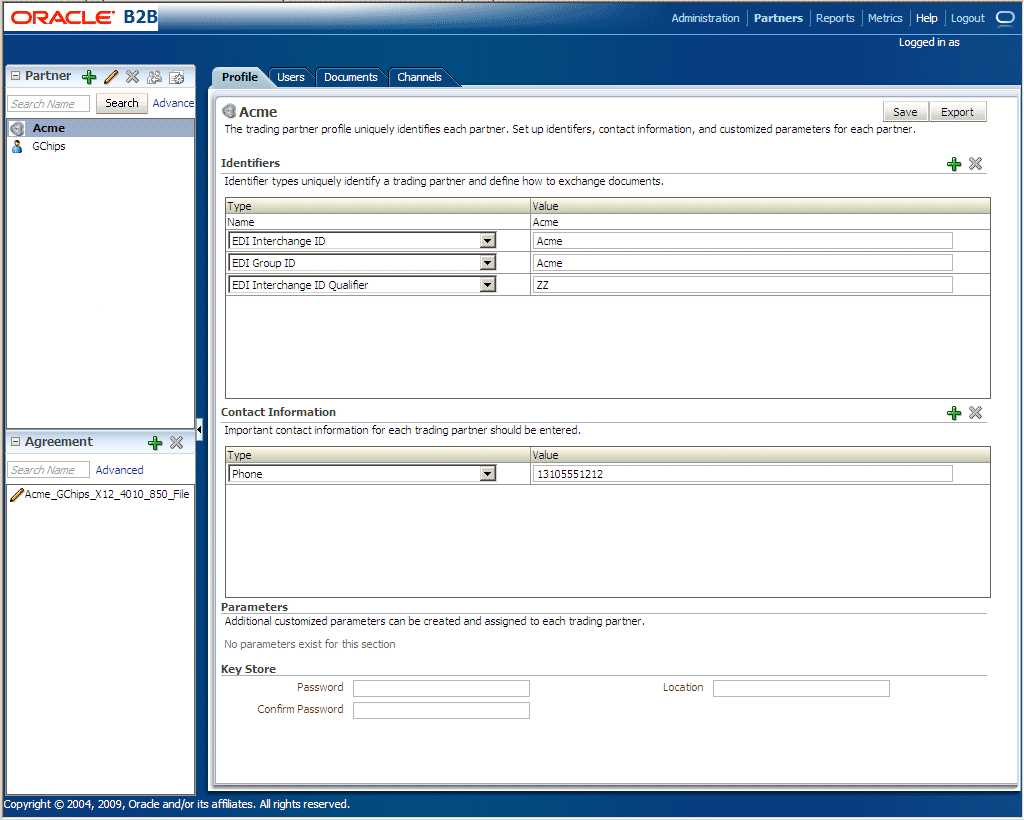
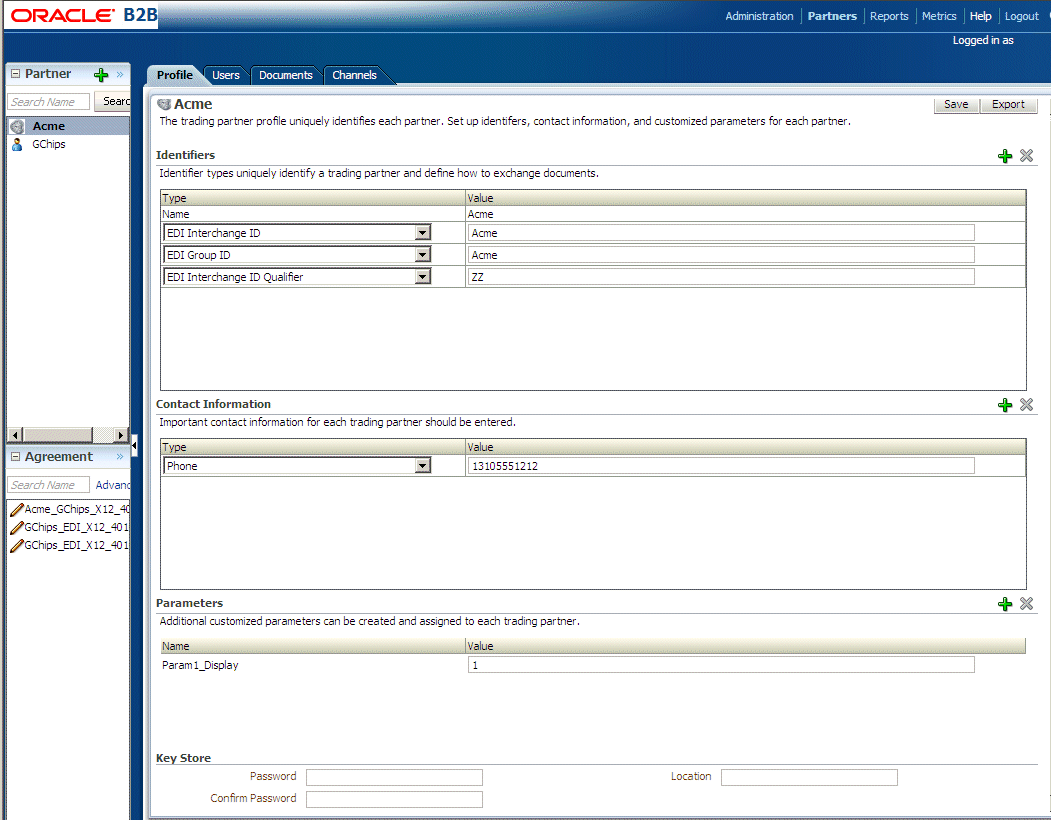
Use the tabs of the Partners page, shown in Figure 2-4, to create and update trading partner information, create and update agreement information, add user information, associate documents with trading partners, set up channels, and configure the key store.
See Oracle B2B Process Flow for more information.
2.3.3 Reports
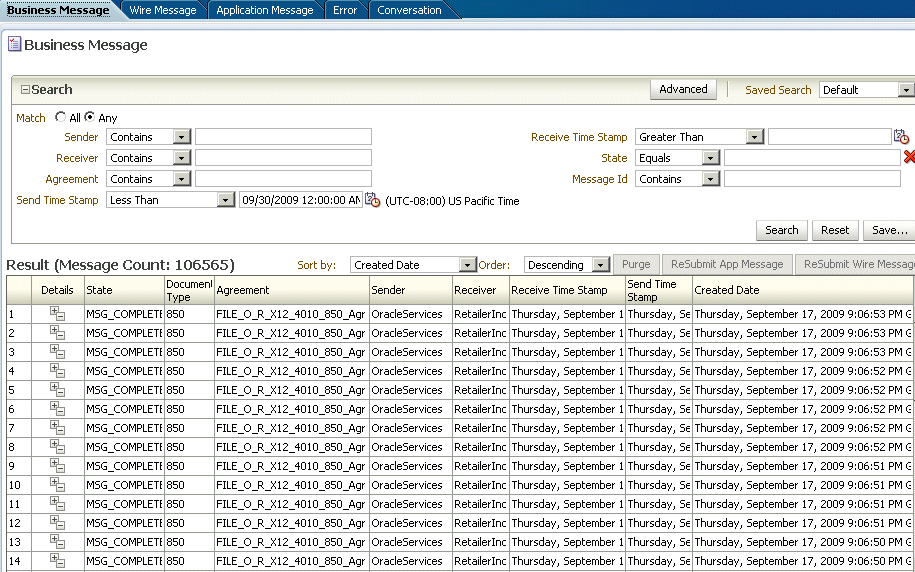
Use the tabs of the Reports page, shown in Figure 2-5, to create and view reports about the instance (runtime) data.
For more information, see Creating Reports.
2.3.4 Metrics
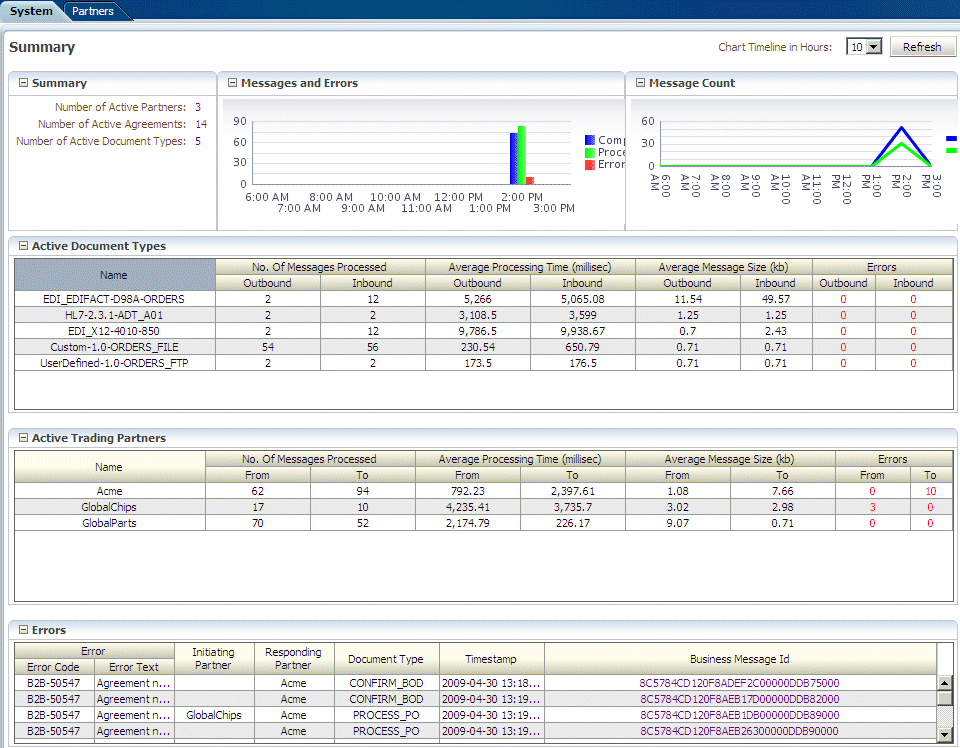
Use the tabs of the Metrics page, shown in Figure 2-6, to see information about deployed agreements, such as lists of the active document types and trading partners, and runtime status, such as error messages and message counts.
For more information, see Using B2B Metrics.
2.4 Creating a B2B Transaction: An Overview of the Process Flow
The B2B process flow starts with creating B2B guideline files in Oracle Document Editor and continues with using the Oracle B2B interface to create document definitions, configure trading partners, and create and deploy agreements.
Figure 2-7 illustrates the B2B process flow.
Step 1: Create guideline files (ECS and optional XSD files) in Oracle Document Editor
Using Oracle B2B Document Editor, shown in Figure 2-8, create transaction documents based on templates for hundreds of industry-standard protocols. The Oracle Document Editor is required only when translation is needed. For XML documents, the editor is not used.
Figure 2-8 Creating a Document in Oracle B2B Document Editor
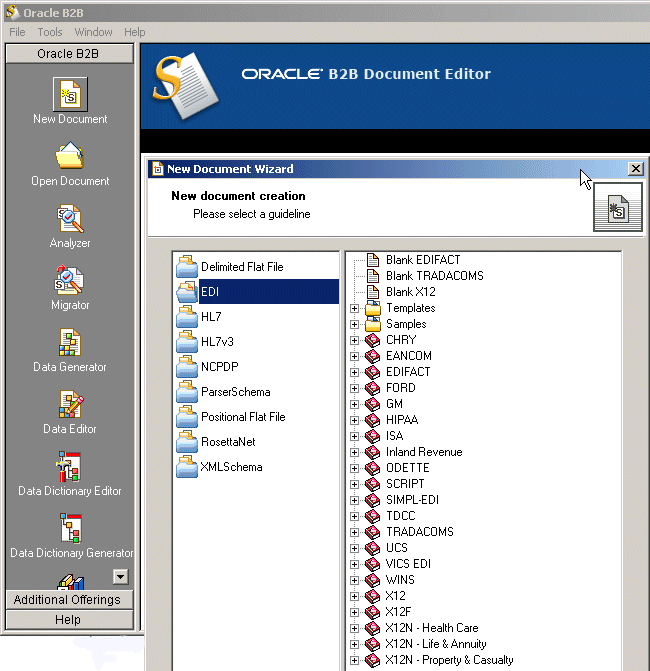
Description of "Figure 2-8 Creating a Document in Oracle B2B Document Editor"
For information on Oracle Document Editor, see the following:
-
The Help menu of Oracle Document Editor.
Step 2: Create document definitions
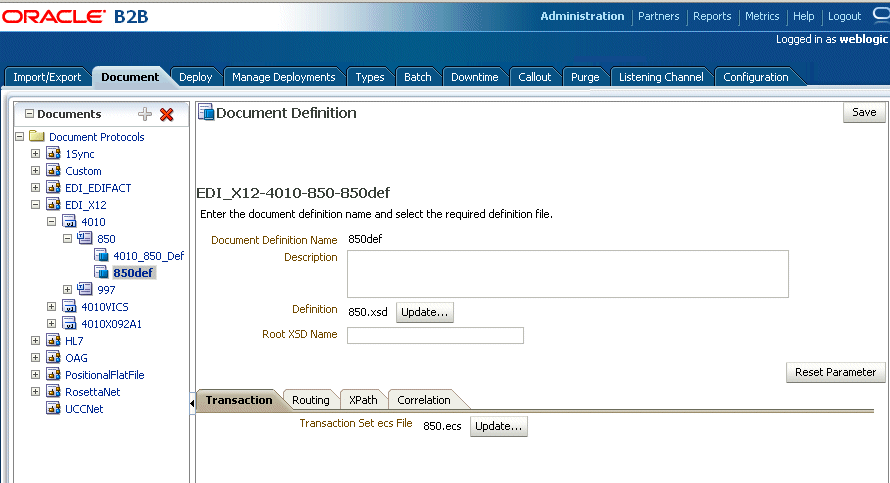
Using the Administration > Document tab of Oracle B2B, shown in Figure 2-9, select from a list of document protocols, and then provide a document protocol version name, a document type name, and a document definition name. (For a Custom document, rather than selecting from the list of document protocols, you add a custom protocol name to the list in the Document Protocols folder.)
After selecting the ECS and optional XSD files you created in Step 1, you have created the document definition.
For more information, see Creating Document Definitions.
Step 3: Configure trading partners
Using the tabs of the Partners page of Oracle B2B, shown in Figure 2-10, add or update trading partner names, add identifiers and optional contact information, view parameters, add documents and delivery channels, and add key store information.
For more information, see Configuring Trading Partners .
Step 4: Create agreements
Using the Partners > Agreement tab of Oracle B2B, shown in Figure 2-11, create an agreement that specifies the trading partners involved and associates the document definitions, channels, and identifiers with the agreement.
Figure 2-11 Creating a Trading Partner Agreement
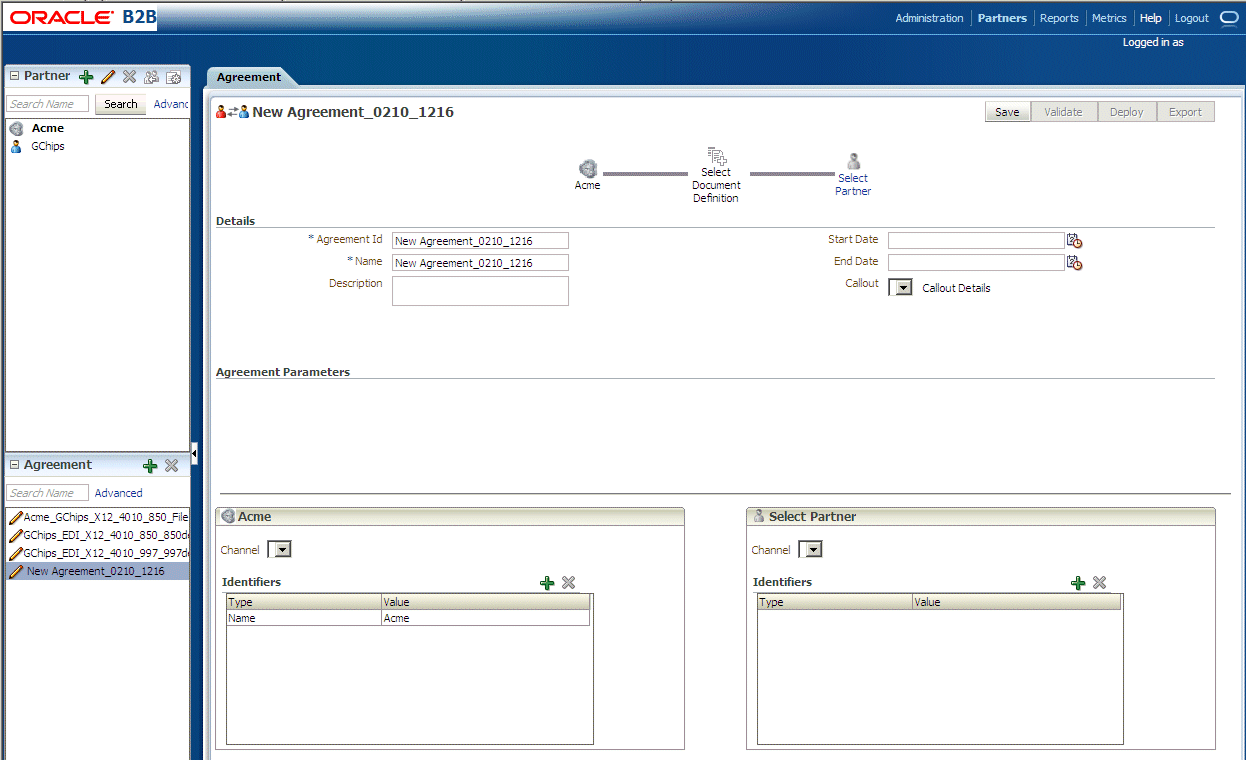
Description of "Figure 2-11 Creating a Trading Partner Agreement"
For more information, see Creating and Deploying Trading Partner Agreements.
Step 5: Deploy agreements
Using the Administration > Deploy tab of Oracle B2B, shown in Figure 2-12, search for and deploy agreements.
Figure 2-12 Searching for and Deploying Agreements
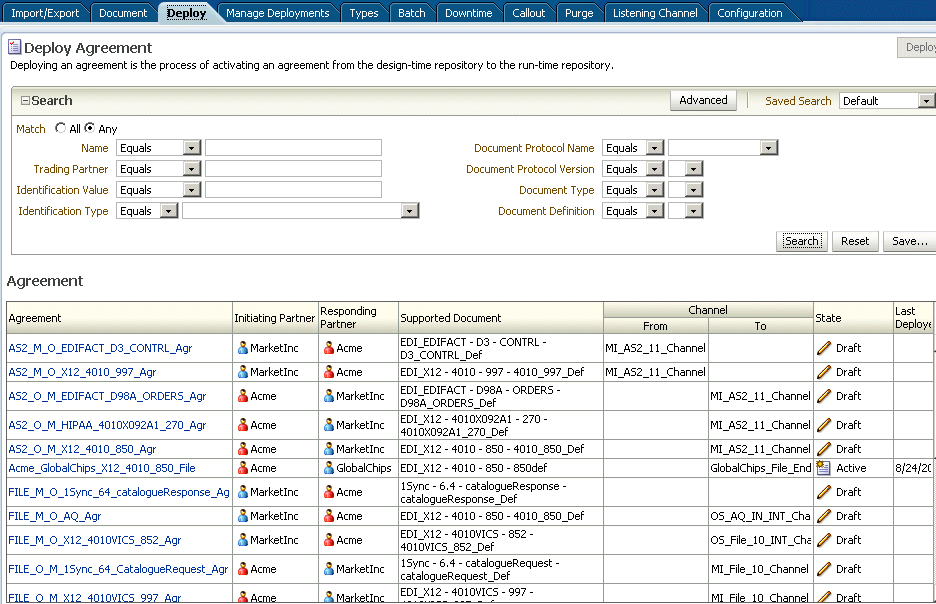
Description of "Figure 2-12 Searching for and Deploying Agreements"
2.5 Using Oracle B2B in the Oracle JDeveloper Environment
By using an Oracle B2B binding component in a SOA composite application, you can create an end-to-end business process, such as sending a purchase order generated by a back-end application to a trading partner. Binding components establish the connection between a SOA composite application and the external world.
The B2B Configuration Wizard in Oracle JDeveloper enables you to add B2B binding components to a SOA composite application as follows:
-
B2B is used as a service (inbound) to receive messages from trading partners and deliver them to SOA composite applications. Oracle B2B is the entry point to the SOA composite application.
-
B2B is used as a reference (outbound) to send messages from the SOA composite application to partners.
As you follow the steps in the B2B Configuration Wizard, you are prompted to select a document definition created in Oracle B2B. Or, you can launch Oracle B2B from the wizard to create a document definition. This is the payload, or message, that you are receiving from trading partners or sending to trading partners.
Note:
In the B2B Configuration Wizard, if SSL is enabled in the middleware (the B2B Web service), then the SSL port is detected by the wizard and the document definitions are retrieved using the SSL connection.
2.5.1 How To Use B2B Binding Components in a SOA Composite Application
To create a SOA composite application with a B2B binding component, do the following:
See the following topics in Developing SOA Applications with Oracle SOA Suite for more information on creating SOA composite applications:
2.5.1.1 Create a SOA Application and Project
2.5.1.2 Add Service Components
Service components implement the business logic or processing rules of your application.
-
From the Component Palette, select SOA.
-
From the Service Components list, drag a component into the designer.
A specific dialog for the selected service components is displayed. Table 2-1 describes the available editors.
Table 2-1 Starting Service Component Editors
Dragging This Service Component... Invokes The... BPEL Process
Create BPEL Process dialog to create a BPEL process that integrates a series of business activities and services into an end-to-end process flow.
Business Rule
Create Business Rules dialog to create a business decision based on rules.
Human Task
Create Human Task dialog to create a workflow that describes the tasks for users or groups to perform as part of an end-to-end business process flow.
Mediator
Create Mediator dialog to define services that perform message and event routing, filtering, and transformations.
-
Configure the settings for a service component. For help with a service component dialog, click Help or press F1. Click Finish.
-
Click OK.
-
Select Save All from the File main menu.
See Oracle Fusion Middleware Developer's Guide for Oracle SOA Suite for more information about adding service components.
2.5.1.3 Add a B2B Binding Component
Add a service or a reference binding component.
-
From the Component Palette, select SOA.
-
Drag B2B to the Exposed Services or the External References swim lane.
-
Select Exposed Services for receiving inbound messages.
-
Select External References for sending outbound messages.
-
-
On the B2B Configuration Wizard Welcome page, click Next.
-
On the Service Name page, provide a name for the B2B service and click Next.
-
On the B2B Integration Type page, select an integration type, as described below.
Table 2-2 Selecting an Integration Type
Type Description Default
A B2B WSDL is generated for the SOA composite to communicate with Oracle B2B directly.
AQ
An AQ Adapter WSDL and JCA file are generated for the SOA composite to communicate with Oracle B2B through AQ queues.
JMS
A JMS Adapter WSDL and JCA file are generated for the SOA composite to communicate with Oracle B2B through JMS queues.
-
If you select Default, complete steps 6 through 10.
-
If you select AQ, complete steps 6 through 9 and 11 through 14.
-
If you select JMS, complete steps 6 through 9 and 15 through 18.
-
-
On the Application Server Connection page, do one of the following:
-
From the AppServer Connection list, select an application server connection and click Next.
-
Or, click New to create an application server connection. Follow the Create Application Server Connection Wizard.
When the application server connection is established, the following information is displayed: the user name created for the application server connection, the host name for the server instance, and the SOA Server name. The SOA servers configured and running in Weblogic are displayed when you select an application server connection. After you select a SOA server, the SSL or HTTP port is retrieved and the B2B web service URL is generated for retrieving document definitions.
You can also click Test B2B to verify that you can connect to your Oracle B2B installation.
-
-
On the Operation page, select Send or Receive, as described below.
Table 2-3 Selecting a Send or Receive Operation
Operation Description Send
For outbound messages
Receive
For inbound messages
-
On the Document Definition Handling page, select the option on the Basic tab or one of the options on the Advanced tab, as described below.
Table 2-4 Selecting Document Definition Handling Options
Option Description Import Schema from B2B (Basic tab)
Imports the schema from Oracle B2B (the same option as on the Advanced tab)
Import Schema from B2B (Advanced tab)
Imports the schema from Oracle B2B (the same option as on the Basic tab)
Refer to Schema in B2B Repository (Advanced tab)
Selects a metadata service (MDS) connection. Or use this option to create a new one. If you create a new MDS connection, use the MDS Connection Wizard to create a connection. This connection is needed to access the B2B repository. When you select a document definition, a URL is generated to link to the MDS.
The selected application server connection refers to a specific B2B instance. The MDS connection used by the specific B2B instance must match the selected MDS connection to avoid inconsistent document definitions.
When referring to schema in a B2B Repository, an MDS connection is required only for referring to a schema in a remote MDS, but not if the schema is referred to within the local shared MDS repository.
For referring to B2B schemas
b2bExceptionandb2bAckin the local shared MDS, you do not need to select an MDS connection. You can select the MDS option and click Next to navigate to the Document Definition page where you can selectb2bExceptionorb2bAck, or other B2B schemas that exist in the local shared MDS.Browse Resource Schema (Advanced tab)
Browse for a schema using the SOA Resource Browser. Selecting this option opens the Type Chooser. Select a type and return to the Document Definition Handling page.
Opaque (Advanced tab)
Handles any type of data (for example, positional flat file) when the content is passed through in base-64 encoding. No schema is specified.
anyType (Advanced tab)
Handles any type of XML data. No schema is specified. This is valid and available only for the 'Default' integration type and not for AQ and JMS.
You can also select Attachment Support for the Default integration type so that the B2B WSDL file includes a message part for the attachment.
-
On the Document Definition page, expand the tree to select a document definition. If you select a document definition with multiple root elements, then select a root element to use and click OK.
Other options are described below.
Table 2-5 Document Definition Page Options
Option Description Search
Enter a definition name. Partial strings are matched if you type the beginning of the definition name. Partial strings with wildcards cannot be used.
Refresh
Retrieves the document definition list from the B2B server. Refresh after a search to see all document definitions.
B2B Configuration
Opens a browser to Oracle B2B, using the connection specified on the Application Server Connection page. In Oracle B2B, you can create a document definition, include it in an agreement, and deploy the agreement. Then return to this dialog, click Refresh, and select the new document definition.
Use Routing ID
Selects all document definitions that use a document routing ID. For more information, see Using Document Routing IDs.
If you selected the
-
Default integration type, go to step 10.
-
AQ integration type, go to step 11.
-
JMS integration type, go to step 15.
-
-
On the Finish page, click Finish.
-
On the Service Connection page, do one of the following:
-
From the Connection list, select a database connection and click Next.
-
Or, click New to create an application server connection. Follow the Create Application Server Connection Wizard.
The information displayed when the database connection is established is described below.
Table 2-6 Service Connection
Parameter Description User Name
The user name created for the database connection.
Driver
The JDBC driver is provided.
Connect String
The JDBC connection string is provided.
JNDI Name
Use the default Java Naming and Directory Interface (JNDI) name or specify a custom name. This connection enables you to configure the adapter during design time and to connect to the database server during runtime.
Data Source
Enter the JNDI name that is used to look up the data source in data-sources.xml. If you are using data-sources.xml to get the connection, then this name is required.
XA Data Source
Select this option if the data source name is an XA data source. An XA data source can participate in an XA global transaction that can span multiple resources. In this transaction, the application server acts as the coordinating transaction manager with multiple databases (or other resources such as JMS), each of which is involved in a single transaction. If selected, the adapter becomes part of the XA transaction. Otherwise, it is a local transaction.
-
-
On the Queue Name page, select a database schema and a queue name.
Only queues for B2B of the type
IP_MESSAGE_TYPEare available. -
On the Queue Parameters page, do the following:
-
For an enqueue operation, enter a recipient name or a list of recipients separated by commas. If you do not enter a recipient, then the message is sent to all subscribers of the queue. This field can be overridden on a per message basis by setting the RecipientList field in the outbound header. The default value is b2buser.
-
For a dequeue operation, enter the following:
-
Consumer: The name of the agent subscribing to the queue. This field is required and is limited to 30 characters. The default value is b2buser.
-
Message Selector Rule: Optional filtering logic for messages to dequeue based on the message properties or message content (for example, priority < 5 or tab.user_data.amount > 10000). If a rule is supplied, then an agent using the consumer name and the message selector rule are created in the queue. The consumer name must be a new agent name, because the adapter does not change the message selector rule of a previously created agent. No validation is performed on the logic you enter.
-
Dequeue Condition: A Boolean expression similar to the
WHEREclause of a SQL query. This expression can include conditions on message properties, user data properties (object payloads only), and PL/SQL or SQL functions. If more than one message satisfies the dequeue condition, then the order of dequeuing is indeterminate, and the sort order of the queue is not honored.
-
-
-
Click Finish.
-
On the JMS Provider page, select one of the following:
-
Oracle Enterprise Messaging Service (OEMS): Oracle WebLogic JMS or Oracle Advanced Queuing
OEMS is built on JMS and the J2EE Connector Architecture (JCA), which enables you to develop and integrate distributed applications in a service-oriented architecture environment. This messaging platform provides service for message persistence and recovery.
-
third-party: Persists messages in a third-party JMS provider, such as Tibco JMS or IBM WebSphere MQ JMS.
-
-
If you selected Oracle WebLogic JMS or Oracle Advanced Queuing, then the Service Connection page appears. On the Service Connection page, do one of the following:
-
From the AppServer Connection list, select an exising application server connection and click Next.
-
Or, click New to create an application server connection. Follow the Create Application Server Connection Wizard.
If you selected third-party, then the JMS Connection page appears. On the JMS Connection page, provide the JMS Connection JNDI Name and click Next.
-
-
If you selected Send in Step 7, then the Produce Operation Parameters page appears. If you selected Receive in Step 7, then the Consume Operation Parameters page appears.
On the Produce Operation Parameters page, provide the following information and click Next:
-
Destination Name: Enter the JNDI name of the queue or topic to produce the message or click Browse to select a name. The value of this field is typically the JNDI name.
-
Message Body Type: Select the message body (payload) type.
-
Text Message: Use this option when the payload is a string.
-
Bytes Message: Use this option when the payload is an array of primitive bytes.
-
-
Delivery Mode: Select a message delivery mode (only if WebLogic JMS was selected).
-
Persistent: Use this option for messages that are persisted to a file system or database.
-
Non-Persistent: Use this option for messages that are not persisted and are typically held in process memory only.
-
-
Priority: Select a priority value, with 9 representing the highest priority and 0 representing the lowest priority.
-
Time To Live: Enter a value that indicates the life span of the message. If no subscribers consume the message in the given time, then the message is not delivered. There is no limit. A value of 0 indicates that there is no expiration time.
-
JNDI Name: Displays the JNDI name based on your selection in the Destination Name field (only if WebLogic JMS or Advanced Queuing is selected).
On the Consume Operation Parameters page, provide the following information and click Next:
-
Destination Name: Enter the JNDI name of the queue or topic to consume the message or click Browse to select a name.
-
Message Body Type: Select the message body (payload) type.
-
Text Message: Use this option when the payload is a string.
-
Bytes Message: Use this option when the payload is an array of primitive bytes.
-
-
Message Selector: Specify filtering logic that enables you to receive messages that match certain criteria. Enter an expression between 1 and 255 characters in length. Use SQL92 syntax in this field. The JMS server uses these criteria to filter messages received by this consumer. This works with variables defined in standard JMS headers and user-defined properties. You cannot use variables or elements that are in the payload of the message.
-
Use MessageListener: This option is set to false by default if you selected Oracle Weblogic JMS on the JMS Provider page. It is not editable. Select true or false if you selected Oracle Advanced Queueing on the JMS Provider page (only if Oracle Advanced Queuing or third-party is selected).
-
Durable Subscriber ID: Enter an ID for receiving messages from a JMS topic. If you do not specify an ID, then you must have an active subscription session to receive messages. If you specify an ID for topics, then you receive messages even if you do not currently have an active subscription session. When a durable subscriber is disconnected from the JMS server, the server stores messages. When the durable subscriber reconnects, the server sends the unexpired messages that accumulated (only if third-party is selected).
-
JNDI Name: Displays the JNDI name based on your selection in the Destination Name field (only if WebLogic JMS or Advanced Queuing is selected).
-
Enable Streaming: When you enable this feature, the payload is streamed to a database. Use this feature for large payloads. When you enable streaming, a corresponding Boolean property,
StreamPayload, is appended to theActivationSpecproperties defined in the respective.jcafile. If the StreamPayload property does not exist, then the default valuefalseis assumed. The property is applicable when processingRawmessages,XMLTypemessages, andADTtype messages for which a payload is specified though anADTattribute.
-
-
Click Finish.
See the following topics in Developing SOA Applications with Oracle SOA Suite for more information on binding components:
2.5.2 About Using the JMS Integration Type in the B2B Configuration Wizard
If you select the JMS integration type, then you must use JMS properties prefixed with jca.jms.JMSProperty, as in jca.jms.JMSProperty.property_name. (In contrast, when you select the Default or AQ integration types in the B2B Configuration Wizard, message properties such as MSG_ID, INREPLYTO_MSG_ID, FROM_PARTY, TO_PARTY, ACTION_NAME, MSG_TYPE, DOCTYPE_NAME, and DOCTYPE_REVISION can be used in the SOA composite application without any changes.)
Table 2-7 lists the JMS properties to use with the Oracle JCA Adapter for JMS.
Table 2-7 JMS Adapter Properties
| Property Name | Property Name When Used with the Oracle JCA Adapter for JMS |
|---|---|
MSG_ID |
jca.jms.JMSProperty.MSG_ID |
INREPLYTO_MSG_ID |
jca.jms.JMSProperty.INREPLYTO_MSG_ID |
FROM_PARTY |
jca.jms.JMSProperty.FROM_PARTY |
TO_PARTY |
jca.jms.JMSProperty.TO_PARTY |
ACTION_NAME |
jca.jms.JMSProperty.ACTION_NAME |
MSG_TYPE |
jca.jms.JMSProperty.MSG_TYPE |
DOCTYPE_NAME |
jca.jms.JMSProperty.DOCTYPE_NAME |
DOCTYPE_REVISION |
jca.jms.JMSProperty.DOCTYPE_REVISION |
ATTACHMENT |
jca.jms.JMSProperty.ATTACHMENT |
A2A |
jca.jms.JMSProperty.A2A |
For JMS message correlation, set the property A2A=true. If MSG_ID is provided from the back-end application, then MSG_ID is set as JMS Correlation ID in the B2B output, otherwise the JMS Message ID is set to JMS Correlation ID in the B2B output.
For example, these sender properties and values are added in the Assign Values dialog of the Mediator component for an outbound composite, as shown in Figure 2-13.
Figure 2-13 Adding JCA JMS Properties in the Assign Values Dialog
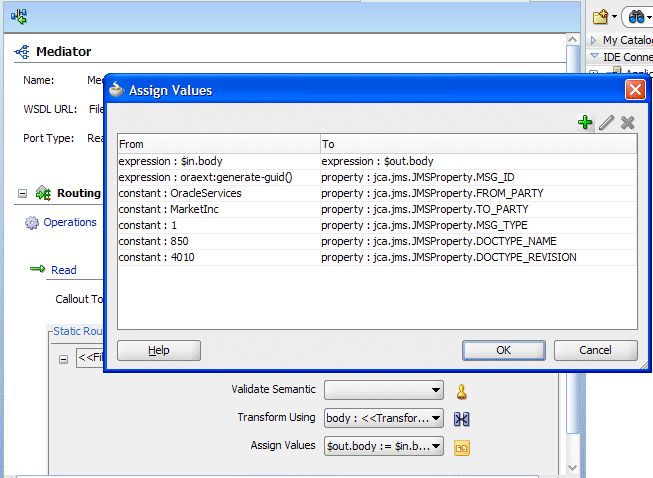
Description of "Figure 2-13 Adding JCA JMS Properties in the Assign Values Dialog"
