13 Developing Workflows
This chapter describes the concepts, features, and architecture of workflows in Oracle Identity Manager. It provides use cases for workflow, and instructions for designing, implementing, and deploying your first workflow. In addition, this chapter describes how to extend the request management operations by using plug-in points and how to customize the certification and identity audit composites.
This chapter contains the following topics:
13.1 Introducing Workflows
Workflows are used to route requests for approval and route manual provisioning tasks to IT provisioners or help desk fulfillment.
This section describes the key workflow concepts in the following topics:
13.1.1 Overview of Workflows
Managing user access and orchestrating the business process so that users get the correct access is a key identity governance function.
The process of changing users' access can be initiated by the users through events in HR that trigger policies, or by administrators. Irrespective of how the change in access is initiated, organizations require the following:
-
The business process that is initiated must be flexible, and must be able to meet changing business rules of the organization.
-
The business process must be able to decide between granting access immediately versus introducing manual intervention steps and seeking approval prior to granting access.
-
The business process must be able to perform validations, including Segregation of Duties (SoD) checks on what is being requested, by who, for whom, and in what context.
-
If manual intervention is required, then the business process must have the ability to assign to users or groups of users and escalate, reassign, or expire if no response is received in a timely manner.
-
For manual intervention, the business process must have the ability to gather information from the approvers, including comments and attachments.
-
The business process must be able to interact with external systems, such as ticketing systems, when automated access grants are not possible, or the organization's rules require that access is granted manually.
-
All decisions and actions must be audited and available in a reportable manner to allow the organization to measure performance of the process and also for auditors to fulfill compliance requirements
Oracle Identity Manager provides flexible and powerful access request capabilities that allow organizations to meet these requirements.
13.1.2 Workflow Concepts
Primary concepts related to workflows are request, approval, approval workflow policy, SOA composite, partner link, BPEL process, IT provisioner, request web service, request callback, provisioning callback, request payload, and human task.
The key concept of workflows in Oracle Identity Manager involves the following terminologies:
-
Request
In Oracle Identity Manager, a request refers to the business process that is invoked when an operation on an identity or an account has to be performed. Examples of these operations include creating a user, provisioning an account, and granting a role to a user. A request can either be fulfilled immediately (also known as direct operation) or can require manual intervention in the form of approvals (also known as request-based operation). When a user tries to perform an operation, Oracle Identity Manager determines whether the operation would be direct or request-based on the authorization policies of the logged-in user.
-
Approval
A request goes through one level of approval. This is configured in the workflow policy of the corresponding operation.
A bulk requests goes through one level of approval. This is configured in the workflow policy of the corresponding Bulk operation. After approval, child requests are generated. These child requests would follow same approval process as simple request.
-
Approval workflow policy
An approval workflow policy consist of a rule configured by the administrator that allows the request engine to pick a SOA composite to invoke. The rules defined in approval workflow policies help the request engine determine if the request should be auto-approved or a SOA composite should be invoked.
-
SOA composite
A SOA composite is an assembly of services, service components, and references designed and deployed together in a single application. Wiring between the service, service component, and reference enables message communication. The composite processes the information described in the messages.
-
Partner Link
A partner link enables you to define the external services with which the BPEL process service component is to interact. You can define partner links as services or references (for example, through a JCA adapter) in the SOA Composite Editor or within a BPEL process service component in Oracle BPEL Designer.
-
BPEL process
BPEL processes provide process orchestration and storage of synchronous or asynchronous processes. You design a business process that integrates a series of business activities and services into an end-to-end process flow.
-
IT provisioner
The IT provisioner, also known as fulfillment user or Help Desk user, is the persona responsible for fulfilling manual provisioning requests.
-
Request web service
The request web service is a web service that is shipped with Oracle Identity Manager. It allows customers to expose request, user, role, organization, account, entitlement, application instance, and catalog information so that approval workflows can make data-driven routing decisions.
-
Request callback
The request callback is a web service that is invoked by the SOA composite when an approval outcome (approve/ reject) has been received. When the request engine invokes a SOA composite for the purpose of approval, it suspends the request until the composite invokes the request callback and provides an approve or reject decision. This decision allows the request engine to proceed with fulfilling the request (if approved) or rejecting the request (if rejected).
-
Provisioning callback
The provisioning callback is a web service that is invoked as part of disconnected provisioning. When the IT provisioner or fulfillment user fulfills a disconnected provisioning request and marks the task as completed, the SOA composite invokes the provisioning callback and sends the provisioning status allowing the provisioning workflow to complete.
-
Request payload
The request engine invokes the SOA composite and passes it some basic information about the request, requester, and target user. This information is called the request payload.
-
Human Task
Human tasks provide workflow modeling that describes the tasks for users or groups to perform as part of an end-to-end business process flow.
13.1.3 Workflow Architecture
The components involved in workflow architecture are authorization policies, Business Process Execution Language (BPEL) process, human tasks, and approval or rejection of requests.
Workflows are used in Oracle Identity Manager to:
-
Route requests to approvers for approval
-
Route manual provisioning tasks to IT provisioners or Help Desk for fulfillment
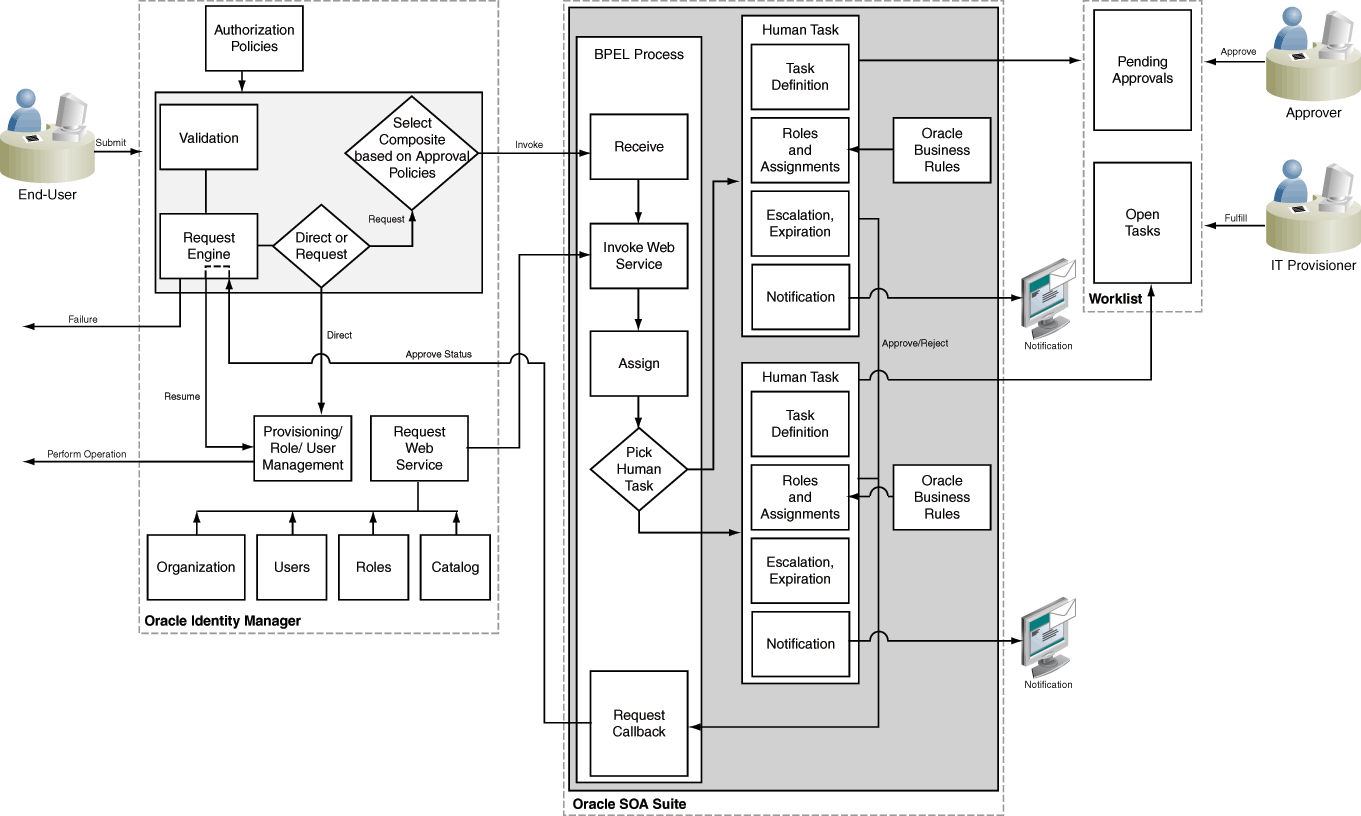
Figure 13-1 provides an overview of workflows in Oracle Identity Manager:
For information about the steps involved in completion of the human task, see Human Task Process Flow.
13.1.4 Human Task Process Flow
Completion of human tasks includes various user-initiated actions, request creation, approval workflow policies, SOA composites, whether human intervention is required, and approval or rejection of the request.
The following actions occur for completion of the human task, as shown in Figure 13-1, are the following:
-
User initiates an operation that results in a request. Examples of such operations include:
-
Self-registration
-
User profile modification, excluding lock, unlock, and password management operations
-
Role grant operations
-
Application instance operations, including disconnected provisioning
-
Entitlement operations
-
Bulk operations
-
-
A request is created. After appropriate validation, the request engine evaluates approval workflow policies and selects a SOA composite to be invoked.
-
If approval workflow policies are not configured, then the default SOA composite is selected for approval.
-
The SOA composite involves the Business Process Execution Language (BPEL) process.
-
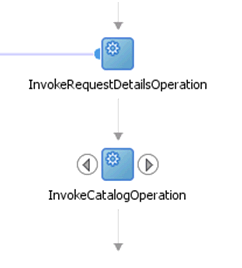
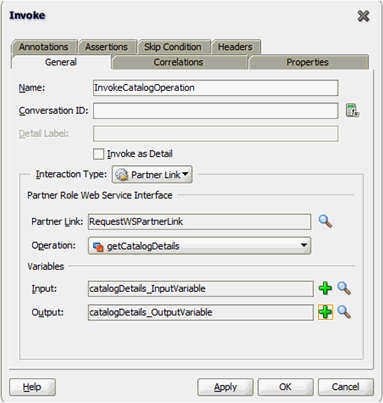
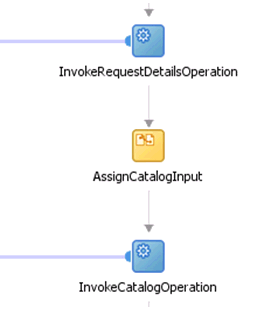
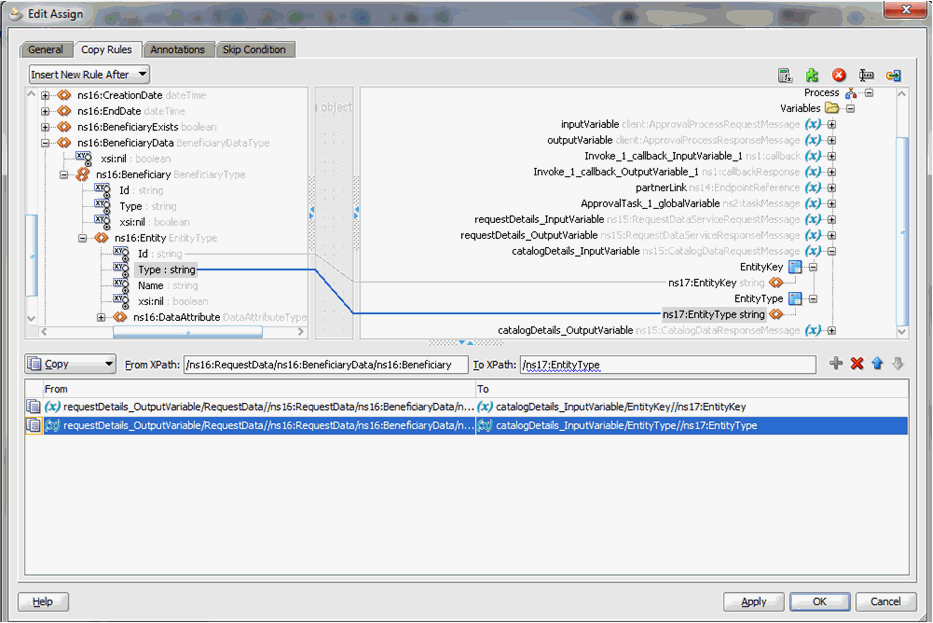
The BPEL process invokes a web service to get additional details about the request including:
Note:
This step is optional. This is required only if additional information related to various entities is required in BPEL Process.
-
Item details from the catalog
-
Target user information
-
Requester information
-
-
The BPEL process invokes additional logic to calculate properties such as priority, approvers, and notification.
-
When manual intervention is required, such as during approval and manual fulfillment, the process invokes a Human Task.
A Human Task contains the logic to assign, expire, or escalate the approval task to users or roles. The Human Task can assign the users and roles statically or dynamically. For static assignments, the approvers can be determined in the BPEL process and passed as parameters to the Human Task. For dynamic assignments, rules created using Oracle Business Rules (OBR) are used to dynamically determine the approvers.
Typically, the BPEL process contains one Human Task. In some instances, the BPEL process might invoke a decision point to pick one of multiple Human Tasks.
-
When the human task completes, a response of approve or reject (for approval) or complete (for manual fulfillment), is returned via a callback service to Oracle Identity Manager, which resumes the operation.
13.2 Predefined SOA Composites
Predefined SOA composites can be used as approval processes.
Table 13-1 lists the predefined SOA composites in Oracle Identity Manager that can be used as approval processes.
Table 13-1 Predefined Workflow Composites
| Workflow Composite | Description |
|---|---|
|
DefaultRequestApproval |
This is the default request-level approval. By default, the request-level approval goes to the SYSTEM ADMINISTRATORS role, for request-level approval. In addition, this composite is invoked by certification use cases. The task will have one of the following states:
Note: For information about the certification use cases, see Managing Identity Certification in Performing Self Service Tasks with Oracle Identity Governance. |
|
DefaultOperationalApproval |
This is the default operation-level approval. By default, the approval task is assigned to the SYSTEM ADMINISTRATORS role for operation-level approval. In addition, the composite is invoked by certification use cases, and the task will be auto-approved. |
|
BeneficiaryManagerApproval |
This requires approval from the beneficiary's manager. This can be associated with the following:
This composite must be associated at the operational level of approval because a request can have multiple beneficiaries at the request level. |
|
DefaultRoleApproval |
This SOA composite creates a single approval task that is assigned to the SYSTEM ADMINISTRATORS role for approval. |
|
RequesterManagerApproval |
This SOA composite creates a single approval task that is assigned to the requester's manager for approval. Note: This composite cannot be associated with unauthenticated request models, such as Self-Register User. |
|
DefaultSODApproval |
This SOA composite creates an approval task that is assigned to the System Administrator, starts SoD check, and after the SoD result is available, it creates another approval task assigned to the SOD Administrators role. This must be associated with request models to provision or modify resources at the operational level if SoD check is required. |
|
DisconnectedProvisioning |
This SOA composite assigns the task to the System Administrator to fulfil the disconnected provisioning. |
|
ProvideInformation |
This SOA composite assigns the task to the requester seeking details of account/entitlement. |
|
CertificationProcess |
This is the default Certification composite. This composite takes care of assigning the certification task to the certifier (user). This composite also manages the following certification task events:
|
|
CertificationOverseerProcess |
This composite assigns a certification task to the certifier (user). In addition, the composite also handles routing the task to the overseer after the certifier completes the task. Oracle SOA Business Rules are used to handle the task routing. This composite handles the following certification task events:
|
13.3 Creating New SOA Composites
You can create and deploy a SOA composite and use it as an approval process.
Creating a new SOA composite that can be used as an approval process involves the following steps:
13.3.1 Creating a New SOA Composite
You can create a new SOA composite that can be used as an approval process by adhering to certain standards.
To use a SOA composite as an approval process, it must adhere to certain standards. This section describes the standards and how to create a new SOA composite. It contains the following topics:
13.3.1.1 Standards of Using SOA Composites as Approval Process
To use a SOA composite as an approval process, it must adhere to certain standards. These standards ensure that the request service is able to instantiate and manage such composites correctly. These standards are:
-
The following attributes are mandatory for BPEL process:
-
RequestID of type String
-
RequestModel of type String
-
RequestTarget of type String
-
URL of type String
-
RequesterDetails of XML Element
-
BeneficiaryDetails of XML Element
-
ObjectDetails of XML Element
-
OtherDetails of XML Element
The RequestID, RequestModel, RequestTarget, and URL attributes are always set with valid values for all types of requests.
RequesterDetails is an XML element. This element is filled up with valid values for all requests that requires authentication. Requester details is empty for the requests of type Self-Register User because the requester is anonymous user.
BeneficiaryDetails is an XML element. This element is filled up with valid values for all requests that have a beneficiary, for example, Provision Resource and Assign Roles. This is filled up only if the request is associated with single beneficiary. If the request is associated with multiple beneficiaries, then BeneficiaryDetails is empty. BeneficiaryDetails element always has valid value for simple requests and child requests that have a beneficiary. Therefore, it is recommended to use this XML element in SOA composites that are used as approval processes at the operational level of approval. This is because at the operational level of approval, the request is associated with only one beneficiary.
ObjectDetails is an XML element. This element is filled up with valid values for all requests that are associated with the Resource entity. This is filled up only if the request is associated with single resource. If the request is associated with multiple resources, then ObjectDetails is empty. The ObjectDetails element always has valid value for simple and child requests that are associated with resource. Therefore, it is recommended to use this XML element in SOA composites that are used as approval processes at the operational level of approval. This is because at the operational level of approval, the request is associated with only one resource.
-
-
All the attributes that are mandatory for the BPEL process are referred from RequestDetails.xsd and ApprovalProcess.xsd. These files are present in the template SOA composite, which must not de modified or deleted.
13.3.1.2 Creating a Custom SOA Composite Using the Helper Utility
Oracle Identity Manager provides a helper utility for creating custom SOA composites. This utility creates a template SOA project that adheres to all the necessary standards. This utility is located in the OIM_HOME/workflows/new-workflow directory.
Note:
-
JAVA_HOME environment variable must be set before running this utility.
-
This utility requires Apache Ant version 1.9.8 or later.
-
JDeveloper is not available with Oracle Identity Manager by default. For SOA support, install SOA recommended JDeveloper.
To create a custom SOA composite by running the helper utility:
13.3.2 Deploying a SOA Composite in Oracle SOA Server
After creating a new SOA composite, you must deploy it for using it as an approval process.
For information about deploying the workflow composite in BPEL, see Deploying SOA Composite Applications in the Developer’s Guide for Oracle SOA Suite.
Note:
The composite should be redeployed with a new version. If a composite is redeployed with the same version in SOA, then all the pending approvals in Oracle Identity Manager initiated by the composite becomes stale and are removed from the user's TaskList. See How to Deploy an Existing SOA Archive in Oracle JDeveloper in the Developer's Guide for Oracle SOA Suite for information about deploying existing SOA composites.
If you are redeploying a composite using Oracle Enterprise Manager:
- As already recommended, redeploy with a different version. Otherwise, all the pending requests will be stale.
- If you still want to redeploy a composite either because there are no pending requests or you are fine with stale requests, then do not use the redeploy option on Enterprise Manager. First undeploy the composite, and then deploy.
13.3.3 Setting the Prerequisites for Communication to Oracle Identity Governance Through SSL Mode
The prerequisite for SSL communication is setting the TRUSTSTORE_LOCATION environment variable and using t3s protocol.
If the communication to Oracle Identity Manager is through the SSL mode, then you must:
Note:
For a non-SSL connection, skip this section.
13.4 Developing Workflows: Vision Request Tutorial
Vision Request tutorial includes creating an application and developing the workflow for it, and configuring the approval and fulfillment for the application.
This section describes how to design your first workflow. It contains the following topics:
13.4.1 Introducing the Tutorial
The end result of the use case for this tutorial is an application instance and a SOA composite for approval consisting of a BPEL process and multiple human tasks.
This tutorial is based on the following use case:
-
Vision Corp uses FinApp, a mainframe-based application. The application does not have APIs that can be remotely invoked. Therefore, accounts are managed manually by the Help Desk.
-
Vision Corp employees use the Access Request Catalog to request accounts and entitlements in the application.
-
Approvals are based on the risk level of the access being requested. When the risk level is Low, approval is required only from the beneficiary's manager. When the risk level is Medium, approval is required from either the beneficiary's manager or a member of the Audit Review team. When the risk level is High, approval is required from the beneficiary's manager and a member of the Audit Review team.
This tutorial describes how to create the application and the workflow, and how to configure the approval and fulfillment for the application.
The result of the tutorial is:
-
An application instance
-
A SOA composite for approval consisting of:
-
A BPEL process
-
Multiple Human Tasks
-
13.4.2 Assumptions
Certain prerequisites must be met for the tutorial, which includes installation of Oracle SOA Suite and JDeveloper with SOA Design Time, and creation of couple of roles and an organization called Vision.
The following assumptions are made for this tutorial:
-
Oracle SOA Suite is installed on a host on which the SOA infrastructure is configured.
-
JDeveloper 12.2.1.3 is available with SOA Composite Editor 12.2.1.3 and BPEL Designer 12.2.1.3.0.
-
Mandatory patches, if any, for SOA Jdeveloper extension have been applied. For information about the mandatory patches, see Mandatory Patches Required for Installing Oracle Identity Manager in Oracle Fusion Middleware Release Notes.
-
You are familiar with basic BPEL constructs, including BPEL activities and partner links, and basic XPath functions.
-
You are familiar with the SOA Composite Editor and Oracle BPEL Designer, the environment for designing and deploying BPEL processes. However, for detailed information about SOA composites, see Getting Started with Developing SOA Composite Applications in Developing SOA Applications with Oracle SOA Suite.
-
Two roles, Audit Review Team and Asset Management Team, have been created and members have been assigned.
-
An organization with name Vision is created.
13.4.3 Creating the Application Instance
As a prerequisite for this tutorial, you must create an application instance, define the application instance attributes and create a form, publish the application instance to one or more organizations, link entitlements to the application instance, and publish the application instance with entitlements to the catalog.
This section describes how to create and publish the application instance, and link entitlements to it. It contains the following topics:
13.4.3.1 Creating the FinApp Application Instance
To create the FinApp application instance:
- Login to Oracle Identity System Administration.
- Click Sandboxes to access sandbox management, create a sandbox, and activate it. SeeManaging Sandboxesfor information about sandboxes and how to create, activate, and publish sandboxes.
- Under Configuration, click Application Instances. Click Create on the toolbar to open the Create Application Instance page.
- Enter Name and Display Name as FinApp.
- Select the Disconnected option to specify a disconnected application instance.
- Click Save, and then click OK to confirm creation of the FinApp application instance.
13.4.3.2 Defining Application Instance Attributes and Creating a Form
To define the attributes of the application instance and create a form:
-
Under Configuration, click Form Designer.
-
Search and select the FinApp form. This form is automatically created when the disconnected application instance is saved.
Note:
You must be in an active sandbox to create and edit a form.
-
Click the Fields tab, and then click the Edit icon on the toolbar.
By default, the following fields are created and are available for use:
Field Description IT Resource
The IT resource instance where the account is being created
Account Login
The login for the application
Password
The password that is used while logging in to the application
Account ID
The unique identifier generated by the application when the account is created
Service Account
A flag that is used during access request only
Note:
Attributes such as Account ID and IT Resource are typically not displayed in the access request user interface. Depending upon the use case, for example a mobile phone request, the attributes might not be relevant. To hide these attributes, you can customize the form. See Configuring Custom Attributes in Administering Oracle Identity Governance for more information on how to customize the form.
-
Add additional attributes. In this example, add the following attribute:
Account Description: Data type is Text.
Note:
See Configuring Custom Attributes in Administering Oracle Identity Governance for more information on creating the custom attributes
-
After adding the attributes, verify that the configuration in the Fields tab is similar to the following table:
Display Label Name Type Account Description
AccountDescription
Text
Account ID
UD_FINAPP_ACCOUNTID
Text
ITResource
UD_FINAPP_IT
Number
Account Login
UD_FINAPP_LOGIN
Text
Password
UD_FINAPP_PASSWORD
Text
Service Account
serviceaccount
Checkbox
-
To allow users to request entitlements, you must add a child object and add an attribute that is tagged as an Entitlement. To do so:
-
Click the Child Objects tab, and then click Add on the toolbar.
-
Enter the child object name, and click OK to create the child object.
-
Click the child object just created.
-
Select Action, Create to create a new attribute. From the popup window, select Lookup, and click OK. Enter values for the following fields:
Name: Profile Name
Display Name: Profile Name
-
Select Use in Bulk to allow requesters to specify a value when requesting access for multiple users.
-
Under Lookup Type, click Create a New Lookup Type.
-
Create the new Lookup and specify the values, as shown:
Code: Lookup.FinApp.Profile
Meaning: Lookup.FinApp.Profile
Description: Lookup.FinApp.Profile
-
Create three lookup codes by using the values given in the following table:
Meaning Code FinApp User
FinAppUser
FinApp Administrator
FinAppAdministrator
FinApp Operator
FinAppOperator
Note:
You can also populate the lookup definition by using a scheduled task and the lookup APIs.
-
Select the Searchable, Entitlement, and Searchable Picklist options.
-
-
Click Save and Close.
-
Click Back to Parent Object.
-
Click Regenerate View to re-create the UI form with the new attributes.
-
Close all tabs.
-
Publish the sandbox.
13.4.3.3 Publishing the Application Instance to One or More Organizations
To publish the application instance to one or more organizations:
- Open the FinApp application instance details page, and click the Organizations tab.
- Click Assign. In the Select Organizations dialog box, select one or more organizations to publish the application instance to.
- Select the Hierarchy option if you want the application instance to be published to the organization and its child organizations.
- Click OK.
13.4.3.4 Linking Entitlements to the Application Instance
To link entitlements to the application instance:
13.4.4 Configuring FinApp in the Catalog
Edit the catalog item details to configure the application instance and its entitlements in the catalog.
To configure the application instance and its entitlements in the catalog:
13.4.5 Creating and Configuring the SOA Composite for Approval
After configuring the application instance and its entitlements in the catalog, you can create and configure the SOA composite for approval, which includes creating the approval workflow, making request and catalog data available to the BPEL process, configuring workflow selection, configuring human tasks, configuring the human task and BPEL mappings, deploying the SOA composite, and creating the workflow rules.
This section contains the following topics:
13.4.5.2 Making Request and Catalog Data Available to the BPEL Process
To make request and catalog data available to the BPEL process:
13.4.5.3 Configuring Workflow Selection
To define the workflow selection rules:
-
Define a variable called catalogData. To do so:
- Click the Variables icon, and then click the Create icon on the Variable dialog box.
- Choose Type as Element, and click the Search icon next to the field.
- In the dialog box, expand Project Schema Files and then CatalogData.xsd, and select the CatalogData element. This variable will contain the catalog details returned as an output of the InvokeCatalogDetails step.
-
Define a variable called workflowtype. To do so:
- Select type as Element, and click the Search icon next to the field.
- In the dialog box, expand Project Schema Files and then BusinessRule.xsd, and select the StageOutput element. This variable will contain the type of workflow to be invoked.
-
Navigate to the SOA Composite view, and add a Business Rule component, as shown in Figure 13-12.
Figure 13-12 Adding Business Rule Component

Description of "Figure 13-12 Adding Business Rule Component" -
In the Create Business Rules dialog box, specify the name of the Rule Dictionary as WorkflowSelection.
-
Specify Input as CatalogData from CatalogData.xsd in Project Schema Files and Output as StageOutput from BusinessRule.xsd in Project Schema Files.
-
Switch to the BPEL process.
-
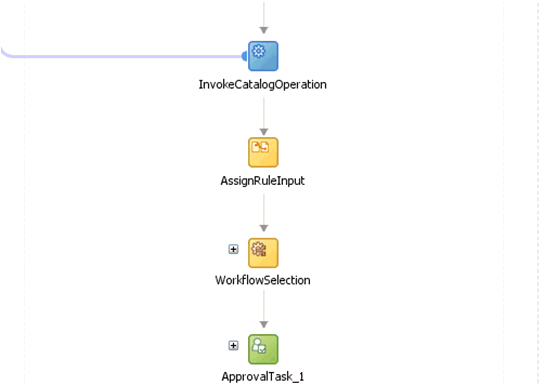
Expand SOA Components and add a Business Rule component between the InvokeCatalogOperation and ApprovalTask_1 components.
-
Edit the rule and rename it to
WorkflowSelection. -
In the Rule dialog box, click the Dictionary tab, and select the WorkflowSelection dictionary that you defined in step 4.
-
Click the Assign Input Facts subtab in the Dictionary tab, and click the plus (+) icon.
-
Map the catalogData variable to the input to the Rule, as shown in Figure 13-13.
Figure 13-13 catalogData Variable Input Mapping
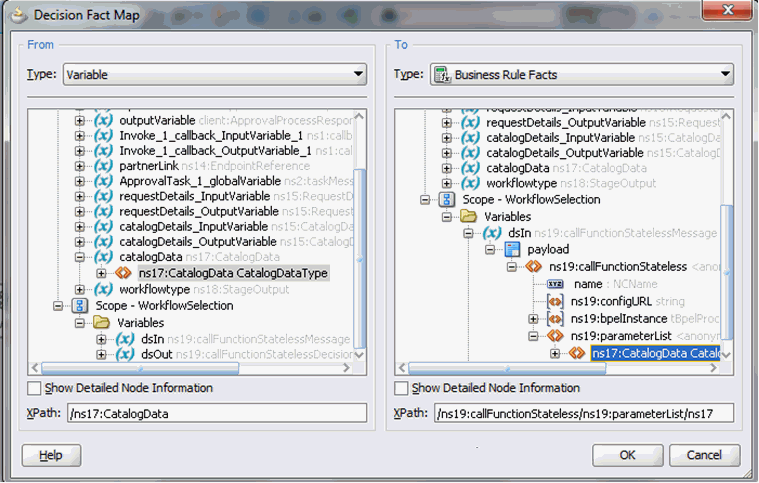
Description of "Figure 13-13 catalogData Variable Input Mapping" -
Click the Assign Output Facts subtab in the Dictionary tab.
-
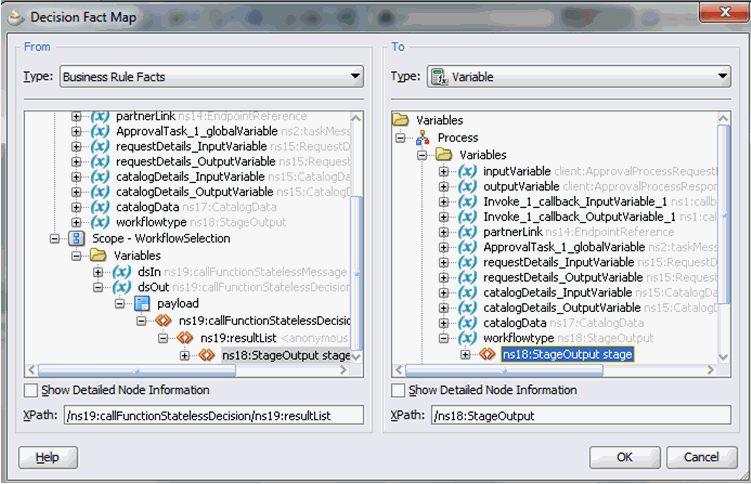
Map the workflowtype variable to the output to the Rule, as shown in Figure 13-14.
Figure 13-14 workflowtype Variable Output Mapping
Description of "Figure 13-14 workflowtype Variable Output Mapping" -
Add an Assign activity before the WorkflowSelection rule and rename it as AssignRuleInput, as shown in Figure 13-15.
-
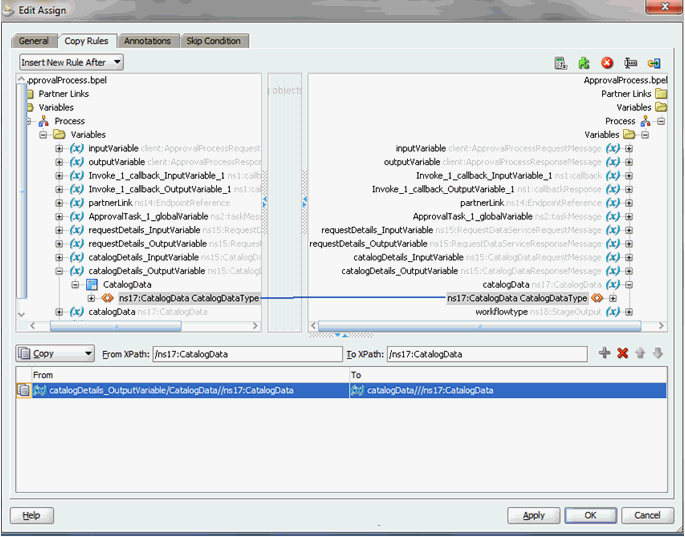
Map the output of the InvokeCatalogOperation to the catalogData variable, as shown in Figure 13-16.
Figure 13-16 catalogData Variable Output Mapping
Description of "Figure 13-16 catalogData Variable Output Mapping" -
Switch to the SOA Composite view.
-
Right-click the Business Rule component, and select Edit.
-
Click Create Rule.
-
Rename the rule from Rule1 to
Auto Approval. -
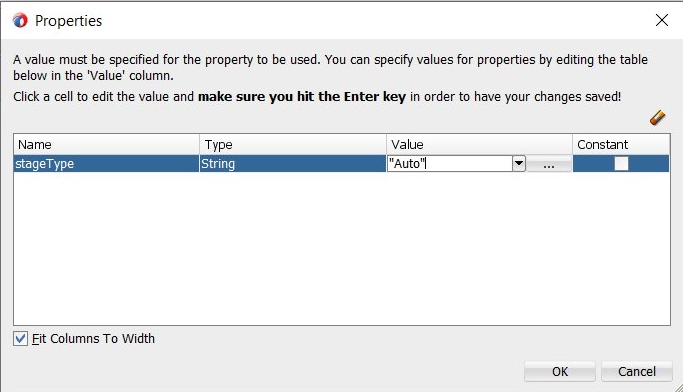
Edit the rule so that items without Low, Medium, or High risk values are staged as Auto approval. To do this: , as shown in Figure 13-17.
-
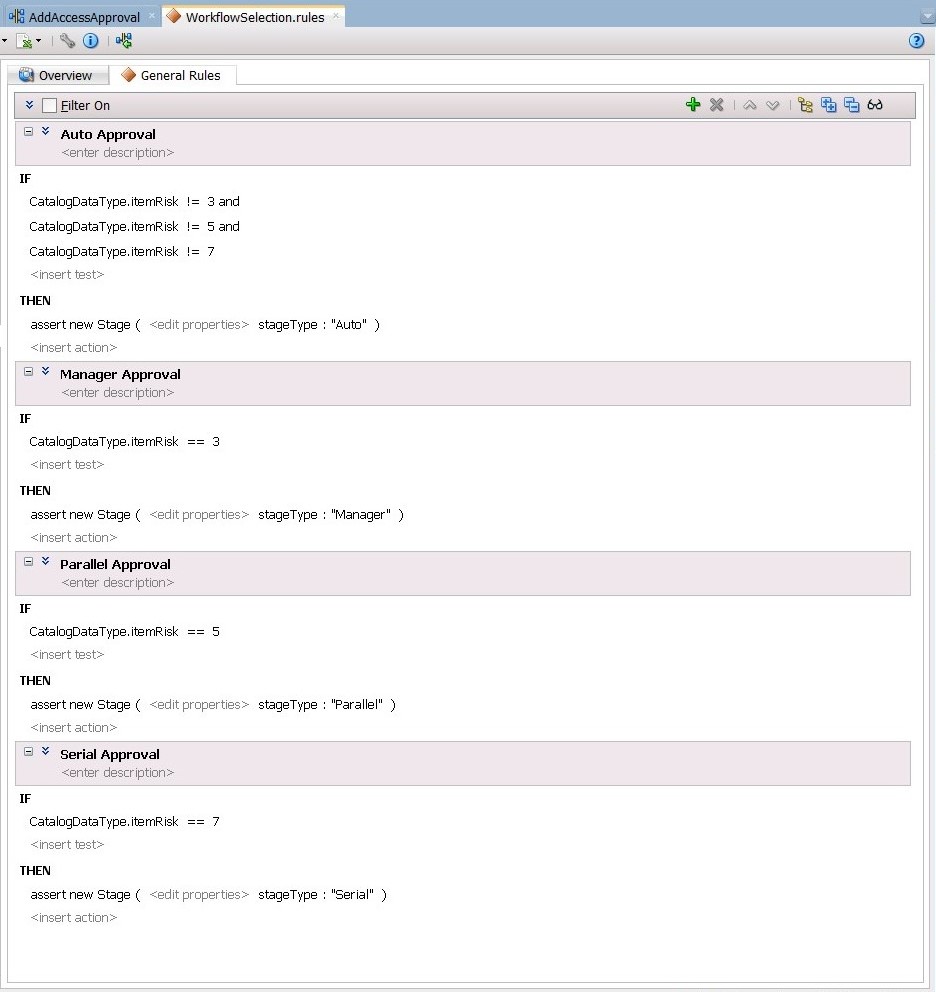
Click the <insert test> action below IF and select simple test. Define this as:
CatalogDataType.itemRisk != 3
-
Select the first test and use the Insert After option to add another simple test:
CatalogDataType.itemRisk != 5
-
Select the previous test and again use the Insert After option to add the final simple test
CatalogDataType.itemRisk != 7
As a result of these additions, the IF condition shows:
CatalogDataType.itemRisk != 3 and CatalogDataType.itemRisk != 5 and CatalogDataType.itemRisk != 7 -
Click <insert_action> action below THEN, and select assert new.
-
Click <target> that is added next to assert new, and select Stage.
-
Click <edit properties> and type in the value
Autoin the Properties dialog box, as shown in Figure 13-17.
-
-
Similarly, create the Manager, Serial, and Parallel approval rules, as shown in Figure 13-18.
-
Switch to the BPEL process.
-
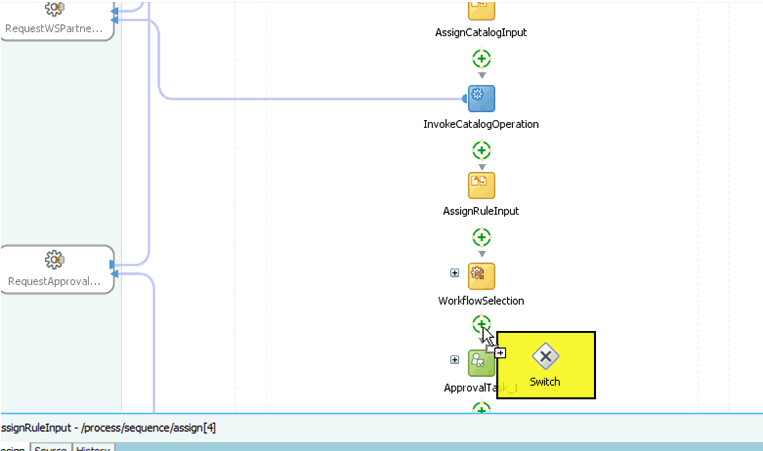
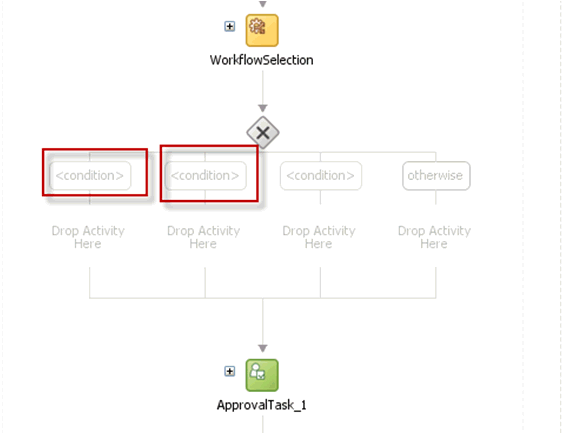
Add a switch activity after the WorkflowSelection rule, as shown in Figure 13-19.
-
Select the Switch activity and add two Switch Case steps, as shown in Figure 13-20.
-
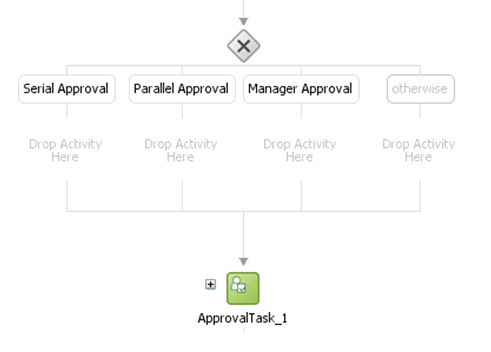
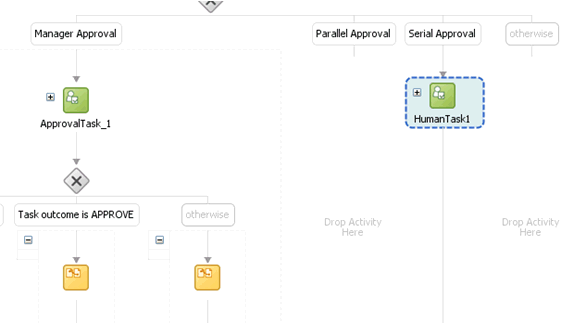
Rename the conditions as Serial Approval, Parallel Approval, and Manager Approval, as shown in Figure 13-21.
-
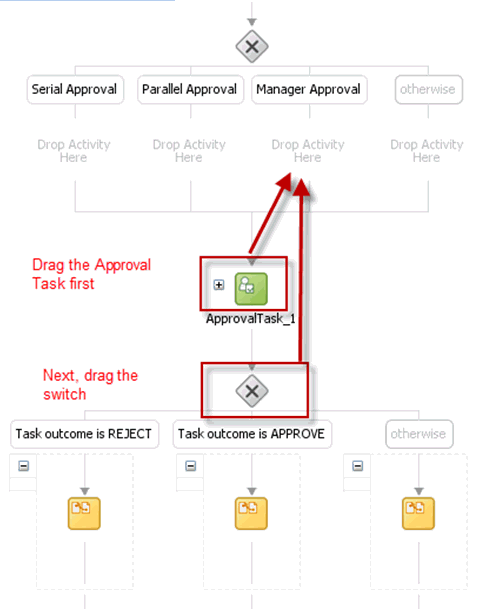
Drag the default Human Task into the Manager Switch Case, as shown in Figure 13-22.
-
Switch to the SOA Composite view.
-
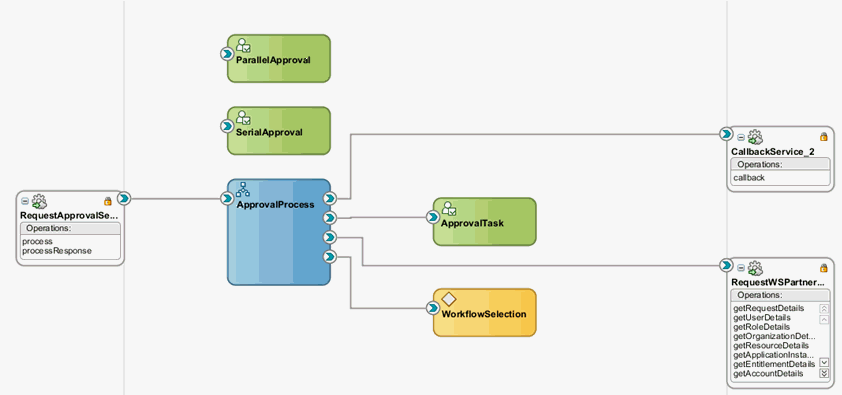
Add two Human Tasks, SerialApproval and ParallelApproval, as shown in Figure 13-23.
-
Switch to the BPEL Process.
-
Edit the Manager Approval Switch case, and add the following expression:
bpws:getVariableData('workflowtype','/ns18:StageOutput/ns18:stageType')='Manager'You must first configure the newly added Tasks and then wire them to the BPEL Process.
Note:
Oracle recommends using expression builder to add the expression..
13.4.5.4 Configuring Human Tasks
This section describes how to configure the Human Task. It consists of the following topics:
13.4.5.4.1 Configuring the Parallel Human Task
To configure the parallel Human Task:
-
Switch to the SOA Composite view. Edit the Parallel Approval Task.
-
Click the Data tab, and add the attributes listed in Properties of the Parallel Approval Task.
-
Verify the task parameters in the Data tab, and then click the General tab.
-
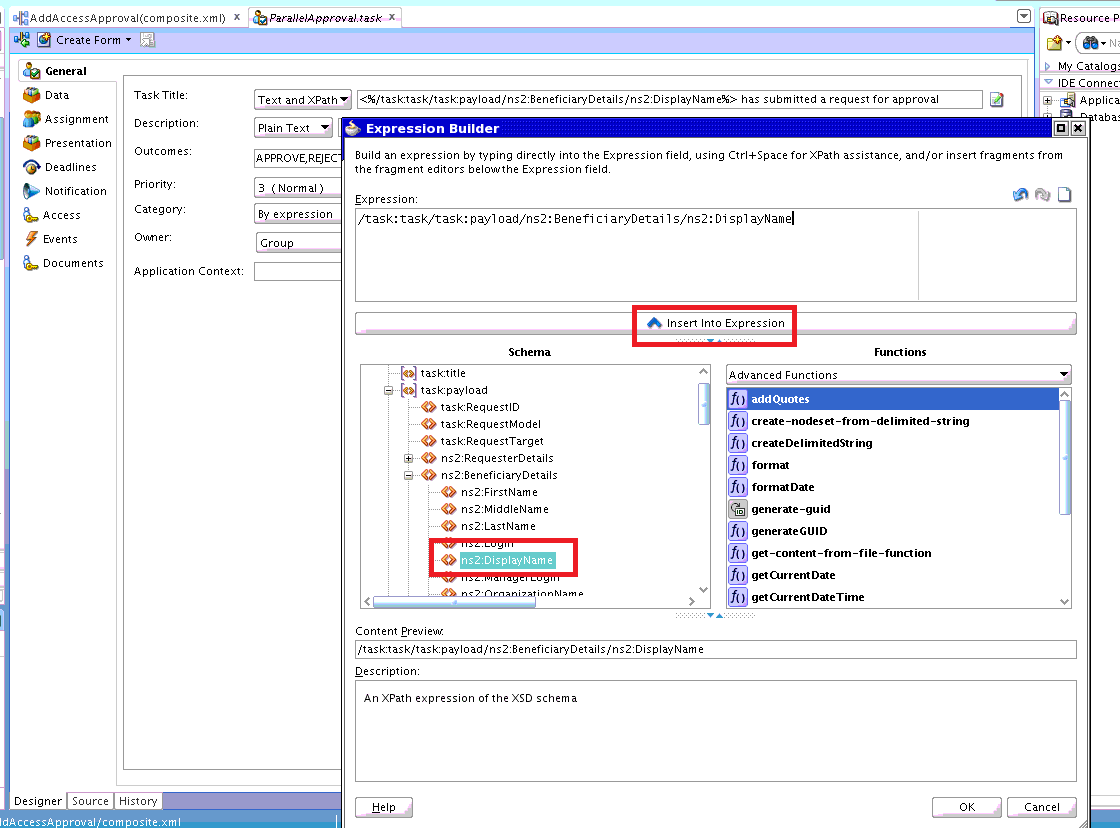
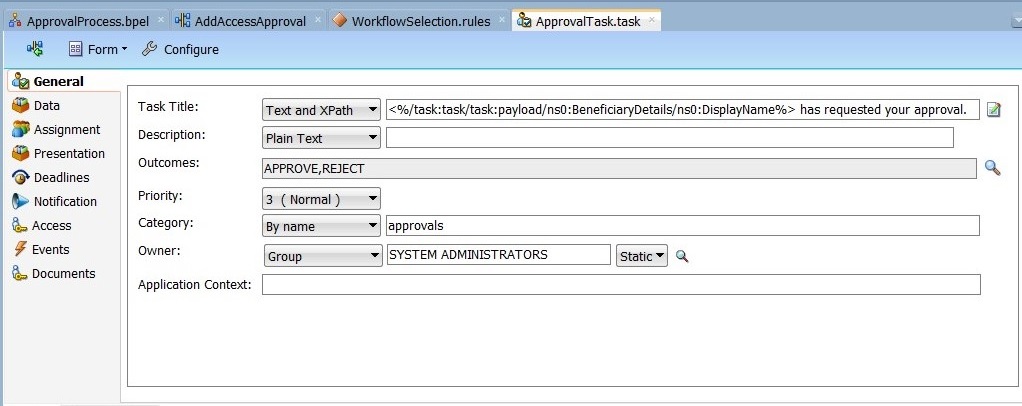
Set the Task Title to
<%/task:task/task:payload/ns2:BeneficiaryDetails/ns2:DisplayName%> has submitted a request for approval. To do so:-
Click Edit next to Task Title, and select task:payload, ns2:BeneficiaryDetails, ns2:DisplayName.
-
Click Insert Into Expression. Task Title is displayed as shown in Figure 13-24:
<%/task:task/task:payload/ns2:BeneficiaryDetails/ns2:DisplayName%>
This can be edited to configure meaningful title, such as:
<%/task:task/task:payload/ns2:BeneficiaryDetails/ns2:DisplayName%> has submitted a request for approval.
-
-
Set the Task Owner to Group and SYSTEM ADMINISTRATORS, and set the Category using the By name option with approvals.
-
Click the Notification tab, and then click Advanced.
-
Select the Make notification actionable option. Deselect the Show worlist/workspace url in notifications option.
-
Click the Assignment tab.
-
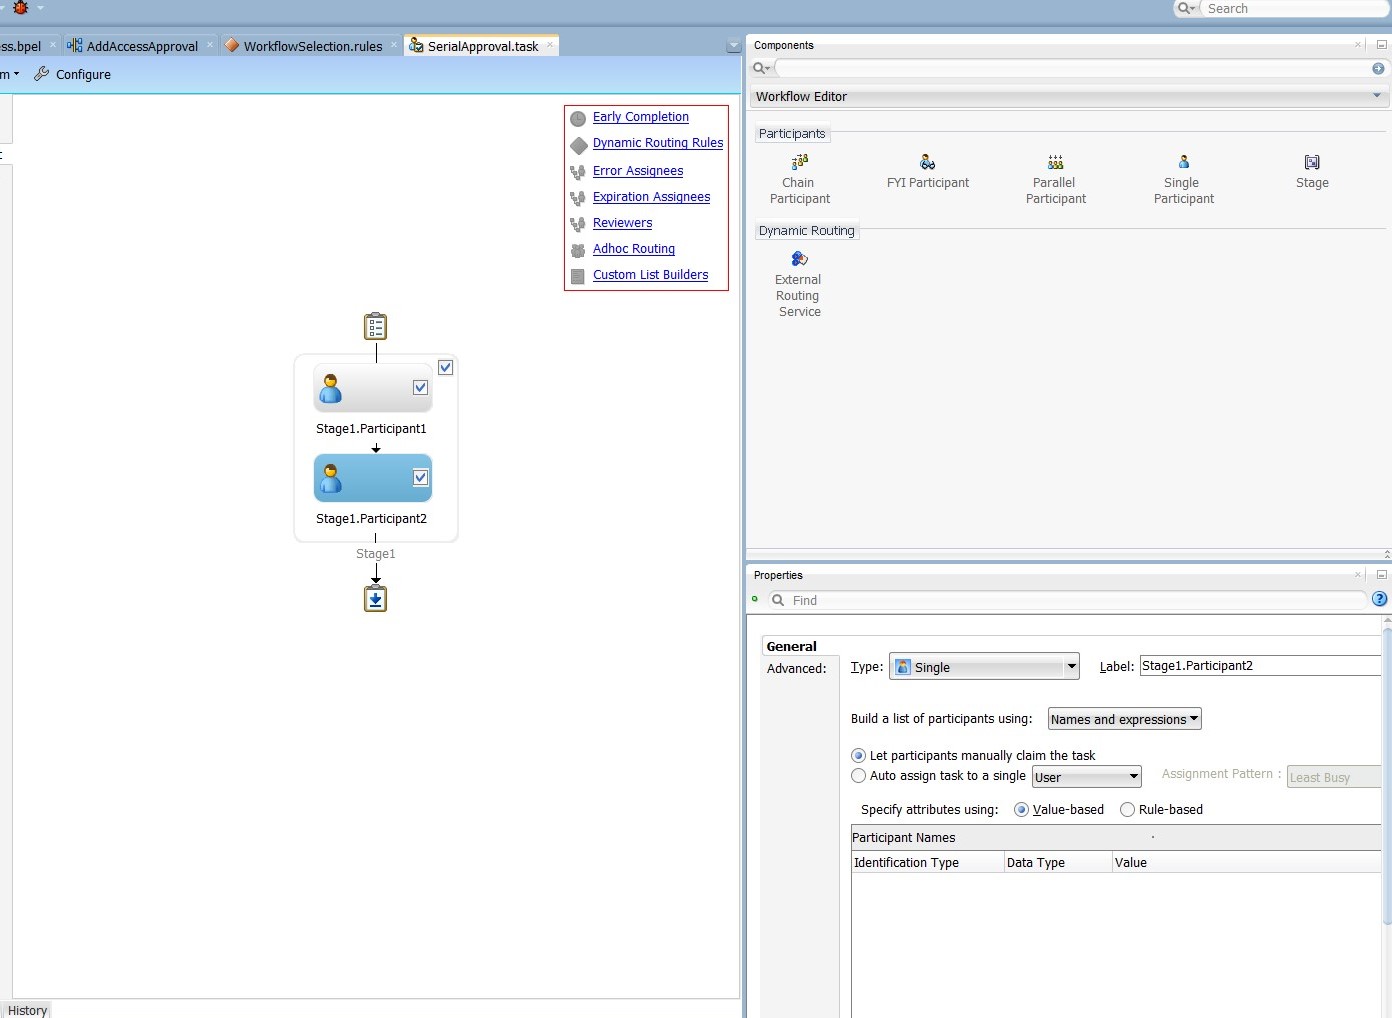
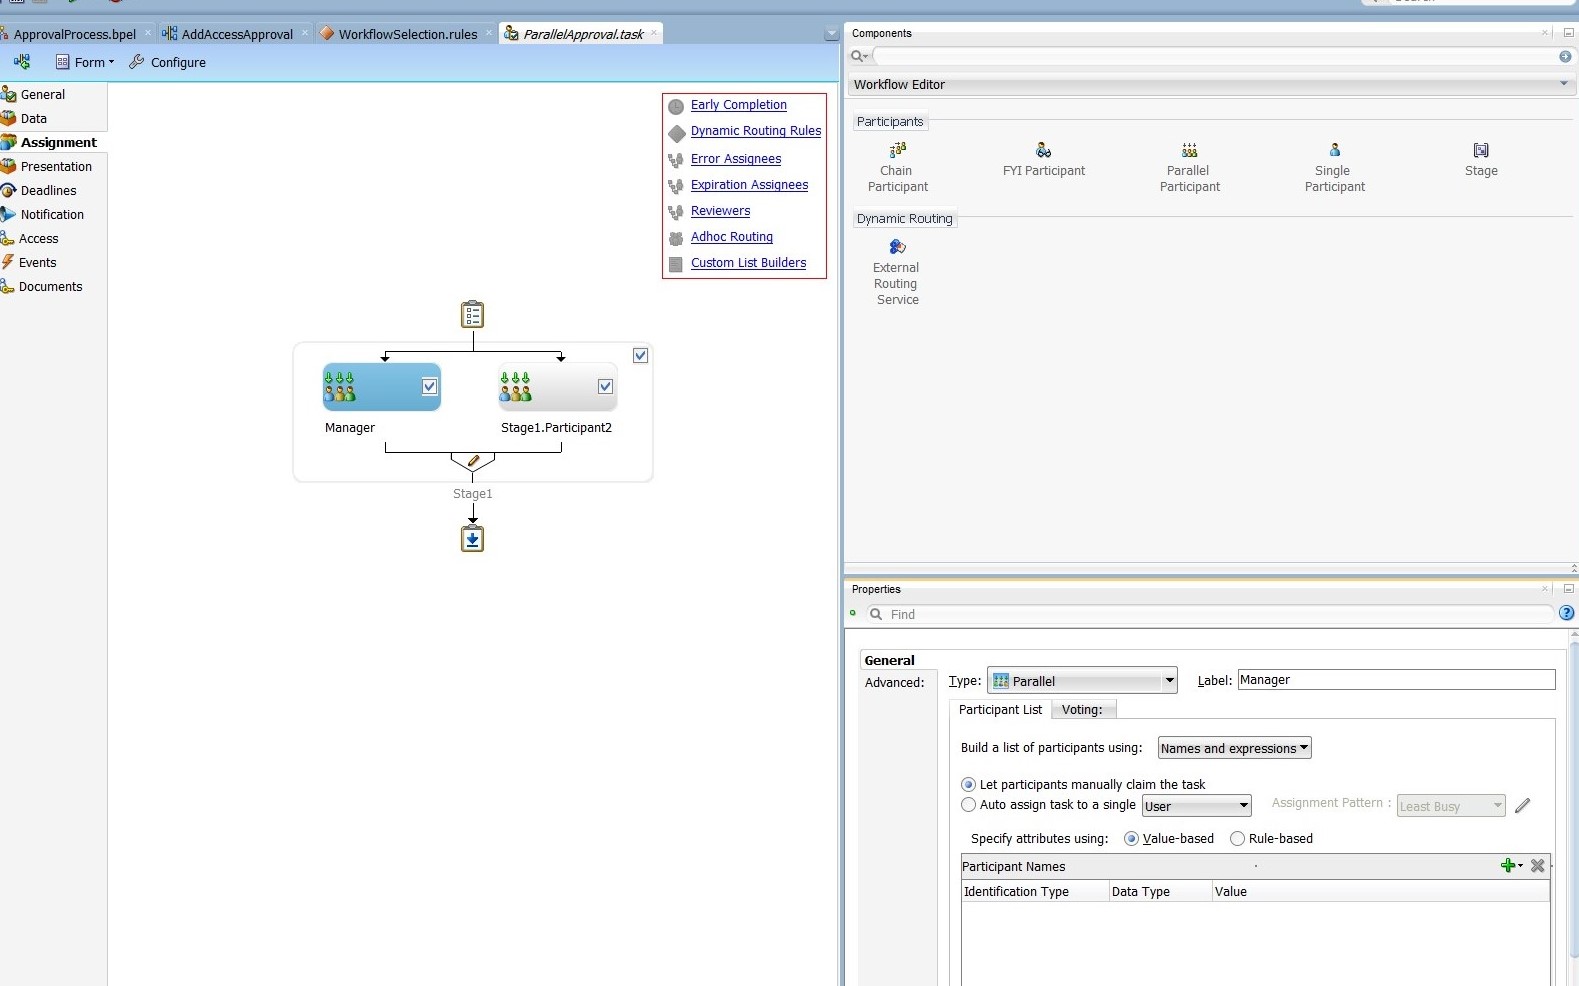
Add a Parallel stage. To do so, drag and drop a Single Participant from the Workflow Editor to the Stage1 box. Repeat the process adding a second Single Participant just to the right of the first one.
-
Configure the Voted Outcome details. To do so, select the pencil icon just below the two stages. In the Properties box:
- Set Voted Outcomes to APPROVE, leaving Outcome Type as "By Percentage" and Value as "50".
- Set the Default Outcome to REJECT.
- Select the Share attachments and comments and the Immediately trigger voted outcome when minimum percentage is met options.
-
Edit the Manager stage. To do this, select the Stage1.Participant1 stage. In the Properties box:
- Change the Label to Manager, as shown in Figure 13-25.
Figure 13-25 Manager and Review Team Stages
Description of "Figure 13-25 Manager and Review Team Stages" - From the Build a list of participants drop down box, select Rule-based.
- In the List Ruleset field, enter
Manager, then click the plus icon to the right of the field.
- Change the Label to Manager, as shown in Figure 13-25.
-
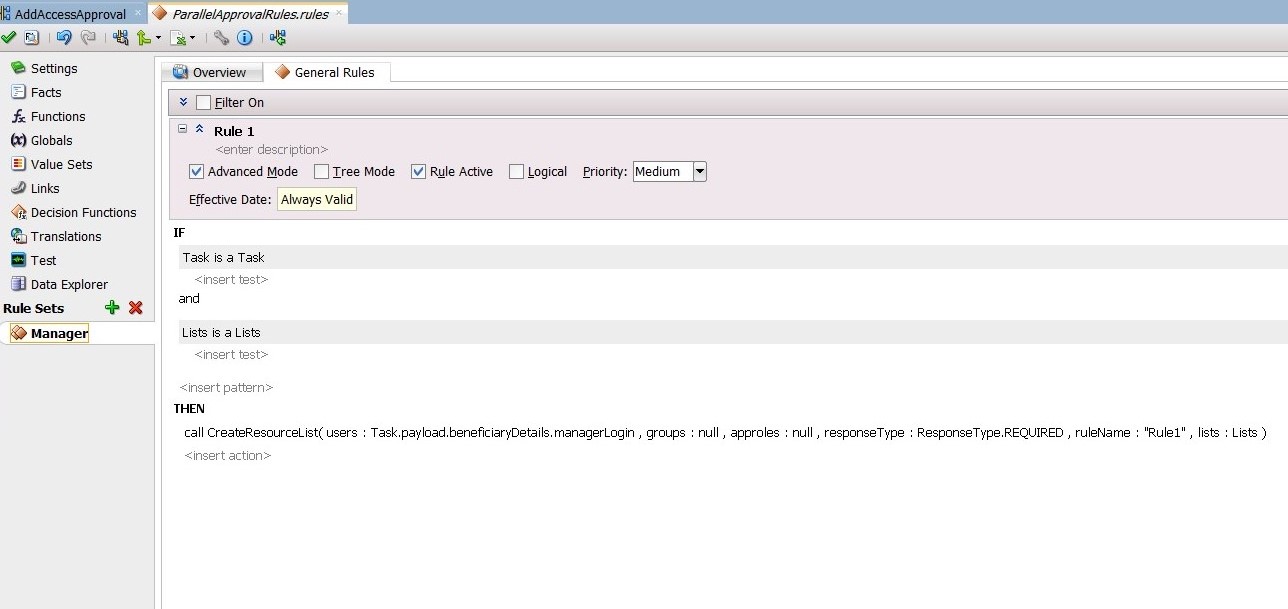
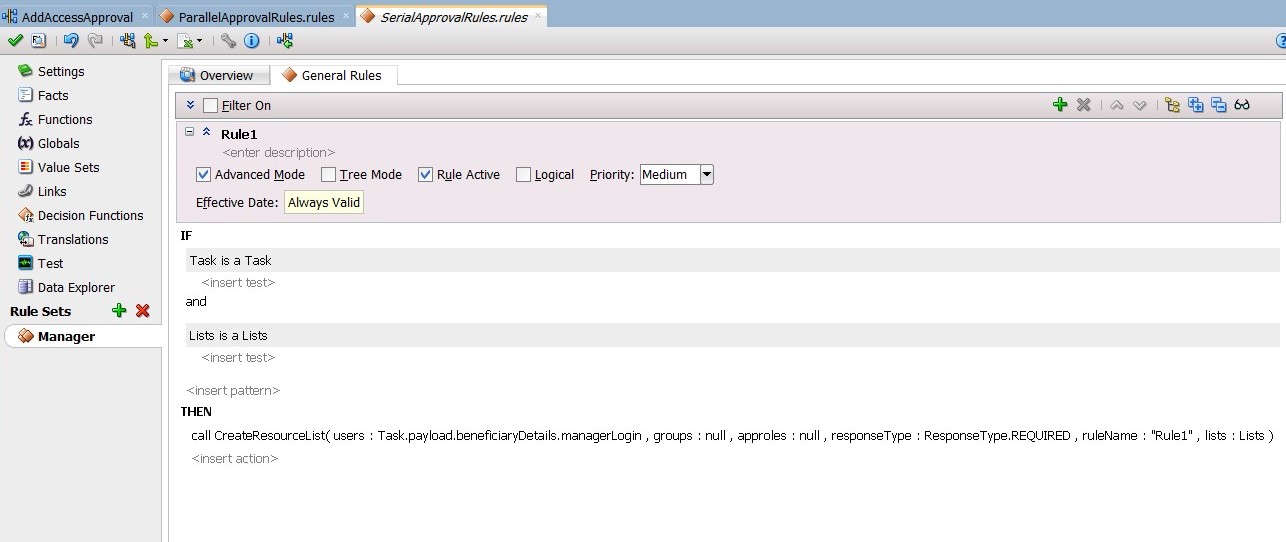
From the General Rules box on the Overview tab of the Manager Rule Set, click the Add icon to create a new rule.
-
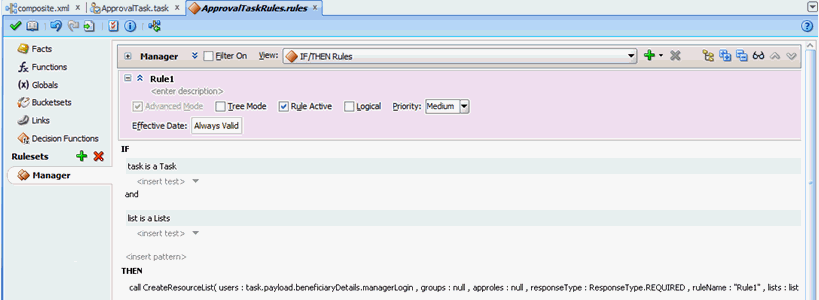
Create the participant list rule as shown in Figure 13-26.
-
Edit the ReviewTeam stage. To do this, select the Stage1.Participant2 stage. In the Properties box:
- Change the Label to ReviewTeam.
- From the Build a list of participants drop down box, select Rule-based.
- In the List Ruleset field, enter
ReviewTeam, and then click the plus icon to the right of the field.
-
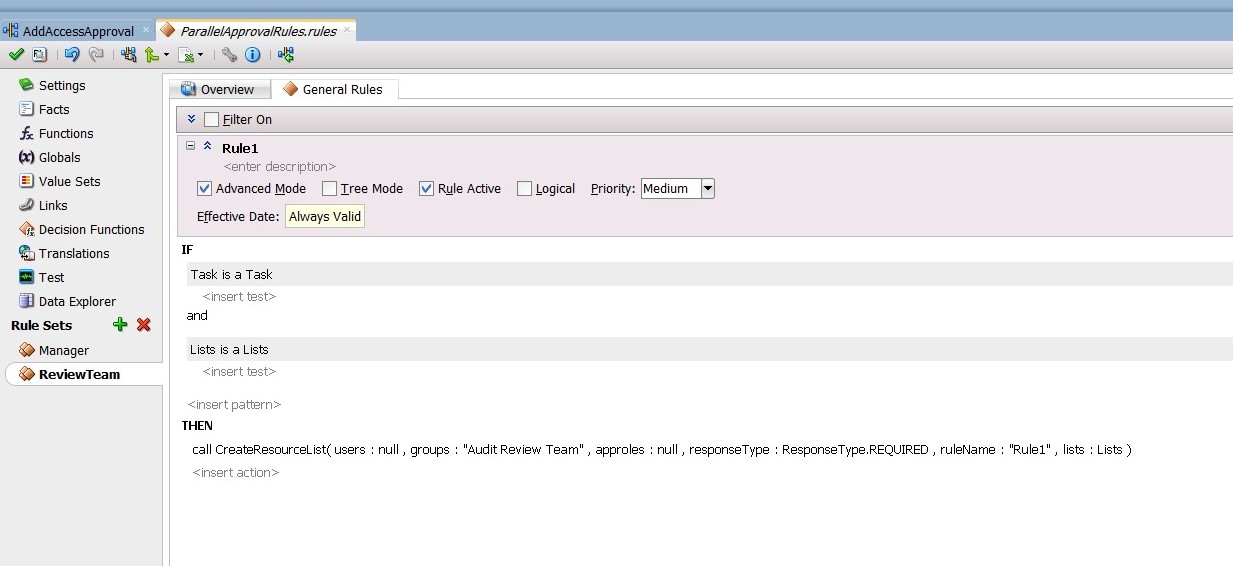
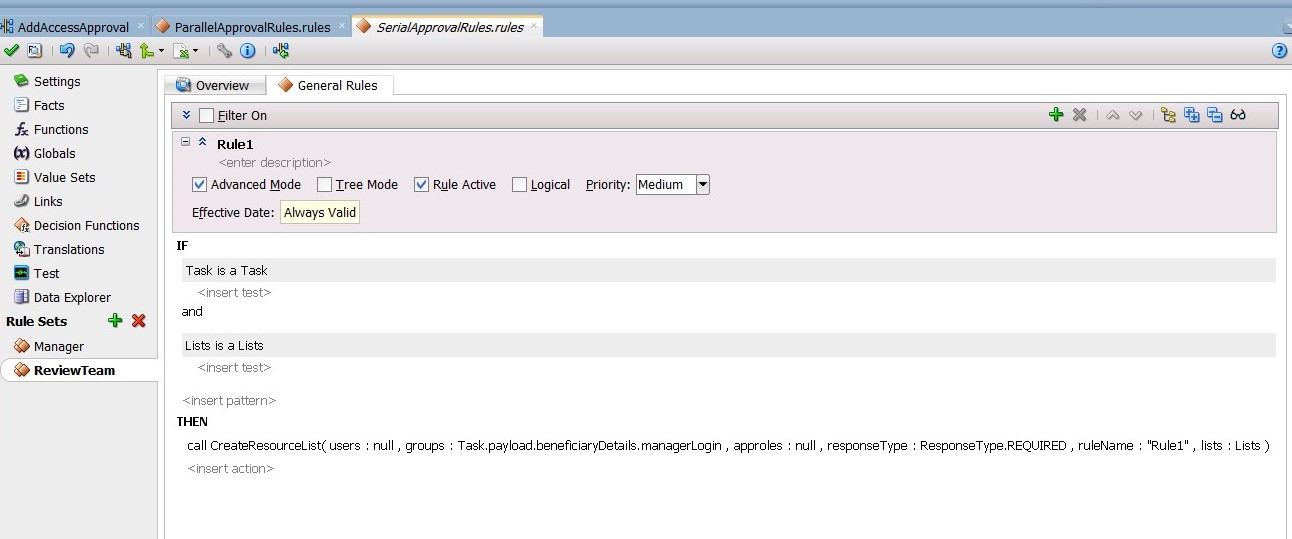
From the General Rules box on the Overview tab of the ReviewTeam Rule Set, click the Add icon to create a new rule. If ReviewTeam does not show under Rule Sets, then use the Add icon to create it manually.
-
Create the participant list rule as shown in Figure 13-27.
13.4.5.4.2 Properties of the Parallel Approval Task
Table 13-2 lists the attributes of the Data tab when you configure a parallel approval task.
Table 13-2 Attributes of the Data Tab for Parallel Human Task
| Patameter | Data Type |
|---|---|
|
RequestID |
{http://www.w3.org/2001/XMLSchema}string |
|
RequestModel |
{http://www.w3.org/2001/XMLSchema}string |
|
RequestTarget |
{http://www.w3.org/2001/XMLSchema}string |
|
RequesterDetails |
{http://xmlns.oracle.com/request/RequestDetails}RequesterDetails |
|
BeneficiaryDetails |
{http://xmlns.oracle.com/request/RequestDetails}BeneficiaryDetails |
|
ObjectDetails |
{http://xmlns.oracle.com/request/RequestDetails}ObjectDetails |
|
OtherDetails |
{http://xmlns.oracle.com/request/RequestDetails}OtherDetails |
|
url |
{http://xmlns.oracle.com/request/RequestDetails}url |
|
Catalogdata |
{http://xmlns.oracle.com/RequestServiceApp/RequestDataService/CatalogData}CatalogData |
|
RequesterDisplayName |
{http://www.w3.org/2001/XMLSchema}string |
|
BeneficiaryDisplayName |
{http://www.w3.org/2001/XMLSchema}string |
|
Requester |
{http://www.w3.org/2001/XMLSchema}string |
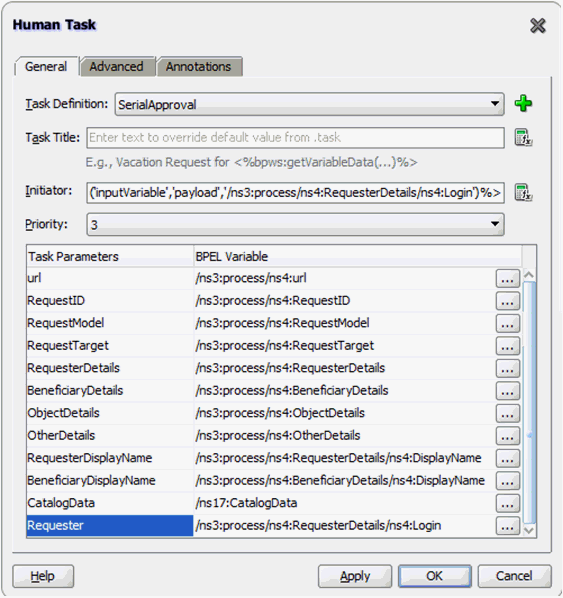
13.4.5.4.4 Properties of the Serial Approval Task
Table 13-3 lists the attributes of the Data tab when you configure the serial approval task.
Table 13-3 Attributes of the Data Tab for Serial Approval Task
| Parameter | Data Type |
|---|---|
|
RequestID |
{http://www.w3.org/2001/XMLSchema}string |
|
RequestModel |
{http://www.w3.org/2001/XMLSchema}string |
|
RequestTarget |
{http://www.w3.org/2001/XMLSchema}string |
|
RequesterDetails |
{http://xmlns.oracle.com/request/RequestDetails}RequesterDetails |
|
BeneficiaryDetails |
{http://xmlns.oracle.com/request/RequestDetails}BeneficiaryDetails |
|
ObjectDetails |
{http://xmlns.oracle.com/request/RequestDetails}ObjectDetails |
|
OtherDetails |
{http://xmlns.oracle.com/request/RequestDetails}OtherDetails |
|
url |
{http://xmlns.oracle.com/request/RequestDetails}url |
|
Catalogdata |
{http://xmlns.oracle.com/RequestServiceApp/RequestDataService/CatalogData}CatalogData |
|
RequesterDisplayName |
{http://www.w3.org/2001/XMLSchema}string |
|
BeneficiaryDisplayName |
{http://www.w3.org/2001/XMLSchema}string |
|
Requester |
{http://www.w3.org/2001/XMLSchema}string |
13.4.5.5 Configuring the Human Task and BPEL Mappings
Configuring the Human Task and BPEL mappings involves:
13.4.5.7 Creating the Workflow Rules
The SOA composite that you have created can be used for the single and bulk operations. To ensure that the composite is invoked for particular operations, you must create a workflow rule in Oracle Identity Manager.
To create workflow rules in Oracle Identity Manager:
- Login to Oracle Identity System Administration.
- On the left navigation pane, under Workflows, click Approval.
- Create a workflow rule for the Bulk Provision Application Instance operation, and set it to auto approve. See Configuring Approval Workflow Rules in Administering Oracle Identity Governance for information about creating and managing workflow rules.
- Create a workflow rule for the Provision Application Instance operation, and specify that the composite you deployed will be invoked.
Note:
While it is possible to create multiple SOA composites for each type of request, it is recommended that you use a single SOA composite (as demonstrated in this tutorial) and create multiple Human Tasks. You can use rules created by using Oracle Business Rules to pick a Human Task (as demonstrated in this tutorial).
Tip:
You can access custom attribute's value of entities, such as catalog, user, role, or organization, supported by the request web service is SOA composite BPEL process. The custom attributes or UDFs are part of the CustomAttribute element. An instance of catalog entity containing UDF is:
<ns12:CustomAttribute Name="ApproverRolePhoneNumber">
    <ns5:Value>1234</ns5:Value>
</ns12:CustomAttribute>
<ns12:CustomAttribute Name="ApproverRoleEmailId">
   <ns5:Value>approver@example.com</ns5:Value>
</ns12:CustomAttribute>
For example, to access the ApproverRolePhoneNumber catalog UDF value in BPEL process, specify the following:
bpws:getVariableData('catalogDetails','CatalogData','/ns22:CatalogData/ns22:CustomAttribute[@Name = string("ApproverRolePhoneNumber")]/ns24:Value')
13.5 Configuring Default Approval Composites for Single and Bulk Operations
The request-level composite is applicable to bulk requests, and the operation-level composite is applicable to single and child requests.
You can configure the default composites by setting the DefaultRequestLevelComposite and DefaultOperationLevelComposite properties in the oim-config.xml file. You can edit these properties by using System MBean Browser in Oracle Enterprise Manager. The default values for these properties are default/DefaultRequestApproval!6.0 and default/DefaultOperationalApproval!6.0 respectively.
The values for these properties are in the following format:
NAMESPACE/COMPOSITE_NAME!VERSION
For example:
default/AddAccessApproval!2.0
If you change the default values of the DefaultRequestLevelComposite and DefaultOperationLevelComposite properties, then you must restart Oracle Identity Manager.
13.6 Creating and Deploying Custom Task Details Taskflow
Build your own taskflow, and configure the human task in the DefaultRequestApproval composite to invoke your custom taskflow.
By default, all tasks are configured to use the default task details page in pending approvals. This taskflow is not customizable. However, you might want to customize the UI or show some other information in the task details page. This section describes how to build your own taskflow, and configure the human task in the DefaultRequestApproval composite to invoke your custom taskflow.
This section contains the following topics:
13.6.1 Prerequisites for Developing Custom Task Details Taskflow
Install Oracle Identity Manager, SOA, and JDeveloper for developing custom task details taskflow.
Before developing a custom task details taskflow, you must have the following software installed on your computer:
-
Oracle Identity Governance 12c (12.2.1.3.0)
-
Oracle SOA 12c (12.2.1.3)
-
JDeveloper 12c (12.2.1.3) installed from a SOA Quick Start distribution, as described in Installing Oracle SOA Suite Quick Start for Developers in Installing Oracle SOA Suite and Business Process Management Suite Quick Start for Developers
13.6.2 Developing Custom Task Details Taskflow
You build a custom taskflow for the human task in the DefaultRequestApproval composite.
This section describes how to develop the custom taskflow. It contains the following topics:
13.6.2.1 Building a Custom Taskflow: Broad-Level Steps
To build a custom taskflow for the human task in the DefaultRequestApproval composite:
-
Open Jdeveloper and create a new Generic Application. To do so:
-
Enter Application Name as
RequestApprovalTaskDetailsApp, and then click Next. -
Enter Project Name as
RequestApprovalTaskDetails. Do not select any project technologies. -
Click Finish.
-
-
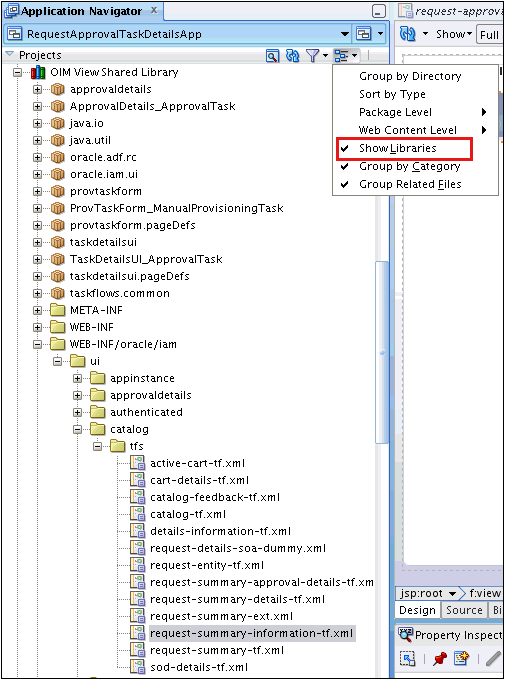
Add Oracle Identity Manager shared library. To do so:
-
Right-click RequestApprovalTaskDetails project, and select Project Properties, Libraries and Classpath.
-
Click Add Library.
-
Click Load Dir.
-
Navigate to the IAM_HOME/server/jdev.lib/ directory, and click Select.
Note:
IAM_HOME is the path to the Oracle Identity Manager home directory, for example, BEA_HOME/Oracle_IDM1/. Here, BEA_HOME is the path to the middleware directory in Oracle Identity Manager installation.
-
Select OIM View Shared library, OIM Model Shared library, and then click OK.
-
Click OK.
-
-
Create task details taskflow. To do so:
-
Navigate to the following directory in shiphome:
IAM_HOME/server/workflows/composites/
-
Unzip the DefaultRequestApproval.zip file.
-
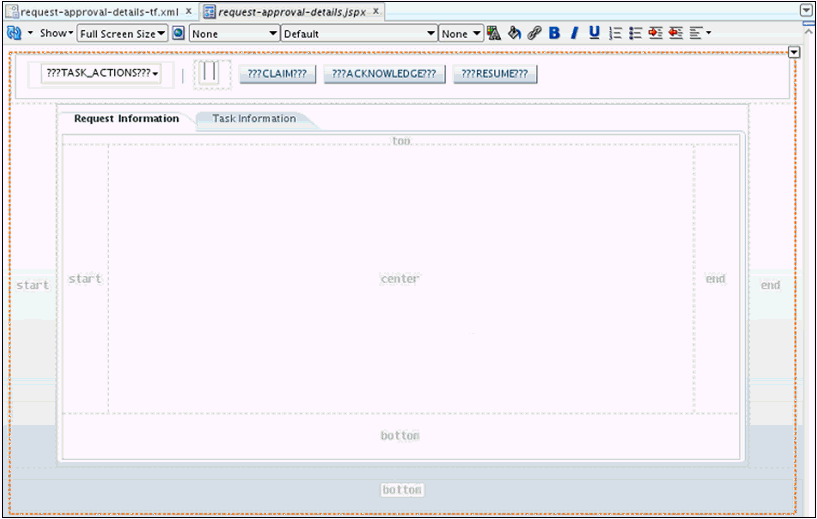
Go back to Jdeveloper, right-click RequestApprovalTaskDetails, and select New.
-
Select Web Tier, JSF, ADF task flow based on human task.
-
In the file browser, navigate to the directory in which you unzipped DefaultRequestApproval.zip. Select the DefaultRequestApproval/ApprovalTask.task file
-
In the Create Task flow dialog box, provide the following values:
File Name: request-approval-details-tf.xml
Directory: Make sure that the taskflow is created under the WEB-INF/oracle/iam/ui/custom/ directory. All taskflows under the WEB-INF/oracle/iam/ui/custom/ directory are secured with view permission.
Task Flow ID: request-approval-details-tf
-
Click OK.
-
-
Delete hwtaskflow.xml. To do so, go to Application Sources under RequestApprovalTaskDetails project, and then delete hwtaskflow.xml.
-
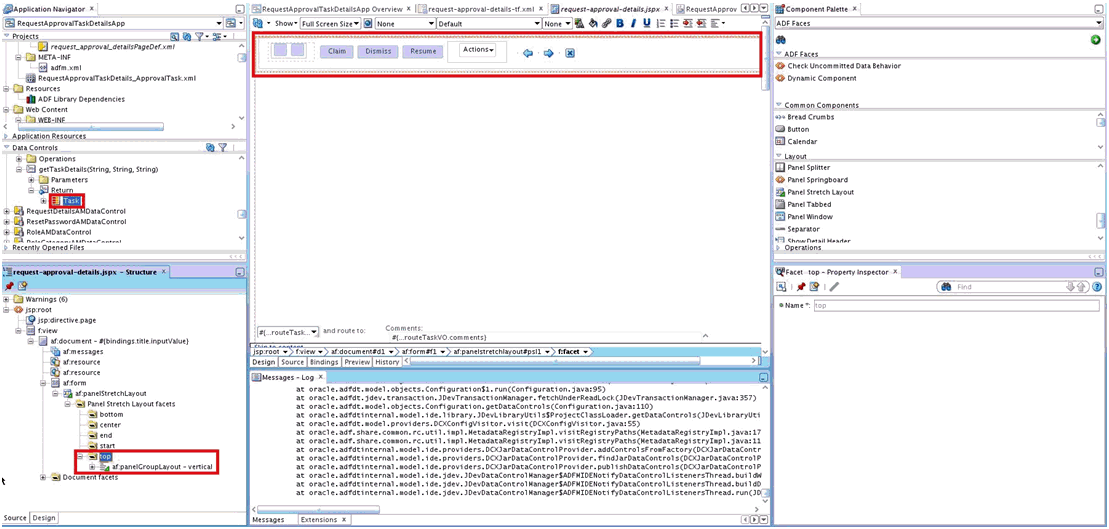
Create the task details page. To do so:
-
Open request-approval-details-tf.xml. Switch to diagram mode.
-
Rename taskdetails1_jspx view activity to request-approval-details.
-
Right-click the request-approval-details view activity, and select Create Page. Provide the following values:
File name: request-approval-details.jspx
Directory: Place the JSPX file under the public_html/oracle/iam/ui/custom/ directory.
Initial Page layout and content: Blank Page
-
Click OK.
-
-
Add managed bean for the task details page, as described in Adding Managed Beans for the Task Details Page.
-
Create the details page structure, as described in Creating the Details Page Structure.
-
Populate the Request Information tab, as described in Populating the Request Information Tab.
-
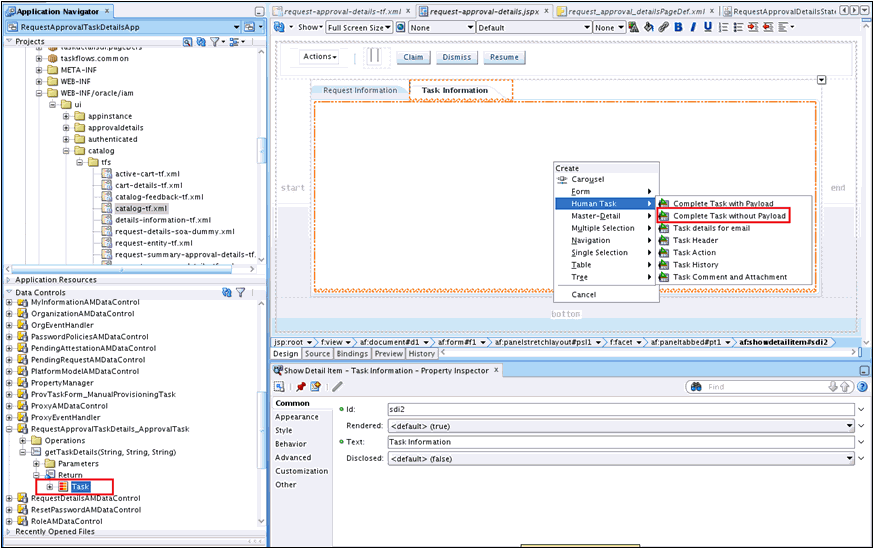
Populate the Task Information tab, as described in Populating the Task Information Tab.
13.6.2.2 Adding Managed Beans for the Task Details Page
To add managed bean for the task details page:
13.6.3 Developing Custom Task Details for Email Notification (Optional)
By default, for sending email notification, if there is no separate page for email, then the same task details page that is developed is sent in email notification.
Sometimes, limited information needs to be sent in email notification. In such scenarios, separate page for email notification can be developed. The email page will also be part of the same task details taskflow.
For more information on building custom taskflow for email, see Creating an Email Notification in the Developer's Guide for Oracle SOA Suite.
13.6.4 Deploying the Task Details Taskflow
Task details taskflow is deployed by deploying the task details as an ADF library JAR and packaging the adflibRequestApprovalTaskDetails.jar in custom shared library.
To deploy the task details taskflow:
-
Deploy the Task Details as an ADF library jar. To do so:
-
Right-click RequestApprovalTaskDetails, Project Properties, Deployment.
-
Click New. The Create deployment profile dialog box is displayed.
-
Provide following values, and click OK.
Archive Type: ADF Library Jar File
Name: adflibRequestApprovalTaskDetails
-
Right-click RequestApprovalTaskDetails, and select Deploy, adflibRequestApprovalTaskDetails.
-
In the deployment action popup, click Finish.
-
-
Package the adflibRequestApprovalTaskDetails.jar in custom shared library. To do so:
-
Navigate to the IAM_HOME/server/apps/ directory.
-
Create following directory structure:
WEB-INF/lib/
-
Copy adflibRequestApprovalTaskDetails.jar to the WEB-INF/lib/ directory.
-
Update IAM_HOME/server/apps/ oracle.iam.ui.custom-dev-starter-pack.war to add adflibRequestApprovalTaskDetails.jar. For example:
jar uvf oracle.iam.ui.custom-dev-starter-pack.war WEB-INF/*
-
-
Restart Oracle Identity Manager managed server for the changes to custom shared library to take effect.
13.6.5 Configuring Human Task and Taskflow Permissions
After deploying the task details taskflow, you can configure the human task and taskflow permissions.
Configuring the human task and taskflow permissions involves the following:
13.6.5.1 Adding View Permission for Custom Taskflow
To add view permission for custom taskflow by using Authorization Policy Manager (APM):
13.6.6 Testing the Custom Taskflow
Test the custom taskflow by creating a request and verifying the Task Details link in Pending Approvals.
To test custom taskflow:
- Login to Oracle Identity Self Service as an end user.
- Go to My Information, and modify the value of the Telephone attribute. A request is created and the task is assigned to the System Administrator.
- Login to Oracle Identity Self Service as System Administrator.
- Go to Pending Approvals.
- Click the Task Details link of the corresponding request. The custom task details page is displayed.
13.7 Extending Request Management Operations
You can customize certain aspects of request management operations to allow greater flexibility and implement customized logic for additional functionality. To achieve this, you can use request management plug-ins. There are plug-in points that you can use to implement customization.
This section discusses the plug-in points in the following topics:
13.7.1 Running Custom Code Based on Request Status Change
A request undergoes change in status at each stage of its lifecycle. The request engine exposes a plug-in point that allows running of custom code during request status change. A plug-in with custom code that extends this plug-in point can be implemented and registered for running the code.
The plug-in point is the oracle.iam.request.plugins.StatusChangeEvent interface with the public void followUpActions(String reqId) method. This method consists of the request id parameter, using which the request details can be obtained with the help of request management APIs.
See Also:
Developing Plug-ins for detailed information about plug-ins and plug-in points
Any code that is to be run during the status change must be implemented in the followUpActions() method in a plug-in class that implements the oracle.iam.request.plugins.StatusChangeEvent interface. You must specify at which request status change this plug-in is to be run in the plugin.xml file.
For example, when a request in Oracle Identity Manager moves to the Request Failed status, you want to run a custom code that sends a notification to an administrator. To do so:
13.7.2 Validating Request Data
You can use the RequestDataValidator plug-in to add custom validation of request data after submission.
This section describes how to associate plug-ins with data validators and prepopulation adapters and illustrates a couple of scenarios. It contains the following topics:
13.7.2.1 About Validating Request Data
You can use the RequestDataValidator plug-in to add custom validation of request data after submission. The plug-in point for this is the oracle.iam.request.plugins.RequestDataValidator interface with public void validate(RequestData requesterData) method.
You can define the dataset validators and prepopulation adatpers associated with the given plug-in. The request datasets associated with the plug-ins can be defined at the time of plug-in registration. The plugin.xml file is used to define the association between plug-ins and dataset validator or prepopulation adapters. The <metadata> node attached with the <plugins> element is used to define the association between data validators and prepopulation adapters.
Note:
DataSetValidator plug-in specified for a dataset cannot be overridden by the plug-in enhancement of specifying the validators metadata in the plugin.xml itself. For instance, the predefined dataset 'ModifyUserDataset' shipped with default validator does not get overridden by the custom implementation class. Therefore, the validator in dataset will be given precedence, currently there is no option to override it.
13.7.2.2 Associating Plug-ins With Data Validators and Prepopulate Adapters
The following example shows how the plug-ins can be associated with data validators and prepopulation adapters.
<?xml version="1.0" encoding="UTF-8"?>
<oimplugins xmlns:xsi="http://www.w3.org/2001/XMLSchema-instance">
  <plugins pluginpoint="oracle.iam.request.plugins.RequestDataValidator">
     <plugin pluginclass= "oracle.iam.plugin.appinst.ApplicationInstanceDataValidator" version="1.0" name="AppInstDataValidator">
     <metadata name="DataValidator">
      <value>AppInstanceDataSet|ADAppDataSet|EBSDataSet</value>
   </metadata>
      </plugin>
  </plugins>
</oimplugins>
In this example, the following line of code indicates defining metadata xml element to indicate that the plug-in is associated with request data validator datasets:
<metadata name="DataValidator">
Note that Attribute name="DataValidator" in the metadata element indicates plug-in associated with request data validators.
Defining the names of the datasets to be associated with the current plug-in is indicated by the following line:
<value>AppInstanceDataSet|ADAppDataSet|EBSDataSet</value>
Note:
Request dataset names must be delimited by the single pipe character (|).
13.7.2.3 Scenario I: Provisioning Users to a Target System
Suppose Oracle Identity Manager is configured for provisioning users to the AD User APAC target. A RequestDataValidator specifies ADUserDataValidator is configured for the corresponding request dataset, as shown:
<plugin pluginclass= "oracle.iam.plugin.appinst.ADUserDataValidator" version="1.0" name="ADUserDataValidator">
<metadata name="DataValidator">
<value>ADUserAPACDataSet</value>
</metadata>
</plugin>
Later, if the System Configurator wants to configure Oracle Identity Manager for provisioning users to the AD User EMEA target, then the System Configurator would create a new application instance, and associate a UI form with it. Request dataset would be auto-generated in the process. If the data-validator is to be re-used for this request dataset, then perform the following:
13.7.2.4 Scenario II: Provisioning or Modifying Entitlement Request
Entitlement data provided as part of Provision Entitlement and Modify Entitlement request can be validated by creating a dataset validator plug-in and specifying the following in the plug-in metadata (plugin.xml):
<metadata name="DataValidator">
      <value>EBSForm.UD_EBS_RESP</value>
</metadata>
Here, EBSForm is the name of the form associated with the application instance on which the account is provisioned, and UD_EBS_RESP is the name of the child form corresponding to the entitlement. UD_EBS_RESP identifies the entitlement type.
13.7.3 Prepopulation of an Attribute Value During Request Creation
Prepopulation plug-in is associated with an attribute reference or attribute in request dataset. This can be used to prepopulate an attribute value by running custom code during request creation. Requester can modify the value that is prepopulated if required.
The plug-in point for this is oracle.iam.request.plugins.PrePopulationAdapter with public Serializable prepopulate(RequestData requestData) method. Use this plug-in only for the following request types:
Provision Resource, Self-Request Resource, Create User, Self-Register User.
Defining metadata element to indicate that the plug-in is mapped to request data set attributes for filling up prepopulated data is indicated by the following line:
<metadata name="PrePopulationAdapater">
The association is defined by combining dataset name with attribute name in the following format:
<DATASET_NAME>::<ATTRIBUTE_NAME>
For example:
AppInstanceDataSet::First Name
Multiple attributes can be associated with the same prepopulation plug-in, where each association is separated by the single pipe character (|). For example:
<datasetname1>::<attribute1> | <datasetname2>::<attributename2>|<datasetname3>::<attribute3>
The following is an example of prepopulation plug-in:
<plugins pluginpoint="oracle.iam.request.plugins.PrePopulationAdapter">
  <plugin pluginclass= "oracle.iam.plugin.appinst.ApplicationInstancePrePopulateAdapter" version="1.0" name="AppInstPrepopAdapter">
     <metadata name="PrePopulationAdapater">
   <value>
AppInstanceDataSet::First Name|ADAppDataSet::Last Name
  </value>
   </metadata>
   </plugin>
  </plugins>
Note:
In addition to creating request datasets by using the catalog Form Designer, you can manually upload request datasets to MDS. You can also define DataSetValidator or PrepopulationAdapter elements within the request dataset. These dataset validators or prepoulation adapters configured in the dataset have the highest priority over other configuration.
For example, a plug-in EBSUserDataValidator is registered to associate it with a request dataset EBSUSerDataSet, but the dataset has not been created or uploaded. Another plug-in ADUserDataValidator is registered but not associated with any request dataset. When you later create the request dataset EBSUSerDataSet and use it for creating requests, the plug-in EBSUserDataValidator is called for validating the request data. Then, you add the DataSetValidator element to the request dataset EBSUSerDataSet that you manually created, and specify another plug-in ADUserDataValidator. When you use EBSUSerDataSet to create requests, the plug-in ADUserDataValidator is called. This is because ADUserDataValidator is configured as a part of the request dataset. If the DataSetValidator entry is removed from EBSUSerDataSet, then the plug-in EBSUserDataValidator is invoked to validate the request data.
13.7.4 Enabling Request Approval by Account Beneficiary
Approval by account beneficiary can be enabled by creating a callback class that implements the IRoutingSlipCallback class.
13.8 Enabling Auto-Approval for Self Registration Requests
Rules in approval workflow policies can be configured that determine whether a request should be auto-approved or a SOA composite should be invoked.
For information about configuring approval workflow rules, see Configuring Approval Workflow Rules in Administering Oracle Identity Governance.
After you configure rules in the approval workflow policies for auto-approval, perform the following steps to enable auto-approval for self registration requests:
-
To assign the organization automatically, configure a home organization policy. See Managing Home Organization Policy in Administering Oracle Identity Governance for information on how to configure home organization policies.
-
By default, the Role/User Type set for the self registration requests is Part-Time Employee. If you want to overwrite this value, then change the plug-in configured in the SelfCreateUserDataset.xml dataset.
-
You can create a new plug-in implementation for the value/logic required and change the plug-in configured in the dataset to bring the new one in affect. The new plug-in must implement oracle.iam.request.plugins.PrePopulationAdapter.
-
Register the plug-in that you created by using the Plugin Registration Utility. For details, see Registering and Unregistering Plug-ins By Using the Plugin Registration Utility.
-
To update the request dataset:
-
Export the /metadata/iam-features-requestactions/model-data/SelfCreateUserDataset.xml request dataset from the MDS, as described in Exporting Metadata Files to MDS.
-
Update the name of the plug-in configured for Role attribute, as shown:
<AttributeReference name="Role" attr-ref="Role" available-in-bulk="false"
type="String" length="255" widget="dropdown" lookup-code="Lookup.Users.Role"
required="true">
<PrePopulationAdapter
classname="oracle.iam.selfservice.uself.uselfmgmt.plugins.RolePrepopulateAdapter"
name="RolePrepopulateAdapter"/>
</AttributeReference>
-
Import the updated request dataset to MDS, as described in Importing Metadata Files from MDS.
-
Note:
Dynamic Monitoring Service (DMS) can be used to view performance metrics. The following DMS metrics are present for monitoring the performance of Self Registration flow:
-
Self_Registration: This provides the number of completed and failed self registration requests. -
oracle.iam.selfservice.uself.uselfmgmt.api.UnauthenticatedSelfService: This provides details, such as the number of self registration requests and time taken to submit a self registration request.
13.9 Hiding the Skip Current Assignment Option
The Skip Current Assignment action can be hidden by changing task actions from the SOA Composer or JDeveloper.
Skipping the current assignment is not a valid action for an approver. If an approver chooses this action, then the corresponding request fails. Therefore, you can hide this option by performing any one of the following ways:
-
Change the task actions from the SOA composer. For the Skip Current Assignment action, deselect all the checkboxes and save.
-
Change the task action by using JDeveloper. For the Skip Current Assignment action, deselect all the checkboxes. Then save and redeploy the composite. For information about specifying actions that task creators or owners have for acting on the task content, see Specifying Actions for Acting Upon Tasks in the Developer's Guide for Oracle SOA Suite.
13.10 Customizing Certification Oversight
Certification oversight can be customized to extend the levels of oversight or stop the oversight process when a certain title is reached.
This section describes how to customize certification oversight. It contains the following topics:
13.10.1 Understanding Certification Oversight Customization
Certification oversight can be customized to extend the levels of oversight or stop the oversight process when a certain title is reached.
The certification composite contains customizable oversight logic that supports queries to Oracle Identity Manager to select a sequence of overseers based on any one or all of the following:
-
The primary reviewer
-
The current phase of certification
-
The management-hierarchy defined in Oracle Identity Manager
By default, only a single level of oversight is supported such that a certification task is assigned to one reviewer.
As predefined in the composite for certification oversight, whenever the primary reviewer or an overseer signs off, the primary-review task is automatically routed to the next overseer in the sequence. After a primary reviewer or an overseer, except the final overseer, has signed off on the primary review task, that user will no longer be able to view the task in the inbox by querying for completed tasks.
13.10.2 Customizing Certification Oversight
Certification oversight is customized by editing the certification composite in JDeveloper.
Customizing the certification oversight involves the following steps:
-
Create the composite. To do so:
-
Set the JAVA_HOME, ANT_HOME, and PATH environment variables by running the setDomainEnv.sh script in the DOMAIN_HOME/bin/ directory.
-
Go to the OIM_HOME/server/workflows/new-workflow/ directory. The process-template subdirectory contains the ZIP file archives with composite files that are used as the base files to create the new composite.
-
Run the following command:
ant -f new_project.xml compliance
You are prompted to make the following selection:
1 - Identity Audit Composite
2 - Certification Composite [Default]
-
Choose option 2 for certification composite.
-
When prompted, enter a name for the new composite, and press
Enter. The composite is created, and a package directory with the composite name that you specified is created in the process-template subdirectory.
-
-
Open the composite in JDeveloper. To do so:
-
Go to the process-template directory.
-
Go to the directory with the composite name provided in step 1c.
-
Open COMPOSITE_NAME.jpr using JDeveloper.
-
-
In the Projects pane of the Application Navigator view, expand the project and edit the CertificationTask.task by double-clicking. Click the Assignment tab. Click Stage1.Participant object, and select Edit. The Edit Participant Type dialog box is displayed. By default, the composite defines a single level of certification, and the certifications will be assigned to a single reviewer. For example, to change the level of certification to go to the manager of the current task assignee, set the following values:
Note:
The customization described in this procedure is a sample. For further customizations, see the CertificationOverseerProcess default template, and/or refer to SOA documentation.
-
Type: Serial. Only serial certification logic is supported.
-
Build a list of participants using: Management Chain
-
Specify attributes using: Value-based
-
Starting Participant: Select a user from which the certification starts.
-
Top Participant: By Title. Specify a title for the reviewer who is the top participant of the certification review. If you specify VP as the top participant and 5 as the number of levels, then the certification will go up to VP level even though it is level 3. The other levels will be skipped.
-
Number of Levels: By Number. If you specify 1, then it means that certification will up to the manager's level. A value of 2 means that the certification will up to the manager's manager.
-
Auto assign task to a single: User
-
Assignment Pattern: Least Busy
-
-
Click OK.
-
Deploy the composite. To do so:
- Select File, Save All to save your work.
- Right-click the project, and select Deploy, COMPOSITE_NAME, Deploy to Application server. Alternatively, you can deploy to SAR (SOA Archive ), and then deploy it by using Oracle Enterprise Manager.
-
Login to Oracle Identity Self Service, and create a certification definition by selecting the newly deployed composite in the Configuration page. See Creating Certification Definitions in Performing Self Service Tasks in Oracle Identity Governance for information about creating certification definitions.
13.11 Customizing the Identity Audit Composite
You can customize the Identity Audit composite and create a new identity audit scan definition.
To customize the identity audit composite:
-
Create the composite. To do so:
-
Go to the OIM_HOME/server/workflows/new-workflow/ directory. The process-template subdirectory contains the ZIP file archives with composite files that are used as the base files to create the new composite.
-
Run the following command:
ant -f new_project.xml compliance
You are prompted to make the following selection:
1 - Identity Audit Composite
2 - Certification Composite [Default]
-
Choose option 1 for identity audit composite.
-
When prompted, enter a name for the new composite, and press
Enter. The composite is created, and a package directory with the composite name that you specified is created in the process-template subdirectory.
-
-
Open the composite in JDeveloper. To do so:
-
Go to the process-template directory.
-
Go to the directory with the composite name provided in step 1d.
-
Open COMPOSITE_NAME.jpr using JDeveloper.
-
-
Make all the customizations for the IdentityAuditTask assignment by editing
IdentityAuditRemediationTask.task. -
Ensure that the required callbacks are configured (Task Completion, Escalation, Expiry, Routing, ReAssignment, and Proxy). Look into Task Assignment callbacks from the newly created composite or the callbacks configured in default Identity Audit Remediation composite for reference.
-
Save the changes.
-
Compile the composite, and deploy the composite JAR file to SOA by referring to SOA documentation.
-
Login to Oracle Identity Self Service, and create a new identity audit scan definition by using the newly created composite from the identity audit configuration composite lookup.
