Pipelines and Recipes
Learn to create data replication processes using recipes and pipelines.
About Pipelines
A pipeline is an instance of a recipe. It enables you to select your source connection, the type of replication action(s) to apply, and the target connection. After a pipeline starts, you can observe the replication process in real time.
- Prepares the database objects for extraction
- Creates a Heartbeat Table
- Creates and runs the Extract process
- Performs an initial load using Oracle Data Pump
- Creates the Checkpoint Table
- Creates and runs the Replicat process
These steps can be observed during the pipeline's Initialization phase on the Pipeline Details page.
You can view pipelines on the Home page, as well as the Pipelines page. Before you create a pipeline, ensure that you have Connections configured for the source and target databases.
To know more, see About Extracts and About Replicats in Oracle GoldenGate Microservices Documentation.
About Recipes
Recipes are templates for common replication scenario that you can use to accelerate your data replication journey.
A Recipe is a template that defines a set of data replication tasks or mappings between source and target systems. Recipes help simplify and accelerate the creation of replication solutions. Using a recipe reduces the time and effort required to set up a new data integration projects, ensuring consistency and reliability across different environments.
- One-way database replication: Performs an initial load and ensures the target database is kept in sync with the source database.
- Active-Active database replication: Performs an initial load of the source database to the target, and then applies change events in both directions to keep the databases synchronized.
- ZeroETL Mirror: Provides near real-time replication
from an operational database to an analytics or reporting
environment without requiring traditional ETL (Extract, Transform,
Load) processes. This recipe simplifies architecture and delivers
up-to-date data for analytics with minimal latency.
Note:
If you encounter a warning about sequences detected, ensure that you don't replicate database generated sequential values. The range of values must be different on each system, with no chance of overlap. For example, in a two-database environment, you can have one server generate even values, and the other odd. For an n-server environment, start each key at a different value and increment the values by the number of servers in the environment. This method may not be available to all types of applications or databases. If the application permits, you can add a location identifier to the value to enforce uniqueness.
Create a Pipeline
Learn to create pipelines in GoldenGate Studio.
Before You Begin
Before you create a pipeline, ensure that you've created and tested the source and target database connections.
If you want to use Oracle Autonomous Database as your pipeline's source or target connection, you must:
- Configure Autonomous Database:
-
Download the Wallet: Download the Autonomous Database wallet from the instance's details page in Oracle Cloud Infrastructure. You'll upload it to GoldenGate Studio when you create the connection, if you haven't done so already.
-
Configure TNS Alias: Use the alias from
tnsnames.orainside the wallet for the Autonomous Database connections. -
Check Client Credentials: Make sure username and password are available and have permission for the GoldenGate replication operations.
-
Verify Autonomous Database Firewall and VNet rules: Ensure appropriate network access so GoldenGate Studio can reach your Autonomous Database.
Note:
Ensure that your wallet and credentials management comply with the Oracle security policies. -
-
Target Database Access: Configure and validate connectivity to your target database (which can be Autonomous Database or any other supported Database).
-
User Alias Configuration:
-
Create a credential store with a user alias. Complete steps 3 to 6 in Configure Extract for Oracle Autonomous Database. The user alias references the secure credentials for the source and target databases.
-
Register the user alias in the GoldenGate credential store, and enter this user alias in GoldenGate Studio when creating pipelines with Autonomous Database connections to avoid storing plain-text credentials.
Note:
To verify if the user alias is functioning correctly, go to your GoldenGate user interface and test the DB Connections there first. See Prerequisites for Capturing from Autonomous Database in Oracle GoldenGate Microservices Documentation.
-
-
Database Privileges: You need the required database permissions on the source and target side to support GoldenGate operations (typically
SELECT,FLASHBACK, DBA-level privileges, and so on).
Create a Pipeline
After the pipeline starts, you can view detailed status and logs for each pipeline. This helps identify and troubleshoot errors, in case the pipeline creation process fails.
Validate Source and Target Database Connections with SYS User
This step is required only when the source and/or target database connection validation fails while creating a pipeline.
If a source validation step fails, then the validation source status
displays an error. You can use the Action menu (ellipses) to view the error details
for the validation failure, as shown in the following image: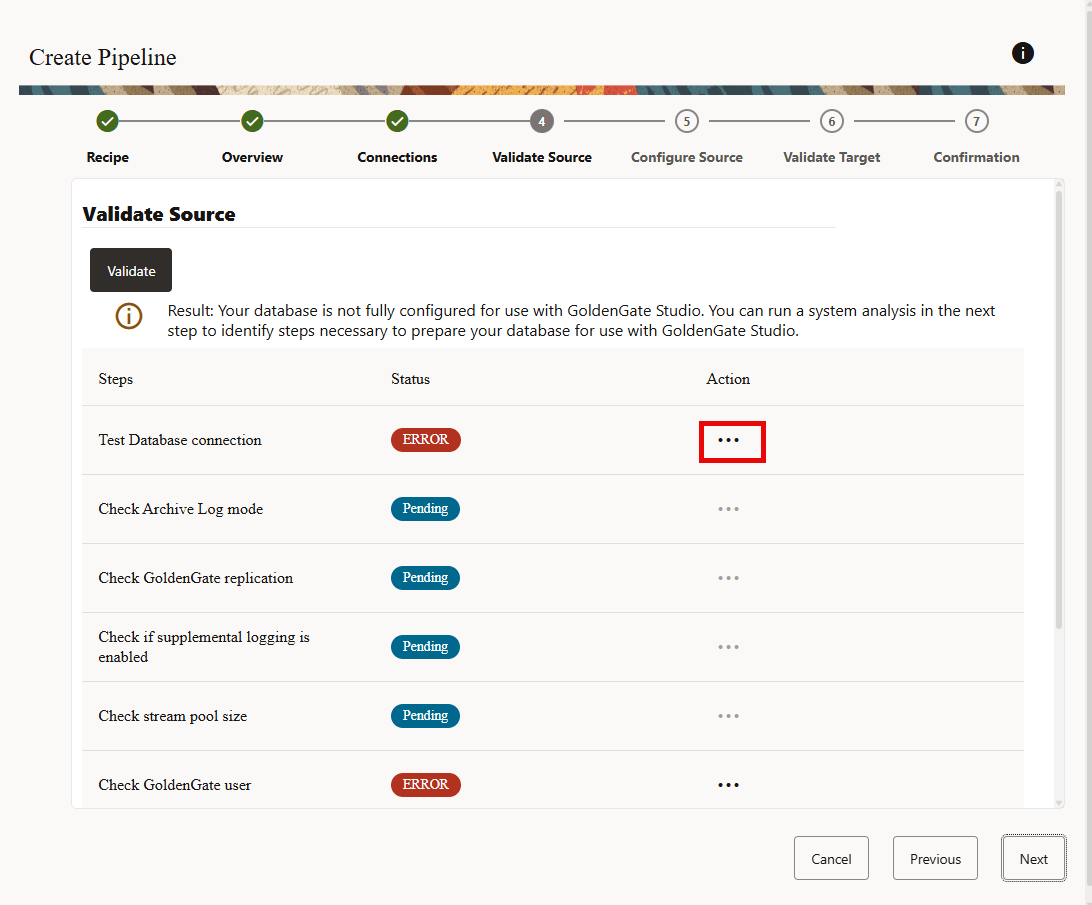
The following steps are required to validate the source database connection using a
SYS/SYSDBA user.
-
When the validate source connection step fails, click Next in the Validate Source screen. The Configure Source screen is displayed.
-
In the Configure Source screen, enter credentials for
SYSuser or a user with theSYSDBArole, as shown in the following image: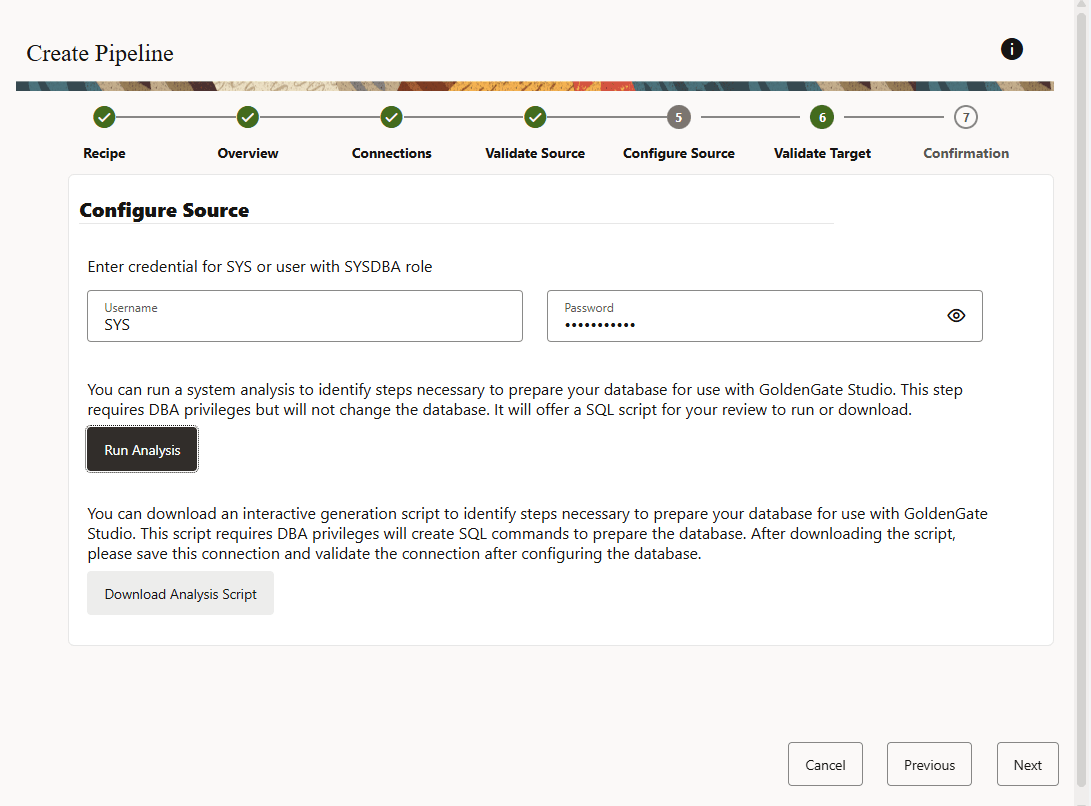
-
Select one of the following options:
Note:
The availability of SQL command options in the user interface depends on the database configuration.-
Click Run Analysis to perform a system analysis and review the recommended SQL script needed to prepare your database for GoldenGate Studio (requires DBA privileges).
This option is available when the database is already configured and does not require additional configuration allowing you to execute the required scripts directly from the interface, streamlining the setup process. -
Click Download SQL to obtain a script that generates the required SQL commands for configuration.
This option is available for databases that require manual configuration of enabling archive log, setting up
stream_pool_size, or configuring GoldenGate replication for Oracle Database 19c, as these tasks may require a database restart. In these instances, you must first configure the database before proceeding.
-
-
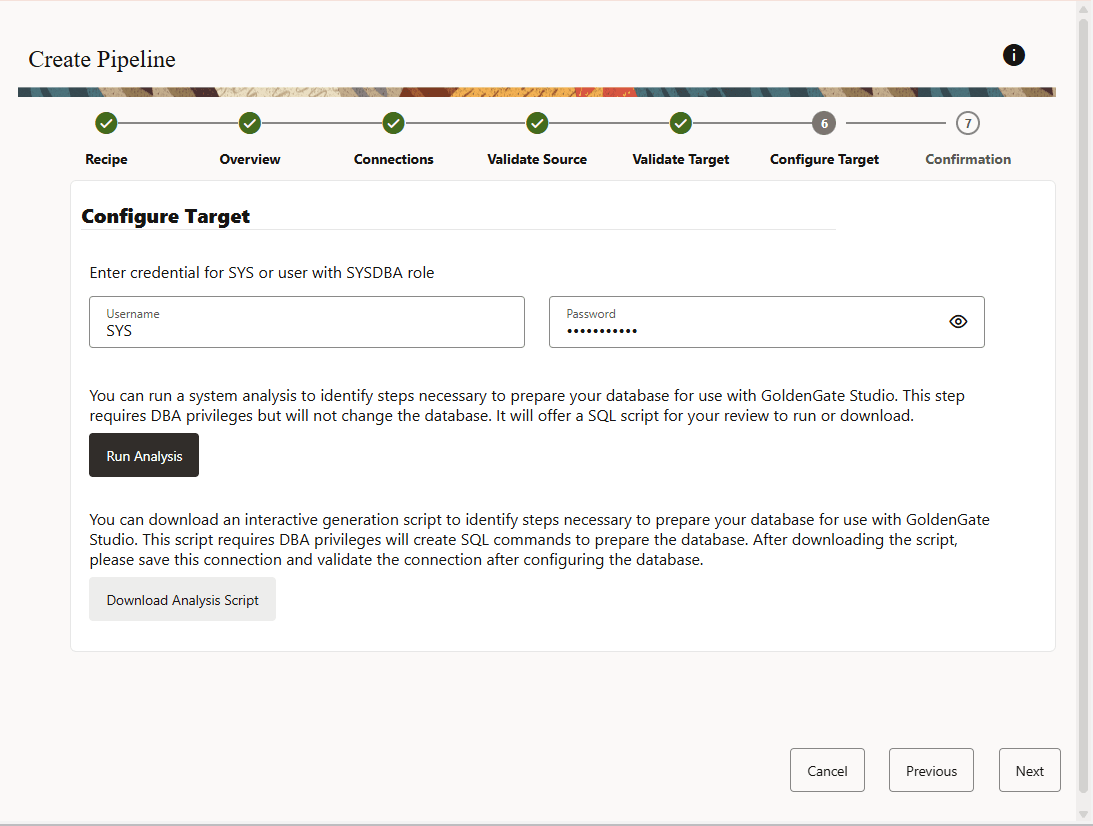
If the target validation fails, then click Next. The Configure Target screen is displayed, as shown in the following image:
-
Follow the tasks given in step 3 for validating the target database connection using the
SYS/SYSDBAuser.
Configure a Pipeline
You must have a pipeline created before you can configure it.
To configure a pipeline:
-
Under Mapping, you can review and select the source database schemas and tables to replicate.
Note:
The username entered when creating the connection will not appear on the pipeline Mapping page for mapping selection.Always double check the rules added in the Mapping Rules list after selecting or deselecting schemas or tables using the Mapping tree view. These are the source of truth on what will be executed by Oracle GoldenGate.
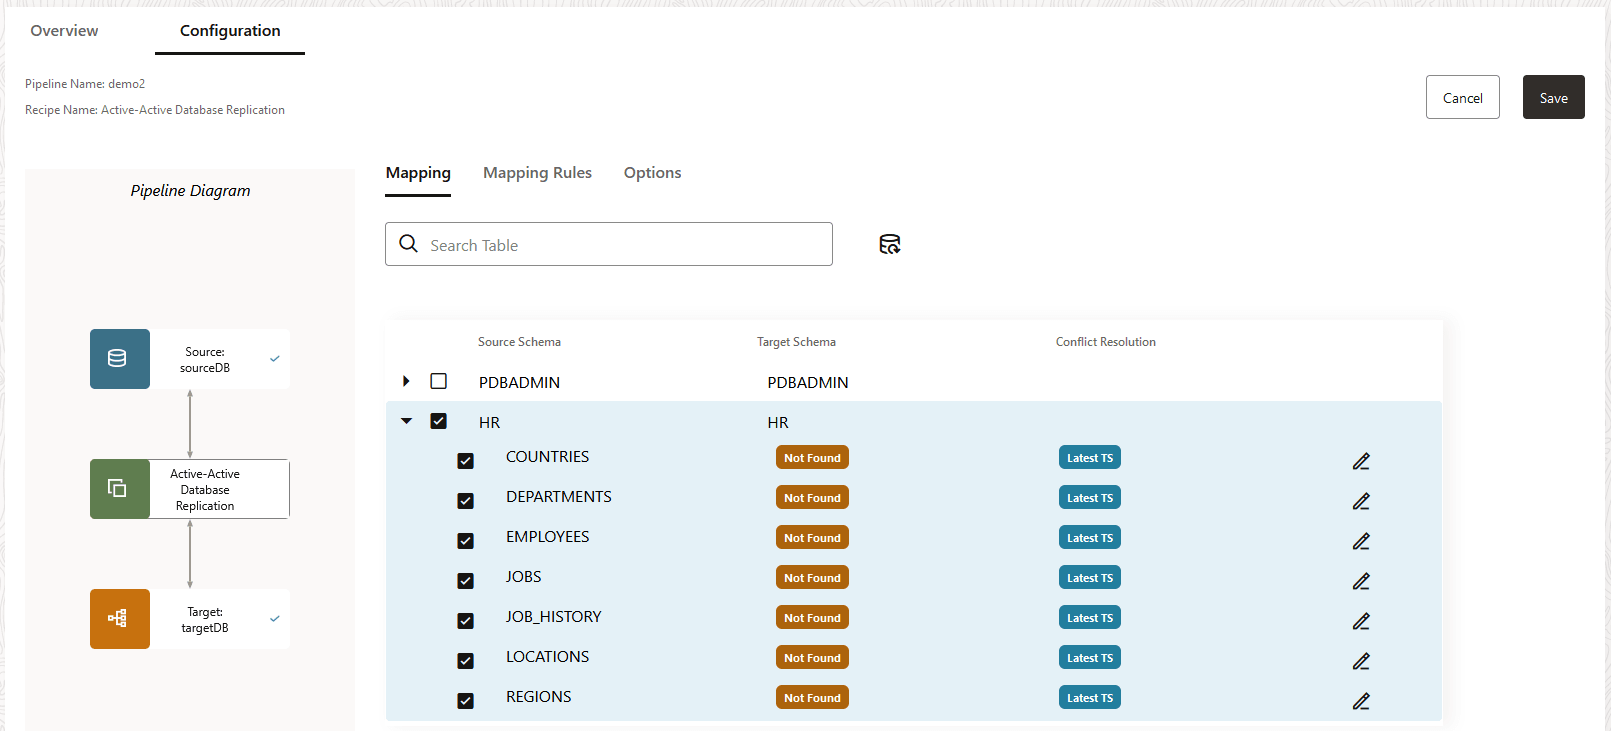
Note:
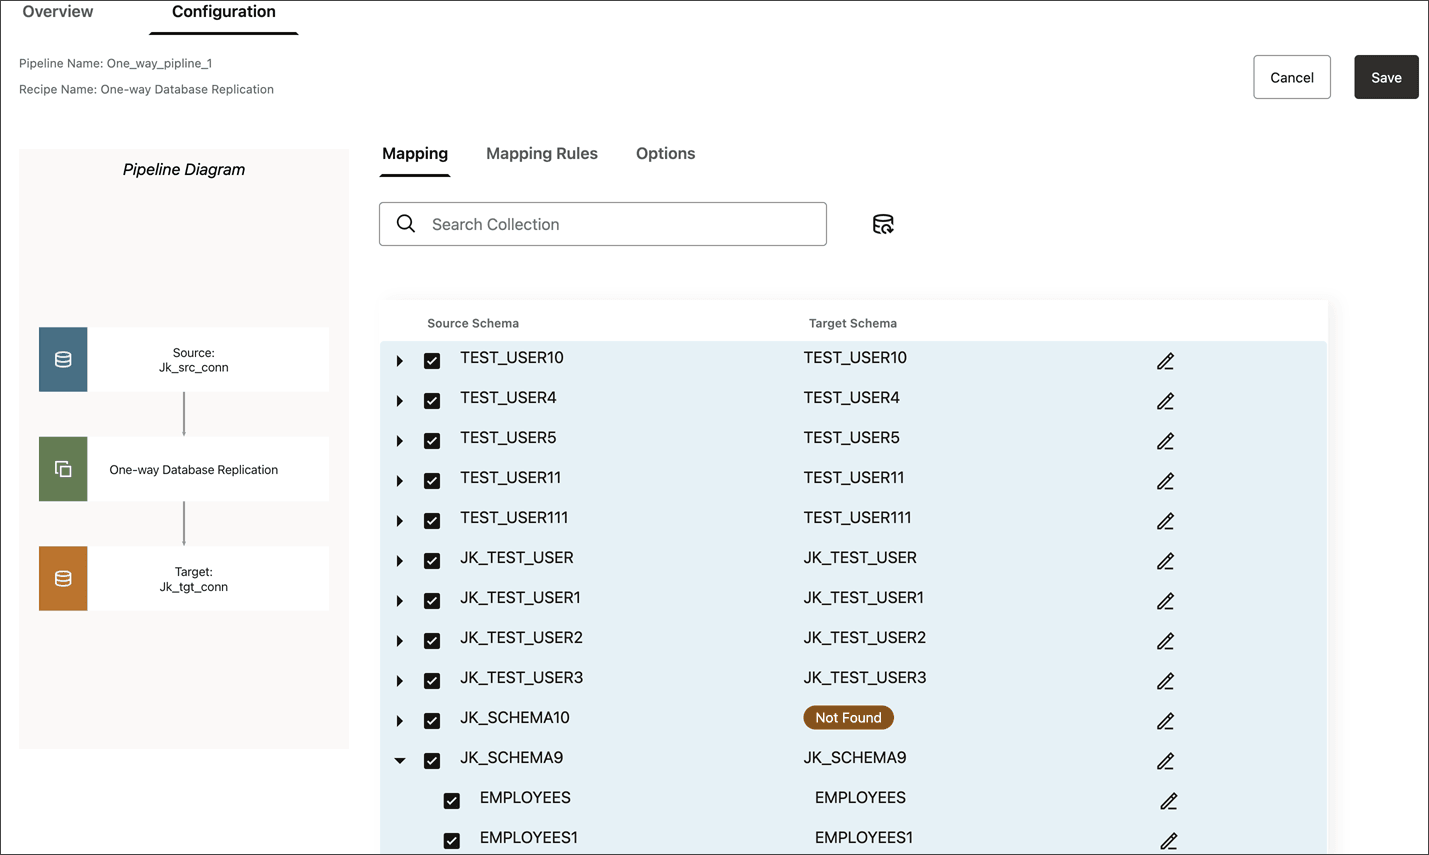
In One-way database replication, target schemas and tables show only when they exist in the target, otherwise they show as Not found.The following image shows a one-way replication pipeline:
-
Using the Mapping tab, you can:
- Click Edit (pencil icon) to rename a target schema or table. This redirects the replication to the renamed schemas and tables.
- Include a schema and all its tables. This also ensures that any tables added to the schema in the future are also implicitly included and replicated.
- Include a schema but not all its tables. Tables not included will not be replicated, however, future tables added to the schema are implicitly included and replicated to the target.
- Exclude the schema but include its tables. Any tables added to the schema in the future are not included.
- Exclude an entire schema and all its tables.
As you select or deselect source schemas and tables, or edit target schemas or tables, rules are added to Mapping Rules.
-
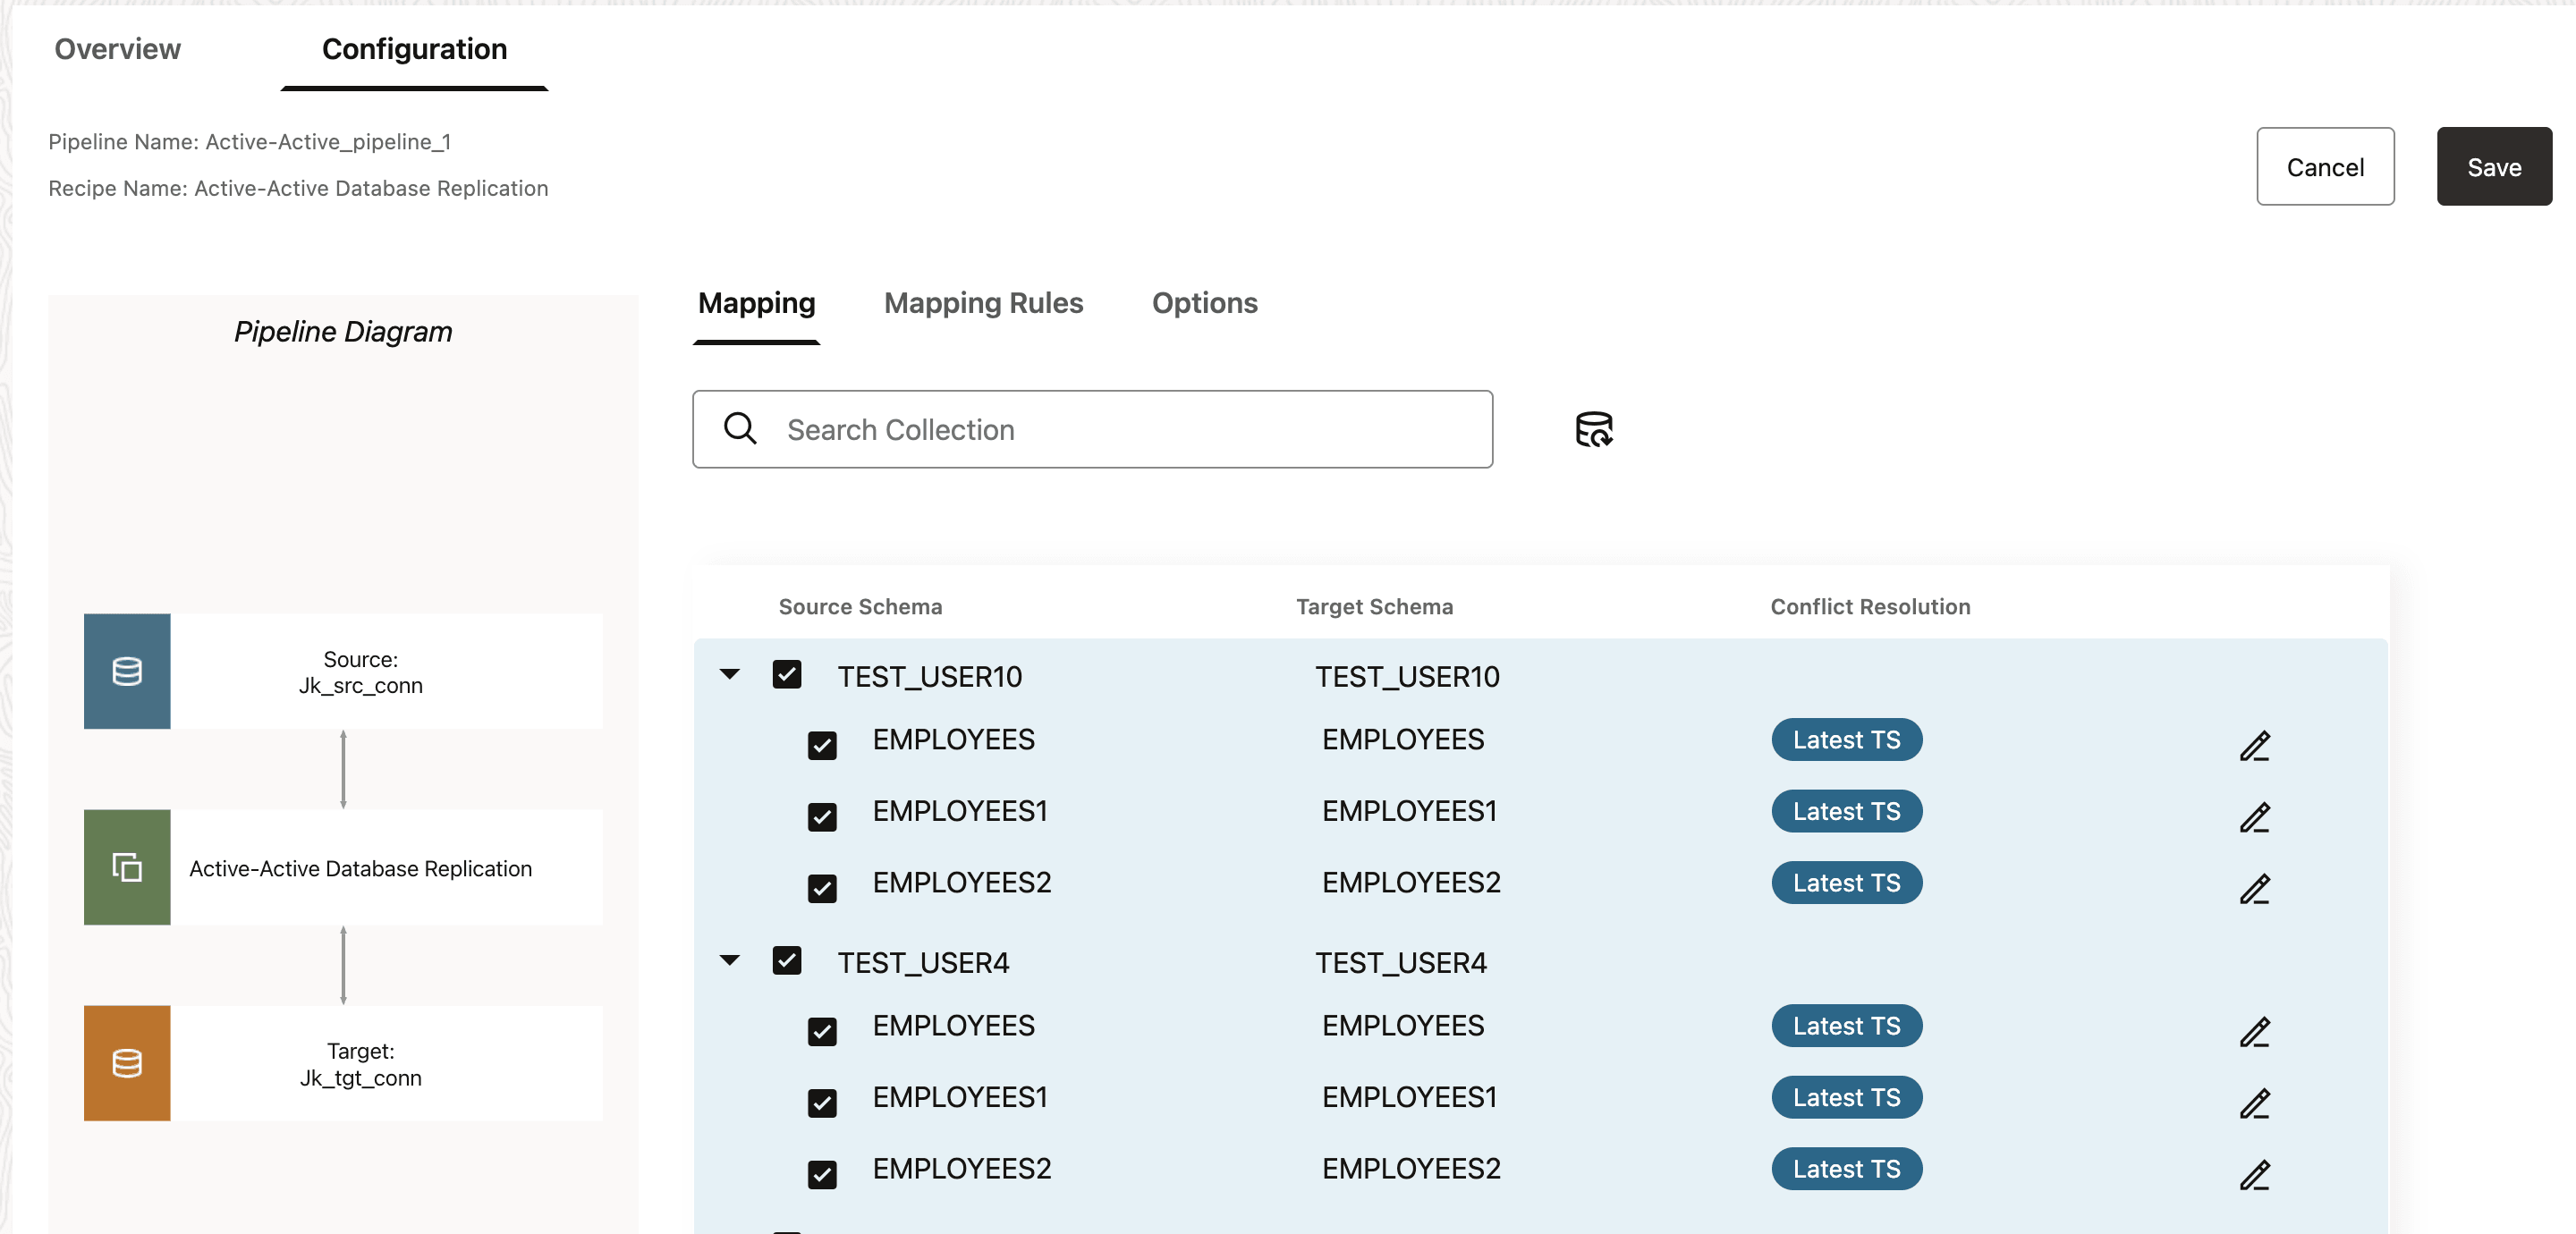
For Active-Active replications, a Conflict Resolution column appears in the Mapping screen.
Tip:
In Active-Active pipeline, Automatic Conflict Detection and Resolution (ACDR) is enabled for tables if it is not already enabled. If ACDR is already enabled, then GoldenGate Studio will not modify the configuration.
To configure Automatic Conflict Detection and Resolution (ACDR):
-
Click Edit next to the schema for whom you want to configure ACDR.
-
In the Edit table mapping panel, select Automatic Conflict Detection and Resolution.
-
For Timestamp, select whether the Latest change or Earliest change takes precedence.
-
Select Delta Resolution if the changes made must be combined to resolve the conflict, and then select the columns to use. For example, updates made to product inventory.
-
Click Apply.
WARNING:
GoldenGate Studio doesn't support the addition of new tables, nor the change of ACDR type, after the active-active pipeline starts. Unless absolutely necessary, you can either:-
Create, configure, and start a new pipeline with the new tables added.
-
In the GoldenGate Studio console:
-
Stop the pipeline.
-
Create a new table externally.
-
Under Mapping, expand the schema and select new tables.
-
Under Options, in Advanced Options and under Replicat, select DISCARD for Actions upon DML Error.
-
Save the pipeline configuration and then restart the pipeline.
-
Note:
ACDR isn't automatically enabled for tables without keys.
Note:
If you stop a pipeline while ACDR is enabled or if the Enable ACDR step generates an error, then ACDR will not be enabled for selected tables.
-
-
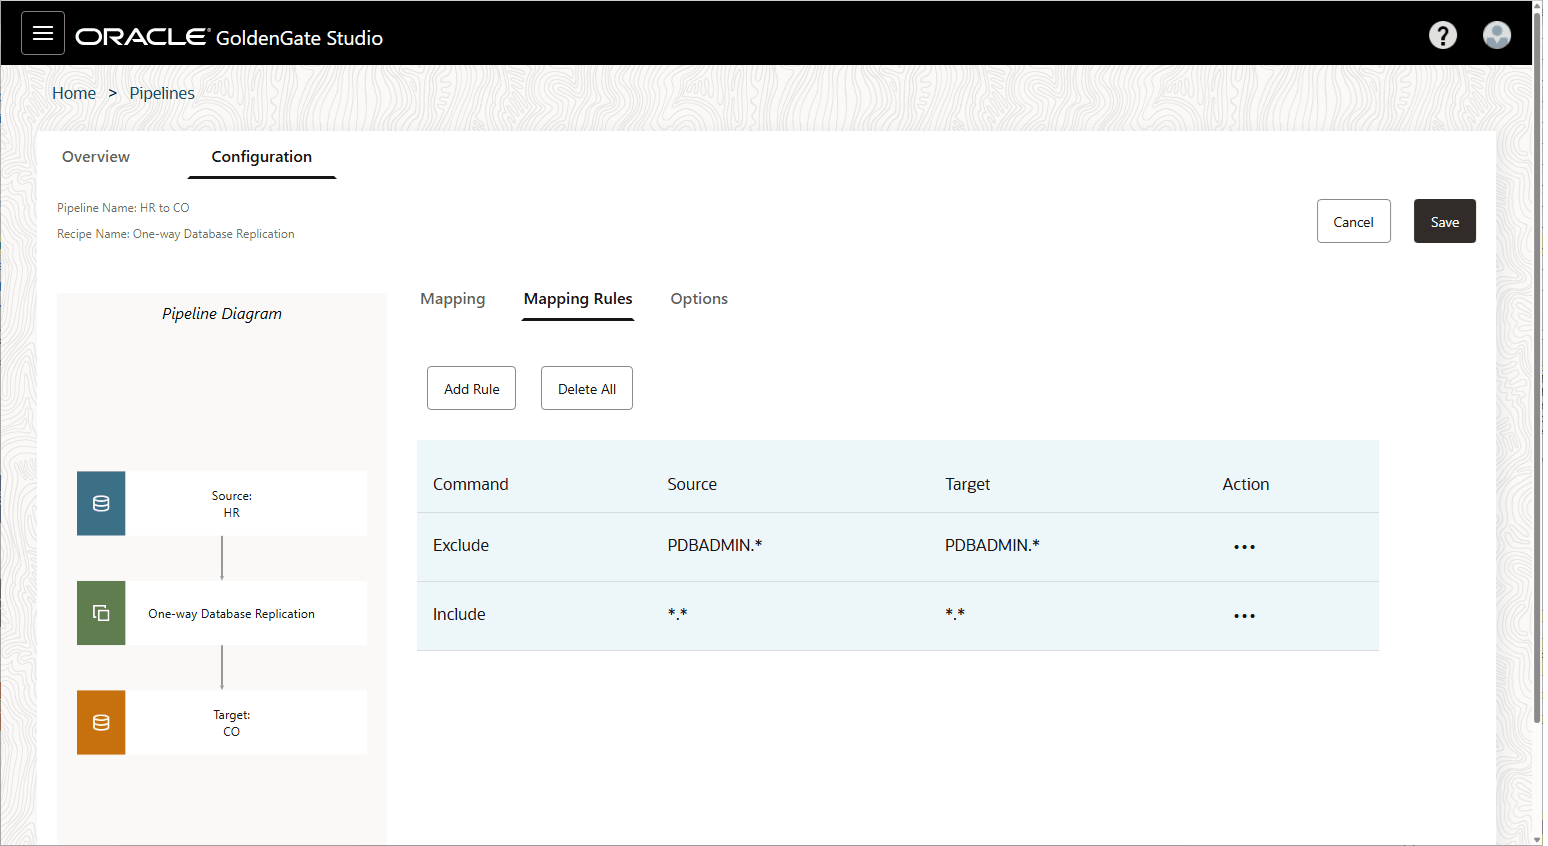
Under Mapping Rules, you can review, add, delete, and reorder rules.
Additional Considerations:
-
Exclude rules take precedence over Include rules.
-
To delete a rule, click Actions (ellipsis icon) and select Delete.
-
To reorder a rule, click Actions (ellipsis icon) and then select either Increase priority or Decrease priority.
-
To add a new rule, click Add rule. You can use the following special characters when constructing rules:
-
Asterisk (*) as a wildcard for any number of characters
-
Underscore (_)
-
Space ( )
-
Double quotes (") to enclose schema or table names that include spaces or when case sensitivity is required.
-
-
Individual rules take precedence over group rules.
-
Delete all removes all rules in the list.
-
-
Under Options, you can configure a limited set of GoldenGate parameters:
-
Initial Load of existing schemas and/or tables
Note:
- If you use a Database Link for Initial Load, you must provide the Source Wallet URI parameter value.
- If you use Object Storage for Initial Load, you must provide the Object Storage Bucket URI value.
-
Replicate Data Definition Language (DDL)
-
Advanced options for Initial Load (Data Pump), Extract, or Replicat
Note:
Refrain from making changes to the underlying parameter file as it affects the ability to manage the pipeline. Likewise, if using the GoldenGate Studio console, refrain from changing the Replicat type.
-
-
Click Save to save your configuration settings.
-
After configuring the pipeline, click Start to run it.
You can review the initialization procedure, the status and progress of each step in the replication process, and how much time it takes for each step to complete.
-
After initialization completes, the Runtime page displays data capture operations on the source database replicated to the target.
The pipeline runs continually until it's stopped.